我们怎么用PS绘制画正方形虚线 在Photoshop中画虚线的技巧介绍
在photoshop中没有现成的虚线工具,那我们怎么绘制虚线呢,在本文中小编就为大家介绍一下ps虚线绘制的方法,还在为该问题纠结的同学不妨来看看
在photoshop中没有现成的虚线工具,那我们怎么绘制虚线呢,在本文中小编就为大家介绍一下ps虚线绘制的方法,还在为该问题纠结的同学不妨来看看。完成效果:
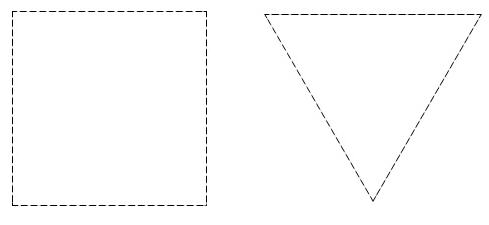
下面是具体的制作方法介绍:
一、新建一个随意大小的空白文档,为了视觉效果,建议在新建的时候选用白色为背景颜色。我新建的为300x300px
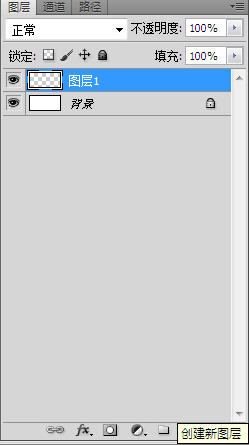
二、背景图层上面,新建一个透明图层。
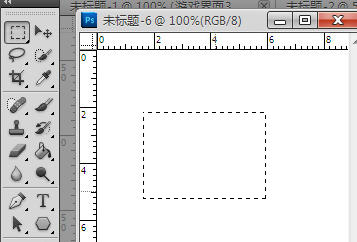
三、矩形选框工具,建立任意大小的矩形。
四、画笔工具,设画笔大小为5~8px之间,硬度为100%。
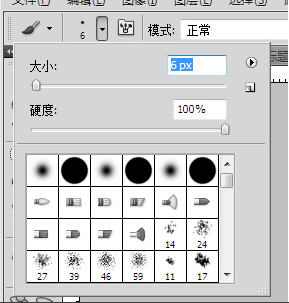
画笔窗口,调节间距在140%左右。
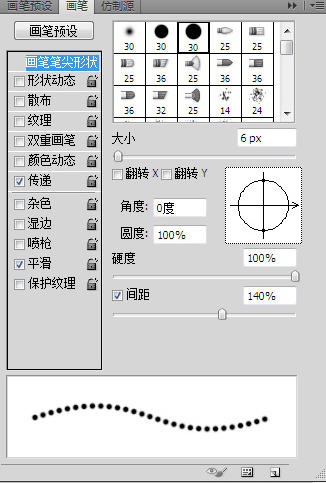
五、按住键盘shift键并单击矩形选框的四个顶点,得到如下图形。
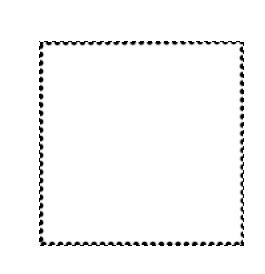
六、选择-修改-收缩,收缩值为1。
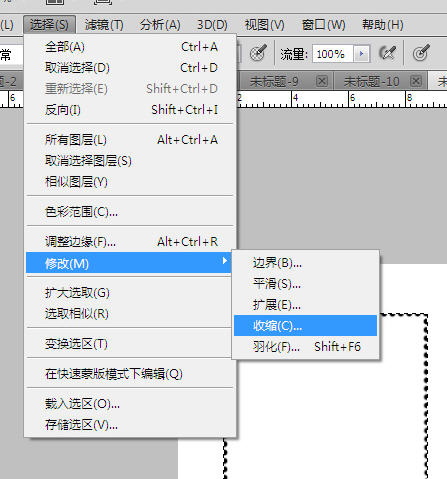
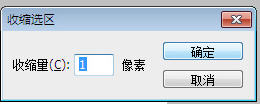
七、按一下键盘上的delete,删除选框内区域。好了,虚线画好了。
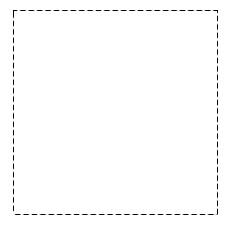
以上就是利用用PS绘制画虚线技巧介绍,希望大家看我之后都会这种绘制虚线方法,谢谢大家观看!

Hot AI Tools

Undresser.AI Undress
AI-powered app for creating realistic nude photos

AI Clothes Remover
Online AI tool for removing clothes from photos.

Undress AI Tool
Undress images for free

Clothoff.io
AI clothes remover

AI Hentai Generator
Generate AI Hentai for free.

Hot Article

Hot Tools

Notepad++7.3.1
Easy-to-use and free code editor

SublimeText3 Chinese version
Chinese version, very easy to use

Zend Studio 13.0.1
Powerful PHP integrated development environment

Dreamweaver CS6
Visual web development tools

SublimeText3 Mac version
God-level code editing software (SublimeText3)

Hot Topics
 ps serial number cs5 permanently free 2020
Jul 13, 2023 am 10:06 AM
PS serial numbers cs5 permanent free 2020 include: 1. 1330-1384-7388-4265-2355-8589 (Chinese); 2. 1330-1409-7892-5799-0412-7680 (Chinese); 3. 1330-1616-1993 -8375-9492-6951 (Chinese); 4. 1330-1971-2669-5043-0398-7801 (Chinese), etc.
 How to draw a dotted line in word
Mar 19, 2024 pm 10:25 PM
Word is a software that we often use in our office. It has many functions that can facilitate our operations. For example, for a large article, we can use the search function inside to find out that a word in the full text is wrong, so we can directly replace it. Make changes one by one; when submitting the document to your superiors, you can beautify the document to make it look better, etc. Below, the editor will share with you the steps on how to draw a dotted line in Word. Let's learn together! 1. First, we open the word document on the computer, as shown in the figure below: 2. Then, enter a string of text in the document, as shown in the red circle in the figure below: 3. Next, press and hold [ctrl+A] Select all the text, as shown in the red circle in the figure below: 4. Click [Start] on the top of the menu bar
 How to delete selected area in ps
Aug 07, 2023 pm 01:46 PM
Steps to delete the selected area in PS: 1. Open the picture you want to edit; 2. Use the appropriate tool to create a selection; 3. You can use a variety of methods to delete the content in the selection, use the "Delete" key, use the "Healing Brush Tool" , use "Content-Aware Fill", use the "Stamp Tool", etc.; 4. Use tools to repair any obvious traces or defects to make the picture look more natural; 5. After completing editing, click "File" > in the menu bar "Save" to save the editing results.
 What to do if ps installation cannot write registry value error 160
Mar 22, 2023 pm 02:33 PM
Solution to error 160 when ps installation cannot write registry value: 1. Check whether there is 2345 software on the computer, and if so, uninstall the software; 2. Press "Win+R" and enter "Regedit" to open the system registry, and then Find "Photoshop.exe" and delete the Photoshop item.
 What should I do if the PS interface font is too small?
Dec 01, 2022 am 11:31 AM
How to fix the PS interface font that is too small: 1. Open PS, click the "Edit" button on the top menu bar of PS to expand the editing menu; 2. Click the "Preferences" button in the expanded editing menu, and then click "Interface. .." button; 3. In the interface settings, set the user interface font size to "Large", set the UI scaling to "200%" and save the settings, then restart PS to take effect.
 How to automate tasks using PowerShell
Feb 20, 2024 pm 01:51 PM
If you are an IT administrator or technology expert, you must be aware of the importance of automation. Especially for Windows users, Microsoft PowerShell is one of the best automation tools. Microsoft offers a variety of tools for your automation needs, without the need to install third-party applications. This guide will detail how to leverage PowerShell to automate tasks. What is a PowerShell script? If you have experience using PowerShell, you may have used commands to configure your operating system. A script is a collection of these commands in a .ps1 file. .ps1 files contain scripts executed by PowerShell, such as basic Get-Help
 Introduction to the process of extracting line drawings in PS
Apr 01, 2024 pm 12:51 PM
1. Open the software and import a piece of material, as shown in the picture below. 2. Then ctrl+shift+u to remove color. 3. Then press ctrl+J to copy the layer. 4. Then reverse ctrl+I, and then set the layer blending mode to Color Dodge. 5. Click Filter--Others--Minimum. 6. In the pop-up dialog box, set the radius to 2 and click OK. 7. Finally, you can see the line draft extracted.
 What should I do if the content behind the dotted line in Excel is not displayed when printing?
Mar 20, 2024 pm 12:55 PM
After we use excel office software to edit the form, we often need to print it. However, many novice friends find that the excel form is not fully printed, and the content behind a dotted line cannot be printed. What is the reason? In fact, this is because the printed content is outside the page margins and cannot be printed. As long as the dotted line is adjusted to be outside the content that needs to be printed, it can be printed. Below, let’s take a look together! 1. First, we create and open an excel form and enter some simple content for demonstration. 2. At this time, we can see that there is a dotted line in the excel table. At this time, if we want to print, the content on the right side of the dotted line will not be printed together with the previous content, resulting in paging out.


