

PS快速制作照片撕裂的逼真效果

这篇教程是向PHP中文网的朋友介绍PS快速制作照片撕裂的逼真效果方法,教程制作出来的照片效果非常地漂亮。难度不是很大,新手可以过来学习一下,希望能对大家有所帮助
PS专业的图像处理软件,能做出各种图片特效,几乎无所不能。今天给大家讲解的是PS快速制作照片撕裂的逼真效果,想学的同学抓紧啦,跟着步骤一步一步来做吧!

方法/步骤
1、用PS打开一张背景图片,作为背景,然后在将要制作撕裂效果的图片拖入背景图层中,如图所示:

2、选择撕裂的图层“Ctrl+t(自由变换)”,鼠标在图片中右击选择“变形”,根据自己的喜好,适当的给图片进行稍微变形处理。如图所示:


3、选择“套索工具”在图层中绘制撕裂效果。如图所示:

4、按"Q"键给图层一个快速蒙版,然后选择菜单栏中的“滤镜”>"像素化">"晶格化",调节单元格大小为4。如图所示:

5、按“Q”键退出快速蒙版,然后按“Ctrl+Shift+j”剪切图层。如图所示:

6、“Ctrl+t(自由变换)”,把中心点移到下方,然后通过旋转调整图层位置。如图所示:

7、新建一个图层,然后把鼠标放到左侧图层按住Ctrl键的同时单机鼠标左键来载入选区。在新建图层中填充一个灰色。如图所示:

8、把填充图层移到下层,适当移动上面图层的位置,将填充部分显示出一部分。如图所示:

9、用同样的方法把图层右半部分做出来就完成了,一副完整的撕裂效果图片就做完了。

以上就是PS快速制作照片撕裂的逼真效果方法介绍,希望能对大家有所帮助!

Hot AI Tools

Undresser.AI Undress
AI-powered app for creating realistic nude photos

AI Clothes Remover
Online AI tool for removing clothes from photos.

Undress AI Tool
Undress images for free

Clothoff.io
AI clothes remover

Video Face Swap
Swap faces in any video effortlessly with our completely free AI face swap tool!

Hot Article
Hot Tools

Notepad++7.3.1
Easy-to-use and free code editor

SublimeText3 Chinese version
Chinese version, very easy to use

Zend Studio 13.0.1
Powerful PHP integrated development environment

Dreamweaver CS6
Visual web development tools

SublimeText3 Mac version
God-level code editing software (SublimeText3)
Hot Topics
 1386
1386
 52
52

 How to color invert photos on iPhone
Feb 02, 2024 pm 04:15 PM
How to color invert photos on iPhone
Feb 02, 2024 pm 04:15 PM
While you might not do it often, inverting colors on a photo can have some interesting effects. By inverting the colors of your image, you might end up with a spooky or interesting photo. Whatever the result, inverting colors can give you a deeper understanding of how colors work. In addition, inverting colors can help people with visual impairments and color blindness better understand and distinguish objects in pictures. So while it may not be a technique you use often, trying inverting colors can still be a fun and rewarding way to explore the possibilities of photo editing. In this article, we will explain to you all the ways to temporarily and permanently invert the colors of pictures on iPhone. How to color invert photos on iPhone We provide two scenarios
 How to sort photos by favorites in Windows 11
Mar 18, 2024 am 09:37 AM
How to sort photos by favorites in Windows 11
Mar 18, 2024 am 09:37 AM
In this article, we will explain how to sort photos using the Favorites feature in Windows 11. The Photos app in Windows offers a convenient feature that allows you to mark specific photos or videos as Favorites or Preferences. Once you mark these items as favorites, they are automatically organized into a separate folder, allowing you to easily browse your favorite content without having to hunt through your entire photo library. This feature enables you to quickly access and manage your favorite photos and videos, saving you a lot of time and effort. Normally, photos in the Favorites folder are sorted by date in descending order, so that the newest photos appear first, followed by older photos. However, if you wish to focus on
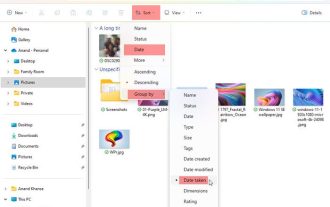 How to sort photos by date taken in Windows 11/10
Feb 19, 2024 pm 08:45 PM
How to sort photos by date taken in Windows 11/10
Feb 19, 2024 pm 08:45 PM
This article will introduce how to sort pictures according to shooting date in Windows 11/10, and also discuss what to do if Windows does not sort pictures by date. In Windows systems, organizing photos properly is crucial to making it easy to find image files. Users can manage folders containing photos based on different sorting methods such as date, size, and name. In addition, you can set ascending or descending order as needed to organize files more flexibly. How to Sort Photos by Date Taken in Windows 11/10 To sort photos by date taken in Windows, follow these steps: Open Pictures, Desktop, or any folder where you place photos In the Ribbon menu, click
 How to disable Face ID or Touch ID for hidden and recently deleted photos on iPhone
Mar 04, 2024 pm 04:40 PM
How to disable Face ID or Touch ID for hidden and recently deleted photos on iPhone
Mar 04, 2024 pm 04:40 PM
Apple's Photos app offers a feature that locks photos in Hidden and Recently Deleted albums to ensure they're hidden from prying eyes. This provides an extra layer of protection for the sensitive photos and videos you may have stored in those albums because they are locked behind your iPhone's Face ID, Touch ID, or device passcode. If you have difficulty accessing Hidden and Recently Deleted albums using this lock feature, you may consider disabling it to make the content more accessible. This article will explain to you in detail how to disable FaceID or TouchID authentication for Photos app on iPhone. How to disable Face ID or Touch ID for the Photos app Required: Running iOS 16 or later
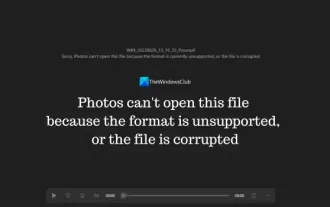 Photos cannot open this file because the format is not supported or the file is corrupted
Feb 22, 2024 am 09:49 AM
Photos cannot open this file because the format is not supported or the file is corrupted
Feb 22, 2024 am 09:49 AM
In Windows, the Photos app is a convenient way to view and manage photos and videos. Through this application, users can easily access their multimedia files without installing additional software. However, sometimes users may encounter some problems, such as encountering a "This file cannot be opened because the format is not supported" error message when using the Photos app, or file corruption when trying to open photos or videos. This situation can be confusing and inconvenient for users, requiring some investigation and fixes to resolve the issues. Users see the following error when they try to open photos or videos on the Photos app. Sorry, Photos cannot open this file because the format is not currently supported, or the file
 What should I do if the 'Unable to upload' message appears in the iPhone 'Photos' app?
Feb 28, 2024 pm 09:00 PM
What should I do if the 'Unable to upload' message appears in the iPhone 'Photos' app?
Feb 28, 2024 pm 09:00 PM
If you turn on the iCloud photo function, the photos and videos taken on your iPhone will be synchronized to Apple servers for storage. However, during the synchronization process to iCloud, a "Unable to upload" prompt or album may appear. Usually, this status will be displayed at the bottom of the iPhone Photos app, with a prompt saying "Unable to sync [number] items to iCloud." A new album named "Cannot Upload" will be added in the "Photos" App. To add these photos or videos to iCloud Photos, you can try exporting them from the Photos App and then re-importing them. Note, however, that any edits or keywords previously applied to these photos or videos will be lost. on iPhone
 2 Ways to Lock Photos on Mac
Feb 02, 2024 pm 04:05 PM
2 Ways to Lock Photos on Mac
Feb 02, 2024 pm 04:05 PM
When storing photos on your Mac, there may be some that you want to keep private. To ensure that they are not seen by others, you can lock these photos on your Mac so they are protected from prying eyes. This article will guide you on how to lock photos on Mac so you can view them when you need them. How to Lock Photos on Mac [2 Methods] You can lock photos on Mac in two ways – using the Photos app or the Disk Utility app. Method 1: Use the Photos app If you have photos stored in this app, you can use the Photos app to lock them. If the photos are stored elsewhere, they need to be moved to the Photos app to lock them. Step 1: Add Pictures to Photos App If
 How to blur photos with Yitian camera
Feb 23, 2024 pm 06:40 PM
How to blur photos with Yitian camera
Feb 23, 2024 pm 06:40 PM
You can blur the photos in Yitian Camera, so how to blur the photos? Users can click Edit to select a photo, then click Effects and select Blur to blur the photo. This introduction to how to blur photos can tell you the specific content. The following is a detailed introduction, come and take a look! Yitian Camera usage tutorial. How to blur photos with Yitian Camera. Answer: Go to Edit-Special Effects-Blur. The specific process: 1. First open the app and click Edit on the lower left. 2. Then click on a picture and click the edit button. 3. Then click the special effects button below. 4. You can find the blur function below. 5. Then select the magnification of the blur.
