

Gigabyte graphics card 1050ti


Gigabyte 6500xt is equivalent to 1050TI
1. Yes. In some aspects, the 6500xt graphics card is just a little better than the 588 graphics card, and the 1050ti graphics card beats the 588 graphics card, so the 6500xt graphics card and the 1050ti graphics card are almost normal.
2. In the power consumption comparison, due to the advancement of process technology, the power consumption of Powercon RX 6500 XT 4G 1660 SUPER is around 150W.
3. The Yeston 6500xt is a platinum board, while the Gigabyte 6500xt is an ordinary board. The Yeston board has better performance and will not freeze or become hot during use.
4. xt is equivalent to n card 1650s. The 6500XT uses the Navi24 small core for the first time, but it is still based on the RDNA2 architecture, and the manufacturing process has been upgraded from 7nm to 6nm. There are 5.4 billion integrated transistors, and the core area is only 107 square millimeters. It has 64-bit width 4GB video memory and an equivalent frequency of 16GHz. The bandwidth is 128GBs and the power consumption is 107W.
5. However, compared to the 1869 points of the 1050Ti, it is still ahead to a certain extent.
6. RX5600XT is equivalent to RTX2060 without hardware ray tracing. In the theoretical performance test, the theoretical performance comparison of the AN generation graphics card has been reversed. The N card will be higher and the A card will be lower. The RX5600XT is only equivalent to the GTX1660Ti. In terms of running performance, the RX5600XT is slightly lower than the RTX2060, falling behind by about 2%.
Can the motherboard in the picture (Gigabyte h61m) support 1050ti graphics card?
Yes, the graphics card interface of the motherboard is PCI-E 0 and the graphics card is PCI-E0, but the interface is the same, PCI-E0 graphics card The slot can use PCI-E0 cards. Moreover, the bandwidth requirements required for GTX1050TI transmission do not exceed the speed bottleneck of the PCI-E0 16X interface, and it is fully usable.
The graphics card slot can be used as long as the interface of the card is compatible. The h61 board can use 1050ti, and this card has low power consumption, so you can just replace the original card.
You can use it, but don’t use it because this graphics card sucks. Compared with gtx1050, gtx1050ti is 300 yuan more expensive, but the performance is only improved by 10%.
You can install a gtx1050 graphics card, but the specifications support p0, so it won’t have much impact. I also have an i5 3470 with an h61m motherboard, and a gtx1050ti 4g graphics card.
Yes, there are second-hand junk guys and GTX1060TI. 1050TI can also be installed. No problem, it’s just a case of identification and upgrade the motherboard BIOS.
Yes, GTX1000 supports 6th generation and later motherboards.
Gigabyte 1050ti non-overclocking settings
1. The steps for Gigabyte 1050ti non-overclocking settings are as follows: In the lower right corner of the taskbar, my local NVIDIA settings icon is hidden under the small triangle arrow icon. , then right-click on it and select GEFOREEXPRIENCE.
2. First press the power button of the notebook with GTX1050Ti graphics card and turn on the notebook with GTX1050Ti graphics card. Then press the F2 key on the keyboard of the notebook with GTX1050Ti graphics card to enter the main bios setting interface. Furthermore, in the bios settings main interface, select the "North Bridge" option under the "Chipset" menu.
3. The specific method is as follows: Generally, turbo frequency is turned on by default. Some motherboards may need to enter the bios to turn on Turbo Mode. To check whether the Turbo Frequency is turned on, in this case, just open the power manager, or use the cpu-z loader to check the multiplier changes, as shown in the figure below: Next, start turning off the Turbo Frequency through the power plan.
4. Click Global Settings, preferred graphics processor, select high-performance NVIDIA processor, find vertical synchronization in the settings at the bottom of the page, select Close Settings on the right and save, then return to 3D Settings, select Configure Surround, PhysX In the PhysX settings, select GTX1050ti as the processor, and finally save the settings.
Power consumption of Gigabyte 1050ti knife card
1. The power consumption of ti is 75W. 1050ti is a mid-range graphics card that uses a 14nm process, has 768 CUDA cores and 4GB GDDR5 video memory, and supports the latest graphics technologies such as DirectX12 and OpenGL5. In terms of power consumption, the TDP (thermal design power) of the 1050ti is 75W because this is the maximum power consumption of the 1050ti.
2. This is a GTX1050TI graphics card with a nominal TDP of 75W. The actual maximum load is about 85W, which is generally not reached. For a computer using this graphics card, if the CPU power consumption is not too exaggerated, a 400W power supply rated by a regular manufacturer is enough.
3. w. The 1050ti graphics card is from the RTX brand. According to the official website of the RTX brand, the graphics cards produced by this brand have the lowest and highest power consumption. When the highest power consumption is turned on, the usage time of the graphics card will be reduced. Among them, the 1050ti The maximum power consumption of the graphics card is 75w.
4.w. Definition 1: Power loss refers to the difference between the input power and output power of equipment, devices, etc. power loss. In a circuit, it usually refers to the heat energy dissipated on components and devices. Definition 2: Power consumption is also an indicator that all electrical equipment has. It refers to the amount of energy consumed per unit time, and the unit is W.
5. The designed power consumption of this graphics card is 75W. The non-public version is 90W at full load. As for the CPU, except for the overclocking power with K which can exceed 100 watts, the others will not exceed 100 watts. I5 is common It's less than 80W at full load.
6. Performance running score According to the running score data given by Master Lu, the score of GTX 1050 Ti actually reached 91591 points.
Can the a107800 on the Gigabyte f2a88xmds2 motherboard be paired with a gtx1050ti graphics card?
The Gigabyte f2a78m-ds2 motherboard can support the gtx1050ti graphics card. The gtx1050Ti graphics card requires a power supply with a rated power of more than 350W, and the power supply needs to be replaced.
As long as there is a PCIex16 slot on the motherboard. This type of graphics card can be supported. In this sense, the 1050 graphics card should be able to be plugged directly into this motherboard. But the problem is that the highest CPU performance this motherboard can support is only equivalent to the level of the I3 4th generation processor.
Without overclocking, it can be paired with GTX1050 and RX460 graphics cards. From a suitable perspective, in fact, second-hand GTX750TI or GTX950, R7 260X is good. It is affordable, has a suitable combination of performance and processor, and is basically sufficient for playing online games. Stand-alone games must reduce the special effects before they can run.
Gigabyte f2a88xm-ds2 (AMD 15K) motherboard is compatible with gtx1050TI graphics card. Upgrading the graphics card mainly considers CPU performance, power supply and whether the internal space of the chassis is large enough. It has little to do with the motherboard. The gtx1050Ti graphics card requires at least an amd quad-core CPU to achieve full performance.
The above is the detailed content of Gigabyte graphics card 1050ti. For more information, please follow other related articles on the PHP Chinese website!

Hot AI Tools

Undresser.AI Undress
AI-powered app for creating realistic nude photos

AI Clothes Remover
Online AI tool for removing clothes from photos.

Undress AI Tool
Undress images for free

Clothoff.io
AI clothes remover

AI Hentai Generator
Generate AI Hentai for free.

Hot Article
Hot Tools

Notepad++7.3.1
Easy-to-use and free code editor

SublimeText3 Chinese version
Chinese version, very easy to use

Zend Studio 13.0.1
Powerful PHP integrated development environment

Dreamweaver CS6
Visual web development tools

SublimeText3 Mac version
God-level code editing software (SublimeText3)
Hot Topics


 In which folder is the win10 graphics card driver located?
Apr 18, 2024 am 09:20 AM
In which folder is the win10 graphics card driver located?
Apr 18, 2024 am 09:20 AM
What is the installation path of the graphics card driver? 1. Turn on the computer, click Computer, and open the Device Manager. For all devices on our computer, find the installation directory location of the graphics card driver. Click on the display adapter, find the device to which the driver belongs, and click to select properties. After entering properties, select Update Driver. 2. The graphics card driver is best installed on the C drive. By default, some drives are installed on the system disk. Cannot make selection. If you want to choose, you can install it on other disks. It is better to divide the hard disk into multiple areas than one area. The access speed through the C drive is faster than the D drive, and the access speed through the D drive is faster than the E drive. 3. It cannot be changed otherwise problems will occur. The driver is installed in C:\ProgramFiles, and C:\WINDOW
 When I turn on the computer, it always stops at the motherboard logo screen. Nothing happens when I press anything, and I can't enter the bios?
Apr 23, 2024 am 09:13 AM
When I turn on the computer, it always stops at the motherboard logo screen. Nothing happens when I press anything, and I can't enter the bios?
Apr 23, 2024 am 09:13 AM
When I turn on the computer, it always stops at the motherboard logo screen. Nothing happens when I press anything, and I can't enter the bios? This is usually because the BIOS battery voltage is too low, and the system time has returned to the BIOS preset time, such as 2000.1.1, 00:00. You can use it after pressing F1 to enter the bios and set the time. Do not turn off the AC power after shutting down at night. Generally, the system time will not be lost when you turn on the computer the next day, and you can still enter the system normally. If the AC power is cut off, the battery voltage cannot sustain the power consumption of the bios, and the computer will be in the same state again the next day when it is turned on. Replacing the bios battery is the ultimate solution. Win11 is stuck on the motherboard logo interface when booting? 1. It is a problem with bios settings. We only need to find the corresponding setting items.
 How to enter bios on hp motherboard
May 04, 2024 pm 09:01 PM
How to enter bios on hp motherboard
May 04, 2024 pm 09:01 PM
How to set up the U disk boot in the HP notebook bios (how to enter the HP computer bios) and then insert the U disk to be booted first into the USB port of the notebook. If you want to install the system, the system program must have been prepared in the U disk. First, open the laptop. Make sure the laptop is turned off. Setting the bios must be done with the computer turned off. Then insert the U disk that you want to boot first into the USB port of the notebook. If you want to install the system, the prerequisite is that the system program has been prepared in the U disk. Take the HP ProDesk400G5SFF desktop computer as an example. Set the BIOS disk startup method: First, restart the computer and wait for the startup screen to appear. There are two ways to set up USB disk startup on HP notebooks. One is to directly press the shortcut key to select
 Tutorial on assembling a computer and installing a system? How to install win11 system when assembling a computer?
Apr 27, 2024 pm 03:38 PM
Tutorial on assembling a computer and installing a system? How to install win11 system when assembling a computer?
Apr 27, 2024 pm 03:38 PM
Tutorial on assembling a computer and installing a system? Nowadays, the system installation for assembling computers is very simple and convenient, and only requires a CD. First enter the bios settings, set the computer to boot first with the CD-ROM drive, then restart the computer and load the system CD into the CD-ROM drive. The CD will automatically enter the installation state. At this time, you only need to manually repartition the partitions, and the rest will be completed automatically. How to install win11 system when assembling a computer? 1. First, we need to download a win11 image file from this site before installing it. 2. The win11 image file has undergone a large number of professional tests to ensure stable installation and smooth operation. 3. After the download is completed, load the folder in the download path and run the "windowssetup" process in it.
 How to enter bios after assembling a computer? How to enter bios when assembling a computer?
May 07, 2024 am 09:13 AM
How to enter bios after assembling a computer? How to enter bios when assembling a computer?
May 07, 2024 am 09:13 AM
How to enter bios after assembling a computer? Before entering the BIOS, you need to make sure that the computer is completely shut down and powered off. Here are several common ways to enter the BIOS: 1. Use shortcut keys: Most computer manufacturers will display a prompt message at startup telling you which key to press to enter the BIOS settings. Usually the F2, F10, F12 or Delete key. After pressing the appropriate keys, you should be able to see a screen with information about your computer's hardware and BIOS settings. 2. Use the button on the motherboard: Some computer motherboards have a dedicated button for entering BIOS settings. This button is usually labeled "BIOS" or "UEFI". After pressing the button you should be able to see
 How to enable tpm2.0 in win11_How to enable tpm2.0 in win11
May 08, 2024 pm 06:10 PM
How to enable tpm2.0 in win11_How to enable tpm2.0 in win11
May 08, 2024 pm 06:10 PM
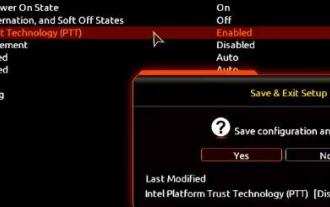
1. Gigabyte motherboard 1. First, we restart the computer and use the keyboard [DEL] to enter the BIOS settings when restarting. 2. Find and enter the [Settings] tab above. 3. Then find and enter [Miscellaneous] under settings. 4. Set [Intel Platform Trust Technology (PTT)] to [Enabled]. 5. After the settings are completed, use the keyboard [F10] to save, and then click [YES] to exit. 2. ASUS motherboard 1. First restart the computer and continuously tap [del] on the keyboard to enter the bios settings when booting. 2. Click [AdvancedMode] or press [F7] to find [A
 MSI motherboard boot logo
May 08, 2024 pm 02:20 PM
MSI motherboard boot logo
May 08, 2024 pm 02:20 PM
How to cancel the MSI motherboard icon when booting 1. Press the DEL key when booting to enter the BIOS. Generally, in the "Advanced Features" item, you can find the words MSI motherboard LOGO screen. Select DISABLED, save and exit. There will no longer be this MSI motherboard LOGO screen when you turn on the computer in the future. MSI motherboard refers to the motherboard brand developed by MSI (MSI Technology Company). 2. The logo displayed when the computer is turned on is basically that of the motherboard manufacturer. You can set QUICKPOST to DISENABLE in the BIOS, so that the logo will generally no longer be displayed. It will display computer configuration-related information and give you more details. 3. First, teach you how to flash the BIOS in Windows environment. First: Go online
 How to upgrade Gigabyte motherboard to Win11_How to upgrade Gigabyte motherboard to Win11
May 06, 2024 pm 12:04 PM
How to upgrade Gigabyte motherboard to Win11_How to upgrade Gigabyte motherboard to Win11
May 06, 2024 pm 12:04 PM
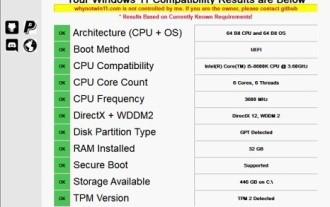
1. Win11 does not have very high requirements for the motherboard. You can first download healthcheck or whynotwin11 to check whether your other hardware devices support it (you can download it from this site). 2. If other conditions are met and only tpm does not meet the requirements, you can enable tpm in the bios settings. 3. Restart the system, and then press [DEL] on the keyboard to enter the BIOS settings when the logo pops up. 4. Enter the [Settings] option and [Miscellaneous] option in sequence. 5. Find [Intel Platform Trust Technology (PTT)] below and set it to [Start]. 6. If it is an AMD platform, then
