Operation steps for AE design melt ball effect
Steps for designing melt ball effects in AE In graphic design and video production, using After Effects (AE) to create melt ball effects is a common requirement. This professional software provides powerful tools to easily achieve this flowing and dynamic effect. In this guide, PHP editor Xigua will introduce step by step the operation steps of the ball melting effect in AE, helping everyone master this skill and create stunning visual effects.
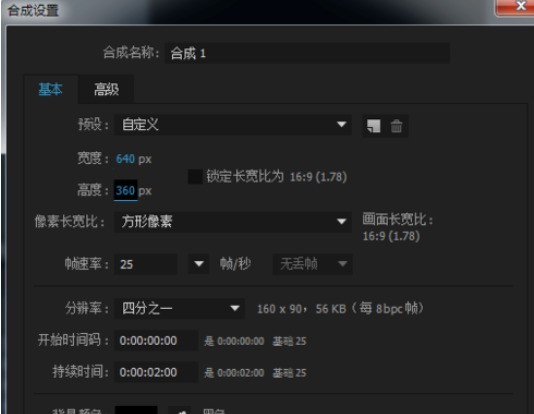
Start the AE software, Ctrl N to create a new synthesis (640*360), and click OK.
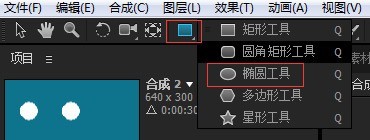
Select the Ellipse Tool and hold down the Ctrl Shift key in the composition window to create a circle.
Ctrl D quickly duplicates a layer and moves the position to get two circles.


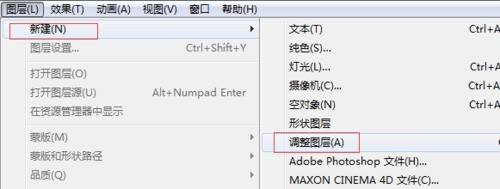
Layer - New - Adjustment layer.
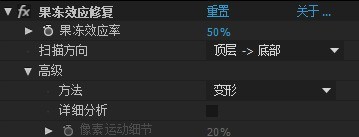
Select the adjustment layer and add special effects-distort-jelly effect repair. The parameters can be left as default.

Continue to add special effects-mask-simple blocking tool, set the parameter to 80.


Create a position keyframe animation for a circle,

and enter the graphics editor to edit the effect as shown:
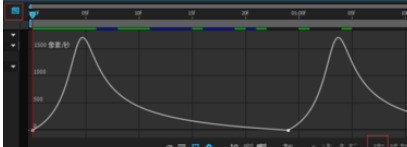
Here you can play the viewing effect, The final output can be made into a GIF animation using GIF editing software.

The above is the detailed content of Operation steps for AE design melt ball effect. For more information, please follow other related articles on the PHP Chinese website!

Hot AI Tools

Undresser.AI Undress
AI-powered app for creating realistic nude photos

AI Clothes Remover
Online AI tool for removing clothes from photos.

Undress AI Tool
Undress images for free

Clothoff.io
AI clothes remover

AI Hentai Generator
Generate AI Hentai for free.

Hot Article

Hot Tools

Notepad++7.3.1
Easy-to-use and free code editor

SublimeText3 Chinese version
Chinese version, very easy to use

Zend Studio 13.0.1
Powerful PHP integrated development environment

Dreamweaver CS6
Visual web development tools

SublimeText3 Mac version
God-level code editing software (SublimeText3)

Hot Topics
 1378
1378
 52
52
![[PROVEN] Steam Error e87 Fix: Get Gaming Again in Minutes!](https://img.php.cn/upload/article/202503/18/2025031817560457401.jpg?x-oss-process=image/resize,m_fill,h_207,w_330) [PROVEN] Steam Error e87 Fix: Get Gaming Again in Minutes!
Mar 18, 2025 pm 05:56 PM
[PROVEN] Steam Error e87 Fix: Get Gaming Again in Minutes!
Mar 18, 2025 pm 05:56 PM
Article discusses causes of Steam Error e87, including network issues, security software, server problems, outdated clients, and corrupted files. Offers prevention and solution strategies.[159 characters]
 Steam Error e87: What It Is & How to Fix It
Mar 18, 2025 pm 05:51 PM
Steam Error e87 occurs during Steam client updates or launches due to connection issues. Fix it by restarting devices, checking server status, changing DNS, disabling security software, clearing cache, or reinstalling Steam.
 Easy Fix: Steam Error e87 Explained & Solved
Mar 18, 2025 pm 05:53 PM
Steam Error e87, caused by connectivity issues, can be fixed without reinstalling by restarting, checking internet, and clearing cache. Adjusting Steam settings helps prevent future occurrences.
 How to Fix Steam Error Code e87: The ULTIMATE Guide
Mar 18, 2025 pm 05:51 PM
Article discusses fixing Steam Error Code e87, caused by network issues, corrupt files, or client problems. Provides troubleshooting steps and prevention tips.
 Steam Error e87: Why It Happens & 5 Ways to Fix It
Mar 18, 2025 pm 05:55 PM
Steam Error e87 disrupts gaming on Steam due to connectivity issues. The article discusses causes like unstable internet and server overload, and offers fixes like restarting Steam and checking for updates.
 Steam Error Code e87: Get Back to Gaming FAST!
Mar 18, 2025 pm 05:52 PM
The article discusses Steam Error Code e87, its causes like network issues, server problems, and corrupted files, and provides fixes and preventive measures to avoid it.Character count: 159
 How to fix: err_response_headers_multiple_access_control_allow_origin error in Google Chrome
Mar 21, 2025 pm 06:19 PM
Article discusses fixing "err_response_headers_multiple_access_control_allow_origin" error in Chrome by addressing multiple Access-Control-Allow-Origin headers.
 Steam Error e87 SOLVED! Quick Fix Guide for 2024
Mar 18, 2025 pm 05:49 PM
Article discusses Steam Error e87, offering solutions like restarting Steam, clearing cache, and updating. Preventive measures and community solutions are also covered.


