

UI设计师的photoshop配置技巧图文介绍教程

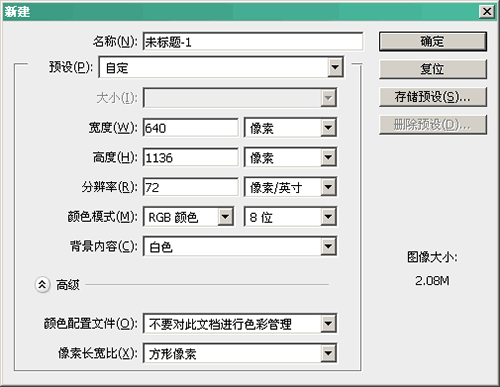
Photoshop新建文档设置
操作:菜单 → 文件 → 新建
宽度:640像素
高度:1136像素(4英寸iPhone设备)
分辨率:72像素/英寸(ppi)
颜色模式:RGB颜色
背景内容:白色(可选)
颜色配置文件:不要色彩管理此文件(更多颜色设置后)
像素长宽比:方形像素
配置如下图:
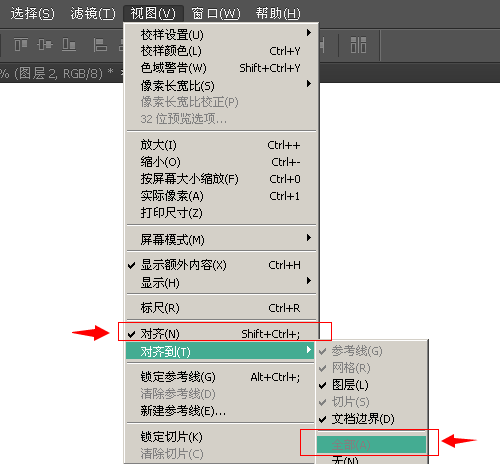
对齐设置
这个处就是当你使用图层、形状等操作时自动对齐网格,画矢量图不怕模糊边缘,确保每个像素保持清晰。
设置:
菜单 → 视图 → 对齐
菜单 → 视图 → 对齐到 → 全部
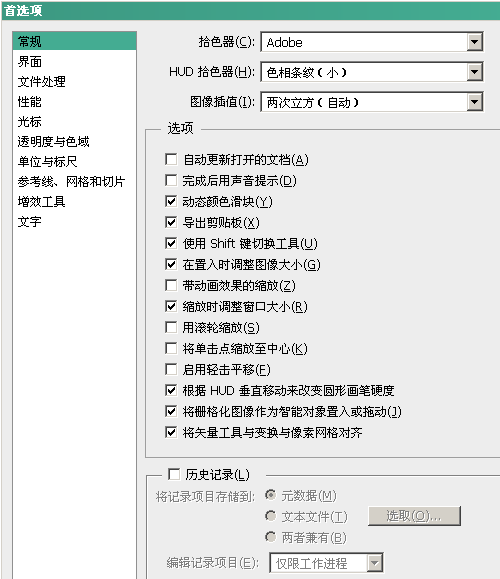
首选项设置
操作:菜单 → 编辑 → 首选项 → 常规,建议按下图设置
启用轻击平移
仅仅是一个滑移效果,占内存又不能提高操作效率,建议关掉。
根据HUD垂直移动来改变圆形画笔硬度
功能挺好用的,按Alt+右键左右/上下移动可以分别改变画笔的大小和硬度。
将矢量工具与变换与像素网格对齐
强烈建议开启这个功能,这个让你不会产生半像素虚边,十分好用。但在需要微调整时可暂时关闭它。
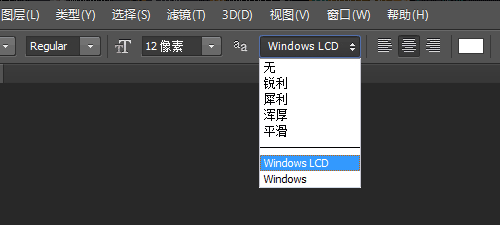
文本设置
字体我一般把字体设置为犀利,如果你是Photoshop CC版本,它有一个Windows LCD/Mac LCD抗锯齿功能,文字可以为网页一样效果了,所以建议升级到Photoshop CC吧。
操作:首先选定文本 → 字符工具(AA)选择Windows LCD/Mac LCD
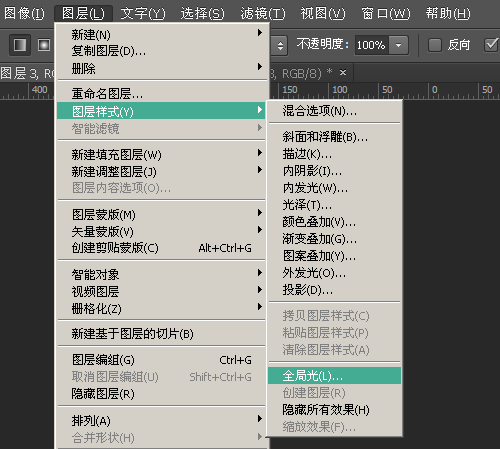
全局光
继苹果iOS人机界面指南,你应该把灯光设置为90°。
操作:图层 → 图层样式 → 全局光 → 90°
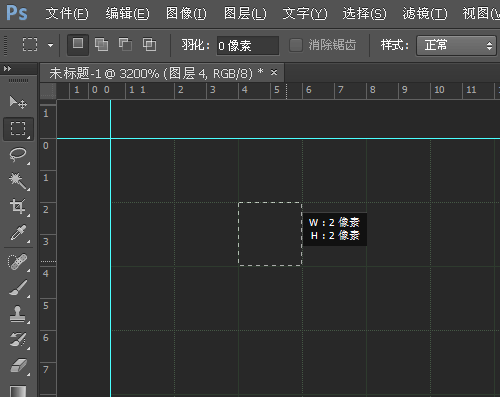
网格设置
现在设计iOS界面都要兼容视网膜(Retina),所以我把每个网格设置为2像素,这样我就不怕图像在视网膜设备下变得模糊了。
操作:菜单 → 编辑 → 首选项 → 参考线、网格和切片,网格线间隔:4像素;子网格2。或者网格线间隔:2像素;子网格1。我喜欢前者^_^
导出设置
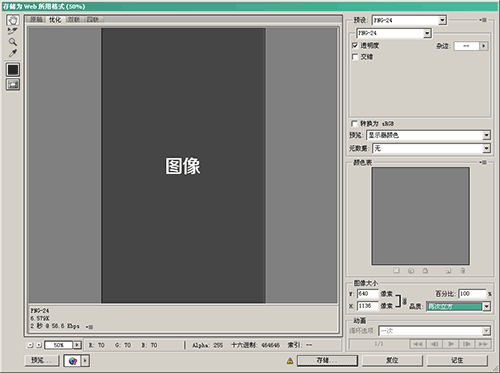
不管我们是做网页不审设计iOS APP应用程序时,导出图像最好是使用”存储为Web所用格式”来导出。
这里通过”存储为Web格式…”导出PNG-24为例,其中默认设置比较重要,如下图:
操作:菜单 → 文件 → 存储为Web格式所用格式
预设:PNG-24
透明:勾选
交错:未勾选
嵌入颜色配置文件:未勾选 (Photoshop CC版本才有)
转换为 sRGB:未勾选
质量:两次立方
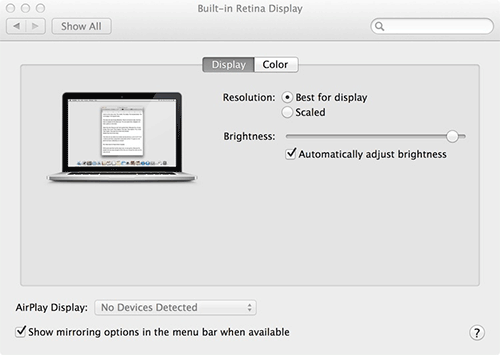
Retina显示器设置
如果你是使用带Retina视网膜的MacBook Pro,你应该确保你是使用2800×1800像素(1440×900点)
操作:Apple菜单 → 系统偏好设置 → 显示 → 最适合显示器
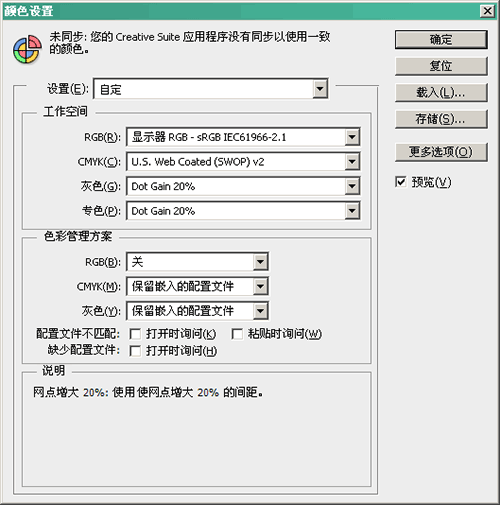
颜色配置
颜色配置是极为复杂的一个操作,如果你不是这领域的大神,那么还是老老实实的用推荐的配置吧,这里我选择了Marc Edwards(http://bjango.com/articles/photoshop)的颜色配置选项。
总结
本指南针是针对UI设计的Phtoshop基本设置介绍,除了以上这些,大多数设计师都会有自己使用的自定义设置,所以如果你有一些技巧设置,欢迎在下方留言处分享给我们。

Hot AI Tools

Undresser.AI Undress
AI-powered app for creating realistic nude photos

AI Clothes Remover
Online AI tool for removing clothes from photos.

Undress AI Tool
Undress images for free

Clothoff.io
AI clothes remover

Video Face Swap
Swap faces in any video effortlessly with our completely free AI face swap tool!

Hot Article
Hot Tools

Notepad++7.3.1
Easy-to-use and free code editor

SublimeText3 Chinese version
Chinese version, very easy to use

Zend Studio 13.0.1
Powerful PHP integrated development environment

Dreamweaver CS6
Visual web development tools

SublimeText3 Mac version
God-level code editing software (SublimeText3)
Hot Topics
 1389
1389
 52
52

 What is the reason why PS keeps showing loading?
Apr 06, 2025 pm 06:39 PM
What is the reason why PS keeps showing loading?
Apr 06, 2025 pm 06:39 PM
PS "Loading" problems are caused by resource access or processing problems: hard disk reading speed is slow or bad: Use CrystalDiskInfo to check the hard disk health and replace the problematic hard disk. Insufficient memory: Upgrade memory to meet PS's needs for high-resolution images and complex layer processing. Graphics card drivers are outdated or corrupted: Update the drivers to optimize communication between the PS and the graphics card. File paths are too long or file names have special characters: use short paths and avoid special characters. PS's own problem: Reinstall or repair the PS installer.
 What are the common questions about exporting PDF on PS
Apr 06, 2025 pm 04:51 PM
What are the common questions about exporting PDF on PS
Apr 06, 2025 pm 04:51 PM
Frequently Asked Questions and Solutions when Exporting PS as PDF: Font Embedding Problems: Check the "Font" option, select "Embed" or convert the font into a curve (path). Color deviation problem: convert the file into CMYK mode and adjust the color; directly exporting it with RGB requires psychological preparation for preview and color deviation. Resolution and file size issues: Choose resolution according to actual conditions, or use the compression option to optimize file size. Special effects issue: Merge (flatten) layers before exporting, or weigh the pros and cons.
 How to solve the problem of loading when PS is always showing that it is loading?
Apr 06, 2025 pm 06:30 PM
How to solve the problem of loading when PS is always showing that it is loading?
Apr 06, 2025 pm 06:30 PM
PS card is "Loading"? Solutions include: checking the computer configuration (memory, hard disk, processor), cleaning hard disk fragmentation, updating the graphics card driver, adjusting PS settings, reinstalling PS, and developing good programming habits.
 How to speed up the loading speed of PS?
Apr 06, 2025 pm 06:27 PM
How to speed up the loading speed of PS?
Apr 06, 2025 pm 06:27 PM
Solving the problem of slow Photoshop startup requires a multi-pronged approach, including: upgrading hardware (memory, solid-state drive, CPU); uninstalling outdated or incompatible plug-ins; cleaning up system garbage and excessive background programs regularly; closing irrelevant programs with caution; avoiding opening a large number of files during startup.
 How to set password protection for export PDF on PS
Apr 06, 2025 pm 04:45 PM
How to set password protection for export PDF on PS
Apr 06, 2025 pm 04:45 PM
Export password-protected PDF in Photoshop: Open the image file. Click "File"> "Export"> "Export as PDF". Set the "Security" option and enter the same password twice. Click "Export" to generate a PDF file.
 How to use PS Pen Tool
Apr 06, 2025 pm 10:15 PM
How to use PS Pen Tool
Apr 06, 2025 pm 10:15 PM
The Pen Tool is a tool that creates precise paths and shapes, and is used by: Select the Pen Tool (P). Sets Path, Fill, Stroke, and Shape options. Click Create anchor point, drag the curve to release the Create anchor point. Press Ctrl/Cmd Alt/Opt to delete the anchor point, drag and move the anchor point, and click Adjust curve. Click the first anchor to close the path to create a shape, and double-click the last anchor to create an open path.
 Is slow PS loading related to computer configuration?
Apr 06, 2025 pm 06:24 PM
Is slow PS loading related to computer configuration?
Apr 06, 2025 pm 06:24 PM
The reason for slow PS loading is the combined impact of hardware (CPU, memory, hard disk, graphics card) and software (system, background program). Solutions include: upgrading hardware (especially replacing solid-state drives), optimizing software (cleaning up system garbage, updating drivers, checking PS settings), and processing PS files. Regular computer maintenance can also help improve PS running speed.
 How to solve the problem of loading when the PS opens the file?
Apr 06, 2025 pm 06:33 PM
How to solve the problem of loading when the PS opens the file?
Apr 06, 2025 pm 06:33 PM
"Loading" stuttering occurs when opening a file on PS. The reasons may include: too large or corrupted file, insufficient memory, slow hard disk speed, graphics card driver problems, PS version or plug-in conflicts. The solutions are: check file size and integrity, increase memory, upgrade hard disk, update graphics card driver, uninstall or disable suspicious plug-ins, and reinstall PS. This problem can be effectively solved by gradually checking and making good use of PS performance settings and developing good file management habits.
