Description of DingTalk Cloud Print Settings Method
How to configure DingTalk cloud printing to make printing your documents easier? PHP editor Xiaoxin brings you a detailed DingTalk cloud printing setup guide, teaching you step by step how to connect your device to DingTalk cloud printing service, allowing you to print important documents anytime and anywhere.
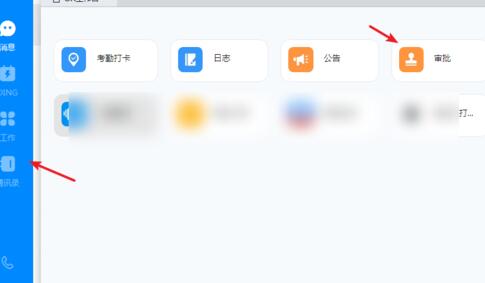
1. Open the DingTalk software, click the [Work] option on the left, and find the [Approval] option in the pop-up work interface.

2. In the approval interface, click the [Initiated by me] option above and select an approval form to be printed.

3. In the approval form interface, click the [Cloud Print] option in the upper right corner.

4. Click the [Start Installation] option to automatically download the print service.

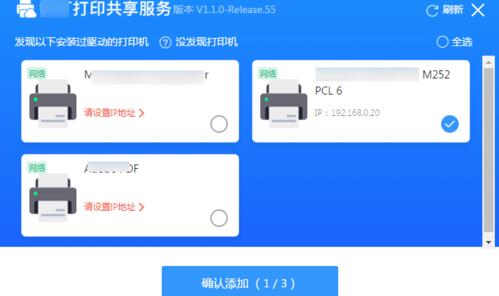
5. After the installation is completed, the software will automatically scan the printer, select the printer device to be used for cloud printing, and click the [Confirm Add] option.

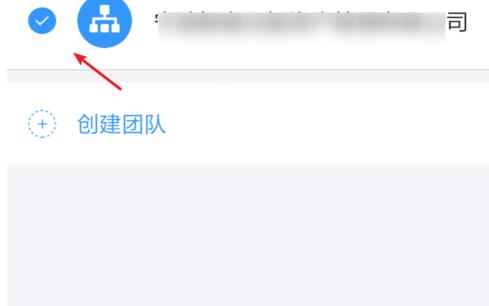
6. Open the mobile app and scan the QR code to bind the team.

7. Select your corporate team and click the [Complete Printer Sharing] option at the bottom of the interface.

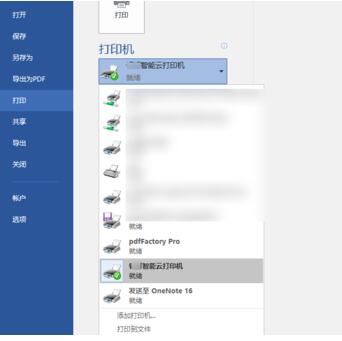
8. After the sharing is completed, the cloud printer can be found automatically on the computer or on the printer.

The above is the detailed content of Description of DingTalk Cloud Print Settings Method. For more information, please follow other related articles on the PHP Chinese website!

Hot AI Tools

Undresser.AI Undress
AI-powered app for creating realistic nude photos

AI Clothes Remover
Online AI tool for removing clothes from photos.

Undress AI Tool
Undress images for free

Clothoff.io
AI clothes remover

AI Hentai Generator
Generate AI Hentai for free.

Hot Article

Hot Tools

Notepad++7.3.1
Easy-to-use and free code editor

SublimeText3 Chinese version
Chinese version, very easy to use

Zend Studio 13.0.1
Powerful PHP integrated development environment

Dreamweaver CS6
Visual web development tools

SublimeText3 Mac version
God-level code editing software (SublimeText3)

Hot Topics
 How to scan the QR code to join a group on DingTalk
May 01, 2024 am 03:18 AM
It only takes five steps to scan the QR code on DingTalk to join a group: open the DingTalk APP, enter the address book, click "Scan", scan the group QR code, and finally click "Join".
 How to join a group on DingTalk
May 01, 2024 am 03:09 AM
There are many ways to join a DingTalk group: click on the link to join directly through the group link; join by scanning the QR code in the DingTalk App; enter the group number in the search box to join; agree to join through friend invitation; join the organization Automatically added after the architecture.
 What should I do if I have already registered DingTalk and forgot my password?
May 01, 2024 am 02:51 AM
If you forget your DingTalk password, you can retrieve it through the following methods: 1. Retrieve it through your mobile phone number; 2. Retrieve it through your email (requires binding); 3. Contact DingTalk customer service (relevant information is required to verify your identity).
 Where to set the attendance and clock-in range on DingTalk_Introduction to the method of changing the location and clock-in range on DingTalk
Apr 29, 2024 pm 12:52 PM
1. Open DingTalk, click Attendance and Clock on the workbench interface. 2. Click Settings in the lower right corner, select the attendance group, and click the clock-in method. 3. Turn on location check-in. After adding the location, set the allowed check-in range.
 How to set the background for a DingTalk video conference_A list of operations to display a virtual background for a DingTalk video conference
Apr 29, 2024 pm 02:20 PM
1. Open the DingTalk app, click to write below, and click to join the meeting. 2. Click More. 3. Select a virtual background. 4. Choose a background image you like. 5. You can see that your video conference screen has changed into this picture, which can replace appearing in person. Just click Finish.
 How to share screen in DingTalk video conferencing on computer_Screen sharing tutorial in DingTalk video conferencing
Apr 29, 2024 pm 01:50 PM
1. Open DingTalk on the computer, go to the workbench, click on video conferencing to start a meeting, as shown in the figure below: 2. After entering the video conferencing meeting interface, click on the sharing window, as shown on the following figure: 3. After clicking on the sharing window, select Desktop, click Share, as shown in the figure below: 4. After clicking, you can see that the computer screen has been shared, as shown in the figure below: 5. Click to end sharing, and you can return to the video conference, as shown in the figure below:
 I forgot my original password for DingTalk, how to set a new password?
May 01, 2024 am 02:54 AM
After forgetting the original password of DingTalk, you can set a new password through the following methods: 1. Contact the administrator to reset; 2. Verify the retrieval by mobile phone or email (if you have the original mobile phone number or verification method); 3. Reset by the enterprise administrator ( Enterprise members); 4. Retrieve it through the account retrieval tool.
 How to tell if others have deleted you on DingTalk?
May 01, 2024 am 02:57 AM
Determine whether others have deleted you on DingTalk: Check the group chat participant list. If your name is not there, it means you have been deleted. Check the one-on-one chat and there will be a dotted gray line next to the contact's name, which means it has been deleted. Check the recent contact list. If you are not included, it may have been deleted. Try sending the message, if it cannot be sent it may have been deleted. Check with the third party and ask them if they can see your name. It should be noted that the above method is not absolutely accurate, because muting or blocking contacts will also affect the display effect.


