
 Mobile Tutorial
Android Phone
Tutorial on how to install the system directly from your mobile phone to your computer (easy operation)
Mobile Tutorial
Android Phone
Tutorial on how to install the system directly from your mobile phone to your computer (easy operation)
Tutorial on how to install the system directly from your mobile phone to your computer (easy operation)

With the advancement of technology, computer system problems are no longer a problem! PHP editor Banana will reveal a convenient method for you to easily install the system on your computer using your mobile phone. Say goodbye to the cumbersome operations of traditional U disks or CDs, and make your computer look brand new through your mobile phone. Don’t want to miss this handy tip? Continue reading this article to learn how to easily install the system on your computer using your mobile phone.
1. Preparation
We need to ensure that the mobile phone and computer can be connected normally. Before operation, And prepare a data cable.
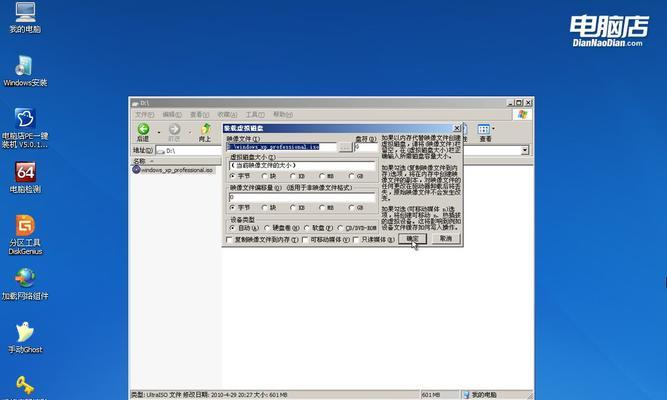
2. Download the required software
Search and download an application called "Mobile Phone Installation System" in the mobile application store. This application can help us complete the system installation.
3. Open the mobile phone to install the system application
There are multiple function buttons on the interface. After opening the application, we will see a simple interface.
4. Select the system version
We need to select the appropriate system version in the application, based on the specific conditions of the computer, and click Confirm.
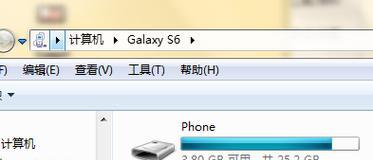
5. Connect to the computer
Make sure the connection is stable and connect the phone to the computer through the data cable.
6. Identify computer information
Including hardware configuration and system requirements, the application will automatically identify computer-related information.
7. Download system files
To ensure the compatibility and stability of the system, the application will automatically select and download appropriate system files based on computer information.
8. Transfer system files
The application will transfer the files to the computer. After the system files are downloaded, ensure the integrity of the files.
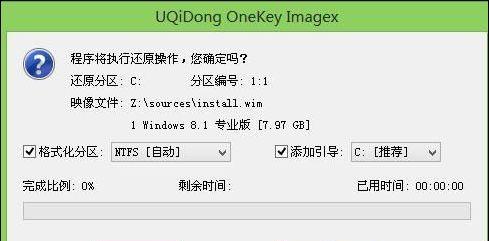
9. Install the system
The application will automatically start the installation process and provide real-time display of the installation progress after the system file transfer is completed.
10. Complete the installation
We can choose to restart the computer and enjoy a new system experience after the system installation is completed.
11. Solving common problems
The application will provide corresponding solutions and help guidance if problems occur during the installation process.
12. Precautions
And make sure the battery is sufficient. We need to pay attention to ensure a stable connection between the mobile phone and the computer during operation.
13. Compatibility issues
Need to be adjusted according to the actual situation. There may be some compatibility issues due to different hardware configurations and system requirements of different computers.
14. Data backup
To prevent data loss, we need to back up important data before installing the system.
15. Advantages and Disadvantages
For example, compatibility issues and dependence on mobile phones, etc., but there are also some limitations. This method of directly installing the system on the computer from the mobile phone is simple, convenient and fast. The advantages.
We can easily solve computer system problems, avoid the cumbersome operations of traditional methods, and install the system directly on the computer through the mobile phone introduced in this article. To ensure smooth operation, you need to pay attention to compatibility issues and data backup. It provides us with a new solution, which is convenient and practical in practical applications.
The above is the detailed content of Tutorial on how to install the system directly from your mobile phone to your computer (easy operation). For more information, please follow other related articles on the PHP Chinese website!

Hot AI Tools

Undresser.AI Undress
AI-powered app for creating realistic nude photos

AI Clothes Remover
Online AI tool for removing clothes from photos.

Undress AI Tool
Undress images for free

Clothoff.io
AI clothes remover

AI Hentai Generator
Generate AI Hentai for free.

Hot Article
Hot Tools

Notepad++7.3.1
Easy-to-use and free code editor

SublimeText3 Chinese version
Chinese version, very easy to use

Zend Studio 13.0.1
Powerful PHP integrated development environment

Dreamweaver CS6
Visual web development tools

SublimeText3 Mac version
God-level code editing software (SublimeText3)
Hot Topics
 1377
1377
 52
52

 How to use sql datetime
Apr 09, 2025 pm 06:09 PM
How to use sql datetime
Apr 09, 2025 pm 06:09 PM
The DATETIME data type is used to store high-precision date and time information, ranging from 0001-01-01 00:00:00 to 9999-12-31 23:59:59.99999999, and the syntax is DATETIME(precision), where precision specifies the accuracy after the decimal point (0-7), and the default is 3. It supports sorting, calculation, and time zone conversion functions, but needs to be aware of potential issues when converting precision, range and time zones.
 Can I retrieve the database password in Navicat?
Apr 08, 2025 pm 09:51 PM
Can I retrieve the database password in Navicat?
Apr 08, 2025 pm 09:51 PM
Navicat itself does not store the database password, and can only retrieve the encrypted password. Solution: 1. Check the password manager; 2. Check Navicat's "Remember Password" function; 3. Reset the database password; 4. Contact the database administrator.
 How to view database password in Navicat for MariaDB?
Apr 08, 2025 pm 09:18 PM
How to view database password in Navicat for MariaDB?
Apr 08, 2025 pm 09:18 PM
Navicat for MariaDB cannot view the database password directly because the password is stored in encrypted form. To ensure the database security, there are three ways to reset your password: reset your password through Navicat and set a complex password. View the configuration file (not recommended, high risk). Use system command line tools (not recommended, you need to be proficient in command line tools).
 Navicat's method to view PostgreSQL database password
Apr 08, 2025 pm 09:57 PM
Navicat's method to view PostgreSQL database password
Apr 08, 2025 pm 09:57 PM
It is impossible to view PostgreSQL passwords directly from Navicat, because Navicat stores passwords encrypted for security reasons. To confirm the password, try to connect to the database; to modify the password, please use the graphical interface of psql or Navicat; for other purposes, you need to configure connection parameters in the code to avoid hard-coded passwords. To enhance security, it is recommended to use strong passwords, periodic modifications and enable multi-factor authentication.
 How to delete rows that meet certain criteria in SQL
Apr 09, 2025 pm 12:24 PM
How to delete rows that meet certain criteria in SQL
Apr 09, 2025 pm 12:24 PM
Use the DELETE statement to delete data from the database and specify the deletion criteria through the WHERE clause. Example syntax: DELETE FROM table_name WHERE condition; Note: Back up data before performing a DELETE operation, verify statements in the test environment, use the LIMIT clause to limit the number of deleted rows, carefully check the WHERE clause to avoid misdeletion, and use indexes to optimize the deletion efficiency of large tables.
 How to add columns in PostgreSQL?
Apr 09, 2025 pm 12:36 PM
How to add columns in PostgreSQL?
Apr 09, 2025 pm 12:36 PM
PostgreSQL The method to add columns is to use the ALTER TABLE command and consider the following details: Data type: Select the type that is suitable for the new column to store data, such as INT or VARCHAR. Default: Specify the default value of the new column through the DEFAULT keyword, avoiding the value of NULL. Constraints: Add NOT NULL, UNIQUE, or CHECK constraints as needed. Concurrent operations: Use transactions or other concurrency control mechanisms to handle lock conflicts when adding columns.
 How to recover data after SQL deletes rows
Apr 09, 2025 pm 12:21 PM
How to recover data after SQL deletes rows
Apr 09, 2025 pm 12:21 PM
Recovering deleted rows directly from the database is usually impossible unless there is a backup or transaction rollback mechanism. Key point: Transaction rollback: Execute ROLLBACK before the transaction is committed to recover data. Backup: Regular backup of the database can be used to quickly restore data. Database snapshot: You can create a read-only copy of the database and restore the data after the data is deleted accidentally. Use DELETE statement with caution: Check the conditions carefully to avoid accidentally deleting data. Use the WHERE clause: explicitly specify the data to be deleted. Use the test environment: Test before performing a DELETE operation.
 How to roll back a database by navicat
Apr 08, 2025 pm 11:33 PM
How to roll back a database by navicat
Apr 08, 2025 pm 11:33 PM
Roll back the database in Navicat: Make sure you are connected to the database. Right-click the database name and select Rollback. Select the time point to roll back and click OK. The rollback operation affects changes made after the selected time point. The rollback operation is irreversible and may lead to data loss. It is recommended to back up the data before rollback.
