 Software Tutorial
 Mobile Application
 Introduction to how to turn on vt on different models of computers
Introduction to how to turn on vt on different models of computers
VT Technology: Turn it on and let your simulator fly! VT (Virtualization Technology) is a powerful tool that can improve the performance of your emulator by running multiple operating systems simultaneously on a single platform. Turning on VT can significantly enhance the smoothness of the emulator, reduce screen freezes, and allow you to enjoy a smooth gaming experience. Want to know how to enable VT and improve emulator performance? Continue reading the detailed guide carefully prepared by PHP editor Xigua for you, and easily master the VT opening skills!
Introduction to how to turn on vt
The first step: Enter the motherboard BIOS setting interface
When restarting and booting, keep pressing "DEL" or "F2", or you can press For your own motherboard model, enter the BIOS by referring to the buttons in the picture below. Note: Keep pressing the buttons as soon as you turn on the computer! What should I do if the startup speed is too fast and I cannot enter the BIOS?


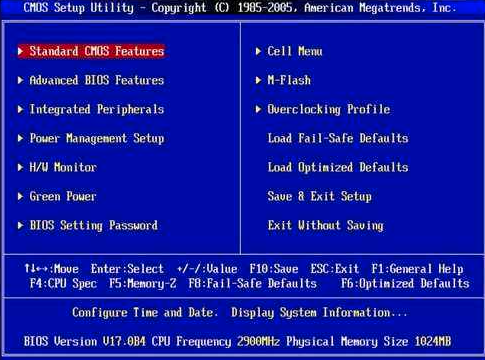
After that you will successfully enter an interface similar to the picture below (looks complicated? Don’t panic! You have succeeded! Most of them)

Step 2: Find the VT option
VT options are usually secretly hidden in the following menus, click on them when you see them!
Chinese: Advanced/Processor
English: Advanced/BIOS Features/
CPU Configuration/Security
VT options are generally aliased as follows: One
Chinese: Intel Virtualization/Virtualization Technology
English: Virtual/Virtualization/VT-x/VMX/
SVM/Secure Virtual Machine/
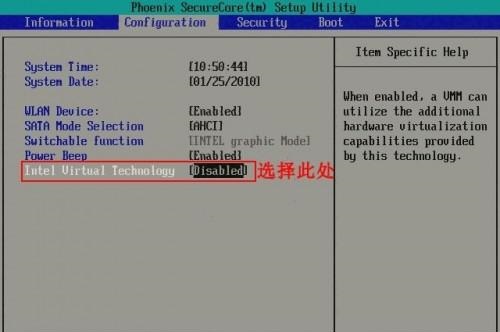
Intel Virtualization Technology
If you cannot use the mouse to enter the BIOS, please use the keyboard's ↑↓←→ arrow keys, enter key, esc key, etc. to control it.
The third step, turn on VT
After finding VT, set it to Enabled/Enable!

The fourth step, F10 to save and exit, select YES/OK, you are done.
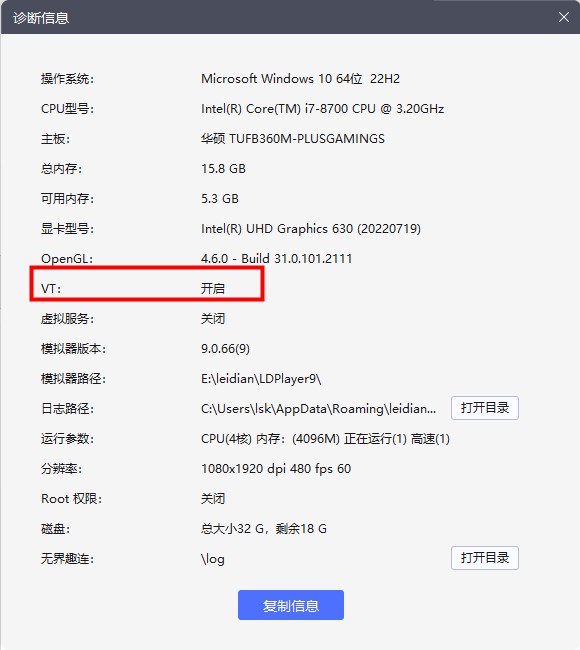
After that, run the simulator (take the lightning simulator as an example), find the diagnostic information, and you can see that the VT function has been turned on.

Opening vt can greatly improve the performance of computer simulator users. The above is an introduction to the general method of opening VT. If you still have questions about turning on VT, you can check the method of turning on VT according to the computer motherboard model below. I hope it can help everyone!
How to turn on VT on different computer models
Step one: Determine your motherboard model. The specific methods of turning on VT are different for different computer motherboard types.
Step 2: Find how to turn on your own motherboard. The process requires restarting the computer.
Lenovo motherboard vt enable method
HP HP motherboard vt enable method
MAXSUN motherboard vt enable method
MSI( MSI) motherboard vt enable method
GIGABYTE motherboard vt enable method
ASUS motherboard enable vt tutorial
Colorful motherboard vt enable method
BIOSTAR motherboard vt activation method
JETWAY motherboard vt activation method
DELL motherboard vt activation method
ASRock ) Mainboard vt opening method
Meijie (SOYO) motherboard vt opening method
The above is the detailed content of Introduction to how to turn on vt on different models of computers. For more information, please follow other related articles on the PHP Chinese website!

Hot AI Tools

Undresser.AI Undress
AI-powered app for creating realistic nude photos

AI Clothes Remover
Online AI tool for removing clothes from photos.

Undress AI Tool
Undress images for free

Clothoff.io
AI clothes remover

AI Hentai Generator
Generate AI Hentai for free.

Hot Article

Hot Tools

Notepad++7.3.1
Easy-to-use and free code editor

SublimeText3 Chinese version
Chinese version, very easy to use

Zend Studio 13.0.1
Powerful PHP integrated development environment

Dreamweaver CS6
Visual web development tools

SublimeText3 Mac version
God-level code editing software (SublimeText3)

Hot Topics
 Introduction to how to use the joiplay simulator
May 04, 2024 pm 06:40 PM
The jojplay simulator is a very easy-to-use mobile phone simulator. It supports computer games to run on mobile phones and has very good compatibility. Some players don’t know how to use it. The editor below will introduce how to use it. How to use joiplay simulator 1. First, you need to download the Joiplay body and RPGM plug-in. It is best to install them in the order of body-plug-in. The apk package can be obtained in the Joiplay bar (click to get >>>). 2. After Android is completed, you can add games in the lower left corner. 3. Fill in the name casually, and press CHOOSE on executablefile to select the game.exe file of the game. 4. Icon can be left blank or you can choose your favorite picture.
 How to enter bios on hp motherboard
May 04, 2024 pm 09:01 PM
How to set up the U disk boot in the HP notebook bios (how to enter the HP computer bios) and then insert the U disk to be booted first into the USB port of the notebook. If you want to install the system, the system program must have been prepared in the U disk. First, open the laptop. Make sure the laptop is turned off. Setting the bios must be done with the computer turned off. Then insert the U disk that you want to boot first into the USB port of the notebook. If you want to install the system, the prerequisite is that the system program has been prepared in the U disk. Take the HP ProDesk400G5SFF desktop computer as an example. Set the BIOS disk startup method: First, restart the computer and wait for the startup screen to appear. There are two ways to set up USB disk startup on HP notebooks. One is to directly press the shortcut key to select
 How to enter bios after assembling a computer? How to enter bios when assembling a computer?
May 07, 2024 am 09:13 AM
How to enter bios after assembling a computer? Before entering the BIOS, you need to make sure that the computer is completely shut down and powered off. Here are several common ways to enter the BIOS: 1. Use shortcut keys: Most computer manufacturers will display a prompt message at startup telling you which key to press to enter the BIOS settings. Usually the F2, F10, F12 or Delete key. After pressing the appropriate keys, you should be able to see a screen with information about your computer's hardware and BIOS settings. 2. Use the button on the motherboard: Some computer motherboards have a dedicated button for entering BIOS settings. This button is usually labeled "BIOS" or "UEFI". After pressing the button you should be able to see
 How to install Windows system on tablet computer
May 03, 2024 pm 01:04 PM
How to flash the Windows system on BBK tablet? The first way is to install the system on the hard disk. As long as the computer system does not crash, you can enter the system and download things, you can use the computer hard drive to install the system. The method is as follows: Depending on your computer configuration, you can install the WIN7 operating system. We choose to download Xiaobai's one-click reinstallation system in vivopad to install it. First, select the system version suitable for your computer, and click "Install this system" to next step. Then we wait patiently for the installation resources to be downloaded, and then wait for the environment to be deployed and restarted. The steps to install win11 on vivopad are: first use the software to check whether win11 can be installed. After passing the system detection, enter the system settings. Select the Update & Security option there. Click
 Life Restart Simulator Guide
May 07, 2024 pm 05:28 PM
Life Restart Simulator is a very interesting simulation game. This game has become very popular recently. There are many ways to play in the game. Below, the editor has brought you a complete guide to Life Restart Simulator. Come and take a look. What strategies are there? Life Restart Simulator Guide Guide Features of Life Restart Simulator This is a very creative game in which players can play according to their own ideas. There are many tasks to complete every day, and you can enjoy a new life in this virtual world. There are many songs in the game, and all kinds of different lives are waiting for you to experience. Life Restart Simulator Game Contents Talent Card Drawing: Talent: You must choose the mysterious small box to become an immortal. A variety of small capsules are available to avoid dying midway. Cthulhu may choose
 MSI motherboard boot logo
May 08, 2024 pm 02:20 PM
How to cancel the MSI motherboard icon when booting 1. Press the DEL key when booting to enter the BIOS. Generally, in the "Advanced Features" item, you can find the words MSI motherboard LOGO screen. Select DISABLED, save and exit. There will no longer be this MSI motherboard LOGO screen when you turn on the computer in the future. MSI motherboard refers to the motherboard brand developed by MSI (MSI Technology Company). 2. The logo displayed when the computer is turned on is basically that of the motherboard manufacturer. You can set QUICKPOST to DISENABLE in the BIOS, so that the logo will generally no longer be displayed. It will display computer configuration-related information and give you more details. 3. First, teach you how to flash the BIOS in Windows environment. First: Go online
 How to enable tpm2.0 in win11_How to enable tpm2.0 in win11
May 08, 2024 pm 06:10 PM
1. Gigabyte motherboard 1. First, we restart the computer and use the keyboard [DEL] to enter the BIOS settings when restarting. 2. Find and enter the [Settings] tab above. 3. Then find and enter [Miscellaneous] under settings. 4. Set [Intel Platform Trust Technology (PTT)] to [Enabled]. 5. After the settings are completed, use the keyboard [F10] to save, and then click [YES] to exit. 2. ASUS motherboard 1. First restart the computer and continuously tap [del] on the keyboard to enter the bios settings when booting. 2. Click [AdvancedMode] or press [F7] to find [A
 How to upgrade Gigabyte motherboard to Win11_How to upgrade Gigabyte motherboard to Win11
May 06, 2024 pm 12:04 PM
1. Win11 does not have very high requirements for the motherboard. You can first download healthcheck or whynotwin11 to check whether your other hardware devices support it (you can download it from this site). 2. If other conditions are met and only tpm does not meet the requirements, you can enable tpm in the bios settings. 3. Restart the system, and then press [DEL] on the keyboard to enter the BIOS settings when the logo pops up. 4. Enter the [Settings] option and [Miscellaneous] option in sequence. 5. Find [Intel Platform Trust Technology (PTT)] below and set it to [Start]. 6. If it is an AMD platform, then


