PS利用滤镜制作绚丽的抽丝花朵
本教程的花朵制作比较艳丽,制作方法也比较独特。先用画笔画出一些线条,然后用滤镜等调出形状并加上纹理
本教程的花朵制作比较艳丽,制作方法也比较独特。先用画笔画出一些线条,然后用滤镜等调出形状并加上纹理。然后多复制几次,适当边角角度后再叠加出自己想要的图案。最后整体上色即可。
最终效果

1、新建黑色背景500×500的文档。

2、工具栏选取笔刷工具,选择17PX软笔刷,画一个米字型的图案。如图:


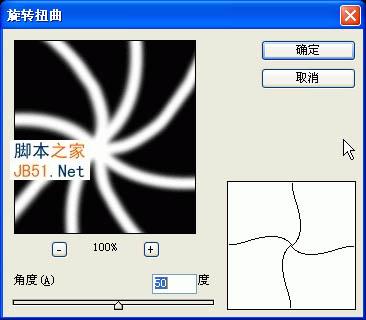
3、现在我们来对它进行扭曲变形。工具栏选取滤镜-扭曲-旋转扭曲。参数设置参考如图,别太大。


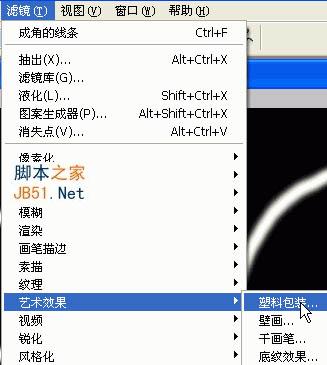
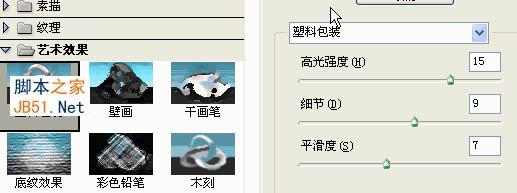
4、滤镜-艺术效果-塑料包装,参数设置参考如图。

5、滤镜-画笔描边-成角的线条,参考设置如图。


6、按CTRL+J复制背景(我做的时候双击背景把它变成了普通图层,在此说明一下),然后把图层混合模式改为变亮。
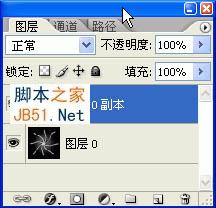
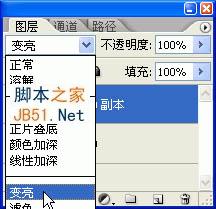
7、按两次CTRL+J再复制两层,如图。

8、关键步骤来了,就是变换。现在有三个副本图层,你可以任选一个,对它进行变换。我选了副本3。
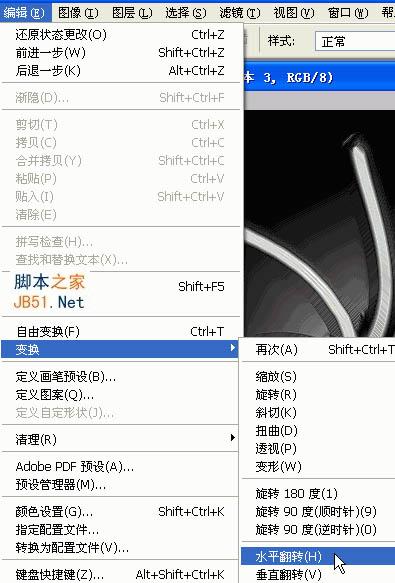

9、在剩下的两个副本再任选一个,进行如图变换。我选了副本2。


10、好了就剩下最后一个副本了,继续变换。如图。


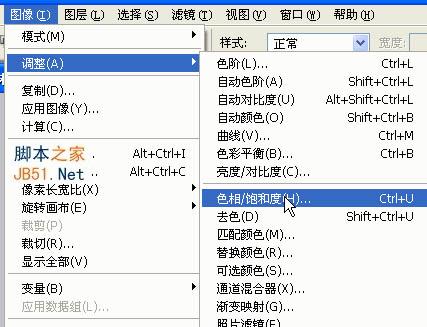
11、合并图层,然后调节色相饱和度,色彩按照自己的爱好来调。如图所示。


最终效果:


Hot AI Tools

Undresser.AI Undress
AI-powered app for creating realistic nude photos

AI Clothes Remover
Online AI tool for removing clothes from photos.

Undress AI Tool
Undress images for free

Clothoff.io
AI clothes remover

Video Face Swap
Swap faces in any video effortlessly with our completely free AI face swap tool!

Hot Article

Hot Tools

Notepad++7.3.1
Easy-to-use and free code editor

SublimeText3 Chinese version
Chinese version, very easy to use

Zend Studio 13.0.1
Powerful PHP integrated development environment

Dreamweaver CS6
Visual web development tools

SublimeText3 Mac version
God-level code editing software (SublimeText3)

Hot Topics
 1386
1386
 52
52
 C++ Image Processing Practice Guide: Implementing Image Special Effects and Filters
Nov 27, 2023 am 11:40 AM
In the fields of computer science and image processing, C++ has always been one of the most commonly used programming languages. Image processing is one of the important subfields of computer vision, including image analysis, processing and recognition. This article will introduce some basic concepts and techniques in C++ image processing, and provide some sample codes for implementing image special effects and filters to help readers better understand and practice C++ image processing. 1. Basics of C++ image processing 1.1 Commonly used image file formats In image processing, we usually need to use various image file formats, including
 Find another way! See how to use CSS filters to create rounded corners and wavy effects
Oct 18, 2022 pm 08:21 PM
This article will take you through a different approach and talk about how to use CSS filters to create rounded corners, and how to use rounded corners to achieve a wave effect. I hope it will be helpful to you!
 Let's talk about how to use CSS filters to achieve rounded corners and wave effects.
Jul 28, 2022 pm 07:42 PM
How to use CSS to achieve rounded corners and wave effects? The following article will show you how to skillfully use CSS filters to create rounded corners and wave effects. I hope it will be helpful to you!
 Cleverly use CSS3 filters to create text flash switching animation effects!
Jul 20, 2022 am 10:55 AM
This article will show you how to use CSS3 filters to achieve a high-end text flash switching animation effect. I hope it will be helpful to you!
 Develop image filter effects based on JavaScript
Aug 09, 2023 pm 11:46 PM
Summary of developing image filter effects based on JavaScript: This article introduces how to use JavaScript to develop image filter effects. By using the Canvas element and related APIs, we can achieve common picture filter effects, such as grayscale, blur, contrast adjustment, etc. This article will provide detailed code examples and implementation processes for each filter effect to help readers quickly get started developing image filter effects. 1. Introduction In web development, we often encounter the need to process and beautify images.
 How to choose a Clip-on filter
Feb 28, 2024 pm 01:10 PM
Clipshot software provides a series of powerful functions in the field of video editing to meet users' needs for all-round video processing. The software has built-in many popular and rich functions and material libraries, allowing users to easily create personalized video works. Users can use this software to easily add filters to enhance the visual appeal of their videos. However, many users still don’t know how to add filters, so players who want to know more about it can follow this article to learn more about it. How to add filters to Clip Shot? 1. Enter the Clip Recording screen and select the "Color Five Star" tool. 2. Open more options and select the "Required Filter Effect" option in the Select Filter tab. 3. Then select "Close" in the option bar. "Button 4, and then add filters to the camera image
 How to add filter effects to images using Python
Aug 18, 2023 pm 01:09 PM
How to add filter effects to pictures using Python In this digital age, picture processing has become an integral part of our daily lives. If you are someone who is interested in image processing, then you will definitely be interested in how to add filter effects to images. This article will introduce how to use the Python programming language to implement image filter effects and provide relevant code examples. First, we need to install Python’s image processing library PIL (PythonImagingLibrary
 How to use filters to create bubble effect in PS
Feb 27, 2024 pm 03:34 PM
PS filter is a powerful tool in Photoshop, which can help us quickly achieve various visual effects, including creating realistic bubble effects. The editor of this website will bring you this article to help you start from scratch and gradually master how to use PS filters to create natural effects and master the bubble effect production skills. If you want to learn, come and follow this article to learn more. . Let’s take a look at the steps of how to use filters to create bubble effects in ps: the article is not original, but is based on combining other people’s methods and exploring the details on your own. After consulting and consulting a large amount of information, I finally summarized this simple production process. There are many ways to make it, the key is to find the one that works for you. Create a canvas: black is for the subsequent filter color


