

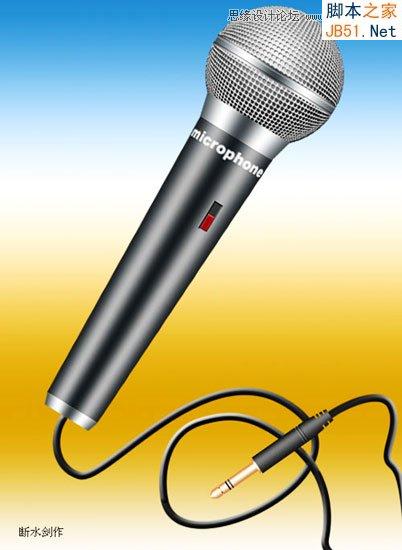
Photoshop绘制立体效果的金属质感麦克风话筒

下面先看看效果图
绘制麦克风第一课:插头
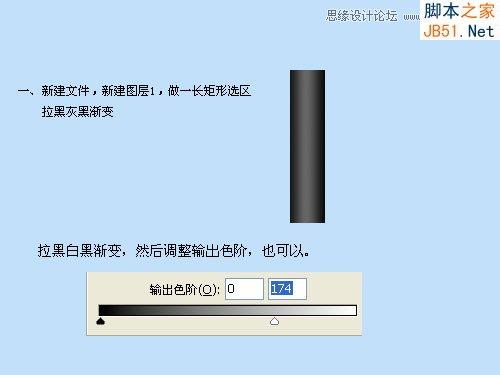


绘制麦克风第二课:麦克风
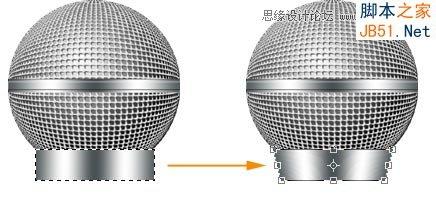
第一步:制作麦克风咪头
一、新建5×5文件,新建图层,用1象素的铅笔,前景色黑色,画出四边,关闭背景层,执行编辑-定义图案。因为画布很小不好操作,请放大操作。

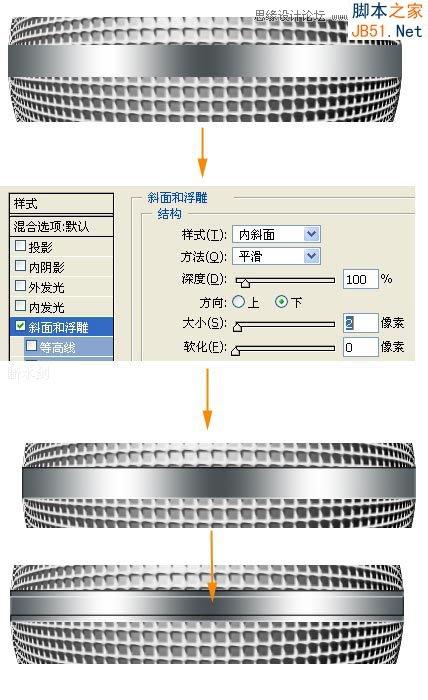
二、新建500×700文件,建立图层一,选一正圆区域,可以画的大一些,一会缩小,如果画的圆太小,出来的网格相对感觉太大就不真实了。填充刚才的自定义图案,不要取消选区,执行两次球面化。

三、不要取消选区,新建图层二,并将其在图层面板上拉到图层一下面,前景色设为白色,背景色设为黑色,对选区执行径向渐变。

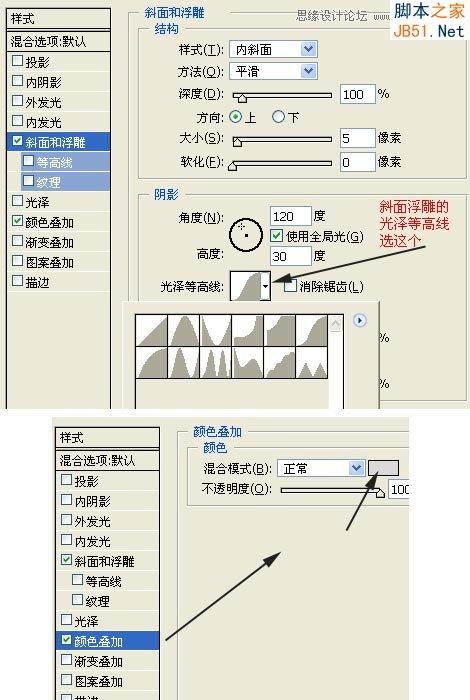
四、扔保留选区,回到图层一,添加图层样式:斜面和浮雕、颜色叠加(设叠加灰色)
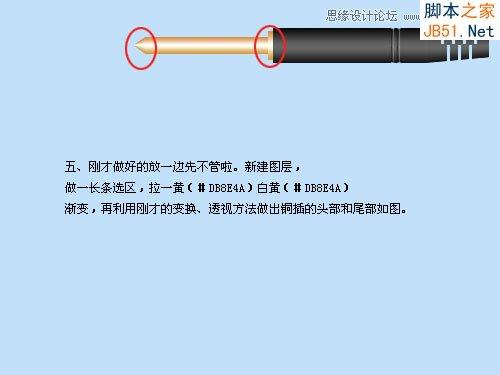
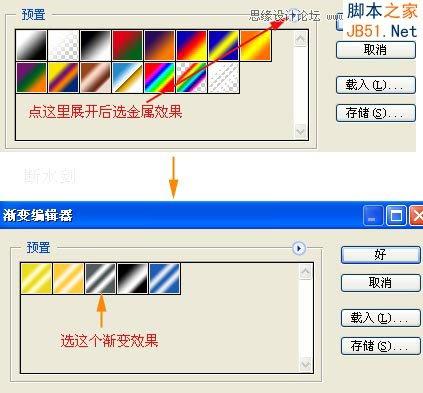
五、新建图层三,选渐变工具,如图设置渐变,然后在麦克头中间位置选一矩形区域做线性渐变,添加图层样式,方向为下,大小1到2即可,其他默认,然后按CTRL+J复制一层,自由变换高度缩小一下,图层样式的方向改为上,其他不变。最终如图:
六、关闭背景层,合并可见图层,命名合并后的图层为(麦克头),自由变换,缩小为合适大小
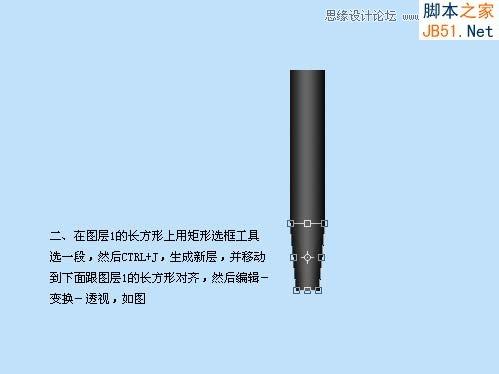
第二步:制作手柄
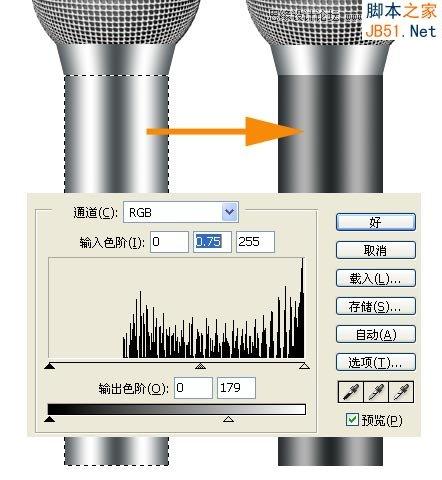
一、新建图层,在如图位置选矩形区域执行渐变(仍然是刚才我们编辑好的金属效果渐变)并执行编辑-变换-透视,如图调整:
二、新建图层,在下面继续选取矩形区域执行渐变,并调整色阶。
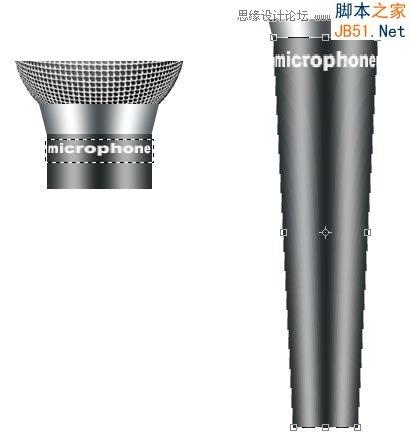
三、打上文字,然后执行图层-格栅化-文字,然后用矩形选框选取文字的范围,选区宽度跟手柄等宽。执行滤镜-扭曲-球面化,数量80%,模式为水平优先。将文字和手柄层合并,执行编辑-变换-透视。
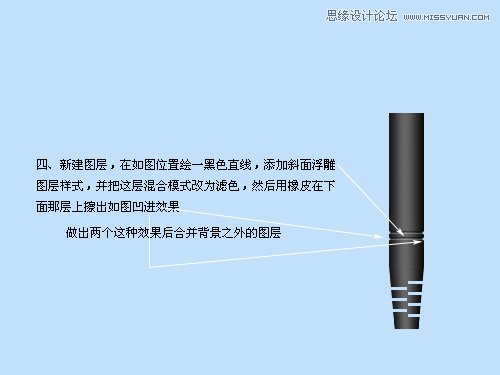
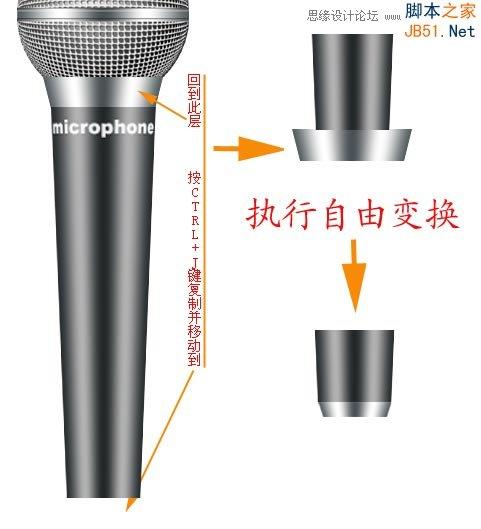
四、依照图示说明作尾部。
五、新建图层,在手柄上选一小长方形填充黑色,并添加斜面浮雕样式,方向为下,大小有1到2个象素即可,其他默认,产生凹进去的效果,再新建图层,在上面再选取一个更小的长方形区域填充深红色,并添加斜面浮雕图层样式,方向为默认的上即可,开关按钮就做好了。如果你不怕麻烦就在红色开关上面再画点小横线就更逼真些,至于怎么画,根据自己习惯,这里不再赘述。

好了,我们合并背景层外的所有图层。自由变换一下,让麦克风有个斜度,这样视觉舒服些
第三步:信号线
一、新建图层,选合适大小的画笔,前景色设为比较深的灰色,用钢笔画出电线路径,然后进行描边路径,描边后删除路径,对电线添加斜面浮雕样式,ok,注意,如果你画的线有交*的地方,注意分开层次做出交*效果。可以分两个层做两条线,做好后再把两条线接成一条。
加个背景,完成。

Hot AI Tools

Undresser.AI Undress
AI-powered app for creating realistic nude photos

AI Clothes Remover
Online AI tool for removing clothes from photos.

Undress AI Tool
Undress images for free

Clothoff.io
AI clothes remover

Video Face Swap
Swap faces in any video effortlessly with our completely free AI face swap tool!

Hot Article
Hot Tools

Notepad++7.3.1
Easy-to-use and free code editor

SublimeText3 Chinese version
Chinese version, very easy to use

Zend Studio 13.0.1
Powerful PHP integrated development environment

Dreamweaver CS6
Visual web development tools

SublimeText3 Mac version
God-level code editing software (SublimeText3)
Hot Topics
 1393
1393
 52
1209
24
52
1209
24

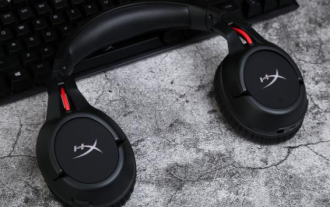 Hyperx headset microphone has no sound
Feb 16, 2024 am 09:12 AM
Hyperx headset microphone has no sound
Feb 16, 2024 am 09:12 AM
The quality of hyperx headphones has always been very good, but some users find that the microphone of the headphones has no sound when using it. There are many possible reasons for this situation. Here are some of them. Several kinds. There is no sound from the hyperx headset microphone. 1. Connect and check whether the microphone is fully inserted into the headphone jack. You can try plugging and unplugging it a few times. 2. If other equipment conditions permit, you can plug the headset into other normally operating equipment to see if it can be used normally and whether the audio link is normal. 3. Audio settings Check the audio settings to make sure that the speakers and microphone are enabled normally and not muted or at a low volume. 4. To disable the software, you can try disabling the audio adapter.
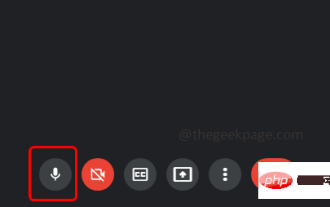 Your microphone is muted by system settings on Google Meet on Windows 10/11
May 12, 2023 pm 11:58 PM
Your microphone is muted by system settings on Google Meet on Windows 10/11
May 12, 2023 pm 11:58 PM
GoogleMeet is used for communication and collaboration purposes. High-quality video conferences can be held where people can talk and share their views. But a few users face microphone issues, and the most common error is "Your microphone has been muted by the system setting." If this happens, others will not be able to hear you. But don’t panic this problem can be solved. A few reasons for microphone issues are, your microphone gets muted, changes in microphone settings, outdated drivers, etc. In this article, we will see different ways on how to fix “Your microphone is muted by the system” Settings issue in Windows 10. Method One: Check if the Microphone is Mute Before jumping into different solutions, just check the screen when you are in a meeting
 How do I use text-to-speech and speech recognition technology on Windows 11?
Apr 24, 2023 pm 03:28 PM
How do I use text-to-speech and speech recognition technology on Windows 11?
Apr 24, 2023 pm 03:28 PM
Like Windows 10, Windows 11 computers have text-to-speech functionality. Also known as TTS, text-to-speech allows you to write in your own voice. When you speak into the microphone, the computer uses a combination of text recognition and speech synthesis to write text on the screen. This is a great tool if you have trouble reading or writing because you can perform stream of consciousness while speaking. You can overcome writer's block with this handy tool. TTS can also help you if you want to generate a voiceover script for a video, check the pronunciation of certain words, or hear text aloud through Microsoft Narrator. Additionally, the software is good at adding proper punctuation, so you can learn good grammar as well. voice
 Error 0x80049dd3 error occurs in Windows 10/11
Apr 29, 2023 pm 11:28 PM
Error 0x80049dd3 error occurs in Windows 10/11
Apr 29, 2023 pm 11:28 PM
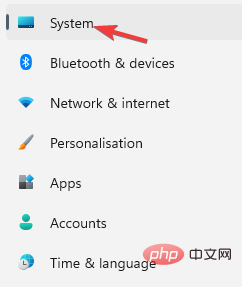
Error code 0x80049d is bound to the voice input function. Some users have encountered this issue when trying to voice type in Windows 11. Mainly when the audio device driver is faulty or it does have an old, corrupt driver, this error message will show "There is a problem with 0x80049dd3". So, don’t waste any more time and follow the steps below to quickly resolve the issue and start using your microphone again. Fix 1 – Run the Recording Audio Troubleshooter You should run the Recording Audio Troubleshooter so that it can identify the issue and resolve it accordingly. 1. Open Settings by right-clicking on the Windows icon and clicking "Settings". 2. Once you reach the "Settings" page, click "System" settings. 3. In the right window
 Logitech headset microphone is silent, please fix it
Jan 18, 2024 am 08:03 AM
Logitech headset microphone is silent, please fix it
Jan 18, 2024 am 08:03 AM
Some users may encounter the problem of no sound from the headset microphone when using Logitech drivers. Check whether the headset microphone cable is plugged in properly or whether the headset is muted. This can be solved by turning it on in the settings. There is no sound from the Logitech-driven headset microphone: 1. Users need to first check whether the headset microphone is plugged into the wrong wire. 2. If it is wrong, just plug it in again. If not, then you need to check whether the headset microphone is broken. 3. Open "Settings" and search for "Control Panel" in "Settings". 4. Select "Hardware and Sound". 5. Click "Manage Audio Devices". 6. After entering the interface, click the "Recording" option and double-click "Microphone". 7. After entering, click "Level" to increase the microphone volume to the maximum. If it is not loud enough, you can strengthen the microphone settings. 8. Last look
 Discord microphone not working in Windows 11? Apply these fixes
Apr 28, 2023 pm 04:04 PM
Discord microphone not working in Windows 11? Apply these fixes
Apr 28, 2023 pm 04:04 PM
Discord is a popular platform not only among gamers but also among people who want to interact with like-minded people. However, many people have reported that the Discord microphone is not working in Windows 11. Discord allows you to connect with other users individually or in groups via text, audio, and video. While the former works fine, microphone issues may affect your audio and video interactions. But the fix here is still quite simple and you can easily fix Discord microphone not working issue in Windows 11. Please read the following section to find out everything you need to know about this issue. Why does Discord microphone work on Window?
 How to Fix Acer Swift 3 Laptop Microphone Not Working
May 01, 2023 pm 10:40 PM
How to Fix Acer Swift 3 Laptop Microphone Not Working
May 01, 2023 pm 10:40 PM
This can be annoying if your AcerSwift3 laptop microphone is not detected and there is no sound. Although the microphone appears active, you won't hear anything at all while playing or recording audio, playing games on apps like Discord, or communicating on Skype. There may be different reasons that may trigger this issue, some common ones include outdated or corrupted drivers, etc. This article will cover all these issues and more and provide you with different solutions to fix Acer Swift 3 built-in microphone not working issue. What should I do if the AcerSwift3 microphone is not detected? 1. Run Record Audio Troubleshooter while pressing
 How to solve the microphone mute problem in Win10 Knives Out
Jan 11, 2024 am 10:24 AM
How to solve the microphone mute problem in Win10 Knives Out
Jan 11, 2024 am 10:24 AM
Knives Out is a very popular game on Windows 10 computers. Many friends like to play it with their friends, but many of them encounter the situation where the microphone has no sound, so what should I do? Let’s take a look at the solution below. What to do if there is no sound from the Knives Out microphone in Windows 10: 1. Enter the Knives Out game interface and turn on the microphone switch. 2. Enter the game settings and check "My Microphone" in the sound settings. 3. If it still doesn’t work, click Start in the lower left corner and open the “Control Panel”. 4. After opening, click "Hardware and Sound" and then "Manage Audio Devices". 5. Select the "Recording" tab and double-click "Microphone". 6. Click "Use this device". 7. Then turn up the volume.
