

How to reassemble a Lenovo computer?

Do you want to know how to reassemble a Lenovo computer? PHP editor Zimo has carefully compiled a detailed guide to help everyone solve this problem. Whether you want to upgrade components, clean out dust, or troubleshoot a technical issue, this article will guide you step-by-step through the process of rebuilding your Lenovo computer. Read on to learn the detailed steps to reinstall your Lenovo computer and make your computer look like new again.

How to reassemble a Lenovo computer?
Lenovo computer reinstallation system steps:
1. Make a U disk boot disk, and then copy the downloaded Lenovo win7 system iso file directly to the GHO directory of the U disk:
2. Insert the U disk into the Lenovo computer. After restarting, keep pressing the F12 or Fn F12 shortcut keys to open the boot menu. Select the U disk item and press Enter:
3. Boot from the U disk and enter this In the main menu, press number 2 or press the up and down arrow keys to select Enter to start the pe system:
4. For users who do not need partitions, go to step 6 directly. If you want to completely repartition, you need to back up all files, and then Double-click to open it in the PE desktop, right-click the hard disk, and select:
5. Set the number and size of partitions. The primary partition is 35G or more, and it is recommended to be 50G or more. If it is a solid-state drive, check "Align Partitions". 4k alignment, click OK to perform the hard disk partition process:
6. After partitioning, open and select the Lenovo win7 system iso image. At this time, the gho file will be extracted. Click the drop-down box and select the gho file:
7. Then click "Restore Partition", select the location of the system disk, usually the C drive, or select according to the "Volume Label" and disk size, click OK:
8. A prompt box will pop up, check " "Restart after completion" and "Boot Repair", click Yes to start the process of reinstalling the system:
9. Go to this interface, perform the operation of reinstalling the Lenovo win7 system to the C drive, and wait patiently for the progress bar to be executed. Completed:
10. After the operation is completed, the Lenovo computer will automatically restart. At this time, pull out the U disk and boot into this interface to reinstall the win7 system and system configuration process:
11. Finally, boot into Lenovo's new win7 system desktop, and the Lenovo computer win7 system will be reinstalled.
How to reassemble the software of greatwall computer?
First press the MENU button, then select left and right, there is one with English and Chinese, that is the language setting, then select Chinese, then save and exit, reopen the option, restore factory settings, or look at Korean .Open the web page translation yourself and find the corresponding factory settings to restore it.
The above is the detailed content of How to reassemble a Lenovo computer?. For more information, please follow other related articles on the PHP Chinese website!

Hot AI Tools

Undresser.AI Undress
AI-powered app for creating realistic nude photos

AI Clothes Remover
Online AI tool for removing clothes from photos.

Undress AI Tool
Undress images for free

Clothoff.io
AI clothes remover

AI Hentai Generator
Generate AI Hentai for free.

Hot Article
Hot Tools

Notepad++7.3.1
Easy-to-use and free code editor

SublimeText3 Chinese version
Chinese version, very easy to use

Zend Studio 13.0.1
Powerful PHP integrated development environment

Dreamweaver CS6
Visual web development tools

SublimeText3 Mac version
God-level code editing software (SublimeText3)
Hot Topics


 How to install WinNTSetup into Win11 system_How to install WinNTSetup into Win11 system
May 08, 2024 am 11:19 AM
How to install WinNTSetup into Win11 system_How to install WinNTSetup into Win11 system
May 08, 2024 am 11:19 AM
First download the latest Win11 system ISO image, and then in Win10 system, you can directly right-click on the downloaded ISO image file and select [Load]; if it is under WinPE, WinXP, or Win7 system, you need to use the virtual optical drive tool to load the ISO Image; or you can directly decompress the ISO image file without using a virtual optical drive. Then run WinNTSetup. The software interface is as shown in the figure: First locate the location of the install.wim file. You can find the install.wim file in the sources directory of the Win11 ISO image loaded or decompressed by the virtual optical drive. Then set the location of the boot disk and installation disk. Generally, you are going to put W
 Specific steps for expanding the C drive using the partition tool diskgenius
May 08, 2024 pm 08:04 PM
Specific steps for expanding the C drive using the partition tool diskgenius
May 08, 2024 pm 08:04 PM
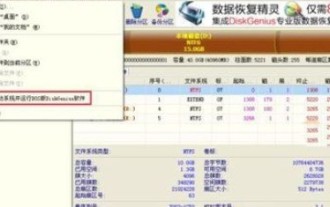
First, download and install the [DiskGenius] tool on your computer, then open the tool, then click [File Menu] at the top, and then click [Restart the system and run the DiskGenius software], as shown in the figure. Then click [OK] in the pop-up prompt box, as shown in the figure. After that, the computer will restart and then enter the Diskgen hard disk partition interface. At this time, if we want to expand the C drive, we only need to right-click the D drive next to the logical partition and click "Adjust Partition Size" in the pop-up menu, as shown in the figure shown. Then you need to adjust the size of the D drive partition. For example, the current capacity of the D drive is 14.99GB, as shown in the figure below. At this time, we can adjust the installment of the D drive. For example, if we want to allocate 1.03GB to the C drive, we only need to allocate 1.03GB to the C drive.
 Tutorial on assembling a computer and installing a system? How to install win11 system when assembling a computer?
Apr 27, 2024 pm 03:38 PM
Tutorial on assembling a computer and installing a system? How to install win11 system when assembling a computer?
Apr 27, 2024 pm 03:38 PM
Tutorial on assembling a computer and installing a system? Nowadays, the system installation for assembling computers is very simple and convenient, and only requires a CD. First enter the bios settings, set the computer to boot first with the CD-ROM drive, then restart the computer and load the system CD into the CD-ROM drive. The CD will automatically enter the installation state. At this time, you only need to manually repartition the partitions, and the rest will be completed automatically. How to install win11 system when assembling a computer? 1. First, we need to download a win11 image file from this site before installing it. 2. The win11 image file has undergone a large number of professional tests to ensure stable installation and smooth operation. 3. After the download is completed, load the folder in the download path and run the "windowssetup" process in it.
 How to skip the network installation system in win11 24h2? The latest version of win11 24h2 skips the online installation tutorial
May 03, 2024 pm 09:13 PM
How to skip the network installation system in win11 24h2? The latest version of win11 24h2 skips the online installation tutorial
May 03, 2024 pm 09:13 PM
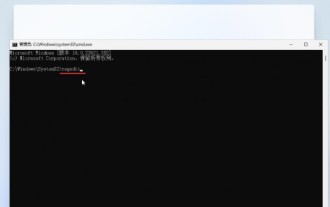
The 24h2 version is the latest operating system released by Microsoft. I believe many users have seen some download packages on the Internet. So how can win1124h2 skip the Internet installation system? Let this site carefully introduce the latest version of win1124h2 to users. Skip the Internet installation tutorial. The latest version of win1124h2 skips the online installation tutorial. Method 1: Skip by modifying the registry. 1. Press the Shift+F10 keys to bring up the cmd command prompt window and enter the following command: regedit and press Enter to quickly open the registry editor. If users feel that the 24h2 version is not used to the operation, they can click on the 23h2 version below to reinstall it. Win1123H22263
 Huawei mobile phone USB sharing network to computer
May 08, 2024 am 08:25 AM
Huawei mobile phone USB sharing network to computer
May 08, 2024 am 08:25 AM
How to connect a Huawei phone to a computer via USB to access the Internet. First, we open the phone settings and search for "HDB". Then we click to open "Mobile Network Sharing" in More. Then we can click to open "USB Sharing Network" in the pop-up window. Summary First, connect the Huawei mobile phone to the computer through the data cable. Open "Settings" on your phone and enter the settings interface. Click "Personal Hotspot", select "USB tethering" and click the switch button at the back to turn it on. First click "Settings About Phone", then click "Version Number" 7 times in succession. You will be prompted to enter developer mode. Then return to the "Settings" list, "Developer Options" will appear, then click to enter "Developer Options", turn on the "USB Debugging" switch, and click
 How to install Windows system on tablet computer
May 03, 2024 pm 01:04 PM
How to install Windows system on tablet computer
May 03, 2024 pm 01:04 PM
How to flash the Windows system on BBK tablet? The first way is to install the system on the hard disk. As long as the computer system does not crash, you can enter the system and download things, you can use the computer hard drive to install the system. The method is as follows: Depending on your computer configuration, you can install the WIN7 operating system. We choose to download Xiaobai's one-click reinstallation system in vivopad to install it. First, select the system version suitable for your computer, and click "Install this system" to next step. Then we wait patiently for the installation resources to be downloaded, and then wait for the environment to be deployed and restarted. The steps to install win11 on vivopad are: first use the software to check whether win11 can be installed. After passing the system detection, enter the system settings. Select the Update & Security option there. Click
 What is the appropriate temperature for playing Apex computer?
May 06, 2024 am 09:31 AM
What is the appropriate temperature for playing Apex computer?
May 06, 2024 am 09:31 AM
What is the appropriate temperature for playing Apex computer? 80 degrees is suitable. When running large-scale games or playing high-definition videos, the temperature can reach about 80°C. Generally, it is considered normal to not exceed 90°C under high load. Graphics cards are generally the hardware that generates the most heat among computer hardware. Generally, it is normal for the temperature of a graphics card to be around 30℃-80℃. Due to external temperature, it is normal for most graphics card temperatures to be between 50℃-85℃ in summer. range, if you are running large-scale 3D games or playing high-definition videos for a long time, the highest temperature may reach about 95°C. This temperature range will affect the life of the computer hardware. No matter how high the temperature is, you must consider strengthening heat dissipation and cleaning dust. How to play with the apex handle and the computer ? Method/step-by-step reading: 1. Use wired or wireless
 Computer settings to automatically restart
Apr 26, 2024 pm 06:10 PM
Computer settings to automatically restart
Apr 26, 2024 pm 06:10 PM
How to set the computer to automatically restart 1. Find the computer on your computer desktop and right-click the mouse. In the pop-up window, we find properties and click. After entering the system properties, we select. 2. You can set it in the task scheduler to set up automatic startup: right-click this computer, select Manage, and enter the page. Expand System Tools, click Task Scheduler, and click Create Basic Task on the right. 3. How to set the computer to automatically restart when a call comes in. First, restart your computer and click Restart with the left button of the mouse. Because the XP system was used for testing, the startup time is very short. Press and hold DEL during startup to enter the BIOS interface. The BIOS interface is shown in the figure below. This is the main BIOS interface. How to set the computer to automatically start after a power outage. First, restart
