 Software Tutorial
 Computer Software
 How to record video in Tencent Conference? -Tencent conference video recording method
How to record video in Tencent Conference? -Tencent conference video recording method
Troubled by the inability to record the screen locally? Stop worrying! PHP editor Youzi brings you a concise and clear guide to help you easily start local screen recording and say goodbye to tedious operation steps. Keep reading for our detailed tutorial as we guide you step-by-step through the setup, making it easy for you to capture great footage and have fun recording!
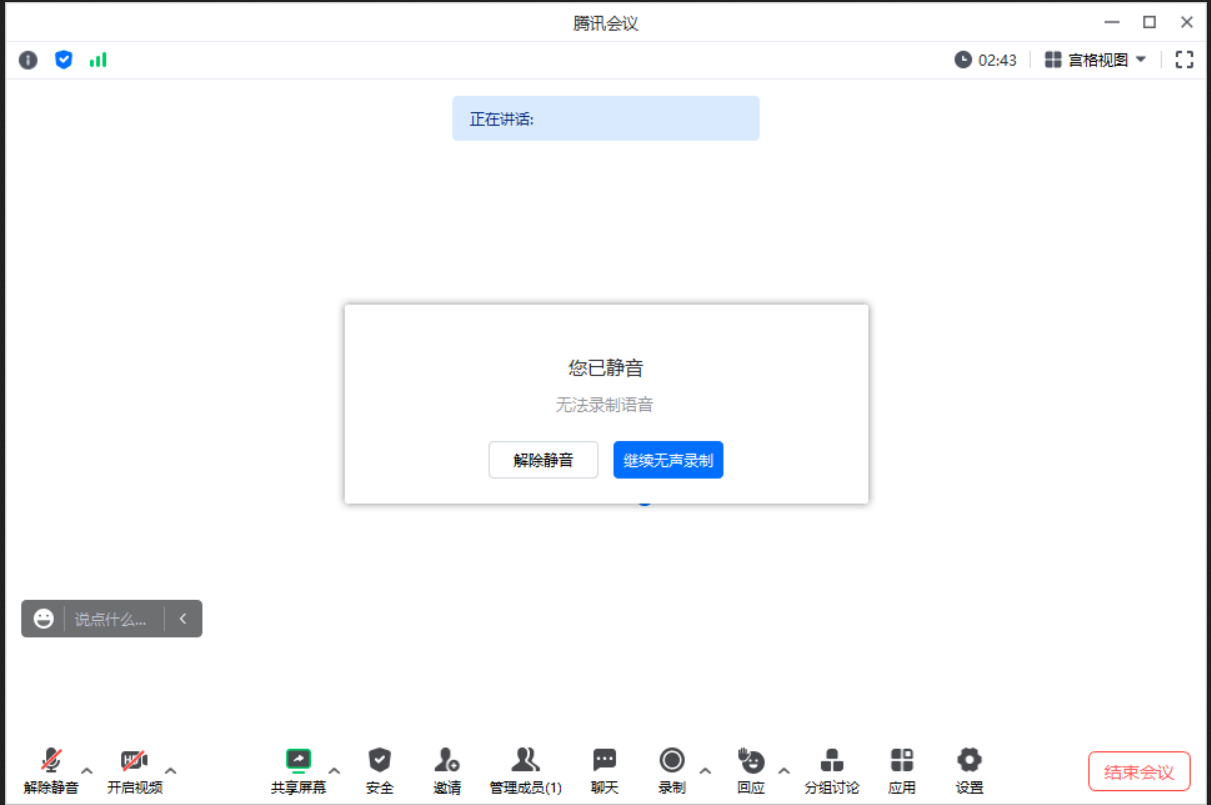
① During the meeting, click [Recording]->[Local Recording]->[Open] on the bottom toolbar to start local recording and notify all participants in the meeting.

② If the user is currently in a mute state, the user is reminded to unmute or maintain silent recording, and start recording after the selection is completed;
③If the user is currently in the open microphone state, start recording normally.
2. Pause and end local recording
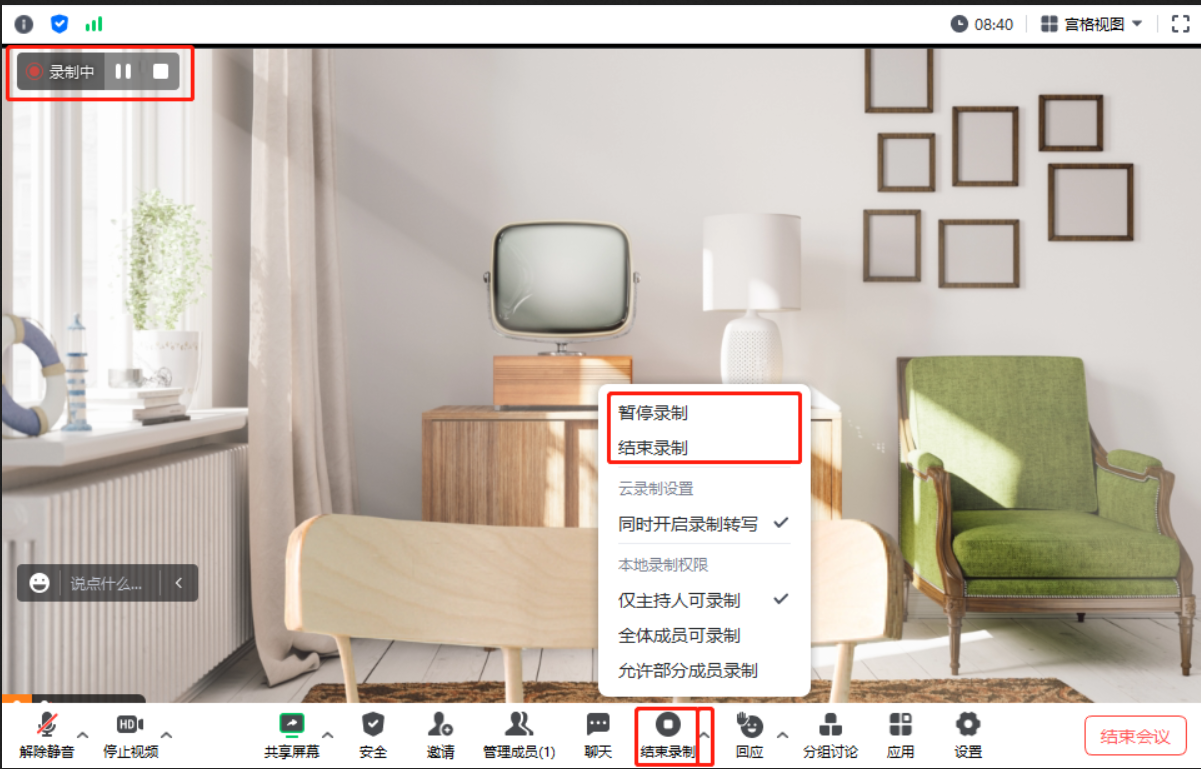
① After entering and starting recording, [Recording] on the bottom toolbar changes to [End Recording].
②The recording status is displayed in the upper left corner of the main window, with control icons for pausing recording and ending recording.
③Click the "triangle" icon to the right of [End Recording] on the bottom toolbar, and add [Pause Recording] and [End Recording] to the expanded menu bar.
④When recording is paused, [Pause] changes to [Resume Recording].
Pause recording: Click to pause the current recording.
Resume recording: Resume recording status.
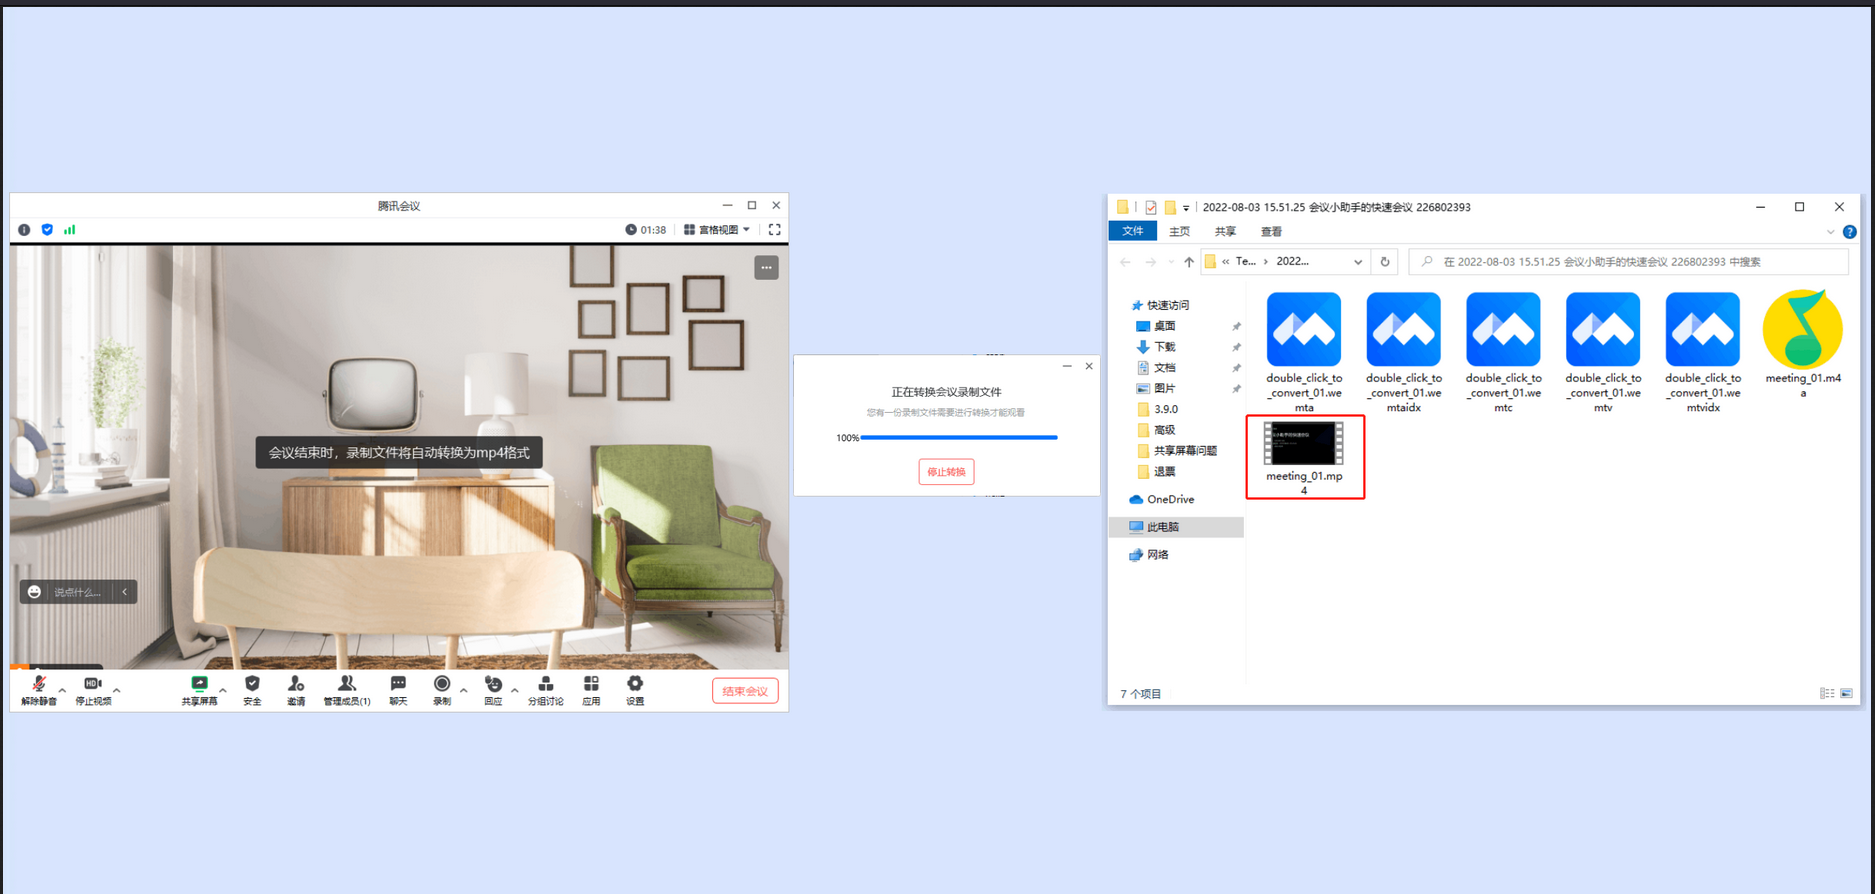
End recording: End and exit the recording state, and prompt "When the meeting ends, the recording file will be automatically converted to MP4 format."
⑤ In the member list, all members will be able to see the user's recording status.
3. View local recording
①After the meeting, the system will automatically transcode the recording to MP4 format for you, and after the transcoding is completed, open the folder where the recorded file is saved for quick viewing.
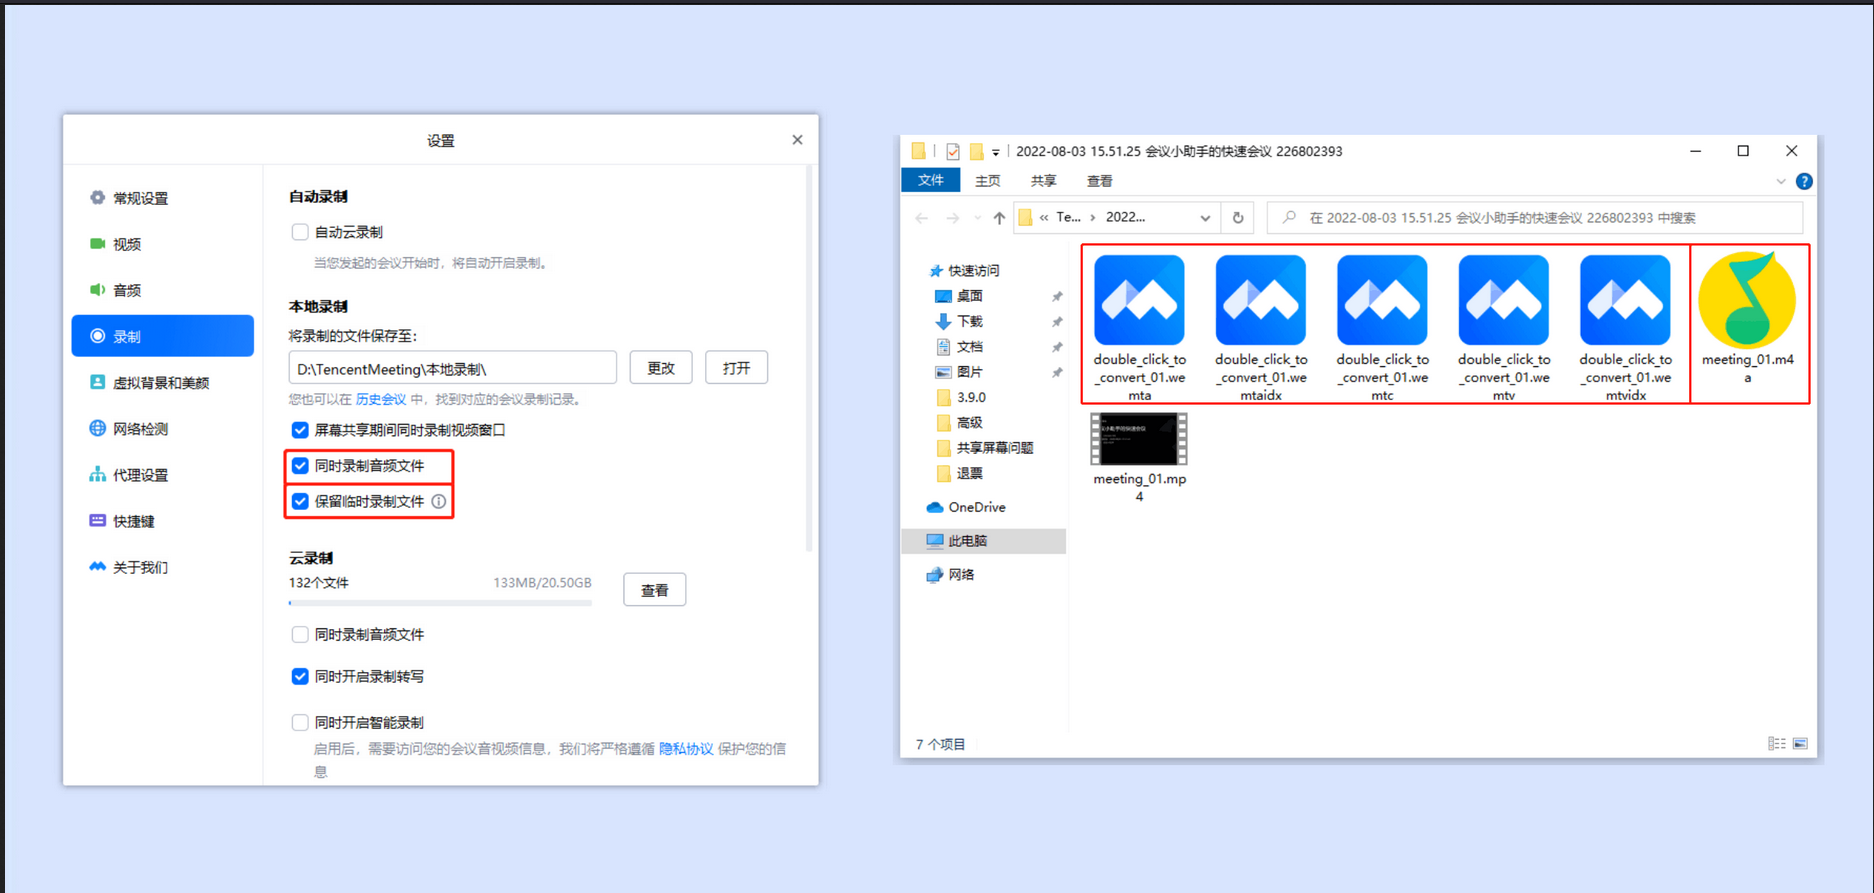
② If you check [Record audio files at the same time] before turning on local recording, after the meeting ends, the recorded voice will be formed into a separate audio file and saved in the folder;
③If you check [Keep temporary recording files] before starting local recording, the original recording files (formats: wemta, wemta.idx, wemtv, wemtv.idx) before transcoding will be saved after the meeting. You can transcode manually by double-clicking the original recording file.
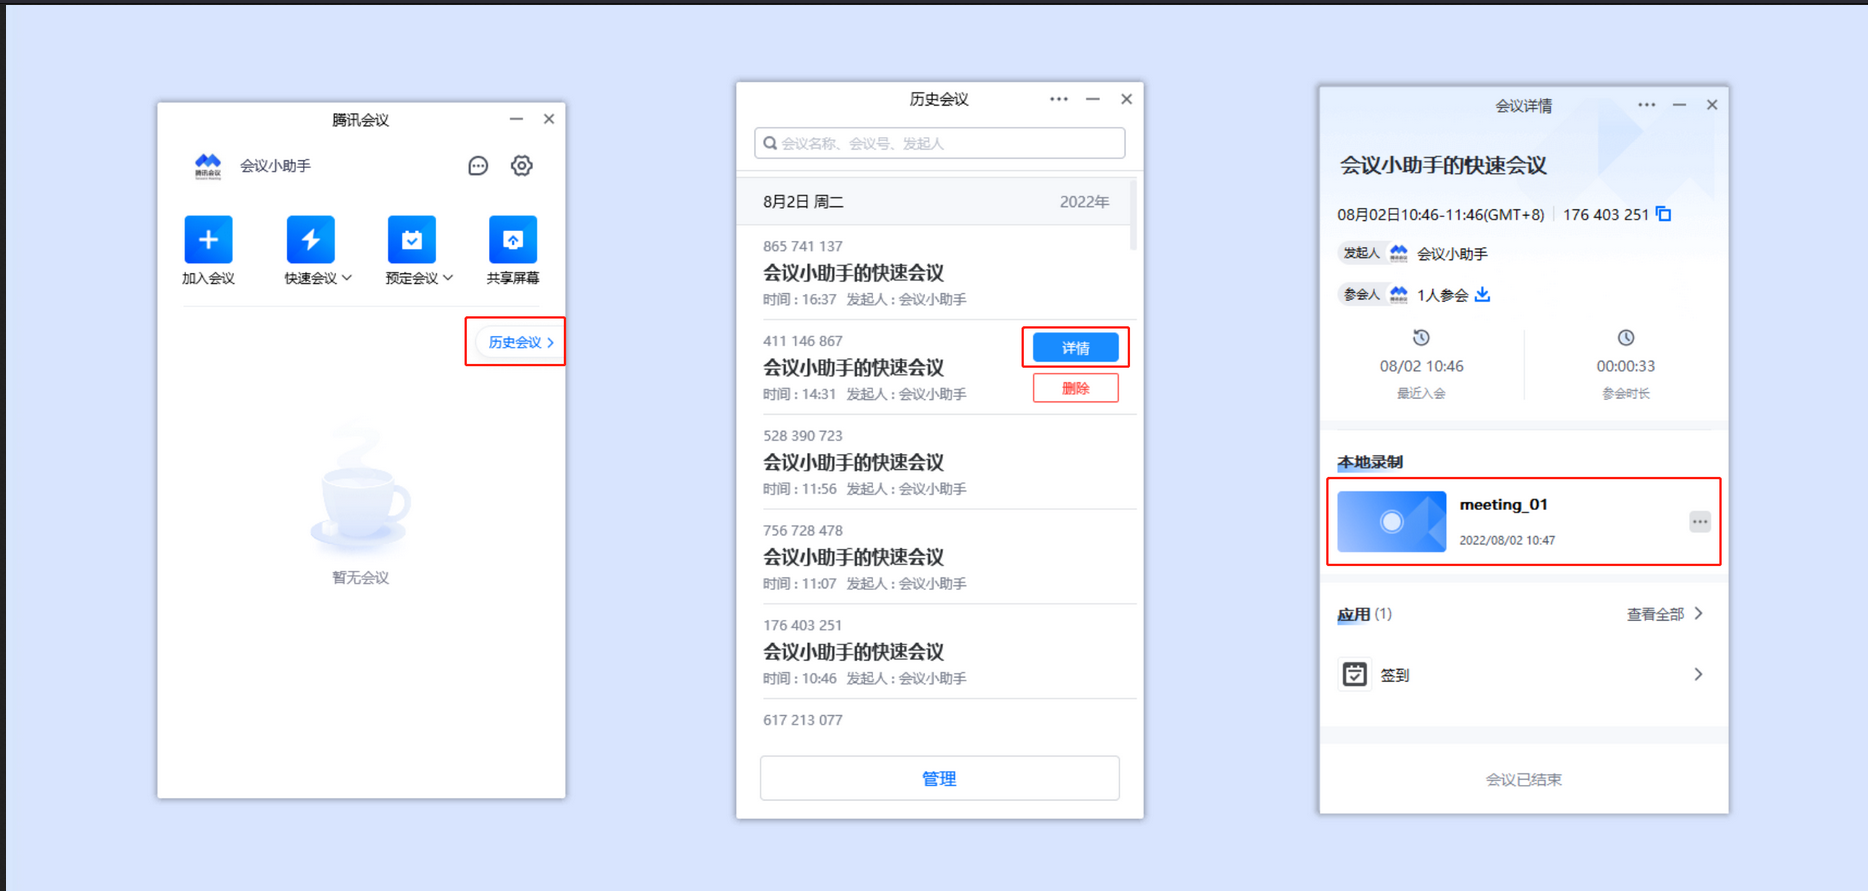
④ You can also click [History Meeting] on the client's main interface -> Select the meeting and click [Details] -> Click [Local Recording] on the meeting details page to view the recording content.
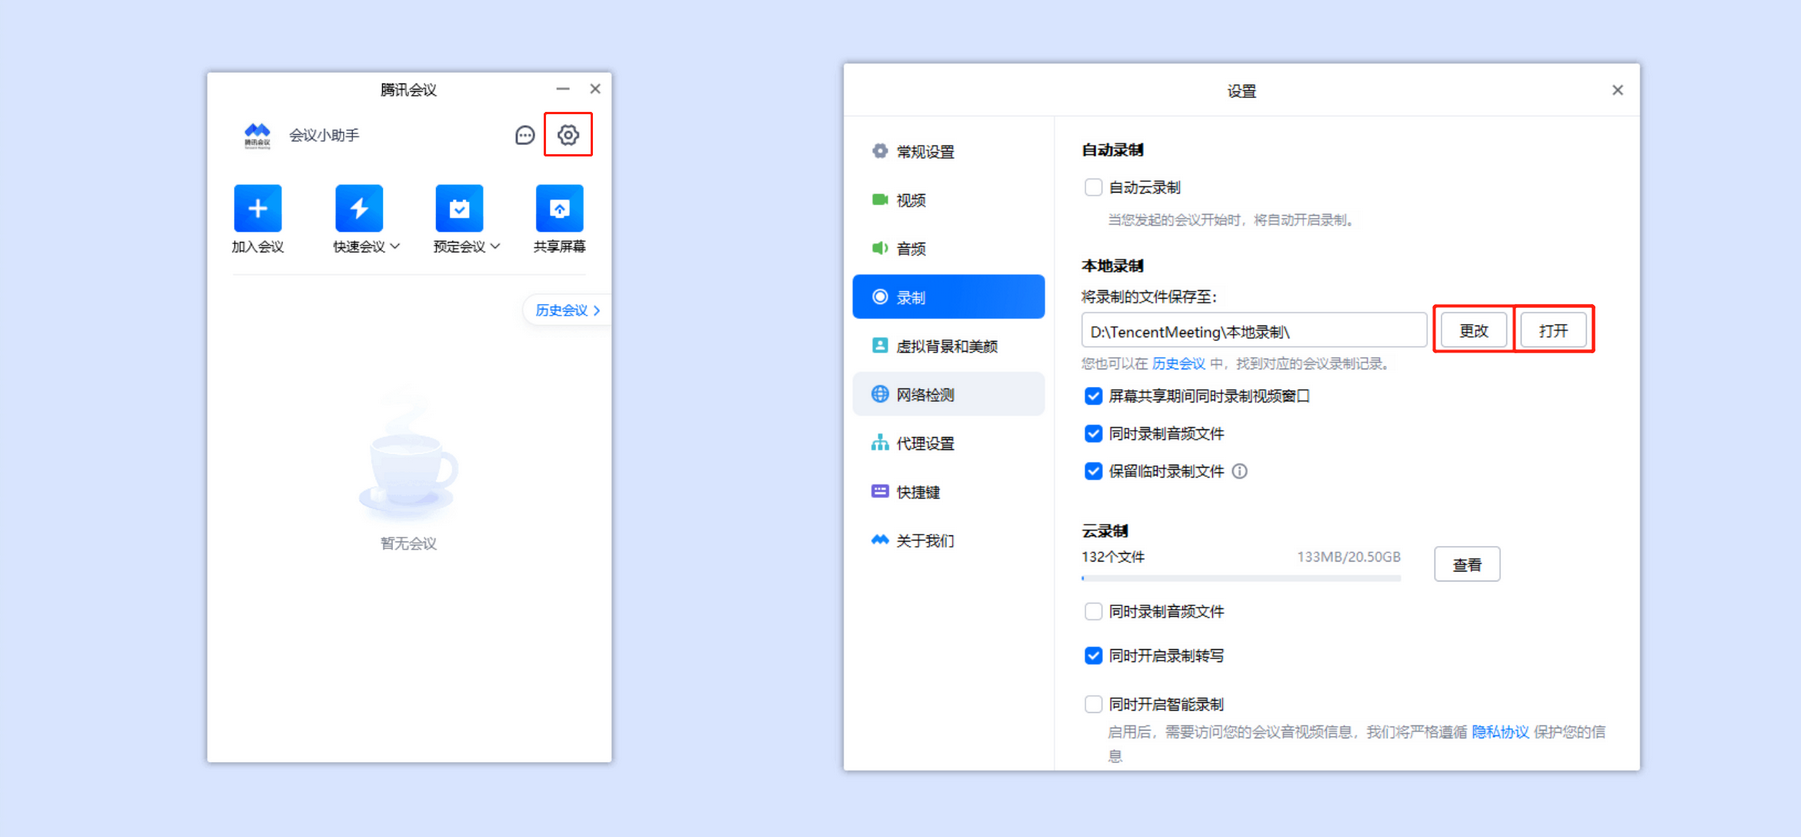
⑤You can click [Settings]->[Recording]->Local Recording-[Change] on the right side of the recording file saving address in the client's main interface to modify the saving address. After modification, all your subsequent local recording files will be saved to this address. in; click [Open] to quickly access local recording content.
The above is the detailed content of How to record video in Tencent Conference? -Tencent conference video recording method. For more information, please follow other related articles on the PHP Chinese website!

Hot AI Tools

Undresser.AI Undress
AI-powered app for creating realistic nude photos

AI Clothes Remover
Online AI tool for removing clothes from photos.

Undress AI Tool
Undress images for free

Clothoff.io
AI clothes remover

AI Hentai Generator
Generate AI Hentai for free.

Hot Article

Hot Tools

Notepad++7.3.1
Easy-to-use and free code editor

SublimeText3 Chinese version
Chinese version, very easy to use

Zend Studio 13.0.1
Powerful PHP integrated development environment

Dreamweaver CS6
Visual web development tools

SublimeText3 Mac version
God-level code editing software (SublimeText3)

Hot Topics
 how to unlink rockstar account from steam
Mar 11, 2025 pm 07:39 PM
This article explains how to unlink a Rockstar Games Social Club account from Steam. The process involves using the Rockstar Games Launcher to manage linked accounts, removing the Steam connection without impacting game progress or future Steam purc
![[PROVEN] Steam Error e87 Fix: Get Gaming Again in Minutes!](https://img.php.cn/upload/article/202503/18/2025031817560457401.jpg?x-oss-process=image/resize,m_fill,h_207,w_330) [PROVEN] Steam Error e87 Fix: Get Gaming Again in Minutes!
Mar 18, 2025 pm 05:56 PM
[PROVEN] Steam Error e87 Fix: Get Gaming Again in Minutes!
Mar 18, 2025 pm 05:56 PM
Article discusses causes of Steam Error e87, including network issues, security software, server problems, outdated clients, and corrupted files. Offers prevention and solution strategies.[159 characters]
 why is steam downloading so slow
Mar 11, 2025 pm 07:36 PM
Slow Steam downloads stem from various factors: network congestion (home or ISP), Steam/game server issues, limited bandwidth, high latency, and computer hardware limitations. Troubleshooting involves checking internet speed, optimizing Steam settin
 Steam Error e87: What It Is & How to Fix It
Mar 18, 2025 pm 05:51 PM
Steam Error e87 occurs during Steam client updates or launches due to connection issues. Fix it by restarting devices, checking server status, changing DNS, disabling security software, clearing cache, or reinstalling Steam.
 Easy Fix: Steam Error e87 Explained & Solved
Mar 18, 2025 pm 05:53 PM
Steam Error e87, caused by connectivity issues, can be fixed without reinstalling by restarting, checking internet, and clearing cache. Adjusting Steam settings helps prevent future occurrences.
 how to add page numbers in google docs
Mar 14, 2025 pm 02:57 PM
The article details how to add, customize, start from a specific page, and remove page numbers in Google Docs using step-by-step instructions.
 How to Fix Steam Error Code e87: The ULTIMATE Guide
Mar 18, 2025 pm 05:51 PM
Article discusses fixing Steam Error Code e87, caused by network issues, corrupt files, or client problems. Provides troubleshooting steps and prevention tips.
 Steam Error e87: Why It Happens & 5 Ways to Fix It
Mar 18, 2025 pm 05:55 PM
Steam Error e87 disrupts gaming on Steam due to connectivity issues. The article discusses causes like unstable internet and server overload, and offers fixes like restarting Steam and checking for updates.


