

ps中常见线条及边框设计制作

在网页与多媒体界面设计过程中,经常会使用到一些线条及边框设计,以对界面区域进行划分,特别是在网页中,线条及边框设计比较多。本小节将介绍网页中常用线条及边框设计的制作方法。
一、虚线的制作
在网页中,虚线是一种最常见的线条及边框设计,它一方面可以使网页结构清晰,另一方面也对画面起修饰与点缀作用。
(1)执行“文件>新建”菜单命令,如下图所示。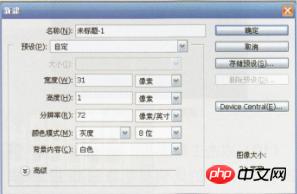
(2)双击工具箱中的“抓手工具”,将图像放大显示。
(3)选择工具箱中的“矩形选框工具”在工具选项栏中设置“羽化”值为0,在图像窗口中拖动鼠标,在中间建立一个像素的选择区域,然后填充为黑色,如下图所示。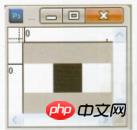
(4)按CtrL+A快捷键全选图像,执行菜单栏中的“编辑>定义匿案”命令,在弹出的“定义图案”对话框中单击“确定”按钮,则定义了图案。
(5)重新建立个图像文件,然后选择工具中的“单行选框工具”,建立一个单行选择区域,在执行菜单栏中的“编辑>填充”命令,在弹出的“填充”对话框中选择刚刚定义的图案进行填充,结果就会产生虚线,将虚线应用到网页中的效果如下图所示。
二、立体线条的制作
使网页中的线条及边框设计具有一种独立感,可以极大地丰富网页的视觉效果,创建更活跃的网页界面,这里介绍一种独立感线条的制作方法。
(1)执行“文件>新建”菜单命令,创建一个尺寸为9.5cm×5cm、分辨率为72像素/英寸的图像文件。
(2)设置背景色的RGB值为95、98、1 01,将图像背景色填充为灰色。
(3)将图像以200%的比例放大显示。
(4)选择工具相中的“铅笔工具”,在铅笔工具选项栏中设置参数,如下图所示。

(5)打开“画笔”面板,设置参数,如下图所示。

(6)创建一个新图层“图层1”。
(7)设置前景色的RGB值为1 93、1 94、198,按住Shift键的同时在画面中水平拖动鼠标,绘制一条两个宽度的虚线,如下图所示。

(8)创建一个新图层“图层2”,然后设置前景色为黑色,在按住Shift键的同时在灰色线条的上方水平拖动鼠标,再绘制出一条相同长度的黑色虚线。
(9)选择工具箱中的“移动工具”,然后使用方向键微移“图层2”的黑色虚线,使“图层1”与“图层2”中的两条虚线产生交错效果,两条虚线偏移1个像素,如下图所示。

(10)双击工具箱中的“放大镜工具”,使图像以1 00%的比例显示,则产生了立体效果,如下图所示。

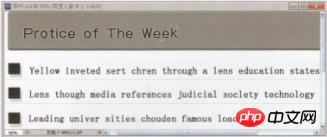
如果将这样的立体线条应用到网页设计中,将产生很好的视觉效果,如下图所示,将这种线条重复使用,可以形成大面积的分割区域。
三、斜纹线条的制作
斜纹线条多用作网页中某一功能区的底纹使用,使用它作为分割线的情况比较少见。斜纹线条的制作主要运用了Photoshop软件的自定义图案技术,具体操作步骤如下。
(1)执行“文件>新建”菜单命令,创建个尺寸为9.5cm x 5cm、分辨率为72像素/英寸的图像文件。
(2)设置背景色的RGB值为95、98、1 01,将图像背景填充为灰色。
(3)将图像以1600%的比例放大显示。
(4)创建一个新图层“图层1”。
(5)选择工具箱中的“铅笔工具”,在铅笔工具选项栏中设置参数,如下图所示。

(6)设置前景色的RGB值为1 90、1 91、1 92,在画面中单击,绘制出两条平行的,由1 0个像素组成的倾斜线条,如下图所示。

(7)选择工具箱中的“矩形工具”,在工具选项栏中设置“羽化”值为O,然后在画面中拖曳鼠标,创建一个矩形选择区域,然后在“图层”面板中隐藏“背景”层,如下图所示。

(8)执行“编辑>定义图案”菜单命令,在弹出的“图案名称”对话框中输入名称,然后单击“确定”按钮,如下图所示。

(9)按Ctrl+A快捷键全选图像,然后按Delete键删除选择区域内的图像。
(1 0)选择工具箱中的“矩形选框工具”,在画面中创建一个矩形选择区域。
(1 1)选择工具箱中的“油漆桶工具”,在“油漆桶工具”选项栏中单击,选择刚刚存储的图案名称,如下页图所示。

(1 2)在选择区域内单击,填充图案,然后按Ctrl+D快捷键取消选择区域效果,如下图所示。

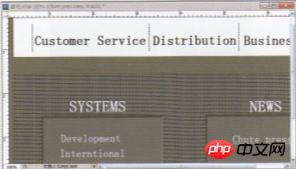
将这种斜纹线条应用到网页设计中,既可以作为功能区的底纹,也可以作为一种点缀,如下图所示,我们将这种斜纹线条应用在导航条右侧的空白区上,平衡了整个页面,并且增强了节奏感,页面更加和谐、清晰。

四、交叉纹线条的制作
与斜纹线条~样,交叉纹线条也多用于网页功能模块的底纹,制作方法与思路跟斜纹线条基本一致,关键是准确定义好图案样本,这一点很重要。
(1)执行“文件>新建”菜单命令,创建一个尺寸为9.5cm×5cm、分辨率为72像素/英寸的图像文件。
(2)设置背景色的RGB值为95、98、101,将背景色填充为灰色。
(3)将图像以1 600%的比例放大显示。
(4)创建一个新图层“图层1”。
(5)选择工具箱中的“铅笔工具”,在“铅笔工具”选项栏中设置参数,如下图所示。

(6)设置前景色的RGB值为1 90、1 91、1 92,在画面中单击,绘制出一个由单个像素组成的图像,如下图所示。

(7)选择工具箱中的“矩形选框工具”,在工具选项栏中设置“羽化”值为O,在画面中拖动鼠标,创建一个正方形选择区域,如下图所示,将图像选中,然后在“图层”面板中隐藏“背景”层。
(8)执行“编辑>定义图案”菜单命令,在弹出的“图案名称”对话框中输入名称,然后存储图案。
(9)按Delete键删除选择区域内的图像,然后显示“背景”层,重新使用“矩形选框工具”在画面中创建一个矩形选择区域。
(1 O)选择工具箱中的“油漆桶工具”,在油漆桶工具选项栏中单击,选择刚刚存储的图案。
(11)在选择区域内单击,填充图案,效果如下图所示。

在网页设计中,我们使用交叉纹线条作为导航条的底纹,使得页面显得很清净而又不单调,如下图所示,与其他的按钮式导航条相比,这种设计具有制作方法简单、效果突出的特点。


Hot AI Tools

Undresser.AI Undress
AI-powered app for creating realistic nude photos

AI Clothes Remover
Online AI tool for removing clothes from photos.

Undress AI Tool
Undress images for free

Clothoff.io
AI clothes remover

AI Hentai Generator
Generate AI Hentai for free.

Hot Article
Hot Tools

Notepad++7.3.1
Easy-to-use and free code editor

SublimeText3 Chinese version
Chinese version, very easy to use

Zend Studio 13.0.1
Powerful PHP integrated development environment

Dreamweaver CS6
Visual web development tools

SublimeText3 Mac version
God-level code editing software (SublimeText3)
Hot Topics


 How to adjust window border settings on Windows 11: Change color and size
Sep 22, 2023 am 11:37 AM
How to adjust window border settings on Windows 11: Change color and size
Sep 22, 2023 am 11:37 AM
Windows 11 brings fresh and elegant design to the forefront; the modern interface allows you to personalize and change the finest details, such as window borders. In this guide, we'll discuss step-by-step instructions to help you create an environment that reflects your style in the Windows operating system. How to change window border settings? Press + to open the Settings app. WindowsI go to Personalization and click Color Settings. Color Change Window Borders Settings Window 11" Width="643" Height="500" > Find the Show accent color on title bar and window borders option, and toggle the switch next to it. To display accent colors on the Start menu and taskbar To display the theme color on the Start menu and taskbar, turn on Show theme on the Start menu and taskbar
 How to make custom borders in Microsoft Word
Nov 18, 2023 pm 11:17 PM
How to make custom borders in Microsoft Word
Nov 18, 2023 pm 11:17 PM
Want to make the front page of your school project look exciting? Nothing makes it stand out from other submissions like a nice, elegant border on the homepage of your workbook. However, the standard single-line borders in Microsoft Word have become very obvious and boring. Therefore, we show you the steps to create and use custom borders in Microsoft Word documents. How to Make Custom Borders in Microsoft Word Creating custom borders is very easy. However, you will need a boundary. Step 1 – Download Custom Borders There are tons of free borders on the internet. We have downloaded a border like this. Step 1 – Search the Internet for custom borders. Alternatively, you can go to clipping
 Popular science on how to set excel borders
Mar 20, 2024 am 10:30 AM
Popular science on how to set excel borders
Mar 20, 2024 am 10:30 AM
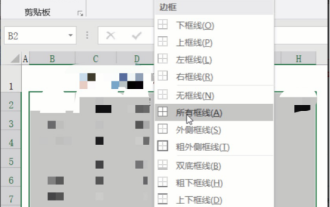
It is not uncommon for Excel to appear in our daily work and life. Whether it is the production of employee information, salary tables, or student enrollment information and transcripts, Excel is a relatively easy-to-use tool. When printing Excel, you need to set borders to meet printing requirements. In this article, the editor will introduce you to several ways to set Excel borders. Method 1. Use the function tab button. This should be a method often used by everyone. It is convenient and fast. The specific operation: select the cell area B2:H10 where you need to add a border, click the [Start] tab - [Border] drop-down on the right Button-[All Frames] to complete adding frames. Method 2. Select the cell area B2:H10 where you want to add a border.
 What should I do if the lines on my computer screen are shaking and flickering?
Feb 22, 2024 pm 05:46 PM
What should I do if the lines on my computer screen are shaking and flickering?
Feb 22, 2024 pm 05:46 PM
When you use your computer every day, you may encounter lines flickering on the screen, which greatly affects the user experience, but you don’t know how to deal with it. Today, I will bring you a solution to the flickering lines on the computer screen. What to do if lines jitter and flicker appear on the computer screen 1. Graphics card failure If the computer is used for a long time, it may cause problems with the graphics card, leading to rendering failure, and then lines flickering. In this case, the user only needs to shut down the computer for a period of time to allow the graphics card to rest and restore performance, and then restart the computer to solve the problem. 2. External magnetic field. If there is a strong magnetic field in the environment where the computer is located, this situation will also occur. Users need to place the computer in an open environment for testing. If the line jitter disappears
 How to use CSS to animate the border of an element
Nov 21, 2023 pm 02:26 PM
How to use CSS to animate the border of an element
Nov 21, 2023 pm 02:26 PM
How to use CSS to achieve element border animation effects Introduction: In web design, in order to increase the user's visual experience and the attractiveness of the page, some animation effects are often used to make page elements more vivid and interesting. Among them, border animation is a very common effect, which can make the element border change, flicker or flow dynamically. This article will introduce how to use CSS to animate the border of elements and provide specific code examples. 1. Realize the border color change animation To realize the border color change animation effect, you can
 How to fix lines on iPhone screen
May 03, 2024 pm 09:10 PM
How to fix lines on iPhone screen
May 03, 2024 pm 09:10 PM
Notice vertical green, pink, or while lines on your iPhone screen? Some users have taken to various forums, social media handles, regarding the issue of some lines they are witnessing on the iPhone screen. If the issue is still not resolved with our quick fixes, continue following the solutions to resolve this issue. Fix 1 – Remove the Screen Protector Lines on your phone screen may be caused by the screen protector on the display. Sometimes, accumulated dust, water, or any other foreign matter can slip between the gap between the protector and the screen, causing lines to appear on the screen. Remove the screen protector from the screen and check the status of the wiring. Fix 2 – Try deleting the line Some users can delete the line simply by pressing one side of the vertical line on their phone. step 1
 Tips for achieving gradient border effect using CSS properties
Nov 18, 2023 pm 02:53 PM
Tips for achieving gradient border effect using CSS properties
Nov 18, 2023 pm 02:53 PM
The technique of realizing the gradient border effect using CSS properties requires specific code examples. In web design, the border is an important element that can bring richer visual effects to the page. And if you can achieve a gradient effect on the border, it will further increase the appeal of the page. This article will introduce some techniques for using CSS properties to achieve gradient border effects, and provide specific code examples. Use the "border-image" attribute to implement gradient borders<style>.gradient-
 How to add borders to images using PHP
Aug 26, 2023 am 10:12 AM
How to add borders to images using PHP
Aug 26, 2023 am 10:12 AM
How to use PHP to add borders to pictures In web development and image processing, it is often necessary to add borders to pictures to improve the beauty and visibility of the pictures. This article will introduce how to add borders to images using PHP, with code examples. First, we need to make sure that PHP's GD library is installed on the server. The GD library is an open source library for image processing that can be used to create, manipulate and output images. Most servers have the GD library installed by default, but if it is not installed, you can manage the work through the PHP extension.
