

What are the reasons for blue screen in computer assembly?

The problem of blue screen when assembling computers troubles many users. There are various blue screen codes, which makes people have a headache. PHP editor Yuzai hereby sorts out the common causes of blue screens in assembled computers for everyone. From hardware compatibility, driver issues, system conflicts, to virus infections, memory failures, etc., he provides an in-depth analysis of the reasons behind blue screens. Come and find out the root cause of the blue screen, solve the problem, and enjoy using your computer!

What are the reasons for blue screen when assembling a computer?
There are hardware and software reasons.
1. Hardware reasons
1. Memory failure: If there is a problem with the memory, such as damage or failure, the computer will have a blue screen problem. You can use a memory test program (such as Memtest86) to test whether the memory is stable.
2. Hard disk problem: When there is a problem with the hard disk, such as a damaged sector or a problem with the magnetic head, it will also cause a blue screen problem. If you see hard disk error messages (such as hard disk failure) on the blue screen interface, you need to replace the hard disk.
3.CPU overheating: When the CPU overheats, the computer will automatically shut down to protect the hardware from damage. If your computer frequently experiences blue screens due to overheating, you can replace the radiator or clear the CPU fan.
2. Software reasons
1. Operating system damage: If there is a problem with the operating system (such as driver damage), the computer will also have a blue screen. This issue can be resolved by restarting the computer in safe mode and then re-downloading drivers, updating the operating system, and repairing corrupted system files.
2. Incompatible Applications: Installing incompatible applications on your computer may cause blue screen errors. There may be bugs and bugs in these software that can cause conflicts with the operating system. Before installing any apps, make sure they are compatible with your operating system and download software from official sources.
3. Virus: If your computer is infected by a virus, it may cause the computer system to crash or cause a blue screen situation. Make sure all your software and operating systems are up to date, and scan your computer frequently to detect and remove viruses and other malware.
Why does a newly assembled computer get a blue screen as soon as the system is installed?
1. If a new computer has a blue screen as soon as the system is installed, it means there is a problem with the hardware. You cannot think that it will not cause problems if it is new.
2. Based on the blue screen after installing the system, it can be judged that it is most likely the hard disk itself. You can use the PE system to check whether it can be entered normally without connecting the hard disk. If it can, it means that there is no problem with other hardware. If the blue screen is still there, continue. Check.
3. Memory problem If the system still has a blue screen under PE, it may be a memory or CPU problem.
4. Re-insert the memory, replace the memory slot, replace the memory and enter the PE test again. If the blue screen is still there, replace the CPU test. If the blue screen still appears after replacing the CPU, it is determined to be a motherboard problem.
5. Through the above step-by-step troubleshooting, you can basically determine that there is a problem with the hardware. Replace the bad parts and then install the system.
The newly assembled computer keyboard light doesn’t light up?
Looking at the motherboard model, it should be UEFI bios. First find a keyboard with PS2 port, enter the bios, turn off UEFI startup, and change to Legacy mode. If there is fast startup, turn off options like Fast Boot. UEFI Start up, turn on fast startup, USB interface detection may be turned off before entering the system, and USB devices can be used only after entering the system.
Blue screen when inserting new memory into the computer?
There are several reasons:
1. The memory module is not installed correctly, causing a blue screen on the computer. It is recommended to reinstall the memory module;
2. If the memory module is reinstalled If there is still a blue screen, then it may be that the memory module is incompatible with the computer. It is recommended to replace the memory module with another model;
dell New computer, blue screen when booting?
First, turn on the Dell laptop and press [F8] to enter safe mode and set the operating system to enter a clean boot state; then click the "Start" menu and enter msconfig in the search box, and then press Enter key.
2. Click the "Services" tab, select "Hide all Microsoft services", and then click Disable All. (If optional) Click the Startup tab, then click Disable All and OK. Then restart your Dell laptop. When the "System Configuration Utility" pops up, select "Don't show this message again" in this dialog box and click OK.
Is the blue screen normal on a new computer?
This is a relatively normal phenomenon, and the reasons for the blue screen are as follows:
1. Software compatibility issues cause the computer to have a blue screen. For a newly installed system, if the driver is incompatible with the hardware, it may cause a blue screen phenomenon. It is recommended to install the driver in the CD provided with the hardware.
2. Poor contact of the memory stick or damage to the memory causes a computer blue screen. During system operation, almost all high-speed data access operations must be performed in the memory. If the memory stick has poor contact or damage, the system data will be lost. There will be problems with access, which can easily lead to system blue screens and crashes. Solution: Clean the dust in the case, unplug the memory module, wipe the gold finger with an eraser, and then re-insert it.
3 Viruses and Trojans cause computer blue screens. Nowadays, there are more and more types of virus Trojans, and they spread in various ways, making it difficult to prevent them. Some virus Trojans infect system files, causing system file errors, or causing system resource exhaustion, and may also cause blue screens. If this phenomenon occurs, it is recommended to install anti-virus software that emphasizes anti-virus capabilities.
Why does the assembly computer automatically restart with a blue screen?
1. A program error will result in a blue screen. Sometimes there is just an error in a certain program or driver, which can usually be solved after restarting.
2. Improper addition of new hardware will result in a blue screen. Check that the new hardware is securely plugged in, unplug it, try another slot, and install the latest drivers.
The Shangsheng assembled computer I bought on JD.com always has a blue screen?
Climbing assembly computer always has a blue screen showing that the USB wireless network card cannot connect to the network. The reasons and solutions are as follows 3. Unknown error
If the user has inserted the USB network card and the computer has detected the The network card just has a problem during the connection process. For example, there is no prompt after the connection, and the computer's WiFi will automatically change to the "Earth" style. When encountering this situation, it is most likely caused by the user clicking WiFi to connect immediately after turning on the computer. You must know that after the computer starts the system, it takes a while to run the functional components. The length of time is related to the computer configuration and system. If you click WiFi network immediately to connect , there will be an inability to connect, the network card is not damaged, the computer and the system are not malfunctioning, it is because the user is too anxious to connect to the network.
How to install the driver for a newly assembled computer?
1. Enter "Driver Wizard" in the browser, search and install it on your computer.
2. Find the "Driver Wizard" selected in the red box on the computer desktop and click to proceed to the next step.
3. Click the red box to select "Detect now" and go to the next step.
4. Driver Wizard software is detecting missing drivers.
5. Find the graphics card selected in the red box. You need to install the upgraded software, and click Upgrade.
6. Wait for the installation and upgrade to be completed, and the graphics card driver will be installed.
How to connect a newly assembled computer to the Internet?
The following steps are required to connect a newly assembled computer to the Internet:
1. Make sure your computer has the network card driver installed. If you are using a wired network connection, you need to confirm whether the network cable is connected. If you are using a wireless network connection, you need to confirm whether the wireless network card driver has been installed.
2. Turn on the computer and enter the operating system interface. If you have already installed the operating system, you need to confirm whether the network connection is open. If you are using a wired network connection, you need to select "Network and Sharing Center" in the Control Panel, find your network card connection in "Change Adapter Settings", and then right-click "Enable". If you are using a wireless network connection, you need to select "Network and Sharing Center" in the Control Panel, find your wireless network card connection in "Change Adapter Settings", and then right-click "Enable".
3. Manually configure the IP address. If your network environment requires manual configuration of the IP address, you need to select "Network and Sharing Center" in the Control Panel, find your network card connection in "Change Adapter Settings", then right-click "Properties" and select "Internet Protocol Version" 4 (TCP/IPv4)", then click "Properties", enter the corresponding information in the IP address, subnet mask, default gateway and DNS server columns, and finally click "OK".
4. Test the network connection. After completing the above steps, you can open the browser and try to access a website, such as Baidu, Google, etc., to test whether the network connection is normal.
It should be noted that network connection problems may cause failure due to various reasons, such as network card driver not being installed, network environment configuration errors, router setting problems, etc. Therefore, after trying the above steps, if you still Unable to connect to the Internet, you may consider checking the relevant settings or contacting the network administrator for help.
The above is the detailed content of What are the reasons for blue screen in computer assembly?. For more information, please follow other related articles on the PHP Chinese website!

Hot AI Tools

Undresser.AI Undress
AI-powered app for creating realistic nude photos

AI Clothes Remover
Online AI tool for removing clothes from photos.

Undress AI Tool
Undress images for free

Clothoff.io
AI clothes remover

AI Hentai Generator
Generate AI Hentai for free.

Hot Article
Hot Tools

Notepad++7.3.1
Easy-to-use and free code editor

SublimeText3 Chinese version
Chinese version, very easy to use

Zend Studio 13.0.1
Powerful PHP integrated development environment

Dreamweaver CS6
Visual web development tools

SublimeText3 Mac version
God-level code editing software (SublimeText3)
Hot Topics
 1377
1377
 52
52

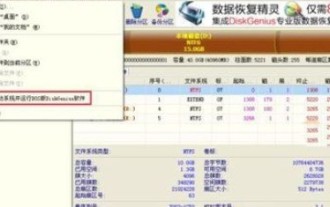 Specific steps for expanding the C drive using the partition tool diskgenius
May 08, 2024 pm 08:04 PM
Specific steps for expanding the C drive using the partition tool diskgenius
May 08, 2024 pm 08:04 PM
First, download and install the [DiskGenius] tool on your computer, then open the tool, then click [File Menu] at the top, and then click [Restart the system and run the DiskGenius software], as shown in the figure. Then click [OK] in the pop-up prompt box, as shown in the figure. After that, the computer will restart and then enter the Diskgen hard disk partition interface. At this time, if we want to expand the C drive, we only need to right-click the D drive next to the logical partition and click "Adjust Partition Size" in the pop-up menu, as shown in the figure shown. Then you need to adjust the size of the D drive partition. For example, the current capacity of the D drive is 14.99GB, as shown in the figure below. At this time, we can adjust the installment of the D drive. For example, if we want to allocate 1.03GB to the C drive, we only need to allocate 1.03GB to the C drive.
 Tutorial on assembling a computer and installing a system? How to install win11 system when assembling a computer?
Apr 27, 2024 pm 03:38 PM
Tutorial on assembling a computer and installing a system? How to install win11 system when assembling a computer?
Apr 27, 2024 pm 03:38 PM
Tutorial on assembling a computer and installing a system? Nowadays, the system installation for assembling computers is very simple and convenient, and only requires a CD. First enter the bios settings, set the computer to boot first with the CD-ROM drive, then restart the computer and load the system CD into the CD-ROM drive. The CD will automatically enter the installation state. At this time, you only need to manually repartition the partitions, and the rest will be completed automatically. How to install win11 system when assembling a computer? 1. First, we need to download a win11 image file from this site before installing it. 2. The win11 image file has undergone a large number of professional tests to ensure stable installation and smooth operation. 3. After the download is completed, load the folder in the download path and run the "windowssetup" process in it.
 How to skip the network installation system in win11 24h2? The latest version of win11 24h2 skips the online installation tutorial
May 03, 2024 pm 09:13 PM
How to skip the network installation system in win11 24h2? The latest version of win11 24h2 skips the online installation tutorial
May 03, 2024 pm 09:13 PM
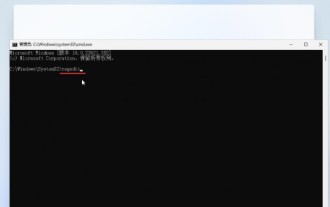
The 24h2 version is the latest operating system released by Microsoft. I believe many users have seen some download packages on the Internet. So how can win1124h2 skip the Internet installation system? Let this site carefully introduce the latest version of win1124h2 to users. Skip the Internet installation tutorial. The latest version of win1124h2 skips the online installation tutorial. Method 1: Skip by modifying the registry. 1. Press the Shift+F10 keys to bring up the cmd command prompt window and enter the following command: regedit and press Enter to quickly open the registry editor. If users feel that the 24h2 version is not used to the operation, they can click on the 23h2 version below to reinstall it. Win1123H22263
 Huawei mobile phone USB sharing network to computer
May 08, 2024 am 08:25 AM
Huawei mobile phone USB sharing network to computer
May 08, 2024 am 08:25 AM
How to connect a Huawei phone to a computer via USB to access the Internet. First, we open the phone settings and search for "HDB". Then we click to open "Mobile Network Sharing" in More. Then we can click to open "USB Sharing Network" in the pop-up window. Summary First, connect the Huawei mobile phone to the computer through the data cable. Open "Settings" on your phone and enter the settings interface. Click "Personal Hotspot", select "USB tethering" and click the switch button at the back to turn it on. First click "Settings About Phone", then click "Version Number" 7 times in succession. You will be prompted to enter developer mode. Then return to the "Settings" list, "Developer Options" will appear, then click to enter "Developer Options", turn on the "USB Debugging" switch, and click
 Dell laptop black screen when booting
May 01, 2024 am 09:04 AM
Dell laptop black screen when booting
May 01, 2024 am 09:04 AM
Dell notebook has a black screen when it is turned on 1. If the notebook has a black screen when it is turned on, the indicator light is on, the main screen is black, and there is no wind when you place your hand on the fan of the host computer. Then it is a problem with the power adapter. At this time, it needs to be removed and replaced with a new one. Start switch problem. Black screen when booting, no self-test. Use the meter pin to short-circuit the startup terminal on the motherboard, and it will start normally. 2. Insufficient battery: Connect the power supply. Wait for a while and then restart. Graphics card failure: Replace the graphics card. If the laptop supports an external monitor, find a good monitor and connect it to your laptop. 3. Reason four: Monitor problem. If the power supply is normal, but the screen is still dark, try to connect another monitor to the computer (you can borrow one if necessary) to make sure it is not the monitor.
 How to speed up BitGenie_How to speed up BitGenie download speed
Apr 29, 2024 pm 02:58 PM
How to speed up BitGenie_How to speed up BitGenie download speed
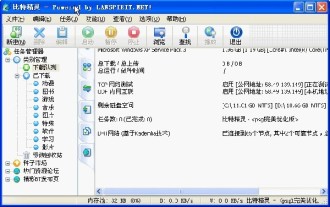
Apr 29, 2024 pm 02:58 PM
1. First of all, make sure that your BT seeds are healthy, have enough seeds, and are popular enough, so that they meet the prerequisites for BT downloading and the speed is fast. Open the "Select" column of your own BitComet, click "Network Connection" in the first column, and adjust the global maximum download speed to 1000 without limit (1000 for users below 2M is an unreachable number, but it is okay not to adjust this, who doesn't want to download it) Very fast). The maximum upload speed can be adjusted to 40 without any limit (choose appropriately based on personal circumstances, the computer will freeze if the speed is too fast). 3. Click Task Settings. You can adjust the default download directory inside. 4. Click Interface Appearance. Change the maximum number of displayed peers to 1000, which is to display the details of the users connected to you, so that you have peace of mind. 5. Click
 What is the appropriate temperature for playing Apex computer?
May 06, 2024 am 09:31 AM
What is the appropriate temperature for playing Apex computer?
May 06, 2024 am 09:31 AM
What is the appropriate temperature for playing Apex computer? 80 degrees is suitable. When running large-scale games or playing high-definition videos, the temperature can reach about 80°C. Generally, it is considered normal to not exceed 90°C under high load. Graphics cards are generally the hardware that generates the most heat among computer hardware. Generally, it is normal for the temperature of a graphics card to be around 30℃-80℃. Due to external temperature, it is normal for most graphics card temperatures to be between 50℃-85℃ in summer. range, if you are running large-scale 3D games or playing high-definition videos for a long time, the highest temperature may reach about 95°C. This temperature range will affect the life of the computer hardware. No matter how high the temperature is, you must consider strengthening heat dissipation and cleaning dust. How to play with the apex handle and the computer ? Method/step-by-step reading: 1. Use wired or wireless
 How to plug in the USB3.0 interface on the motherboard?
Apr 28, 2024 am 11:43 AM
How to plug in the USB3.0 interface on the motherboard?
Apr 28, 2024 am 11:43 AM
How to plug in the USB3.0 interface on the motherboard? The USB3.0 interface on the motherboard is plug-and-play; USB3.0 is a USB specification. The maximum transmission bandwidth of USB2.0 is 480Mbps (i.e. 60MB/s), while the maximum transmission bandwidth of USB3.0 is as high as 5.0 Gbps (500MB/s); USB3.0-related functions can only be used after USB3.0-related hardware devices are installed in the computer; USB30 is widely used in high-resolution web cameras, video monitors, video displays, and USB interfaces Digital cameras, digital camcorders, etc.; USB3.0 has a backward compatibility standard, is compatible with USB1.1 and USB2.0 standards, and has the ease of use of traditional USB technology
