

Photoshop设计制作夜蓝转圈进度条教程

本PS教程将简单介绍如何用Photoshop打造进度条。本PS教程属于初级教程,适合初学者学习。
最终效果图

教程图0
1、选择“文件/新建”菜单,打开“新建”,宽度:为685像素,高度:为443像素,“分辨率”为72 , “模式”为RGB颜色的文档,如图1所示。

图1
2、创建新图层按钮,新建一个图层,接着在工作区填充,设置前景为灰色,设置RGB值分别为:55/56/58,接着按键盘快捷键Alt+Delete填充,并按键盘Ctrl+D取消,如图2所示。
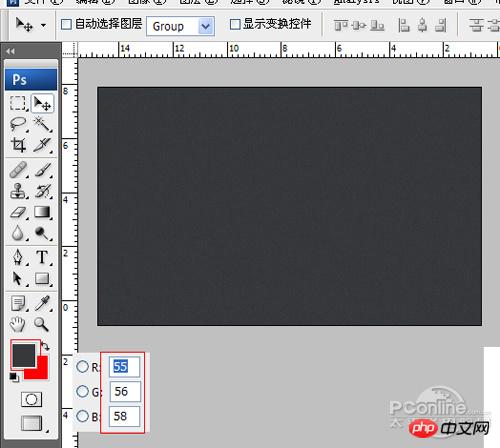
图2
3、执行菜单:“滤镜”/“渲染”/“杂色”/“添加杂色”,设置数量1%,分布勾选平均分布,勾选单色,如图3所示。效果如图4。

图3

图4
4、在图层控制面板击新建图层按钮,新建图层1,在工具箱中选择椭圆工具 ,在工作区中拖出一个椭圆选区,设置前景色为黑色,并按快捷键Alt+Delete填充图层1,然后Ctrl+D取消选择状态,并调整成圆,如图5所示。
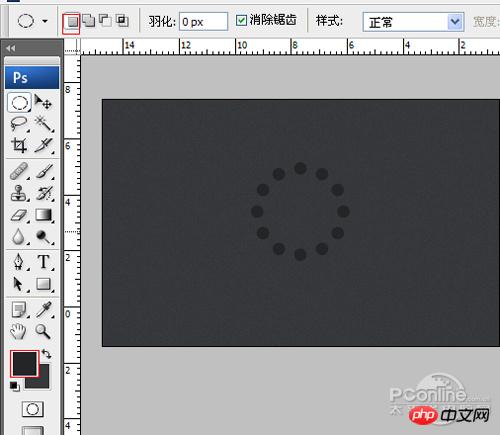
图5
5、双单击图层1进入到图层样式,分别勾选投影、内阴影选项。如图6所示。
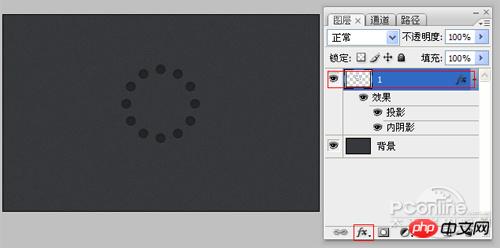
图6
6、勾选投影,设置阴影混合模式:柔光,点击色标处,阴影颜色设置为白色,不透明度:15%,角度:90,距离:1像素,扩展:0%,大小:0像素,然后点击确定按钮,如图7所示。
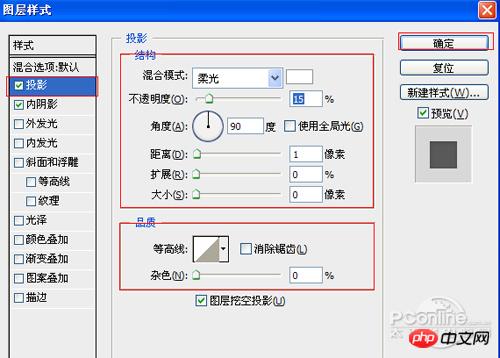
图7
7、勾选内阴影,设置阴影混合模式:正片叠底,点击色标处,阴影颜色设置为黑色,不透明度:25%,角度:90,距离:1像素,扩展:0%,大小:5像素,然后点击确定按钮,如图8所示。

图8
8、在图层控制面板中,选择图层1,复制1一个图层1副本,改名为图层2,并双单击图层2进入到图层样式,分别勾选内阴影、外发光、斜面和浮雕、渐变叠加选项。如图9所示。

图9
9、勾选内阴影,设置阴影混合模式:柔光,点击色标处,阴影颜色设置为白色,不透明度:30%,角度:90,距离:1像素,扩展:0%,大小:0像素,然后点击确定按钮,如图9所示。

图10
10、勾选外发光选项,设置投影混合模式:正常,不透明度:30%,点击点按可编辑渐变,设置前景到透明,颜色为蓝色到白色,方法为柔和,扩展为0%,大小为:5像素,范围为50%,如图11所示。
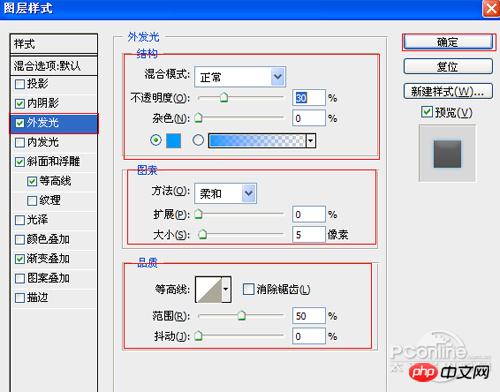
图11
11、勾选斜面和浮雕复选项,样式:内斜面,方法:平滑,深度:100%,方向:上,大小:10像素,软化:0像素,阴影:角度:90,高度:20度,高光模式为:滤色,颜色为:白色,不透明度为:17%,阴影模式为:正片叠加,颜色为:黑色,不透明度为:0%,其他设置值参考图12,如图12所示。
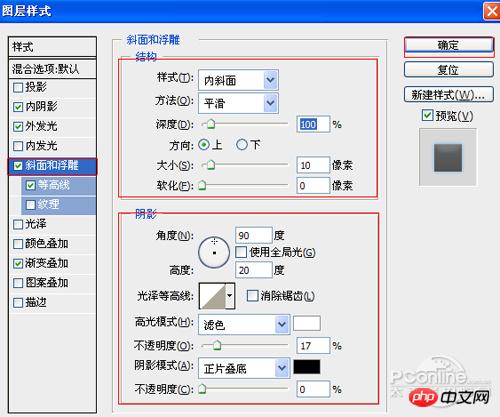
图12
12、勾选渐变叠加选项,弹出渐变叠加对话框,混合模式:叠加,不透明度:22%,渐变颜色为黑色到白色,样式:线性,勾选与图层对齐,角度为90度,缩放为150%,如图13所示。
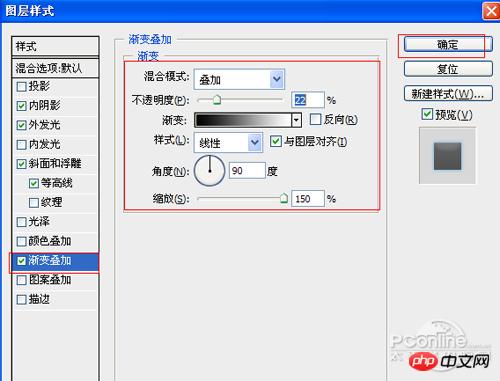
图13
13、在工具箱中选择横排文字工具 ,在画面中用鼠标单击后,在光标后输入“75%”,在工具选项栏中设置字体为“Tahoma”,设置字体大小为“18点”,设置消除锯齿为“犀利”,设置字体颜色为白色,如图14所示。经过调整后的效果图,如图15。
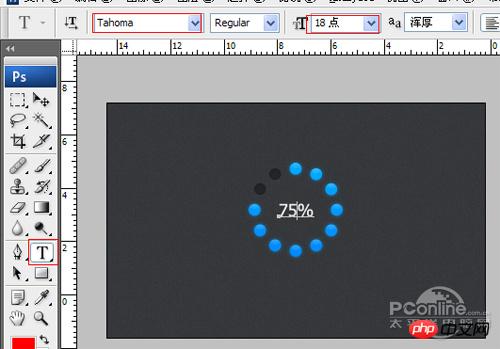
图14
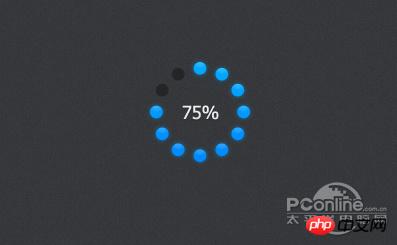
图15

Hot AI Tools

Undresser.AI Undress
AI-powered app for creating realistic nude photos

AI Clothes Remover
Online AI tool for removing clothes from photos.

Undress AI Tool
Undress images for free

Clothoff.io
AI clothes remover

AI Hentai Generator
Generate AI Hentai for free.

Hot Article
Hot Tools

Notepad++7.3.1
Easy-to-use and free code editor

SublimeText3 Chinese version
Chinese version, very easy to use

Zend Studio 13.0.1
Powerful PHP integrated development environment

Dreamweaver CS6
Visual web development tools

SublimeText3 Mac version
God-level code editing software (SublimeText3)
Hot Topics
 1386
1386
 52
52

 How to set the color of a progress bar using HTML and CSS?
Sep 19, 2023 pm 08:25 PM
How to set the color of a progress bar using HTML and CSS?
Sep 19, 2023 pm 08:25 PM
In website development, progress bars are an important part of the website. The progress bar shows the progress of the process. With the help of it, users can see the status of the work being done on the website, including load times, file uploads, file downloads, and other similar tasks. By default, it is gray. However, to make progress bars stand out and be visually appealing, you can use HTML and CSS to change their color. What is a progress bar? A progress bar is used to show the progress of a task. It is a graphical user interface element. It basically consists of a horizontal bar that gradually fills in as the task progresses, accompanied by a percentage value or other completion indicator. Progress bars are used in web applications to provide users with information about completing a process such as file upload, file download, or software installation.
 How to implement page loading progress bar function in JavaScript?
Oct 27, 2023 am 08:57 AM
How to implement page loading progress bar function in JavaScript?
Oct 27, 2023 am 08:57 AM
How does JavaScript implement the page loading progress bar function? In modern Internet applications, page loading speed is one of the key factors of user experience. To show users the loading process, many websites and applications use loading progress bars. JavaScript provides a simple and effective way to implement the page loading progress bar function. The specific implementation process is as follows: Create an HTML structure. First, create an HTML structure of a progress bar at a suitable location on the page. It is common to place the progress bar in
 How to use Vue to implement progress bar effects
Sep 19, 2023 am 09:22 AM
How to use Vue to implement progress bar effects
Sep 19, 2023 am 09:22 AM
How to use Vue to implement progress bar effects The progress bar is a common interface element that can be used to display the completion of a task or operation. In the Vue framework, we can implement special effects of the progress bar through some simple code. This article will introduce how to use Vue to implement progress bar effects and provide specific code examples. Create a Vue component First, we need to create a Vue component to implement the progress bar function. In Vue, components are reusable and can be used in multiple places. Create a file called Pro
 How to use CSS to create a web page loading progress bar implementation steps
Oct 26, 2023 am 11:00 AM
How to use CSS to create a web page loading progress bar implementation steps
Oct 26, 2023 am 11:00 AM
Implementation steps of how to use CSS to create a web page loading progress bar In modern web design, loading speed is crucial to user experience. In order to improve the user experience, you can use CSS to create a web page loading progress bar so that users can clearly understand the web page loading progress. This article will introduce the implementation steps of using CSS to create a web page loading progress bar, and provide specific code examples. Step 1: HTML structure First, you need to add a div element representing the progress bar in HTML, as shown below: <divclass=&q
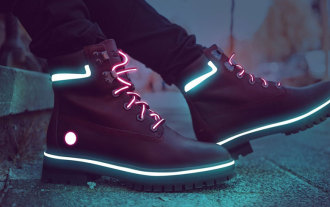 How to make blue fluorescent effect in PS
Feb 27, 2024 pm 12:55 PM
How to make blue fluorescent effect in PS
Feb 27, 2024 pm 12:55 PM
The editor of this website brings you this tutorial to take you into the wonderful world of Photoshop and learn how to create a charming blue fluorescent effect. Whether you are new to Photoshop or an experienced user, you can find inspiration and practical tips from this tutorial. So how to create the blue fluorescent effect in PS? This tutorial guide will give you a detailed introduction, I hope it can help you. PS blue fluorescence effect production method steps final effect: 1. Adjust the brightness of the picture. 2. Add curves to adjust the overall light and dark contrast of the picture. 3. Use a pen to hook out the "edge strips" of the shoes. 4. After cutting out, create a selection and fill it with white. 5. Select the blur tool and blur the hooked white part. 5. Use a pen to mark the shoelaces
 How to use Vue and Element-UI to implement progress bar and loading animation effects
Jul 21, 2023 pm 08:54 PM
How to use Vue and Element-UI to implement progress bar and loading animation effects
Jul 21, 2023 pm 08:54 PM
How to use Vue and Element-UI to implement progress bar and loading animation effects. Vue.js is a lightweight front-end framework, and Element-UI is a UI component library based on Vue.js, which provides a rich set of components and interactions. The effect can help us quickly develop a beautiful front-end interface. This article will introduce how to use Vue and Element-UI to implement progress bar and loading animation effects. 1. Install and introduce Element-UI first,
 How to create a progress bar using HTML and CSS
Sep 05, 2023 am 09:09 AM
How to create a progress bar using HTML and CSS
Sep 05, 2023 am 09:09 AM
Overview Progress bars are the main component of any web application. Progress indicates the completion of a project or task. In this module, we will build a progress bar using HTML and style it with CSS. We will also provide progress animation for the progress bar. In this task, we will animate the progress bar using @keyframes. Use animation style properties such as animation duration, name, timing, etc. Algorithm Step 1 - Create HTML boilerplate in a text editor. Step 2 - Create parent div container and define class name as barContainer. Step 3 - Now create another child of the current parent div and define the class name. Step 4 - Create a child that inherits in progress and will be animated
 What should I do if the file name turns blue in win7 system?
Jul 20, 2023 pm 11:57 PM
What should I do if the file name turns blue in win7 system?
Jul 20, 2023 pm 11:57 PM
What should I do if the file name turns blue in win7 system? The win7 system is currently the most popular Windows system. It has a very long history of development and is deeply loved by users. However, the win7 system also has problems, big and small. When many friends use the win7 system, they will find that the file names on the computer turn blue, and other newly created folders will also turn blue. This is What is the situation and how to solve it? Below, the editor will bring you a method to restore the win7 system file name to blue. Recovery method of win7 system file name turning blue 1. First, right-click the disk with blue file name and open properties. 2. Find the option to compress this drive to save disk space in the properties window and remove it.
