

photoshop合成制作出一个半透明的鸡蛋

效果图中的鸡蛋使用气泡与淡黄合成的。过程也比较简单,选取气泡以后,用变形工具变成鸡蛋的形状,然后融入淡黄,并调整好细节即可。
最终效果
1、打开素材图片。
2、把背景图层复制一层,选择仿制图章工具把黑色鸡蛋涂抹掉。
3、再用修补工具把边缘明显的痕迹去掉。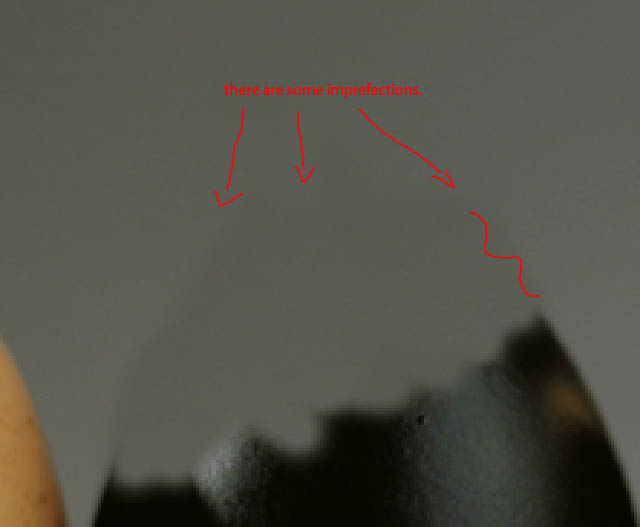


4、打开气泡素材。
5、选择椭圆选框工具,选取所需的部分。
6、将选取的气泡移到鸡蛋文件中,并调整到黑色鸡蛋的位置。
7、按Ctrl + Shift + U 把气泡去色,不透明度改为:30%,如下图。
8、按Ctrl + T,右键选择“变形”,调整各个节点,达到类似鸡蛋效果。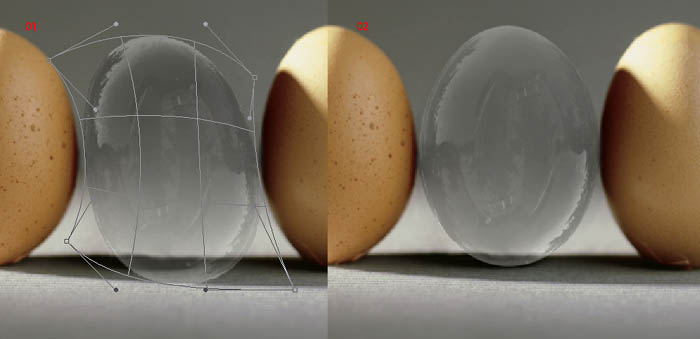
9、打开淡黄素材,拖进来调整好大小,然后添加图层蒙版,用黑色画笔把不需要的部分涂抹掉,混合模式改为“正片叠底”。

10、用画笔工具,在鸡蛋顶部涂抹几下亮黄色,混合模式改为“叠加”,让其看起来有光亮的效果。
11、使用渐变工具制作一个粉色到黄色的渐变背景,图层混合模式改为“柔光”,使其色彩更有氛围。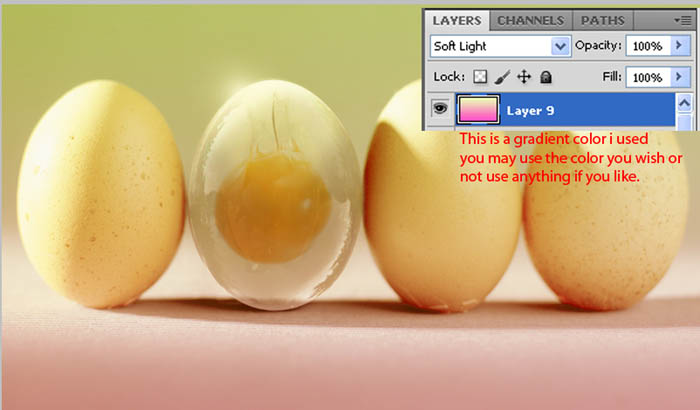
最终效果:

Hot AI Tools

Undresser.AI Undress
AI-powered app for creating realistic nude photos

AI Clothes Remover
Online AI tool for removing clothes from photos.

Undress AI Tool
Undress images for free

Clothoff.io
AI clothes remover

AI Hentai Generator
Generate AI Hentai for free.

Hot Article
Hot Tools

Notepad++7.3.1
Easy-to-use and free code editor

SublimeText3 Chinese version
Chinese version, very easy to use

Zend Studio 13.0.1
Powerful PHP integrated development environment

Dreamweaver CS6
Visual web development tools

SublimeText3 Mac version
God-level code editing software (SublimeText3)
Hot Topics
 1382
1382
 52
52

 How to solve the black line problem of win11 transparent taskbar
Dec 22, 2023 pm 10:04 PM
How to solve the black line problem of win11 transparent taskbar
Dec 22, 2023 pm 10:04 PM
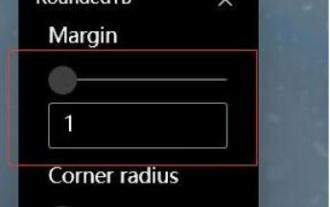
After many friends used translucenttb to set up a transparent taskbar, they found that there was a black line in the win11 transparent taskbar, which looked very uncomfortable. How should I solve it at this time? In fact, it can be solved in the software. There is a black line in the win11 transparent taskbar: Method 1: 1. According to user feedback, you can right-click translucenttb and open settings. 2. Then set the "margin" of the icon option to "1" to solve the problem. Method 2: 1. If it still doesn't work, you can right-click the blank space to open "Personalization" 2. Then select the system default theme to change it. Method three: 1. If all else fails, it is recommended that you uninstall translucenttb. 2. Then replace
 How to solve the problem of a line on the taskbar transparency in Win11?
Jan 29, 2024 pm 12:12 PM
How to solve the problem of a line on the taskbar transparency in Win11?
Jan 29, 2024 pm 12:12 PM
Many Win11 users will set their taskbar to be transparent when running the system, but many users will see a black line appear on the taskbar after setting it up. So what is going on? Users can use third-party software to set it up. Let this website carefully introduce to users the solution to the problem of a transparent line on the win11 taskbar. Solution to the problem of a transparent line on the win11 taskbar. Method 1: 1. According to user feedback, you can right-click translucenttb and open settings. 2. Then set the margin of the icon option to 1 to solve the problem. 2. Then select the system default theme and change it to solve the problem.
 How to set transparency in CSS
Nov 01, 2023 am 10:00 AM
How to set transparency in CSS
Nov 01, 2023 am 10:00 AM
CSS methods for setting transparency include opacity attribute, rgba color value, background-color attribute, using pseudo elements, etc. Detailed introduction: 1. Opacity attribute, by setting the opacity attribute of the element to achieve a transparent effect, the value range of this attribute is 0 to 1, 0 means completely transparent, 1 means completely opaque; 2. RGB color value, by setting the element's opacity The background color or text color is an rgba color value to achieve a transparent effect. The rgba color value consists of red, green, blue, transparency, etc.
 How to set terminal transparency in Linux system?
Jan 07, 2024 am 10:21 AM
How to set terminal transparency in Linux system?
Jan 07, 2024 am 10:21 AM
When Linux executes commands in the terminal, in order to make it difficult to see other help documents, such as PDFs, web pages, etc., you can set the terminal transparency. How to set it? Let’s take a look at the detailed tutorial below. . 1. Turn on window special effects 1. To set the transparency of the terminal, you need to turn on the window special effects first. First, click "Control Center" on the taskbar. 2. Click "Display" in the Control Center. 3. In "Display", make sure the "Turn on window effects" button is turned on. 4. In addition, you can also use the shortcut keys shift+win+tab to quickly open or close window effects. 2. Set transparency
 Graphical tutorial on making the win7 taskbar transparent
Jul 20, 2023 am 09:49 AM
Graphical tutorial on making the win7 taskbar transparent
Jul 20, 2023 am 09:49 AM
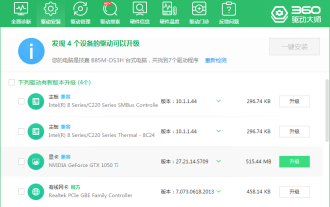
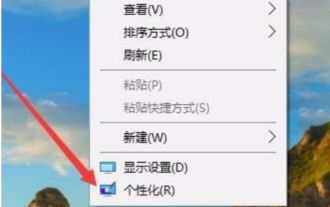
Today, a group of users asked why their computers had no transparency effect after reinstalling Windows 7. In fact, this is caused by your computer not updating the graphics card driver in time and adjusting the Windows 7 Aero theme. You can set it up in the following ways. 1. First, you need to make sure that your computer has a new graphics card driver installed. You can use Driver Wizard or 360 Driver Master to update the graphics card driver online. . 2. Facing a blank space on the desktop, right-click, select Personalize and open. 3. Find the Aero theme here and select it. Under normal circumstances, you should be able to see the transparent glass effect. Do you understand the tutorial on how to make your win7 taskbar transparent? Students who don’t know how to do it, please do it quickly.
 How to adjust the transparency of the Win11 taskbar
Jan 01, 2024 am 11:17 AM
How to adjust the transparency of the Win11 taskbar
Jan 01, 2024 am 11:17 AM
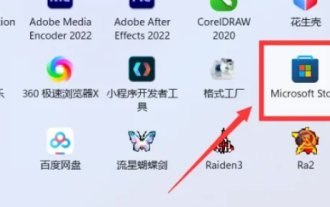
Many users like the transparent version of the page. Under the win11 system, users can also set up a transparent taskbar through some methods, so that the operation and appearance will look better. How to set the win11 taskbar to be transparent 1. Click the Start menu and then open the Microsoft Store. 2. Search for "TranslucentTB", then find the corresponding one and download it. 3. Click here to install. 4. After opening, select "desktop" and then click "clear".
 Step-by-step tutorial on how to set the taskbar transparency in Windows 10
Jul 11, 2023 pm 11:37 PM
Step-by-step tutorial on how to set the taskbar transparency in Windows 10
Jul 11, 2023 pm 11:37 PM
By chance, I saw someone else's win10 taskbar being transparent, and it looked very beautiful. After I came back, I also wanted to set my own win10 computer to be transparent. Under normal circumstances, the default taskbar does not have a transparent background, and you need to adjust the settings. Next, the editor will explain in detail how to make the Win10 taskbar fully transparent in one minute. Come and take a look. 1. First, open the win10 system, then right-click on the desktop and find "Personalization" in the right-click menu. 2. Then, in the "Personalization" window, select "Color" in the left menu and click to open. 3. Then, find "Transparency Effect" in the menu on the right, select "On" and check "Start Menu, Taskbar, and Action Center" and "Title Bar". 4. Then, return to w
 How to set taskbar transparency in win10
Jul 07, 2023 pm 03:57 PM
How to set taskbar transparency in win10
Jul 07, 2023 pm 03:57 PM
The details are as follows: 1. Open the app store; 2. Search and download transflucenttb (this is an open source tool that can help you quickly set up the taskbar); 3. After the assembly is completed, you can confirm the gradual dialog box; 4. Operation this gadget. It's usually hidden among the small, medium, and large arrow symbols on the taskbar. You can drag it to the taskbar; 5. After turning on transparent color tb, you can set the taskbar. If you want to set it to be completely transparent, you can set it to be completely transparent. Because I installed the English version, the settings can be referred to the following pictures. The above is the complete process of making the Win10 taskbar transparent. It is very simple. As a paranoid personality on the desktop, you must not miss it.
