

Photoshop打造一个漂亮的紫色水晶对话泡泡效果

水晶效果虽然简单,仅有高光和暗部的刻画。不过要做好还是要一定功夫的,需要把实物的边缘及中间等较细的高光及暗部刻画出来,这样整体的细节较多,层次感也更强
最终效果
1、新建一个600 * 600像素的文档,背景选择白色。新建一个组命名为“主体”,用钢笔工具把对话框的轮廓勾出来。然后给组添加图层蒙版,如下图。
<图1>
2、在组里新建一个图层,选择渐变工具,颜色设置如图2,由左下向右上拉出图3所示的线性渐变,局部过渡不自然的部分可以用模糊工具模糊处理。
<图2> 
<图3>
3、新建一个图层,用钢笔勾出图4所示的选区,然后羽化15个像素。再选择渐变工具,颜色设置如图5,由下至上拉出图6所示的线性渐变,顶部用加深工具稍微涂暗一点。
<图4> 
<图5> 
<图6>
4、新建一个图层,把前景颜色设置为橙红色:#FFAB33,用画笔把下图选区部分涂上高光。
<图7>
5、新建一个图层,把前景颜色设置为白色,用透明度较低的画笔把下图选区部分涂上高光,不均匀的部分可以添加图层蒙版后再稍微修饰一下。
<图8> 
<图9>
6、新建一个图层,用钢笔勾出底部高光选区,羽化3个像素后填充黄绿色:#EAEE42,效果如下图。
<图10>
7、新建一个图层,同上的方法制作右边、中间、左边边缘部分的高光,过程如图11 - 13。
<图11> 
<图12> 
<图13>
8、新建一个图层,按Ctrl + Alt + Shift + E 盖印图层。调出组蒙版选区,选择菜单:选择 > 修改 > 收缩,数值为2,确定后按Delete 删除,再把混合模式改为“正片叠底”,效果如下图。
<图14> 
<图15>
9、新建一个图层,用钢笔勾出顶部高光部分的选区如图16,选择渐变工具,颜色设置如图17,拉出图18所示的线性渐变。
<图16> 
<图17> 
<图18>
10、把做好的高光复制一层,适当变形及调整大小和位置,效果如下图。
<图19>
11、新建一个图层,用钢笔勾出右上角高光部分的选区并填充白色,假如他20。取消选区后用模糊工具把边缘稍微模糊处理,再添加图层蒙版,把边缘部分擦出来,效果如图21。
<图20> 
<图21>
12、其它部分可跟进需要再添加一些高光,大致效果如下图。
<图22>
13、调出组蒙版选区,在背景图层上面新建一个图层,选择菜单:选择 > 修改 > 收缩,数值为2,确定后填充白色。
<图23>
14、取消选区后给色块添加投影样式,数值自定,大致效果如下图。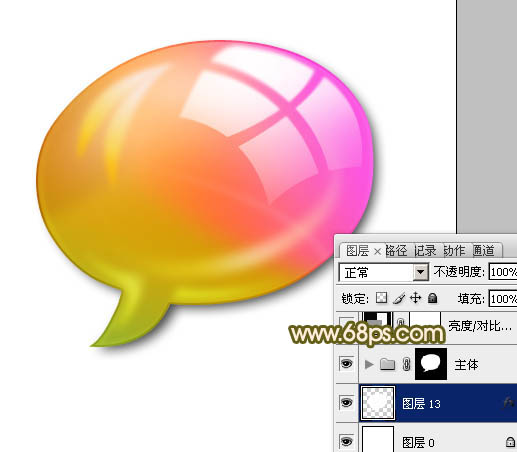
<图24>
15、在图层的最上面创建亮度/对比度调整图层,参数设置如图25,效果如图26。
<图25> 
<图26>
最后调整一下细节,完成最终效果。
<图27>

Hot AI Tools

Undresser.AI Undress
AI-powered app for creating realistic nude photos

AI Clothes Remover
Online AI tool for removing clothes from photos.

Undress AI Tool
Undress images for free

Clothoff.io
AI clothes remover

AI Hentai Generator
Generate AI Hentai for free.

Hot Article
Hot Tools

Notepad++7.3.1
Easy-to-use and free code editor

SublimeText3 Chinese version
Chinese version, very easy to use

Zend Studio 13.0.1
Powerful PHP integrated development environment

Dreamweaver CS6
Visual web development tools

SublimeText3 Mac version
God-level code editing software (SublimeText3)
Hot Topics
 1359
1359
 52
52

 How do I use Photoshop for creating social media graphics?
Mar 18, 2025 pm 01:41 PM
How do I use Photoshop for creating social media graphics?
Mar 18, 2025 pm 01:41 PM
The article details using Photoshop for social media graphics, covering setup, design tools, and optimization techniques. It emphasizes efficiency and quality in graphic creation.
 How do I use Photoshop's Content-Aware Fill and Content-Aware Move tools effectively?
Mar 13, 2025 pm 07:35 PM
How do I use Photoshop's Content-Aware Fill and Content-Aware Move tools effectively?
Mar 13, 2025 pm 07:35 PM
Article discusses using Photoshop's Content-Aware Fill and Move tools effectively, offering tips on selecting source areas, avoiding mistakes, and adjusting settings for optimal results.
 How do I prepare images for web use in Photoshop (file size, resolution, color space)?
Mar 13, 2025 pm 07:28 PM
How do I prepare images for web use in Photoshop (file size, resolution, color space)?
Mar 13, 2025 pm 07:28 PM
Article discusses preparing images for web use in Photoshop, focusing on optimizing file size, resolution, and color space. Main issue is balancing image quality with quick loading times.
 How do I calibrate my monitor for accurate color in Photoshop?
Mar 13, 2025 pm 07:31 PM
How do I calibrate my monitor for accurate color in Photoshop?
Mar 13, 2025 pm 07:31 PM
Article discusses calibrating monitors for accurate color in Photoshop, tools for calibration, effects of improper calibration, and recalibration frequency. Main issue is ensuring color accuracy.
 How do I prepare images for print using Photoshop (resolution, color profiles)?
Mar 18, 2025 pm 01:36 PM
How do I prepare images for print using Photoshop (resolution, color profiles)?
Mar 18, 2025 pm 01:36 PM
The article guides on preparing images for print in Photoshop, focusing on resolution, color profiles, and sharpness. It argues that 300 PPI and CMYK profiles are essential for quality prints.
 How do I use Photoshop's video editing capabilities?
Mar 18, 2025 pm 01:37 PM
How do I use Photoshop's video editing capabilities?
Mar 18, 2025 pm 01:37 PM
The article explains how to use Photoshop for video editing, detailing steps to import, edit, and export videos, and highlighting key features like the Timeline panel, video layers, and effects.
 How do I prepare images for web using Photoshop (optimize file size, resolution)?
Mar 18, 2025 pm 01:35 PM
How do I prepare images for web using Photoshop (optimize file size, resolution)?
Mar 18, 2025 pm 01:35 PM
Article discusses optimizing images for web using Photoshop, focusing on file size and resolution. Main issue is balancing quality and load times.
 How do I create animated GIFs in Photoshop?
Mar 18, 2025 pm 01:38 PM
How do I create animated GIFs in Photoshop?
Mar 18, 2025 pm 01:38 PM
Article discusses creating and optimizing animated GIFs in Photoshop, including adding frames to existing GIFs. Main focus is on balancing quality and file size.
