Photoshop打造漂亮的向日葵花朵
葵花制作相对来说要复杂一点,花朵部分更多同时花盘部分也较为复杂。制作的时候可以稍微偷一下懒,花瓣部分不需要全部都做出来,做几片有代表性的,其它的复制即可
最终效果
1、制作花朵最关键的就是花瓣部分的制作,我们不需要把每片花瓣都做出来,做几片有代表性的,然后复制就可以了。需要完成的几片花瓣如下图。
<图1>
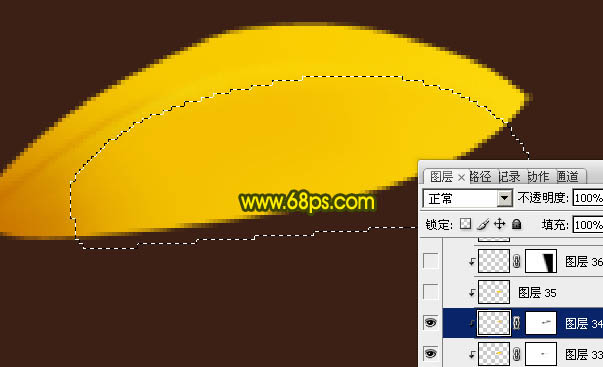
2、我们先来完成第一片花瓣:新建一个1024 * 768像素的文档,背景填充暗褐色:#3C2015,新建一个组,在组里新建一个图层,用钢笔构成花瓣的轮廓,转为选区如下图。
<图2>
3、选择渐变工具,颜色设置如图3,然后由花瓣的左端向右拉出图4所示的径向渐变。
<图3> 
<图4>
4、新建一个图层,按Ctrl + Alt + G 创建剪切图层。然后在当前图层下面新建一个图层,把图层填充橙黄色:#F7CB01,加上图层蒙版,用黑色花瓣把下图选区部分擦出来。
<图5>
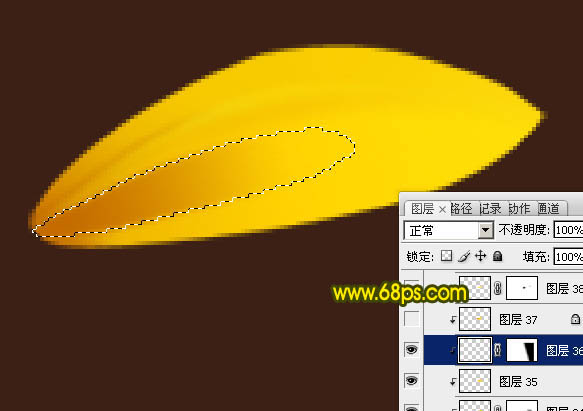
5、新建一个图层,用钢笔构成下图所示的选区,按Ctrl + Alt + D羽化1个像素后填充褐色:#C56F00,取消选区后,加上图层蒙版,用黑色画笔把右端擦出透明度效果。
<图6>
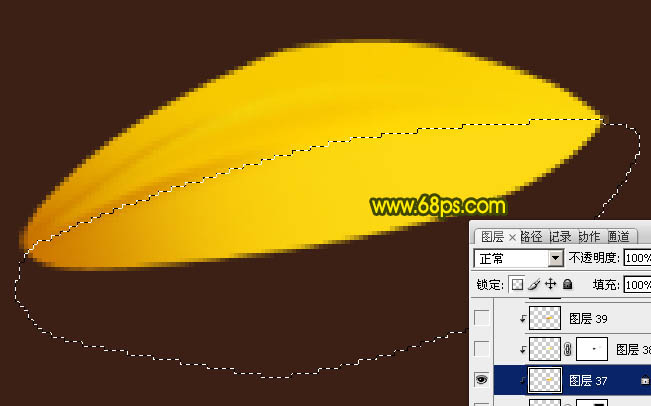
6、新建一个图层,用钢笔勾出下图所示的选区,羽化2个像素后填充橙黄色:#FBD607,取消选区后添加图层蒙版,用黑色画笔把左端擦出过渡效果。
<图7>
7、新建一个图层,用钢笔勾出下图所示的选区,羽化2个像素后填充橙红色色:#F4BF00,取消选区后添加图层蒙版,用黑色画笔把两端擦出过渡效果。
<图8>
8、新建一个图层,用钢笔勾出下图所示的选区,羽化3个像素后填充橙黄色:#FFDB05。
<图9>
9、新建一个图层,同上的方法勾出中间褶皱暗部选区,羽化1个像素后填充褐色:#CA7500,右侧用蒙版擦出过渡效果。
<图10>
10、新建一个图层,用钢笔勾出下图所示的选区,羽化1个像素后拉上图12所示的线性渐变。
<图11> 
<图12>
11、新建一个图层,用钢笔勾出下图所示的选区,羽化2个像素后填充橙黄色:#FEEB2B。
<图13>
12、新建一个图层,同上的方法制作边缘暗部,过程如图14,15。
<图14> 
<图15>
13、新建一个图层,其它褶皱部分制作方法同上,过程如图16,17。
<图16> 
<图17>
14、到这一步第一片花瓣基本完成,先来预览一下效果。如果有什么不满意的可以微调一下。
<图18>
15、新建一个组,同上的方法制作第二片花瓣,过程如图19 - 21。注意好在上面操作的时候每个渐变色需要保存一下。后面的花瓣都会用到。
<图19> 
<图20> 
<图21>
16、新建一个组,同上的方法制作第三片花瓣,效果如下图。
<图22>
17、把做好的几片花瓣合并。每一片花瓣一个图层。然后拖到图层的左上角,方便复制。
然后制作最底层的花瓣。选择好合适的花瓣复制,再调整花瓣的明暗,局部需要用加深工具加深出来,效果如下图。这一步需要耐心操作。
<图23>
18、再复制顶层的花瓣,这层的花瓣颜色稍亮一点。为了区别,先影藏下部的花瓣,效果如下图。
<图24>
19、花瓣组合后的效果如下图。
<图25>
20、在图层的最上面新建一个图层,选择椭圆选框工具拉出图26所示的正圆选区,选择渐变工具,颜色设置如图27,拉出图28所示的径向渐变。
<图26> 
<图27> 
<图28>
21、现在制作纹理。新建一个图层,用钢笔勾出图29所示的路径,转为选区后填充黑色,效果如图30。
<图29> 
<图30>
22、按Ctrl + R 调出标尺,拉两条相交的参考线,如下图。
<图31>
23、按Ctrl + J 把当前图层复制一层,按Ctrl + T 变形,把中心点移到参考线的交点上,然后稍微旋转一点角度,如下图。
<图32>
24、按Ctrl + ALt + Shift + T 复制,直到组成一个圆。然后把这些图层合并,删除超出的部分,效果如图34。
<图33> 
<图34>
25、把当前图层复制一层,选择菜单:编辑 > 变换 > 垂直翻转,效果如下图。
<图35>
26、新建一个图层,中间部分再加上渐变色块,效果如下图。
<图36>
27、新建一个图层,用钢笔勾出小花朵的轮廓,转为选区后用画笔涂出花朵效果,如图37,38。
<图37> 
<图38>
28、把做好的花朵复制,做出下图所示的效果。
<图39>
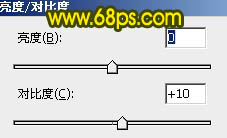
29、创建亮度/对比度调整图层,适当加大对比度,参数设置如图40,效果如图41。
<图40> 
<图41>
最后微调一下细节,完成最终效果。

Hot AI Tools

Undresser.AI Undress
AI-powered app for creating realistic nude photos

AI Clothes Remover
Online AI tool for removing clothes from photos.

Undress AI Tool
Undress images for free

Clothoff.io
AI clothes remover

AI Hentai Generator
Generate AI Hentai for free.

Hot Article

Hot Tools

Notepad++7.3.1
Easy-to-use and free code editor

SublimeText3 Chinese version
Chinese version, very easy to use

Zend Studio 13.0.1
Powerful PHP integrated development environment

Dreamweaver CS6
Visual web development tools

SublimeText3 Mac version
God-level code editing software (SublimeText3)

Hot Topics
 How to use Sunflower Remote Control How to operate Sunflower Remote Control
Feb 22, 2024 pm 03:22 PM
After viewing the verification code of the controlled device, enter it on the control device to perform remote control. Tutorial Applicable Model: Lenovo AIO520C System: Windows 10 Professional Version: Sunflower Remote Control 12.5.0.43486 Analysis 1 First download and install the Sunflower Remote Control software and register an account. The green version used here does not require an account registration. 2. Click the eye icon to the right of the local verification code on the home page of the software to view the verification code. 3. Under Control the remote device on the right, enter the partner identification code and verification code, and click Remote Control. Supplement: What are the functions of Sunflower remote control software? 1 Sunflower remote control software has remote start, remote assistance, remote viewing of desktop, remote upload and download of files, remote distribution of files, C
 How to control sunflower remotely? -Sunflower remote control tutorial
Mar 20, 2024 pm 02:10 PM
Remote computer control is a new essential skill for modern workers. After all, they often encounter temporary problems at home or after get off work. If you encounter an emergency, remote control of your computer can perfectly solve this problem. So how to remotely control Sunflower? Let’s take a look below. Step 1: Install Sunflower Remote Control on the computer. This is the tool we need for remote control. Run the downloaded installation package and you will see the following interface: ①Install the Sunflower software in the default location; ②Do not install, run with the green version; ③Customize the Sunflower software installation location; Step 2: Open the Sunflower remote control in the computer, and then you can See the local identification code and local verification code of this computer. The local identification code can be passed
 CentOS installation gnuplot and CentOS installation sunflower are missing dependencies
Feb 13, 2024 pm 11:39 PM
LINUX is a widely used operating system that is highly customizable and stable. CentOS is a free and open source operating system built on the Red Hat Enterprise Linux (RHEL) source code. It is widely used in servers and desktop environments. In CentOS Installing software packages on CentOS is one of the common tasks in daily use. This article will introduce how to install gnuplot on CentOS and solve the problem of missing dependencies of Sunflower software. Gnuplot is a powerful drawing tool that can generate various types of charts, including two-dimensional and three-dimensional data visualization. To install gnuplot on CentOS, you can follow the steps below: 1.
 What software is Computer Sunflower?
Mar 03, 2023 am 11:42 AM
Computer Sunflower is a software that provides remote control services. The software was developed by Shanghai Beirui Information Technology Co., Ltd.; Sunflower Remote Control supports cross-platform collaborative operation of mainstream operating systems Windows, Linux, Mac, Android, and iOS, and can operate on any available Anywhere connected to the Internet can easily access and control devices with the Sunflower remote control client installed.
 The Bei Rui Sunflower remote system encountered a fault, and the official emergency repair is under way. It is called a 'database exception'
Jan 26, 2024 pm 09:24 PM
According to news from this website on January 26, this afternoon, our friends reported that Sunflower Remote was suddenly unable to connect, and a 503 server error was displayed when logging in. This site inquired about the official website of Beirui Sunflower and found that the company has issued a fault announcement: Due to database anomalies, some users have experienced equipment list loading exceptions and initiated remote exceptions. Engineers are already working on emergency repairs. Please keep the equipment online and we will Automatic recovery. Bei Rui Sunflower is a remote control software that is widely used in IT operation and maintenance and remote office. It is said that it has connected more than 500 million remote control devices and served more than 700,000 enterprise customers.
 How to turn off and start the Sunflower remote control software - How to turn off and start the Sunflower remote control software
Mar 06, 2024 am 11:22 AM
Friends, do you know how to turn off and start the Sunflower remote control software? Today I will explain how to turn off and start the Sunflower remote control software. If you are interested, come and take a look with me. I hope it can help you. Step one: Start the Sunflower remote control software on your computer. Step 2: After opening the software, right-click the icon on the lower right, a window will pop up, and select [Settings]. Step 3: A new window will pop up, select [General]. Step 4: Find the [Startup] item as shown in the picture. Step 5: Finally, turn off the [Startup] function.
 National remote control Bei Rui Sunflower 15 is launched, creating a full-process remote control safety closed loop
Sep 10, 2023 pm 10:33 PM
According to news from this website on September 4, Beirui’s national-level remote control software Beirui Sunflower has recently updated a new version of “Sunflower 15”. This version will be based on the actual security needs of users and is the first “full remote control process” in the industry. The concept of "safety closed loop" better protects the remote control security of enterprises and users. Try it now: Sunflower 15: National remote control protects national security. With the continuous development of the remote control industry, many consumers have higher demands on controlled terminal information security, privacy leakage, etc. How to make consumers feel at ease when using it? , has always been the focus of Sunflower Remote Control. There are some sharp questions, such as: How to ensure that important files of the controlled device are not randomly viewed? How can the controlled device protect its privacy when no one is around? because there is
 How to make a flower shape from a window frame in photoshop
Apr 01, 2024 pm 02:06 PM
1. Open photoshop and create a new PS file. 2. Click the New Layer button in the Layers Panel to create a new empty layer. 3. Select the picture frame in the menu bar-Filter-Rendering. 4. Select a picture frame style and set the beauty color to sepia. The specific parameters are shown in the figure. 5. Select Advanced and set the parameters as shown in the figure: 6. After clicking OK, the corresponding frame will be generated and the size of the frame will be adjusted. 7. Use guide lines to frame the graphic. Then use a rectangular selection to select the shape. 8. Define the selected graphics as patterns. 9. Hide the picture frame layer and create a new layer. 10. Press Shift+F5 to open the fill, select the pattern fill, and then select the pattern just defined to fill. 11. Delete the redundant frames so that the effect is correct


