How to set up Windows11 dns_Windows11 dns setting tutorial
Want to set up DNS in Windows 11? Don't worry anymore! PHP editor Zimo has prepared a detailed tutorial for you to easily complete the DNS settings step by step. Now, let’s dive right in to learn how to configure the ideal DNS settings for your Windows 11 system to make your network connections more efficient and secure.
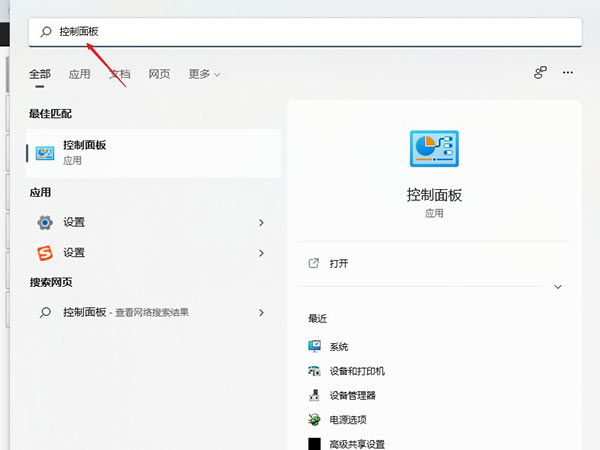
1. First, click the search box at the bottom of the desktop, enter [Control Panel] in the search box, and open the control panel interface, as shown in the figure.
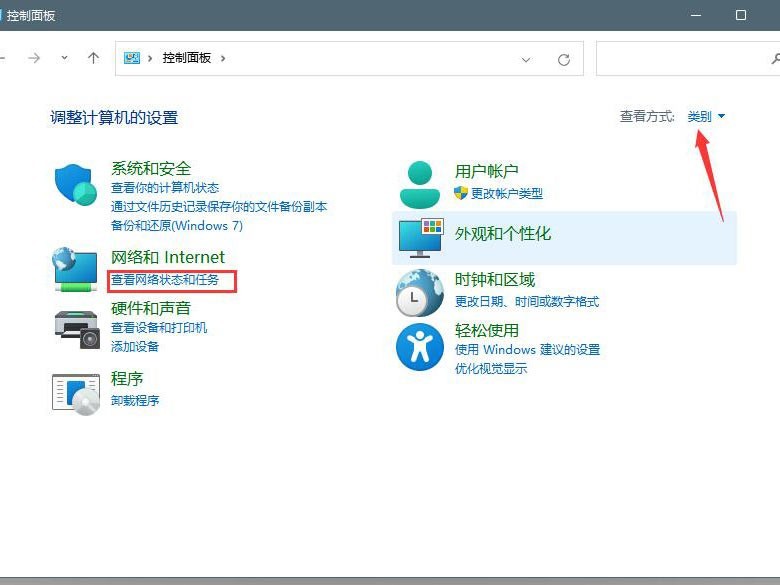
2. Then, in the [Control Panel] interface that opens, set [View By] in the upper right corner to [Category], and click [Find Network Status and Tasks] below. options as shown in the figure.
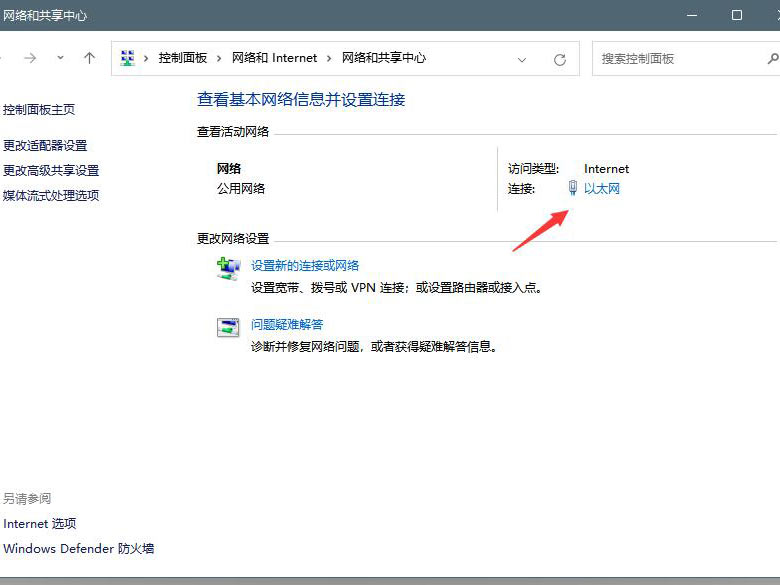
3. Then, open the connected network, and in the window that opens, click the [Properties] option, as shown in the figure.
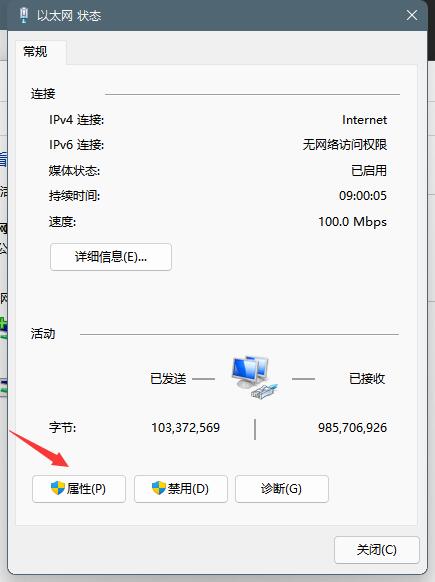
#4. Then in the properties window that opens, select to open the [ipv4] properties interface, as shown in the figure.
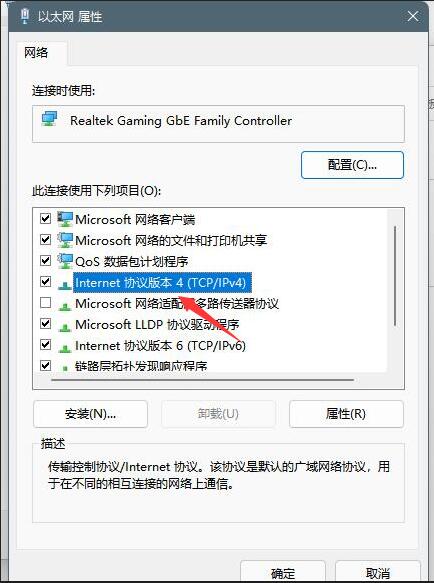
5. Finally, check the [Use the following dns server address] option below and enter the dns number to complete the setting, as shown in the figure.
The above is the detailed content of How to set up Windows11 dns_Windows11 dns setting tutorial. For more information, please follow other related articles on the PHP Chinese website!

Hot AI Tools

Undresser.AI Undress
AI-powered app for creating realistic nude photos

AI Clothes Remover
Online AI tool for removing clothes from photos.

Undress AI Tool
Undress images for free

Clothoff.io
AI clothes remover

Video Face Swap
Swap faces in any video effortlessly with our completely free AI face swap tool!

Hot Article

Hot Tools

Notepad++7.3.1
Easy-to-use and free code editor

SublimeText3 Chinese version
Chinese version, very easy to use

Zend Studio 13.0.1
Powerful PHP integrated development environment

Dreamweaver CS6
Visual web development tools

SublimeText3 Mac version
God-level code editing software (SublimeText3)

Hot Topics
 1392
1392
 52
52
 36
36
 110
110
 ReactOS, the Open-Source Windows, Just Got an Update
Mar 25, 2025 am 03:02 AM
ReactOS 0.4.15 includes new storage drivers, which should help with overall stability and UDB drive compatibility, as well as new drivers for networking. There are also many updates to fonts support, the desktop shell, Windows APIs, themes, and file
 How to Create a Dynamic Table of Contents in Excel
Mar 24, 2025 am 08:01 AM
A table of contents is a total game-changer when working with large files – it keeps everything organized and easy to navigate. Unfortunately, unlike Word, Microsoft Excel doesn’t have a simple “Table of Contents” button that adds t
 Microsoft's New PowerToys Search Is the Missing Feature Windows 11 Needs
Apr 03, 2025 am 03:53 AM
Microsoft's latest PowerToys update introduces a game-changing search feature reminiscent of macOS' Spotlight. This improved "Command Palette" (formerly PowerToys Run) surpasses the functionality of the Windows R Run command and the task
 This ASUS ROG Zephyrus with an RTX 3070 Is 31% Off Right Now
Mar 22, 2025 am 06:02 AM
Great value for discount! Asus ROG Zephyrus G16 (2024) E-sports book has dropped significantly! Original price is $1999.99, current price is only $1379.99, saving $620! This Asus ROG Zephyrus G16 gaming laptop equipped with RTX 4070 graphics card brings excellent gaming performance at a lower price. It comes with a stunning 16-inch QHD OLED screen with a smooth 240Hz refresh rate. While the CPU isn't top-notch, its cool appearance, oversized storage space and powerful graphics card make it an ideal choice for users who pursue portable high-performance laptops. Best Buy exclusive offer! Currently, Best Buy is selling this product at a significant discount
 New to Multi-Monitors? Don't Make These Mistakes
Mar 25, 2025 am 03:12 AM
Multi-monitor setups boost your productivity and deliver a more immersive experience. However, it's easy for a novice to stumble while assembling the setup and make mistakes. Here are some of the most common ones and how to avoid them.
 Lenovo Yoga Slim 9i 14 Gen 10 Laptop Review: Speedy Processing, Lacking Elsewhere
Mar 22, 2025 am 03:07 AM
The Lenovo Yoga Slim 9i (14-inch, 10th Gen Intel) offers a compelling blend of features: Microsoft Copilot AI integration, a stunning 4K OLED display, and robust Intel processing power. While it comes close to perfection, some shortcomings hold it b
 You Don't Need to Wait for These Amazon Big Spring Sale Deals
Mar 23, 2025 am 03:04 AM
If there are two things you can bet on when it comes to an Amazon sales event, it's for Amazon brand products to be on sale, and it's for them to be on sale early. The latest model of the Amazon Fire HD 10 is one such product, and you can pick it up
 How to Disable Windows 11 Round Corners: 4 Easy Methods!
Mar 27, 2025 pm 03:27 PM
This guide provides four methods to remove the rounded corners in Windows 11, restoring the classic square-edged look. While the rounded corners offer a modern aesthetic, some users prefer the sharper look for reasons including improved screenshot a


