

ps 打造的一款精致的古典风格收音机

本教程介绍古典风格的收音机制作方法。可能实物构成面有很多,制作的时候先分好图层的顺序。然后分别用钢笔勾出各部分的选区,制作表面的质感材质。部分材质可以直接使用图案素材。
最终效果
1、打开Photshop, 文件-新建,大小为500*500像素。
2、新建图层一,绘制一大小沾满画布的矩形,选择渐变工具(G),在上方的选项栏里选择径向渐变。

3、新建图层二,使用圆角矩形工具半径为10Px。
4、添加图层样式。
5、新建图层三,得到图层二的选区,在选区范围内打开照片 “羊皮纸3”。
6、减去多余的部分。
7、把图层的混合模式改为叠加。
8、新建图层四,绘制一稍小一点的圆角矩形。
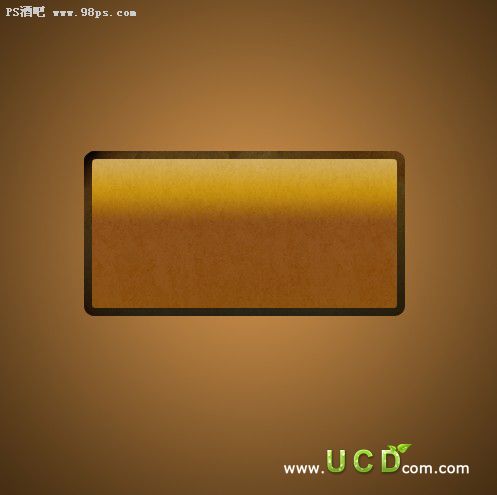
9、添加图层样式。


10、新建图层五,复制图层四的选区,添加图层样式。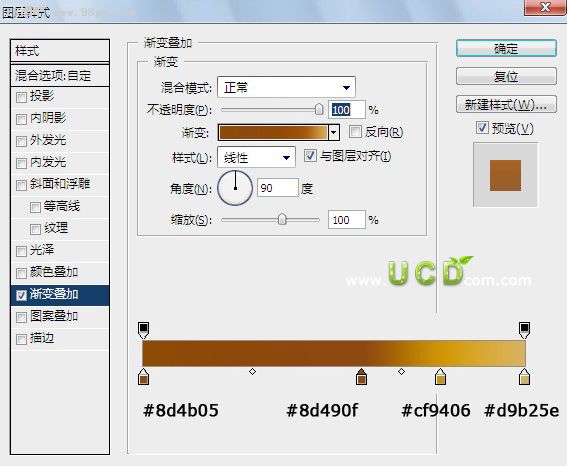
11、新建图层六,复制图层五的选区,单击修改(M)-收缩,2像素。

12、Alt+Delete 填充色味#4d311a。
13、新建图层七,导入素材 “木质地板”,复制图层六的选区,减去多余的部分,图层混合模式改为“正片叠底”。

14、这个时候我们来做反光的效果,新建图层八,使用椭圆选框工具绘制一白色半透明的椭圆,透明不为13%
。
15、减去多余的部分。
16、填充渐变。
17、新建图层九, 绘制一比图层八扁一点的矩形,添加图层样式。


18、按住Shirt键 ,使用直线工具绘制一条黑色,一条颜色为#b88856,的直线(注:两条线分别在两个不同的图层,黑色线在上面)。

19、这个时候开始绘制按钮。

20、使用矩形工具 在两个按钮中间绘制窄的矩形,添加图层样式( 1c0900 381f14)。

21、复制两个,并排列整齐。
22、拉上渐变色。

23、绘制高光 使用钢笔工具绘制高光。图层不透明度为15%。

24、在背景层的上方新建图层,用圆角矩形绘制一底座。
25、用椭圆选框工具绘制一椭圆,羽化30像素,填充黑色。
26、这个时候影印就做好了。
27、这个时候我们就差一投影了,用矩形选框共组选中,填充颜色为#4f3517,图层混合模式为,正叠底片。
28、复制收音机的图层,并旋转位于元件收音机的底部,调整不透明度为7%。
29、使用椭圆选框工具羽化30像素。
最终效果:

Hot AI Tools

Undresser.AI Undress
AI-powered app for creating realistic nude photos

AI Clothes Remover
Online AI tool for removing clothes from photos.

Undress AI Tool
Undress images for free

Clothoff.io
AI clothes remover

AI Hentai Generator
Generate AI Hentai for free.

Hot Article
Hot Tools

Notepad++7.3.1
Easy-to-use and free code editor

SublimeText3 Chinese version
Chinese version, very easy to use

Zend Studio 13.0.1
Powerful PHP integrated development environment

Dreamweaver CS6
Visual web development tools

SublimeText3 Mac version
God-level code editing software (SublimeText3)
Hot Topics
 1376
1376
 52
52

 How do I use Photoshop for creating social media graphics?
Mar 18, 2025 pm 01:41 PM
How do I use Photoshop for creating social media graphics?
Mar 18, 2025 pm 01:41 PM
The article details using Photoshop for social media graphics, covering setup, design tools, and optimization techniques. It emphasizes efficiency and quality in graphic creation.
 How do I use Photoshop's Content-Aware Fill and Content-Aware Move tools effectively?
Mar 13, 2025 pm 07:35 PM
How do I use Photoshop's Content-Aware Fill and Content-Aware Move tools effectively?
Mar 13, 2025 pm 07:35 PM
Article discusses using Photoshop's Content-Aware Fill and Move tools effectively, offering tips on selecting source areas, avoiding mistakes, and adjusting settings for optimal results.
 How do I prepare images for web use in Photoshop (file size, resolution, color space)?
Mar 13, 2025 pm 07:28 PM
How do I prepare images for web use in Photoshop (file size, resolution, color space)?
Mar 13, 2025 pm 07:28 PM
Article discusses preparing images for web use in Photoshop, focusing on optimizing file size, resolution, and color space. Main issue is balancing image quality with quick loading times.
 How do I calibrate my monitor for accurate color in Photoshop?
Mar 13, 2025 pm 07:31 PM
How do I calibrate my monitor for accurate color in Photoshop?
Mar 13, 2025 pm 07:31 PM
Article discusses calibrating monitors for accurate color in Photoshop, tools for calibration, effects of improper calibration, and recalibration frequency. Main issue is ensuring color accuracy.
 How do I prepare images for print using Photoshop (resolution, color profiles)?
Mar 18, 2025 pm 01:36 PM
How do I prepare images for print using Photoshop (resolution, color profiles)?
Mar 18, 2025 pm 01:36 PM
The article guides on preparing images for print in Photoshop, focusing on resolution, color profiles, and sharpness. It argues that 300 PPI and CMYK profiles are essential for quality prints.
 How do I prepare images for web using Photoshop (optimize file size, resolution)?
Mar 18, 2025 pm 01:35 PM
How do I prepare images for web using Photoshop (optimize file size, resolution)?
Mar 18, 2025 pm 01:35 PM
Article discusses optimizing images for web using Photoshop, focusing on file size and resolution. Main issue is balancing quality and load times.
 How do I create animated GIFs in Photoshop?
Mar 18, 2025 pm 01:38 PM
How do I create animated GIFs in Photoshop?
Mar 18, 2025 pm 01:38 PM
Article discusses creating and optimizing animated GIFs in Photoshop, including adding frames to existing GIFs. Main focus is on balancing quality and file size.
 How do I use Photoshop's video editing capabilities?
Mar 18, 2025 pm 01:37 PM
How do I use Photoshop's video editing capabilities?
Mar 18, 2025 pm 01:37 PM
The article explains how to use Photoshop for video editing, detailing steps to import, edit, and export videos, and highlighting key features like the Timeline panel, video layers, and effects.
