

Photoshop 制作水裙效果

前言:浏览教程之前,请不要太在意人物素材部分。因为这篇教程是介绍如何制作逼真的水裙。请以一种学习的态度去浏览。毕竟这是顶级设计师的力作。里面包含大量特效及细节处理的方法。完全值得我们去学习。
最终效果 
1、找素材图片抠图,做背景,合成。女模特不该小朋友看到的地方处理掉。其实不处理掉也行。就怕被和谐掉。 
2、建立新图层(命名水轮廓线A),绘制水群轮廓。绘图板的同学建议用5PX笔刷,鼠标同学建议用4PX粗笔刷。这一步的关键词是画(轮廓) 。轮廓可以用粗笔画。鼠标同学不要看到这就想放弃,因为只要画出大概就可以,不一定非得很美观。 讲一下这里我遇到的问题,昨天尝试轮廓后直接做成水,结果样子很粗糙。我建议,在用粗笔画完轮廓后。用1像素的笔在潦草的描几次。如影随形在粗轮廓线左右。手抖一点效果更好。
还有需要注意的一点就是水的发散,尤其是女模胸部的水裙,要有冒奶的感觉^^ 还有水裙裙摆的水珠不要画的太大。如果你看着大小刚刚好,那么不幸的告诉你,你已经画大了。将来做出来效果不像水。倒是很像冰。
总之整个裙子画的奔放点,open点,浪一点,就对了。 什么?我画的不够浪?好吧,我承认我怕被和谐。
3、这步我很困惑。因为我把我最后才做的东西放到了这里。但是我觉得这样做也没什么不好。更容易让思路清晰。 现在建立新图层(命名图层水裙填充A)。用1像素的画笔在你刚刚水裙的轮廓线内涂啊涂啊。涂到什么程度呢?请看图。 这步需要注意的是一定不能让笔粗了。试用鼠标的同学们建议把画笔透明度调整为40-60左右。里我们主要制作的是水裙子的水填充。
4、灌水之前的准备~!我们要执行滤镜-扭曲-玻璃啦但是直接在以个镂空的线条上做这个滤镜是米有效果的。 所以将(水轮廓线A)复制层。-->(水轮廓线A)层的下面建立新图层,填充成黑色。然后将这两个图层合并。效果如下。然后讲合并的这个图层命名为(轮廓线A1)然后复制该层命名为(轮廓线A2)这步其实很简单啦。就是为了以防万一。复制一个当备用。然后建立个黑层。将线条和黑层合并。然后去执行滤镜玻璃。  5、水的初步形成 激动人心的时刻道来了。先将不用的图层都隐藏掉。(当然留下美女模特和背景层这你还用问我?)选者图层(轮廓线A1)执行滤镜-扭曲-玻璃具体参数如下。
然后选择图层(轮廓线A2)执行滤镜-扭曲-玻璃,这里需要说明的是滤镜参数不一定就是雷打不动的。可以根据情况来调整。我的思路是这两个层将来要叠在一起上色。所以稍微有些区别。 。 
6、现在已经把线条弯曲波动了。整个教程一共就用了两个滤镜。可能我对滤镜还不太纯属吧。有些东西我是自己动手弄的。如果哪位仁兄用滤镜可以搞定一定不要保留哟。 晕,说着说找整跑题了。继续制作水。这步主要是将合并在黑色背景里的白色水群轮廓线抽出。有的同学说了。图层混合模式里的滤色不就搞定了吗?NONONO你这样不行。因为我们要上色。由于你多嘴罚你弹自己小JJ一百遍!
咳。又跑题了。别打我哈。抽出黑色背景下的白色物体这里我用的通道抠图法。其它仁兄有什么更好的招式都可以招呼。选者轮廓线层(其中一个,难道是两个都选啊)进入通道。选择任意一个颜色通道。复制通道。然后在复制通道上按住ctrl点你的鼠标左键。发现建立选区了- -! 然后回到图层面板。点选轮廓线层。使其回到RGB模式,然后按ctrl+J也就是(复制选区通过新建图层)现在同学请把刚刚复制过的呢个家伙删除掉吧。不要它了。嘿嘿。(这里你会惊讶,怎么我复制出来的东东带有黑边)不要着急。锁定图层透明区域(就是在图层混合模式下面那个锁定的后面的小矩形上面带有小块块的按钮=。= )然后按键盘(D)重置颜色,再按ctrl+delete将水群轮廓填充为白色,好了。这回轮廓线正常了。如果你讲整个画布都填充成为白色那么请从看此段教材。按照这个方法将另一个水群轮廓亦填充为白色。
七:水到渠成咯,如果同学们没做错的话。两个轮廓线图层同时打开的时候应该是介个样子地。 如果你做的不对。请从上面开看或回帖提问~ 现在的图层顺序应该是轮廓线A2在A1的上面。图层顺序不对的同学请改正。
隐藏A2。将1复制1个后用(隐藏掉).锁定A1图层透明区域。给水群轮廓线上色。如图,置于为什么要上黑色和黄 色。是因为。。。。光影反射?
我也是粗略的弄了一下。然后再复制一层将其置于原图层层级下面,图层混合模式为颜色减淡(隐藏掉)相信不管是绘图板同学或者是鼠标同学都应该很快搞定。 #p# 8、将A2复制一层隐藏掉,然后画面内A1和A2共同显示了。这是你会发现。水衣轮廓过于明亮。你可以用图层蒙版修整掉一些过于明亮的部分。如图
9、将A2复制层,也就是A2(副本)层填充为灰色9b9c9a更改图层混合模式颜色加深,主意调整画面中模特身上不适处。擦掉或图层蒙版掉  10、将A1在没有填充颜色前的图层放置在A1 A2系列图层层级最下方。(该图层为原始A1图层没有填充过颜色,纯白的)当前效果
11、现在水裙子已经初具规模了。如果你是一个懒人,那么此教材到此就可以不用看了。 我们下面的工作是继续细化还记得起初的轮廓线我叫你复制的那层吗?找到它。将它放在A1A2系列层级下。然后用橡皮活图层模板擦掉多余的部分。以加重水裙边缘质感。此处不放图片。同学们自己想像来搞。不要被局限住。总之你看着顺眼,自然就可以了。
12、还记得老朋友吗?差点被遗忘吧。就是开始我让你们画的呢个水填充,如图:执行滤镜-扭曲-玻璃(此教材主要围绕这个滤镜)参数如下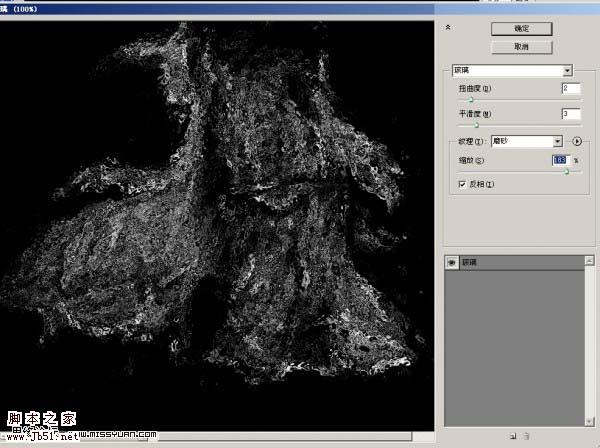
然后抠图。还是同道抠图法,然后锁定透明区域填充成白色。然后复制一层填充成灰色,将其置于原始层级下面。透明度35.用模糊工具涂抹几下,更改图层混合模式为正片叠底。并用画笔稍微上点颜色。  13、打开隐藏的那些家伙。如果你看不到他们让猎人放照明弹。如果你正确的话现在应该是这个样子了
然后讲女模在水中的身体部分进行扭曲,我是复制了一个图层才扭的。你们怎么方便怎么来。这步主要是水的折射可以使物体扭曲(具体说法我还不懂=。=) 
14、讲模特的腿从裙中伸出来(*^__^*) 方法自己揣摩。 
15、建议一个新图层在最顶层,用画笔(1像素粗)将滤镜没有交代清楚的地方在勾勒一遍。 

Hot AI Tools

Undresser.AI Undress
AI-powered app for creating realistic nude photos

AI Clothes Remover
Online AI tool for removing clothes from photos.

Undress AI Tool
Undress images for free

Clothoff.io
AI clothes remover

AI Hentai Generator
Generate AI Hentai for free.

Hot Article
Hot Tools

Notepad++7.3.1
Easy-to-use and free code editor

SublimeText3 Chinese version
Chinese version, very easy to use

Zend Studio 13.0.1
Powerful PHP integrated development environment

Dreamweaver CS6
Visual web development tools

SublimeText3 Mac version
God-level code editing software (SublimeText3)
Hot Topics
 1386
1386
 52
52

 What is the reason why PS keeps showing loading?
Apr 06, 2025 pm 06:39 PM
What is the reason why PS keeps showing loading?
Apr 06, 2025 pm 06:39 PM
PS "Loading" problems are caused by resource access or processing problems: hard disk reading speed is slow or bad: Use CrystalDiskInfo to check the hard disk health and replace the problematic hard disk. Insufficient memory: Upgrade memory to meet PS's needs for high-resolution images and complex layer processing. Graphics card drivers are outdated or corrupted: Update the drivers to optimize communication between the PS and the graphics card. File paths are too long or file names have special characters: use short paths and avoid special characters. PS's own problem: Reinstall or repair the PS installer.
 How to solve the problem of loading when PS is always showing that it is loading?
Apr 06, 2025 pm 06:30 PM
How to solve the problem of loading when PS is always showing that it is loading?
Apr 06, 2025 pm 06:30 PM
PS card is "Loading"? Solutions include: checking the computer configuration (memory, hard disk, processor), cleaning hard disk fragmentation, updating the graphics card driver, adjusting PS settings, reinstalling PS, and developing good programming habits.
 What are the common questions about exporting PDF on PS
Apr 06, 2025 pm 04:51 PM
What are the common questions about exporting PDF on PS
Apr 06, 2025 pm 04:51 PM
Frequently Asked Questions and Solutions when Exporting PS as PDF: Font Embedding Problems: Check the "Font" option, select "Embed" or convert the font into a curve (path). Color deviation problem: convert the file into CMYK mode and adjust the color; directly exporting it with RGB requires psychological preparation for preview and color deviation. Resolution and file size issues: Choose resolution according to actual conditions, or use the compression option to optimize file size. Special effects issue: Merge (flatten) layers before exporting, or weigh the pros and cons.
 How to speed up the loading speed of PS?
Apr 06, 2025 pm 06:27 PM
How to speed up the loading speed of PS?
Apr 06, 2025 pm 06:27 PM
Solving the problem of slow Photoshop startup requires a multi-pronged approach, including: upgrading hardware (memory, solid-state drive, CPU); uninstalling outdated or incompatible plug-ins; cleaning up system garbage and excessive background programs regularly; closing irrelevant programs with caution; avoiding opening a large number of files during startup.
 How to set password protection for export PDF on PS
Apr 06, 2025 pm 04:45 PM
How to set password protection for export PDF on PS
Apr 06, 2025 pm 04:45 PM
Export password-protected PDF in Photoshop: Open the image file. Click "File"> "Export"> "Export as PDF". Set the "Security" option and enter the same password twice. Click "Export" to generate a PDF file.
 How to use PS Pen Tool
Apr 06, 2025 pm 10:15 PM
How to use PS Pen Tool
Apr 06, 2025 pm 10:15 PM
The Pen Tool is a tool that creates precise paths and shapes, and is used by: Select the Pen Tool (P). Sets Path, Fill, Stroke, and Shape options. Click Create anchor point, drag the curve to release the Create anchor point. Press Ctrl/Cmd Alt/Opt to delete the anchor point, drag and move the anchor point, and click Adjust curve. Click the first anchor to close the path to create a shape, and double-click the last anchor to create an open path.
 How to solve the problem of loading when the PS opens the file?
Apr 06, 2025 pm 06:33 PM
How to solve the problem of loading when the PS opens the file?
Apr 06, 2025 pm 06:33 PM
"Loading" stuttering occurs when opening a file on PS. The reasons may include: too large or corrupted file, insufficient memory, slow hard disk speed, graphics card driver problems, PS version or plug-in conflicts. The solutions are: check file size and integrity, increase memory, upgrade hard disk, update graphics card driver, uninstall or disable suspicious plug-ins, and reinstall PS. This problem can be effectively solved by gradually checking and making good use of PS performance settings and developing good file management habits.
 How does PS feathering control the softness of the transition?
Apr 06, 2025 pm 07:33 PM
How does PS feathering control the softness of the transition?
Apr 06, 2025 pm 07:33 PM
The key to feather control is to understand its gradual nature. PS itself does not provide the option to directly control the gradient curve, but you can flexibly adjust the radius and gradient softness by multiple feathering, matching masks, and fine selections to achieve a natural transition effect.
