

photoshop 打造一张绝美的真人插画

本教程视觉效果非常优美,流畅的线条加上一些小花纹装饰,背景层次感强,很有现代艺术风味。而且画面的装饰基本上都是用PS来完成,不得不佩服作者的创意的设计能力。
原图 
1、打开图片,双击背景层解锁。 
#p# 2、用钢笔工具勾出人物主体,转为选区后删除。 

3、执行选择/调整边缘,对边缘进行处理。 

#p# 4、在人物层下面新建一层,灰色渐变填充,然后把画布加宽,如图。 

5、对人物头发进行处理,复制一层人物放原人物层下面,混合模式设为"变暗"(先隐藏原人物层看效果),然后用橡皮擦擦掉原人物层多余的部分。 


#p# 6、然后再复制一层,混合模式设为"强光",越强人物对比,做个盖印层,然后降低一些饱和度。 
7、选取人物飘带部分,复制成一个新层,移到飘带尾部把飘带接长些,可以多复制几层,然后用蒙板处理其过渡,然后再做个盖印层。 


#p# 8、选择仿制图章工具,然后选一个叶子笔刷,在飘带尾部取样,仿制一层飘叶效果,然后在蒙板里结细节进行处理。 


#p# 8、画笔面板里调出一种星光笔刷,然后用钢笔工具色出一条飘逸的线条,右击选择描边路径,选画笔。 效果如图。 

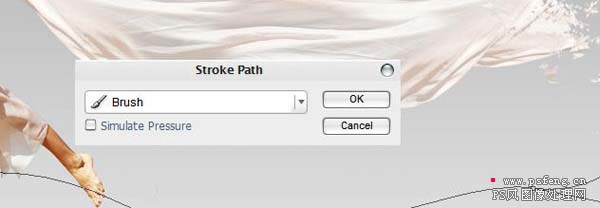

#p# 9、可以多复制几个这样的线条做装饰,如果有时间最好不要还是用钢笔多画几要不同的线条。 
如果有花纹笔刷可以在飘带尾部加一些花纹做装饰。 
10、在此人物和飘带部分处理完成,可以把这个部分除灰色背景层的所有图层分成一个组,方便修改和查看接下来就是整体装饰部分,新建一层,然后用钢笔工具勾出一些线条,然后画笔描边。 


#p# 11、选择一些花纹的形状,转为选区后描边,如图。 


#p# 12、再用钢笔工具勾出一些彩带形状,用渐变填充,如图。 


#p# 13、下面我们要做个光效,可以用星光笔刷刷出一个光照点,然后做一些光晕,这里我们没有用光照效果,是因为光照效果不能很好的控制我们想要的光晕形状。 


#p# 14、效果还不太理想,我们还想再加一些成排的线条,这里作者有给出两种方法,一种是在AI里做,这里我们就翻译出来了,只说在PS里有做法,其实跟做抽丝的方法是一样的,先新建一个横条的文件,定义成图案。 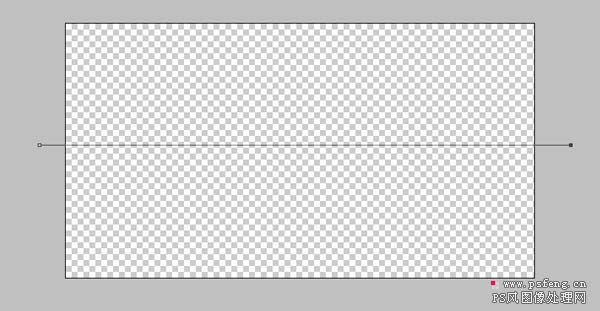


然后在我们处理的图中新建一层填充图案.就会出现很多横线条布满整个画面,我们再用变形进行处理就可以得出成排的线条。 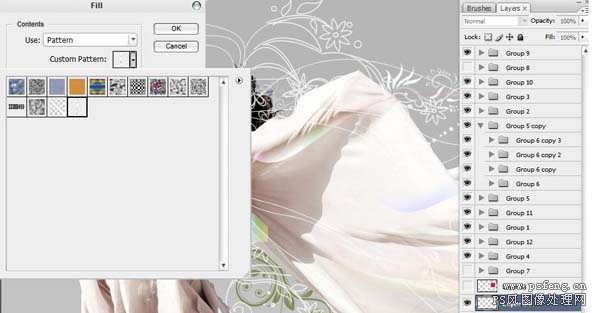


#p# 

15、做最后的修饰和细节的处理就可以收工了。

Hot AI Tools

Undresser.AI Undress
AI-powered app for creating realistic nude photos

AI Clothes Remover
Online AI tool for removing clothes from photos.

Undress AI Tool
Undress images for free

Clothoff.io
AI clothes remover

AI Hentai Generator
Generate AI Hentai for free.

Hot Article
Hot Tools

Notepad++7.3.1
Easy-to-use and free code editor

SublimeText3 Chinese version
Chinese version, very easy to use

Zend Studio 13.0.1
Powerful PHP integrated development environment

Dreamweaver CS6
Visual web development tools

SublimeText3 Mac version
God-level code editing software (SublimeText3)
Hot Topics


 How do I use Photoshop for creating social media graphics?
Mar 18, 2025 pm 01:41 PM
How do I use Photoshop for creating social media graphics?
Mar 18, 2025 pm 01:41 PM
The article details using Photoshop for social media graphics, covering setup, design tools, and optimization techniques. It emphasizes efficiency and quality in graphic creation.
 How do I prepare images for web use in Photoshop (file size, resolution, color space)?
Mar 13, 2025 pm 07:28 PM
How do I prepare images for web use in Photoshop (file size, resolution, color space)?
Mar 13, 2025 pm 07:28 PM
Article discusses preparing images for web use in Photoshop, focusing on optimizing file size, resolution, and color space. Main issue is balancing image quality with quick loading times.
 How do I use Photoshop's Content-Aware Fill and Content-Aware Move tools effectively?
Mar 13, 2025 pm 07:35 PM
How do I use Photoshop's Content-Aware Fill and Content-Aware Move tools effectively?
Mar 13, 2025 pm 07:35 PM
Article discusses using Photoshop's Content-Aware Fill and Move tools effectively, offering tips on selecting source areas, avoiding mistakes, and adjusting settings for optimal results.
 How do I use Photoshop's video editing capabilities?
Mar 18, 2025 pm 01:37 PM
How do I use Photoshop's video editing capabilities?
Mar 18, 2025 pm 01:37 PM
The article explains how to use Photoshop for video editing, detailing steps to import, edit, and export videos, and highlighting key features like the Timeline panel, video layers, and effects.
 How do I calibrate my monitor for accurate color in Photoshop?
Mar 13, 2025 pm 07:31 PM
How do I calibrate my monitor for accurate color in Photoshop?
Mar 13, 2025 pm 07:31 PM
Article discusses calibrating monitors for accurate color in Photoshop, tools for calibration, effects of improper calibration, and recalibration frequency. Main issue is ensuring color accuracy.
 How do I prepare images for web using Photoshop (optimize file size, resolution)?
Mar 18, 2025 pm 01:35 PM
How do I prepare images for web using Photoshop (optimize file size, resolution)?
Mar 18, 2025 pm 01:35 PM
Article discusses optimizing images for web using Photoshop, focusing on file size and resolution. Main issue is balancing quality and load times.
 How do I create animated GIFs in Photoshop?
Mar 18, 2025 pm 01:38 PM
How do I create animated GIFs in Photoshop?
Mar 18, 2025 pm 01:38 PM
Article discusses creating and optimizing animated GIFs in Photoshop, including adding frames to existing GIFs. Main focus is on balancing quality and file size.
 How do I prepare images for print using Photoshop (resolution, color profiles)?
Mar 18, 2025 pm 01:36 PM
How do I prepare images for print using Photoshop (resolution, color profiles)?
Mar 18, 2025 pm 01:36 PM
The article guides on preparing images for print in Photoshop, focusing on resolution, color profiles, and sharpness. It argues that 300 PPI and CMYK profiles are essential for quality prints.
