

photoshop 可爱的中国风卡通MM头像

本教程介绍卡通人物头像的制作方法。一个看似简单的图像,制作起来不是那么简单的,有很多细节需要处理好。尤其是头发及一些小装饰元素比较费时间。不过作者把过程写得非常详细。在此非常感谢作者的优秀教程。制作的过程有任何疑问可以加作者
来源:PS联盟 作者:天使鱼的梦
本教程介绍卡通人物头像的制作方法。一个看似简单的图像,制作起来不是那么简单的,有很多细节需要处理好。尤其是头发及一些小装饰元素比较费时间。不过作者把过程写得非常详细。
最终效果 
1、制作背景:
新建一个宽度为454象素高度为340象素的文件。设置前景色的颜色值为#dc007a(R:220,G:0,B:122),背景色为黑色。选择渐变工具,然后在渐变工具的属性栏(菜单栏的下面)上选择径向渐变工具,做一条渐变。在画布上自己认为合适的地方直接拉一下就好了。 
执行滤镜-纹理-纹理化命令,弹出“纹理化”滤镜对话框,纹理选择--画布, 缩放--91%,凸现--1,光照--上。不要勾选反相。 
 #p# 2、头部的制作:
在背景层上面新建一个图层,取名为--头部。选择椭圆选框工具,画一个圆。并且填充为黑色。 
不要取消选区,选择椭圆/矩形/单行/单列选框中的任意一种工具,再轻按键盘上的向下箭头两次,将选区微微下移2个象素,在头部图层的上方新建一个图层,取名为头顶高光。设置前景色为白色,选择渐变工具,在渐变工具的属性栏上选择线性渐变工具,在画布上做一条白色到透明的线性渐变。做好之后填充度更改为37%。 

3、脸部的制作:
在头顶高光图层的上方新建一个图层,取名为脸部。选择椭圆选框工具,画一个比头部小一点的圆。设置前景色的颜色值为# feeada(R:254,G:234,B:218),按ALT+DELETE键填充前景色。  #p# 4、头发的制作:
在头部图层和背景层的中间新建一个图层,取名为左边头发。选择椭圆选框工具。画一个圆并且填充黑色。 
在左边头发图层的上方新建一个图层,取名为左边头发高光。更改前景色为白色,使用径向渐变工具做一个渐变,填充度更改为25%。 
5、头发丝的制作:
选择椭圆工具(不是椭圆选框工具),在头发上画一个圆。然后使用路径选择工具将这个圆选中,选中之后按住键盘上的ALT键的同时,将圆微微上移(左移/下移/右移都是一样的.),这样就复制了一个圆。调整好位置之后(使用路径选择工具将圆选中之后来根据需要来移动就好了。),再按照这个方法来复制圆。 
6、头发丝路径:
在左边头发高光的图层上方新建一个图层,取名为头发丝。在工具条中选择笔刷工具,设置笔刷的直径为1个象素。在笔刷面板里将比刷间距设置为1%。  #p# 7、头发丝路径描边:
用路径选取工具选取所有头发路径,然后单击鼠标右键,选择描边路径,弹出描边路径对话框,在下拉框里选择画笔,勾选模拟压力,点击确定。效果如图 
8、按住CTRL键的同时单击左边头发图层的图层缩览图,载入左边头发图层的选区。再按CTRL+SHIFT+I键将选区反选,然后使用橡皮擦工具将多余的头发丝擦掉。按CTRL+D取消选区.更改填充度为17%。 
9、制作发带:
在头发丝图层的上方新建一个图层,取名为发带。用椭圆选框工具画一个小一点的圆,填充红色。并移动到合适的位置上。在发带图层上面新建一个名为发带高光的图层。选择2个象素大小的笔刷,在发带上轻轻的刷一下,加点高光。 
10、给发带加个蝴蝶结:
在头部图层的上方新建一个图层,取名为蝴蝶结。在工具条中选择自定形状工具,在它的属性面板打开自定形状拾色器。找到蝴蝶结的形状,在画布上拖拉出合适的大小。按CTRL+ENTER键,将路径转换为选区,填充自己喜欢的颜色。最后使用直径为3个象素大小的笔刷在蝴蝶结的中间点一下。 
 #p# 11、右边头发的制作:
在头部图层下方新建一个图层,取名右边头发。隐藏脸部/头顶高光/蝴蝶结/头部/背景图层,然后按CTRL+SHIFT+ALT+E键盖印图层。 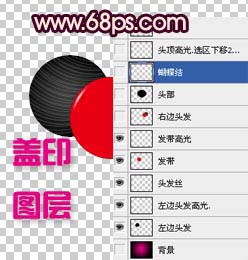
12、编辑-变换-水平翻转,将右边的头发水平翻转,并用移动到合适的位置上。在头发图层上方新建一个图层,给右边的头发加上蝴蝶结和发带高光。 
13、制作眉毛:
在脸部图层的上方新建一个图层,取名为眉毛。设置前景色黑色。选择直径为3个象素大小的笔刷,按住SHIFT的同时用画笔在画布上画一条直线,然后按CTRL+T键,将眉毛旋转到合适的角度。 
14、复制眉毛图层,取名为左眼,并将这个图层放置在眉毛图层的上面, 按CTRL+T键,将眉毛旋转到合适的角度。在左眼图层上面再新建一个图层,取名为睫毛。选择笔刷工具,在画笔面板里选择沙丘草类型的笔刷,直径设置为13个象素大小。笔刷的角度在画睫毛的时候要根据自己的需要不断的调整。画好睫毛之后,将睫毛层复制一层,然后按CTRL+E合并。 
 #p# 15、在所有图层上面新建一个图层,然后将除了眉毛,左眼,睫毛这三个图层以外的所有图层隐藏,按CTRL+SHIFT+ALT+E键盖印图层。 编辑-变换-水平翻转,并用移动工具将它移动到合适的位置。
16、嘴巴的制作:
在工具条里选择圆角矩形工具,在属性栏里将半径设置为75PX,然后使用转换点工具调整到大致如图形状,依个人喜好。在所有图层上面新建一个图层,取名为嘴巴。按CTRL+ENTER将嘴巴的路径转换为选区,填充白色。编辑-描边,宽度为3PX,颜色为黑色,位置居中,其余数值保持默认。再新建一个图层,设置前景色为黑色,使用直径为3象素大小的笔刷,按住SHIFT键,画几条直线,画好后放置到合适的位置。 
17、腮红的制作:
新建一个图层,取名为腮红,设置前景色为#ea68a2(R:234,G:104,B:162),选择直径为35个象素的柔角笔刷,在娃娃头的左右脸各轻轻的点一下。更改填充度为71%。  #p# 18、额头上的头发。用制作睫毛的方法来做就好了。
19、最后附上图层表。 


Hot AI Tools

Undresser.AI Undress
AI-powered app for creating realistic nude photos

AI Clothes Remover
Online AI tool for removing clothes from photos.

Undress AI Tool
Undress images for free

Clothoff.io
AI clothes remover

AI Hentai Generator
Generate AI Hentai for free.

Hot Article
Hot Tools

Notepad++7.3.1
Easy-to-use and free code editor

SublimeText3 Chinese version
Chinese version, very easy to use

Zend Studio 13.0.1
Powerful PHP integrated development environment

Dreamweaver CS6
Visual web development tools

SublimeText3 Mac version
God-level code editing software (SublimeText3)
Hot Topics
 1378
1378
 52
52

 Use Python to convert photos into anime-style avatars.
Apr 22, 2023 pm 10:22 PM
Use Python to convert photos into anime-style avatars.
Apr 22, 2023 pm 10:22 PM
Recently, I encountered a problem. I needed to transform my avatar into an anime style. My first thought was to find ready-made wheels. ▲Convert pictures to pixel style to convert avatars into anime style, hoping to convert real photos into anime/cartoon style non-realistic images while maintaining the original image information and texture details. At present, in addition to Baidu API, there are many open source libraries on Github that we can use directly. Among them, AnimeGAN is a study from Wuhan University and Hubei University of Technology. It uses a combination of neural style transfer + generative adversarial network (GAN), and the effect is very consistent with our needs. AnimeGAN first used the Tensorflow framework, but after querying the information, it was found that the project already supports PyTorch.
 What are the permanently free photoshopcs5 serial numbers?
Jul 06, 2023 am 10:00 AM
What are the permanently free photoshopcs5 serial numbers?
Jul 06, 2023 am 10:00 AM
The permanently free photoshopcs5 serial numbers are: 1. 1330-1440-1602-3671-9749-7897; 2. 1330-1191-2998-6712-2520-5424; 3. 1330-1367-4285-4928-0630-3107; 4. 1330-1570-9599-9499-8092-8237; 5. 1330-1028-1662-3206-1688-5114, etc.
 Solution: Fix keyboard shortcuts not working in Photoshop
Sep 22, 2023 pm 03:17 PM
Solution: Fix keyboard shortcuts not working in Photoshop
Sep 22, 2023 pm 03:17 PM
Adobe Photoshop is the industry standard for digital design, loved and used every day by the online community. However, when keyboard shortcuts stutter or fail entirely, it can significantly slow down any project or your overall productivity on Windows 11. Whether you're an experienced designer or just dabbling in photo editing, these glitches are more than just minor annoyances in Photoshop and Photoshop CC. First, let's look at the common reasons why custom or default shortcuts stop working. Why don't my shortcuts work in Photoshop? Customize workspace settings: Sometimes, adjusting or switching between workspace settings can reset keyboard shortcuts. Sticky Keys: This accessibility feature
 Tutorial to restore win11 default avatar
Jan 02, 2024 pm 12:43 PM
Tutorial to restore win11 default avatar
Jan 02, 2024 pm 12:43 PM
If we change our system account avatar but don’t want it anymore, we can’t find how to change the default avatar in win11. In fact, we only need to find the folder of the default avatar to restore it. Restore the default avatar in win11 1. First click on the "Windows Logo" on the bottom taskbar 2. Then find and open "Settings" 3. Then enter "Account" on the left column 4. Then click on "Account Information" on the right 5. After opening, click "Browse Files" in the selected photo. 6. Finally, enter the "C:\ProgramData\Microsoft\UserAccountPictures" path to find the system default avatar picture.
 How to change account name and avatar in Win10 - Detailed step-by-step guide
Jan 14, 2024 pm 01:45 PM
How to change account name and avatar in Win10 - Detailed step-by-step guide
Jan 14, 2024 pm 01:45 PM
After registering a win10 account, many friends feel that their default avatars are not very good-looking. For this reason, they want to change their avatars. Here is a tutorial on how to change their avatars. If you want to know, you can come and take a look. . How to change the win10 account name and avatar: 1. First click on the lower left corner to start. 2. Then click the avatar above in the pop-up menu. 3. After entering, click "Change Account Settings". 4. Then click "Browse" under the avatar. 5. Find the photo you want to use as your avatar and select it. 6. Finally, the modification is completed successfully.
 How to change boss direct recruitment avatar back to default
Feb 23, 2024 pm 04:07 PM
How to change boss direct recruitment avatar back to default
Feb 23, 2024 pm 04:07 PM
How to change the boss direct recruitment avatar back to the default? The boss direct recruitment avatar can be adjusted at will, but most friends don’t know how to change the boss direct recruitment avatar back to the default. Next is the boss direct recruitment avatar brought to players by the editor. Change back to the default method tutorial, interested players come and take a look! How to change the Boss Direct Recruitment avatar back to the default 1. First open the Boss Direct Recruitment APP, click on the avatar above in the [My] area in the lower right corner of the main page; 2. Then enter the personal information interface and continue to click on the avatar; 3. Then select [ Take photo] and [Select from album] to change back to the default.
 How to modify the avatar in discuz
Aug 08, 2023 pm 03:53 PM
How to modify the avatar in discuz
Aug 08, 2023 pm 03:53 PM
How to modify the avatar in discuz: 1. Log in to the Discuz backend, find the "admin.php" or "admin" directory in the root directory of the website and log in; 2. Enter user management, find and click on the navigation menu on the left or top Enter; 3. Search for users and use the search function to find specific users; 4. Modify the avatar, on the editing page, you can find the avatar option and upload a new avatar; 5. Save the modification; 6. Refresh the page.
 How to implement avatar upload function in Vue
Nov 07, 2023 am 08:01 AM
How to implement avatar upload function in Vue
Nov 07, 2023 am 08:01 AM
Vue is a popular front-end framework that can be used to build highly interactive applications. During the development process, uploading avatars is one of the common requirements. Therefore, in this article, we will introduce how to implement the avatar upload function in Vue and provide specific code examples. Using a third-party library In order to implement the avatar upload function, we can use a third-party library, such as vue-upload-component. This library provides an upload component that can be easily integrated into Vue applications. Here is a simple example
