

photoshop 笔刷及滤镜制作燃烧的火焰

本教程介绍火焰效果的制作方法。制作的时候用到一些火焰图形笔刷,然后再用滤镜等渲染色彩,再配上一些火星等装饰即可。
最终效果
1、新建一个图层,拉出一条渐变色。
2、用笔刷画出一团火焰,填充颜色:
3、为了让火焰有层次感,我们
本教程介绍火焰效果的制作方法。制作的时候用到一些火焰图形笔刷,然后再用滤镜等渲染色彩,再配上一些火星等装饰即可。
最终效果 
1、新建一个图层,拉出一条渐变色。  #p# 2、用笔刷画出一团火焰,填充颜色:
3、为了让火焰有层次感,我们把图层ctrl+j再复制2份,分别填充颜色并使用图层蒙版勾勒出层次: 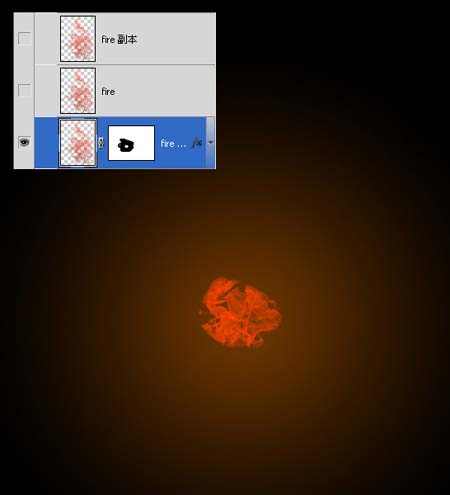
合成效果:  #p# 4、给火焰来点高光效果,选择”椭圆工具”画出一个圆,填充(#f72900),然后高斯特模糊,半径30px:
把这个图层复制几个,用”颜色叠加”适当处理一下。 
5、现在来渲染一些气氛,制作一些烟雾效果,建一个新层,把混合模式改成”颜色减淡”然后使用”椭圆工具”画个圆形,羽化值设40PX,然后使用”滤镜”>”渲染”>”云彩”,确定你当前的前景色为黑,背景色为白.ctrl+f调出自己满意的效果。  #p# 再把这个图层复制,通过”变形”来调出不同的效果,再跟先前做的火焰合成。
6、下面来制作火星,关键是笔刷的设置。 
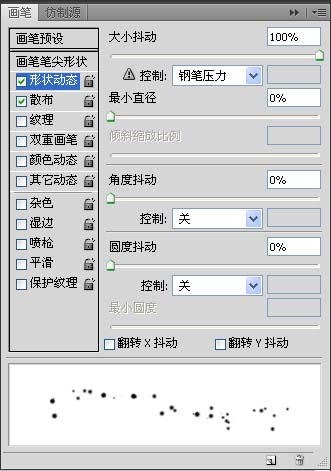
 #p# 然后随手花几笔,添加图层样式”外发光”,混合模式改成”颜色减淡”。
最后用蒙版什么的再修饰一下。 
最终效果。

Hot AI Tools

Undresser.AI Undress
AI-powered app for creating realistic nude photos

AI Clothes Remover
Online AI tool for removing clothes from photos.

Undress AI Tool
Undress images for free

Clothoff.io
AI clothes remover

Video Face Swap
Swap faces in any video effortlessly with our completely free AI face swap tool!

Hot Article
Hot Tools

Notepad++7.3.1
Easy-to-use and free code editor

SublimeText3 Chinese version
Chinese version, very easy to use

Zend Studio 13.0.1
Powerful PHP integrated development environment

Dreamweaver CS6
Visual web development tools

SublimeText3 Mac version
God-level code editing software (SublimeText3)
Hot Topics
 1392
1392
 52
52

 What are the permanently free photoshopcs5 serial numbers?
Jul 06, 2023 am 10:00 AM
What are the permanently free photoshopcs5 serial numbers?
Jul 06, 2023 am 10:00 AM
The permanently free photoshopcs5 serial numbers are: 1. 1330-1440-1602-3671-9749-7897; 2. 1330-1191-2998-6712-2520-5424; 3. 1330-1367-4285-4928-0630-3107; 4. 1330-1570-9599-9499-8092-8237; 5. 1330-1028-1662-3206-1688-5114, etc.
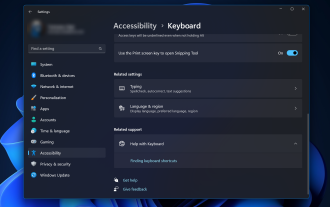 Solution: Fix keyboard shortcuts not working in Photoshop
Sep 22, 2023 pm 03:17 PM
Solution: Fix keyboard shortcuts not working in Photoshop
Sep 22, 2023 pm 03:17 PM
Adobe Photoshop is the industry standard for digital design, loved and used every day by the online community. However, when keyboard shortcuts stutter or fail entirely, it can significantly slow down any project or your overall productivity on Windows 11. Whether you're an experienced designer or just dabbling in photo editing, these glitches are more than just minor annoyances in Photoshop and Photoshop CC. First, let's look at the common reasons why custom or default shortcuts stop working. Why don't my shortcuts work in Photoshop? Customize workspace settings: Sometimes, adjusting or switching between workspace settings can reset keyboard shortcuts. Sticky Keys: This accessibility feature
 C++ Image Processing Practice Guide: Implementing Image Special Effects and Filters
Nov 27, 2023 am 11:40 AM
C++ Image Processing Practice Guide: Implementing Image Special Effects and Filters
Nov 27, 2023 am 11:40 AM
In the fields of computer science and image processing, C++ has always been one of the most commonly used programming languages. Image processing is one of the important subfields of computer vision, including image analysis, processing and recognition. This article will introduce some basic concepts and techniques in C++ image processing, and provide some sample codes for implementing image special effects and filters to help readers better understand and practice C++ image processing. 1. Basics of C++ image processing 1.1 Commonly used image file formats In image processing, we usually need to use various image file formats, including
 Find another way! See how to use CSS filters to create rounded corners and wavy effects
Oct 18, 2022 pm 08:21 PM
Find another way! See how to use CSS filters to create rounded corners and wavy effects
Oct 18, 2022 pm 08:21 PM
This article will take you through a different approach and talk about how to use CSS filters to create rounded corners, and how to use rounded corners to achieve a wave effect. I hope it will be helpful to you!
 Let's talk about how to use CSS filters to achieve rounded corners and wave effects.
Jul 28, 2022 pm 07:42 PM
Let's talk about how to use CSS filters to achieve rounded corners and wave effects.
Jul 28, 2022 pm 07:42 PM
How to use CSS to achieve rounded corners and wave effects? The following article will show you how to skillfully use CSS filters to create rounded corners and wave effects. I hope it will be helpful to you!
 Cleverly use CSS3 filters to create text flash switching animation effects!
Jul 20, 2022 am 10:55 AM
Cleverly use CSS3 filters to create text flash switching animation effects!
Jul 20, 2022 am 10:55 AM
This article will show you how to use CSS3 filters to achieve a high-end text flash switching animation effect. I hope it will be helpful to you!
 Adobe Photoshop official web version AI generated fill and generate extended image tools
Sep 29, 2023 pm 10:13 PM
Adobe Photoshop official web version AI generated fill and generate extended image tools
Sep 29, 2023 pm 10:13 PM
Adobe's Photoshop web service (an online web version) is now generally available. The web version of Photoshop will soon support the AI-generated fill and generate extended image tools, which were recently released for the desktop version of Photoshop. Powered by the Adobe Firefly generative AI model, these features are commercially available and allow users to quickly add, remove, or expand images using text-based descriptions in more than 100 languages while matching the lighting conditions and perspective of the original image. The web version of Photoshop also provides many of the most commonly used tools from the desktop version, but with a redesigned layout to provide a more "simplified" user experience for new Photoshop users. This includes early this year
 How to deal with blurred scanned documents
Jan 05, 2021 pm 03:09 PM
How to deal with blurred scanned documents
Jan 05, 2021 pm 03:09 PM
Processing method: 1. Open the scanned image to be processed in the PS software; 2. Click "Filter" - "Sharpening" - "Smart Sharpening" on the top toolbar; 3. In the pop-up window, select according to your needs Sharpen the radius and click "OK"; 4. Click "File" - "Save As" and save it as a file.
