

Photoshop详细解说磨皮与锐化的全面应用

本例介绍PS磨皮与锐化的应用,教程详细讲解了磨皮和锐化这一对矛盾的统一体的运用及原理,希望能给朋友们带来帮助~~
最终效果图 
原图: 
#p#
磨皮和锐化是一对茅盾的统一体,我们通常所说的磨皮就用模糊手段消除图像上的噪点或皮肤上的斑点,通常磨皮使用最多的是用PS的高斯模糊滤镜或外挂插件来进行,在磨皮的过程中,通常教会把你选择的模糊范围向四面扩散,所以磨皮会使图像变的不清楚,因此一般情况下,在图像处理完后的最后一步就需要使用锐化滤镜来提高图像的清楚。
1、磨皮之前,最好复制一个背景图层来进行,这样可以避免原片受到损坏。 
磨皮的好坏是即要清除皮肤上的斑点,以要尽可能地保留皮肤的纹理,给人以真实的感觉,有的朋友把皮肤磨得很光滑,跟橡皮似的,反让人觉得假了,为了让后面使用高斯模糊滤镜时用较低的数值来保留皮肤纹理,我们这前可用“修复画笔”工具先清除掉皮肤上大的斑点。
2、点击工具箱中的修复画笔工具,要清除黑色斑点,请把上面的模式改成“变亮”,要清除浅色斑点用“变暗”模式,画笔硬度设得软一点,大小略比斑点大一些,因为我们是在背景副本层操作,所以后面的样本处要设置为“所有图层”,按Alt键,在靠近斑点处的好皮肤上取样,然后在斑点上涂沫,斑点就消失了。 
3、为了使磨皮不至于影响其它区域,我们最好把皮肤部分单独选出来,按Q键,进入快速蒙版,用黑色画笔把要磨的皮肤涂上,用白色画笔擦去眼睛,眉毛,唇用轮廓线不用磨皮的地方。 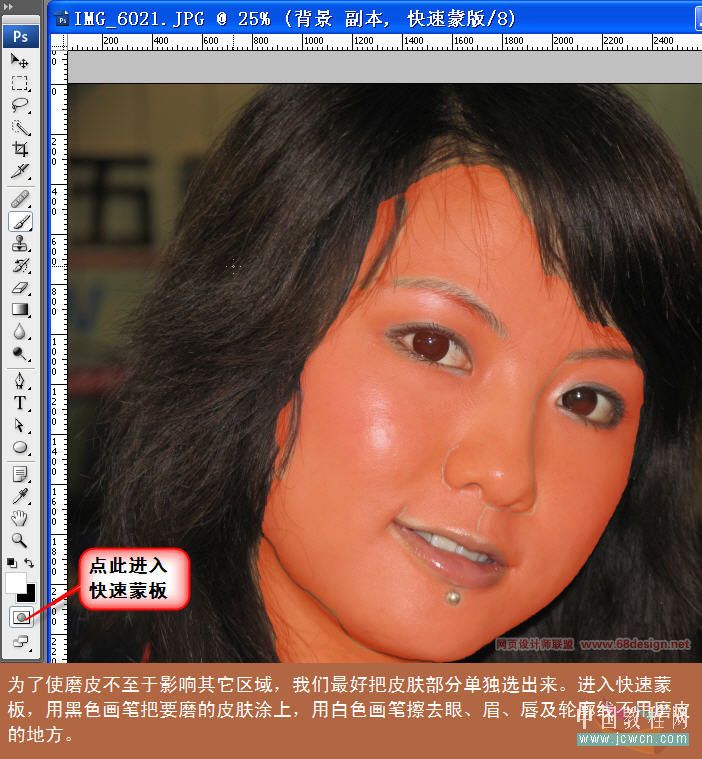
#p#
4、按Q键退出快速蒙版,按Ctrl+j复制出皮肤层。 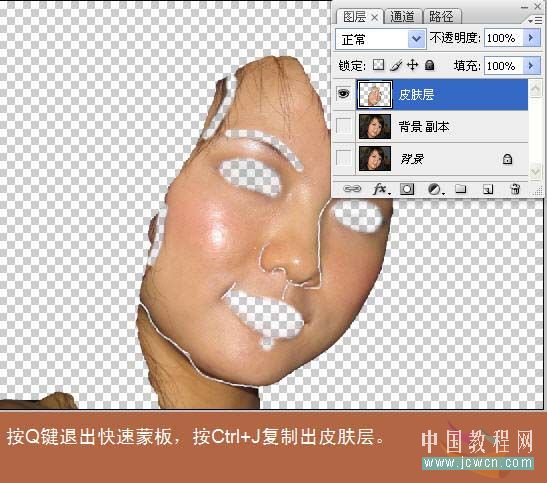
5、在皮肤层上选滤镜-模糊-高斯模糊,在对话框中半径处用鼠标滚轮向前滚动,直到图上斑点消失即为合适数值。 
6、为了更好地通过本层透视出下层的皮肤纹理,我们选择,编辑-渐隐高斯模糊,做如下图设置: 
#p#
7、上一步我们只是在皮肤层上进行了高斯模糊,消除了皮肤部分的杂点,但是在皮肤以外的部分或多或少也会有一些杂点,所以我们按Ctrl+shift+ Alt+E盖印图层,得到合并的图层1,在图层1上按Ctrl+F再次进行高斯模糊,然后用编辑-渐隐高斯模糊,这次用“滤色”模式,不透明度仍然用 50%,现在我们看到皮肤更光滑也更白亮了。 
8、为了更好地透视出皮肤的纹理,同时也是为了后面的锐化效果能充分地体现出来,我们适当降低皮肤层和图层1的不透明度,关闭背景副本层和背景前的眼睛,我们会看我们得到是带点透明的图层至此,磨皮完成。 
9、点击背景副本层,使它成为当前图层,我们在其上进行锐化操作,点击滤镜-锐化-USM锐化,作如图设置,我们用低数值的锐化多做几次,要比一次用高数值的锐化效果好得多,按Ctrl+f三次重复进行USM锐化。 
#p#
10、合并图层,做最后一次稍微锐化就大功告成,假如发现锐化太厉害了点,也可用编辑-消褪来解决,需要注重的是,无论是磨皮还是锐化,都有一个度的问题,磨皮不能太狠,让图像失去许多细节,同样锐化也不能过度,太过的锐化让同样让图像失真,下面举两个磨皮过度和锐化过度的例子。 
锐化后的效果图。 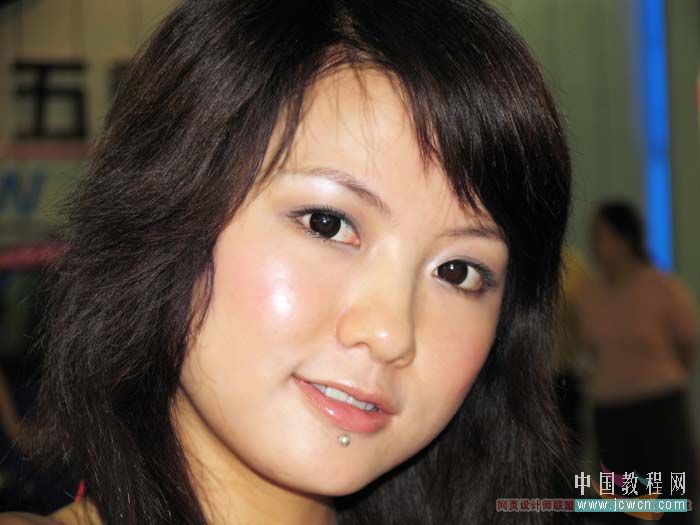
这是没有选出皮肤直接高斯模糊的效果,虽然用了蒙版擦取了不用模糊的地方,但皮肤过度光滑,成橡皮状,反而失真了。 
#p#
这是锐化过度的病况,皮肤生硬,杂点重新浮现,严重的还会出现白边。 

Hot AI Tools

Undresser.AI Undress
AI-powered app for creating realistic nude photos

AI Clothes Remover
Online AI tool for removing clothes from photos.

Undress AI Tool
Undress images for free

Clothoff.io
AI clothes remover

Video Face Swap
Swap faces in any video effortlessly with our completely free AI face swap tool!

Hot Article
Hot Tools

Notepad++7.3.1
Easy-to-use and free code editor

SublimeText3 Chinese version
Chinese version, very easy to use

Zend Studio 13.0.1
Powerful PHP integrated development environment

Dreamweaver CS6
Visual web development tools

SublimeText3 Mac version
God-level code editing software (SublimeText3)
Hot Topics
 1392
1392
 52
52

 What are the permanently free photoshopcs5 serial numbers?
Jul 06, 2023 am 10:00 AM
What are the permanently free photoshopcs5 serial numbers?
Jul 06, 2023 am 10:00 AM
The permanently free photoshopcs5 serial numbers are: 1. 1330-1440-1602-3671-9749-7897; 2. 1330-1191-2998-6712-2520-5424; 3. 1330-1367-4285-4928-0630-3107; 4. 1330-1570-9599-9499-8092-8237; 5. 1330-1028-1662-3206-1688-5114, etc.
 How to use image sharpening techniques in Python?
Jun 04, 2023 am 10:10 AM
How to use image sharpening techniques in Python?
Jun 04, 2023 am 10:10 AM
Image sharpening is a commonly used image processing technique that makes images clearer and more detailed. In Python, we can use some common image processing libraries to implement image sharpening functions. This article will introduce how to use the Pillow library, OpenCV library and Scikit-Image library in Python for image sharpening. Image sharpening using the Pillow library The Pillow library is a commonly used image processing library in Python. It provides PIL (PythonIma
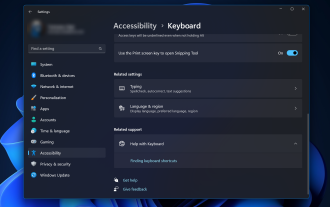 Solution: Fix keyboard shortcuts not working in Photoshop
Sep 22, 2023 pm 03:17 PM
Solution: Fix keyboard shortcuts not working in Photoshop
Sep 22, 2023 pm 03:17 PM
Adobe Photoshop is the industry standard for digital design, loved and used every day by the online community. However, when keyboard shortcuts stutter or fail entirely, it can significantly slow down any project or your overall productivity on Windows 11. Whether you're an experienced designer or just dabbling in photo editing, these glitches are more than just minor annoyances in Photoshop and Photoshop CC. First, let's look at the common reasons why custom or default shortcuts stop working. Why don't my shortcuts work in Photoshop? Customize workspace settings: Sometimes, adjusting or switching between workspace settings can reset keyboard shortcuts. Sticky Keys: This accessibility feature
 Adobe Photoshop official web version AI generated fill and generate extended image tools
Sep 29, 2023 pm 10:13 PM
Adobe Photoshop official web version AI generated fill and generate extended image tools
Sep 29, 2023 pm 10:13 PM
Adobe's Photoshop web service (an online web version) is now generally available. The web version of Photoshop will soon support the AI-generated fill and generate extended image tools, which were recently released for the desktop version of Photoshop. Powered by the Adobe Firefly generative AI model, these features are commercially available and allow users to quickly add, remove, or expand images using text-based descriptions in more than 100 languages while matching the lighting conditions and perspective of the original image. The web version of Photoshop also provides many of the most commonly used tools from the desktop version, but with a redesigned layout to provide a more "simplified" user experience for new Photoshop users. This includes early this year
 How to deal with blurred scanned documents
Jan 05, 2021 pm 03:09 PM
How to deal with blurred scanned documents
Jan 05, 2021 pm 03:09 PM
Processing method: 1. Open the scanned image to be processed in the PS software; 2. Click "Filter" - "Sharpening" - "Smart Sharpening" on the top toolbar; 3. In the pop-up window, select according to your needs Sharpen the radius and click "OK"; 4. Click "File" - "Save As" and save it as a file.
 Which company does photoshop belong to?
Jul 20, 2022 am 11:47 AM
Which company does photoshop belong to?
Jul 20, 2022 am 11:47 AM
photoshop is owned by Adobe. Photoshop is an image processing software developed and distributed by Adobe. It mainly processes digital images composed of pixels. Adobe is an American computer software company headquartered in San Jose, California. It is mainly engaged in the development of multimedia production software; its customers include enterprises, knowledge workers, creative people and designers, OEM partners, and developers around the world.
 Which company developed photoshop?
Jul 08, 2022 am 11:34 AM
Which company developed photoshop?
Jul 08, 2022 am 11:34 AM
Photoshop was developed by Adobe Systems; Photoshop is a graphics processing software developed and distributed by "Adobe Systems", which mainly processes digital images composed of pixels. Adobe Systems is an American multinational computer software company headquartered in San Jose, California.
 What tools do you use to draw paths in photoshop
Mar 19, 2021 pm 05:11 PM
What tools do you use to draw paths in photoshop
Mar 19, 2021 pm 05:11 PM
In photoshop, you can use the "pen tool" to draw paths. The pen tool is a tool used to create paths. After creating a path, you can edit it again. The pen tool is a vector drawing tool. Its advantage is that it can draw smooth curves and maintain a smooth effect after scaling or deformation.
