

photoshop CS3制作开花逐帧动画效果

本例介绍使用photoshop CS3制作逐帧动画开花效果,教程过程比较详细,适合初学者学习,有兴趣的朋友一起动手吧。
本文由中国教程网 耶菜 原创,转载请保留此信息!
知道flash可以做出逐帧动画,你知不知道Photoshop CS3也可以做出逐帧动画呢?今天大家一
本例介绍使用photoshop CS3制作逐帧动画开花效果,教程过程比较详细,适合初学者学习,有兴趣的朋友一起动手吧。
本文由中国教程网 耶菜 原创,转载请保留此信息!
知道flash可以做出逐帧动画,你知不知道Photoshop CS3也可以做出逐帧动画呢?今天大家一起运用Photoshop来做一个简单好玩的逐帧动画—开花,先看看效果图:

效果图
先做花芯部分
打开视图,标尺,拉出两条参考线。选择你喜欢的颜色做前景色,(我用的明黄)选择椭圆工具,把光标对准参考线的交织处,按住SHIFT ALT画一个正圆。

图1
再将这个圆载入选区,执行选择/修改/收缩……数值看情况自定不要照搬。

图2
再修改一下选区:羽化

图3
执行图像/色相饱和度,把选区内的颜色调整一下,(自己喜欢什么颜色就调什么颜色)

图4
再执行滤镜/杂色/添加杂色......

图5
花芯就做好了,下面就做花瓣部分。
新建一层把它拉到花芯层下面,用路径做出一个花瓣。

图6
在色板上选择你喜欢的前景色,然后填充路径。

图7
为了让各个花瓣分明再给路径描一下边,(注意换个前景色,画笔高硬度,一个像素即可)。

图8
我们再切换到移动工具,显示变换控件,把中心点移到参考线交织处,角度栏输入数值,然后回车确定。

图9
按住旋转复制快捷键:SHIFT ALT CTRL T,得到如图八个花瓣。

图10
将副本七复制一份,得到副本八。

图11
看起来很乱哈,归下类吧,选择副本七按住SHIFT点图层B拖到图层夹子中,并关掉夹子中所有图层的眼睛,以免扰乱视听哈...

图12
将副本八拉到花芯层上面,执行变换/垂直翻转,并调整一下位置,注意花瓣尖尖处在参考线中心哦。

图13
再将花芯层载入选区执行选择/反向,再点花瓣层按DEL删除。

图14
如法泡制,旋转复制得到八个花瓣。

图15

图16
再把这些新花瓣归到一个新的图层夹子中,执行窗口/动画打开动画面板,新建一帧,关掉副本15的眼睛,打开副本7的眼睛,因为他俩是对应的。

图17
再新建一帧,关闭副本14,打开副本6,如此类推...

图18
最后生成九个帧,如图:

图19
图层面板是这样的:

图20
点开动画面板右上角的小三角,选择全部帧。

图21
再点一下新建帧按钮。

图22
然后再次点开小三角,反向帧。

图23
再点一下播放按扭看看效果,最后就可以保存了,执行文件/WEB格式/GIF格式。

图24

Hot AI Tools

Undresser.AI Undress
AI-powered app for creating realistic nude photos

AI Clothes Remover
Online AI tool for removing clothes from photos.

Undress AI Tool
Undress images for free

Clothoff.io
AI clothes remover

Video Face Swap
Swap faces in any video effortlessly with our completely free AI face swap tool!

Hot Article
Hot Tools

Notepad++7.3.1
Easy-to-use and free code editor

SublimeText3 Chinese version
Chinese version, very easy to use

Zend Studio 13.0.1
Powerful PHP integrated development environment

Dreamweaver CS6
Visual web development tools

SublimeText3 Mac version
God-level code editing software (SublimeText3)
Hot Topics
 1386
1386
 52
52

 Can wallpaper engine be shared among families?
Mar 18, 2024 pm 07:28 PM
Can wallpaper engine be shared among families?
Mar 18, 2024 pm 07:28 PM
Does Wallpaper support family sharing? Unfortunately, it cannot be supported. Still, we have solutions. For example, you can purchase with a small account or download the software and wallpapers from a large account first, and then change to the small account. Simply launching the software is perfectly fine. Can wallpaperengine be family shared? Answer: Wallpaper does not currently support the family sharing function. 1. It is understood that WallpaperEngine does not seem to be suitable for family sharing environments. 2. In order to solve this problem, it is recommended that you consider purchasing a new account; 3. Or download the required software and wallpapers in the main account first, and then switch to other accounts. 4. Just open the software with a light click and it will be fine. 5. You can view the properties on the above web page"
 How to set lock screen wallpaper on wallpaper engine? How to use wallpaper engine
Mar 13, 2024 pm 08:07 PM
How to set lock screen wallpaper on wallpaper engine? How to use wallpaper engine
Mar 13, 2024 pm 08:07 PM
WallpaperEngine is a software commonly used to set desktop wallpapers. Users can search for their favorite pictures in WallpaperEngine to generate desktop wallpapers. It also supports adding pictures from the computer to WallpaperEngine to set them as computer wallpapers. Let’s take a look at how wallpaperengine sets the lock screen wallpaper. Wallpaperengine setting lock screen wallpaper tutorial 1. First enter the software, then select installed, and click "Configure Wallpaper Options". 2. After selecting the wallpaper in separate settings, you need to click OK on the lower right. 3. Then click on the settings and preview above. 4. Next
 Is there any virus when watching wallpaper engine movies?
Mar 18, 2024 pm 07:28 PM
Is there any virus when watching wallpaper engine movies?
Mar 18, 2024 pm 07:28 PM
Users can download various wallpapers when using WallpaperEngine, and can also use dynamic wallpapers. Many users do not know whether there are viruses when watching videos on WallpaperEngine, but video files cannot be used as viruses. Is there any virus when watching movies on wallpaperengine? Answer: No. 1. Just video files cannot be used as viruses. 2. Just make sure to download videos from trusted sources and maintain computer security measures to avoid the risk of virus infection. 3. Application wallpapers are in apk format, and apk may carry Trojan viruses. 4. WallpaperEngine itself does not have viruses, but some application wallpapers in the creative workshop may have viruses.
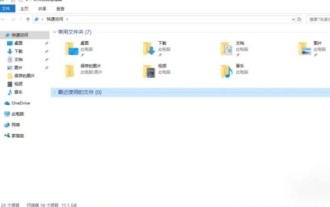 In which folder are the wallpapers of wallpaper engine located?
Mar 19, 2024 am 08:16 AM
In which folder are the wallpapers of wallpaper engine located?
Mar 19, 2024 am 08:16 AM
When using wallpaper, users can download various wallpapers they like for use. Many users do not know which folder the wallpapers are in. The wallpapers downloaded by users are stored in the content folder. Which folder is the wallpaper in? Answer: content folder. 1. Open File Explorer. 2. Click "This PC" on the left. 3. Find the "STEAM" folder. 4. Select "steamapps". 5. Click “workshop”. 6. Find the “content” folder.
 Does wallpaper engine consume a lot of power?
Mar 18, 2024 pm 08:30 PM
Does wallpaper engine consume a lot of power?
Mar 18, 2024 pm 08:30 PM
Users can change their computer wallpapers when using WallpaperEngine. Many users don't know that WallpaperEngine consumes a lot of power. Dynamic wallpapers consume a little more power than static wallpapers, but not a lot. Does wallpaperengine consume a lot of power? Answer: Not much. 1. Dynamic wallpapers consume a little more power than static wallpapers, but not a lot. 2. Turning on dynamic wallpaper will increase the computer's power consumption and take away a small amount of memory usage. 3. Users do not need to worry about the serious power consumption of dynamic wallpapers.
 Where is the wallpaper engine subscription record?
Mar 18, 2024 pm 05:37 PM
Where is the wallpaper engine subscription record?
Mar 18, 2024 pm 05:37 PM
How to check wallpaper subscription records? Many users have made a large number of subscriptions on this software, but may not know how to query these records. In fact, you only need to operate it in the browsing function area of the software. Where are wallpaperengine subscription records? Answer: In the browsing interface. 1. Please start the computer first and enter the wallpaper software. 2. Find the Browse tab icon in the upper left corner of the application and click it. 3. In the "Browse" interface, you will see an overview of various wallpapers and feeds. 4. Enter the keywords you want to search in the search box in the upper right corner. 5. Relying on the search results, you can find the source information of the wallpaper subscription. 6. Click on the corresponding feed to enter its web page. 7. Ordering
 How to set up ppt animation to enter first and then exit
Mar 20, 2024 am 09:30 AM
How to set up ppt animation to enter first and then exit
Mar 20, 2024 am 09:30 AM
We often use ppt in our daily work, so are you familiar with every operating function in ppt? For example: How to set animation effects in ppt, how to set switching effects, and what is the effect duration of each animation? Can each slide play automatically, enter and then exit the ppt animation, etc. In this issue, I will first share with you the specific steps of entering and then exiting the ppt animation. It is below. Friends, come and take a look. Look! 1. First, we open ppt on the computer, click outside the text box to select the text box (as shown in the red circle in the figure below). 2. Then, click [Animation] in the menu bar and select the [Erase] effect (as shown in the red circle in the figure). 3. Next, click [
 Specific method to create film movement effect in PPT
Mar 26, 2024 pm 04:00 PM
Specific method to create film movement effect in PPT
Mar 26, 2024 pm 04:00 PM
1. Start PPT, create a new blank document, select all text boxes and delete them. 2. Execute the Insert-Shape command, drag a rectangle in the document, and fill the shape with black. 3. Drag the rectangle to elongate it, execute the Insert-Shape command, drag out the small square, and set the fill color to white. 4. Copy and paste the small squares one by one so that the top and bottom are evenly distributed on both sides of the film. After selecting them all with ctrl+a, right-click and select Group. 5. Execute the Insert-Picture command, find the picture to be inserted in the pop-up dialog box, click to open, and adjust the size and position of the picture. 6. Repeat step 5 to insert and set the remaining pictures in order to form a film picture. 7. Select the film, execute animation-add animation command
