

Photoshop制作动态下雨特效的3个简单实用方法

本教程主要使用Photoshop3种方法制作动态的下雨效果,今天就向大家分享了3个简单实用的方法,包括动态下雨特效,感兴趣的同学来试一试。
不说则已,一说咱就来两招外加一个大彩蛋,下面是三种方法的效果预览,看图感受下先:

△ 这是原图

△ 方法一的效果

△ 方法二的效果

△ 方法三的效果
是的,你没看错,第三种方法是真的在“下”雨,是动态的,是动画的,而且悄悄剧透给小伙伴们,它还是最简单的,比第二种一键下雨的动作预设大法还要简单。那我们闲言少叙,马上开始“变身老龙王”,让雨下起来喽。
方法一:滤镜大法
第一步,如下图操作所示,在PS中将原图打开,新建一个图层,命名为“雨”。

△ 新建雨图层
第二步,如下图所示,将前景色设置成黑色,按键盘快捷键Alt+删除键,将图层雨填充为黑色。

△ 图层雨填充黑色
第三步,对图层雨进行一系列的滤镜操作。选择菜单滤镜>杂色>添加杂色,如下图所示设置杂色参数,点击确定。

△ 选择添加杂色滤镜

△ 设置杂色参数
选择高斯模糊滤镜,按下图所示设置参数,确定。

接下来,添加动感模糊滤镜,参数如下:

第四步,添加一个色阶调整图层,如下图设置参数后,将该层做成雨图层的剪贴蒙版。
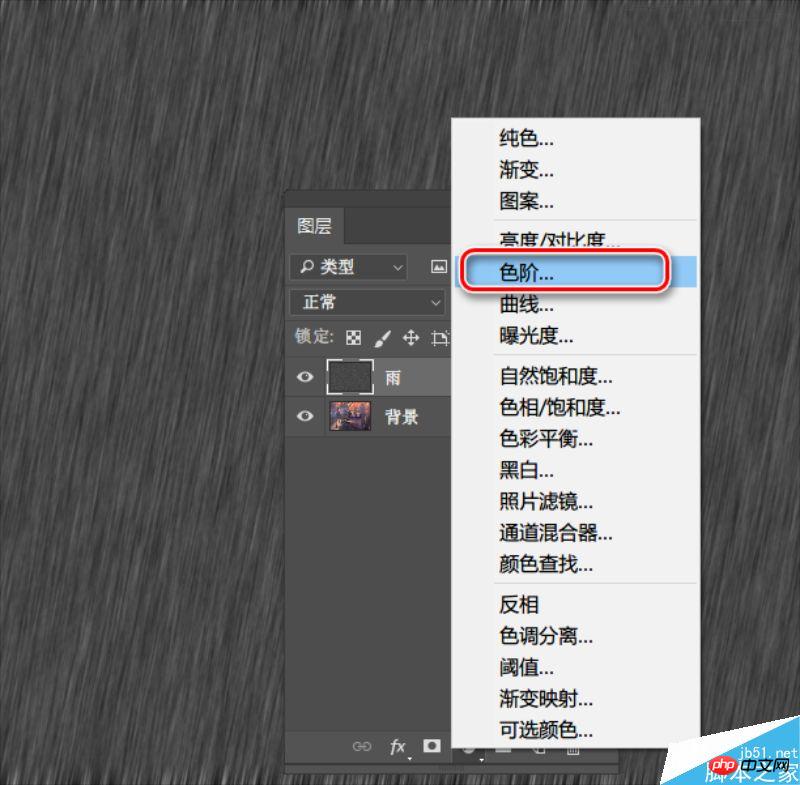
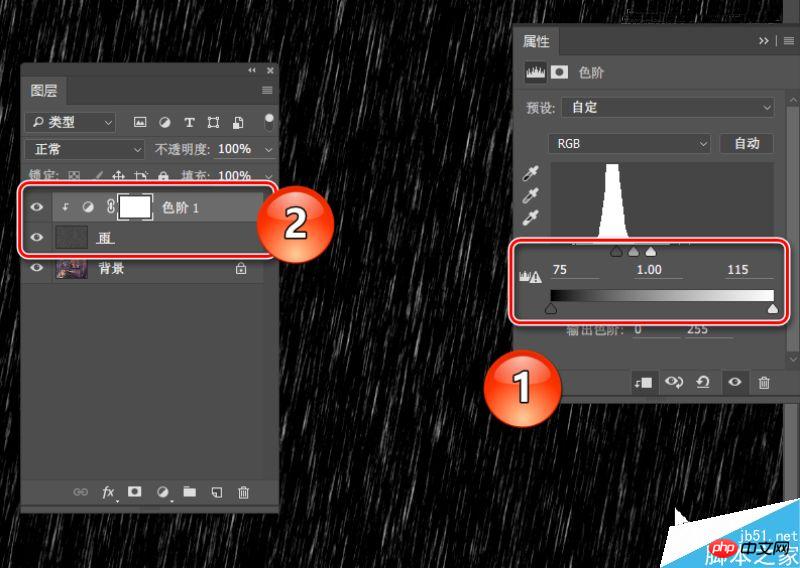
△ 设置色阶参数,添加蒙版
第五步,继续添加滤镜操作。选择菜单滤镜>扭曲>波纹滤镜,参数设置如下图:

添加高斯模糊,如下图:

第六步,选择图层雨,将其混合模式调整为“滤色”,不透明度为60%。此时,正如下图所示,已经完成了下雨特效的绘制。

方法二:动作预设懒人大法
好了,看到这,可能小伙伴会觉得好烦啊,那么第二个方法就是深受喜爱的“懒人神器”动作预设大法了。
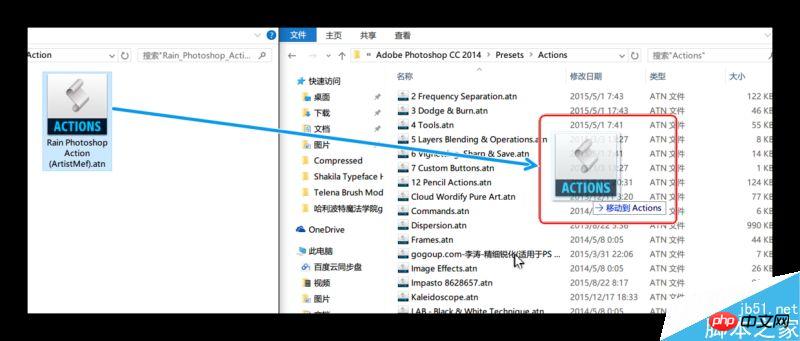
第一步,安装预设。首先还是先来啰嗦一下PS动作预设的安装方法了,方法很多,比如直接双击预设文件,比如复制粘贴到安装目录下的预设文件夹,地址一般是C:\Program Files\Adobe\Adobe Photoshop CC 2014\Presets\Actions(盘符请根据安装时的安装位置选择,CC 2014仅为阿随君版本号示例,请按实际情况选择),正如下图所示的样纸。
第二步,切换英文版。PS:该动作完美支持英文版PS,中文版可能会遇到运行问题哦。所以阿随君再来啰嗦下中英文切换方法→小伙伴们只需打开自己的PS安装文件夹,按C:\Program Files\Adobe\Adobe Photoshop CC 2014\Locales\zh_CN\Support Files这个地址逐层打开,找到“tw10428.dat”这个文件,把它移除此文件夹,或者是删除,或者是改名字,这样再次打开PS时便是英文版了。(PS:一定要记得备份它,随时复制回来即可恢复中文版了。)
第三步,准备动作。接下来就是把刚才复制粘贴过的动作预设调入到动作面板,如果没有在PS工作区找到动作面板的,可以通过菜单栏“窗口>动作”调出,或者直接按Alt+F9。然后,如图所示,点击面板上下文面板,选择“Rain Photoshop Action (ArtistMef)”载入到面板。

第四步,播放动作。以上都是“前戏”,马上进入“高潮”,如图所示的,在选中背景图层的基础上,打开动作预设,点击“播放”即可。在动作运行的过程中,会先后弹出两个对话框,如图所示,两个参数值一个是控制雨水降落的角度,一个是控制雨疏密长短的,按照自己需要的效果来设定即可。

△ 如图所示,播放动作

△ 按需设置雨的角度和距离

△ 继续设置参数

如上,就是完成效果了,也棒棒哒

方法三:AE大法
好了,说了那么多,其实都是要介绍第三种大法:AE大法。是时候,来多玩一些AE了,此方法需要用到的是BBC特效插件,一键“下”雨。
第一步,打开AE,导入图片,如图所示,可以通过菜单文件>导入,或者直接拖拽图片到项目面板。

第二步,新建合成。如下图所示,用鼠标点击图片并长按,拖动它到“新建合成”按钮上,即可以此图的参数新建一个合成了。

第三步,添加特效。在选中图片图层的基础上,选择菜单栏的“效果>BBC10 Particles>BBC Rain”,添加雨的粒子特效:

添加完毕后,按预览播放或者新版AE直接按空格键播放,即可看到,雨下起来了。可以渲染保存成视频,也可以随便选择一帧保存成下雨图片,简单方便。
第四步,更多玩法。当然上一步的默认效果已经很好了,爱折腾的小伙伴,可以在效果面板上,继续调整参数,如图所示:雨的大小、速度、疏密、模糊度、雨滴的大小颜色等等都可以继续调节,而且可以做动画效果,简单说就是想要什么雨就下什么雨,而且可以从小雨下到大雨,棒棒哒。

当然,如果懒得调参数的话,特效本身也预设了很多不同形态的雨,只需如下图所示选择即可:

好了,这就是今天的下雨特效制作秘籍,不知道小伙伴们最喜欢哪一种呢,希望大家喜欢本教程!

Hot AI Tools

Undresser.AI Undress
AI-powered app for creating realistic nude photos

AI Clothes Remover
Online AI tool for removing clothes from photos.

Undress AI Tool
Undress images for free

Clothoff.io
AI clothes remover

AI Hentai Generator
Generate AI Hentai for free.

Hot Article
Hot Tools

Notepad++7.3.1
Easy-to-use and free code editor

SublimeText3 Chinese version
Chinese version, very easy to use

Zend Studio 13.0.1
Powerful PHP integrated development environment

Dreamweaver CS6
Visual web development tools

SublimeText3 Mac version
God-level code editing software (SublimeText3)
Hot Topics
 1359
1359
 52
52

 Fix: Windows 11's dynamic refresh rate doesn't work
Apr 13, 2023 pm 08:52 PM
Fix: Windows 11's dynamic refresh rate doesn't work
Apr 13, 2023 pm 08:52 PM
You can measure a screen's refresh rate by counting the number of times the image updates per second. DRR is a new feature included in Windows 11 that helps you save battery life while still providing a smoother display, but it's no surprise when it doesn't work properly. Screens with higher refresh rates are expected to become more common as more manufacturers announce plans to stop producing 60Hz monitors. This will result in smoother scrolling and better gaming, but it will come at the cost of reduced battery life. However, the dynamic refresh rate feature in this iteration of the OS is a nifty addition that can have a big impact on your overall experience. Read on as we discuss what to do if Windows 11’s dynamic refresh rate isn’t working
 How to Hide Dynamic Island and Red Indicator in iPhone Screen Recording
Apr 13, 2023 am 09:13 AM
How to Hide Dynamic Island and Red Indicator in iPhone Screen Recording
Apr 13, 2023 am 09:13 AM
On iPhone, Apple's screen recording feature records a video of what you're doing on the screen, which is useful if you want to capture gameplay, walk someone through a tutorial in an app, demonstrate a bug, or anything else. On older iPhones that have a notch at the top of the display, the notch is not visible in screen recording, as it should be. But on newer iPhones with the Dynamic Island cutout, such as the iPhone 14 Pro and iPhone 14 Pro Max, the Dynamic Island animation displays the red recording indicator, which causes the cutout to be visible in captured videos. this might
 Convert VirtualBox fixed disk to dynamic disk and vice versa
Mar 25, 2024 am 09:36 AM
Convert VirtualBox fixed disk to dynamic disk and vice versa
Mar 25, 2024 am 09:36 AM
When creating a virtual machine, you will be asked to select a disk type, you can select fixed disk or dynamic disk. What if you choose fixed disks and later realize you need dynamic disks, or vice versa? Good! You can convert one to the other. In this post, we will see how to convert VirtualBox fixed disk to dynamic disk and vice versa. A dynamic disk is a virtual hard disk that initially has a small size and grows in size as you store data in the virtual machine. Dynamic disks are very efficient at saving storage space because they only take up as much host storage space as needed. However, as disk capacity expands, your computer's performance may be slightly affected. Fixed disks and dynamic disks are commonly used in virtual machines
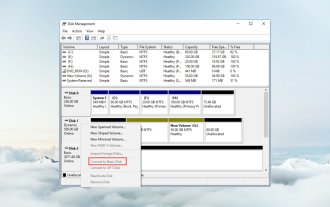 How to convert dynamic disk to basic disk on Windows 11
Sep 23, 2023 pm 11:33 PM
How to convert dynamic disk to basic disk on Windows 11
Sep 23, 2023 pm 11:33 PM
If you want to convert a dynamic disk to a basic disk in Windows 11, you should create a backup first as the process will erase all data in it. Why should you convert dynamic disk to basic disk in Windows 11? According to Microsoft, dynamic disks have been deprecated from Windows and their use is no longer recommended. Additionally, Windows Home Edition does not support dynamic disks, so you will not be able to access these logical drives. If you want to combine more disks into a larger volume, it is recommended to use Basic Disks or Storage Spaces. In this article, we will show you how to convert dynamic disk to basic disk on Windows 11 How to convert dynamic disk to basic disk in Windows 11? In the beginning
 How to Get Live Tiles on the Desktop and Start Menu in Windows 11
Apr 14, 2023 pm 05:07 PM
How to Get Live Tiles on the Desktop and Start Menu in Windows 11
Apr 14, 2023 pm 05:07 PM
Imagine you are looking for something on your system but are not sure which application to open or select. This is where the Live Tiles feature comes into play. A live tile for any supported application can be added to the desktop or Windows system's Start menu, with its tiles changing frequently. LiveTiles make application widgets come alive in a very pleasing way. Not just for its appearance, but even for convenience. Suppose you are using whatsapp or facebook application on your system, wouldn't it be convenient if the number of notifications is displayed on the application icon? This is possible if any such supported app is added as a live tile. Let’s see how to do it in Windows
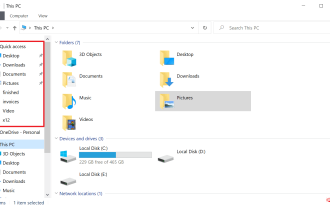 How to disable dynamic display of folders and files to prevent quick access in Windows 10 and 11?
May 06, 2023 pm 04:58 PM
How to disable dynamic display of folders and files to prevent quick access in Windows 10 and 11?
May 06, 2023 pm 04:58 PM
Microsoft introduced Quick Access in Windows 10 and retained the feature in the recently released Windows 11 operating system. Quick Access replaces the Favorites system in File Explorer. One of the core differences between the two features is that Quick Access adds a dynamic component to its list. Some folders appear permanently, while others appear based on usage. Fixed folders are displayed with a pin icon, while dynamic folders do not have such an icon. You can see a comparison between My Favorites and Quick Access here for more details. Quick Access is more powerful than Favorites, but dynamic folder lists add an element of clutter to it. Files that are useless or should not be highlighted in File Explorer may be displayed
 How to use Dynamic Lock on Windows 11
Apr 13, 2023 pm 08:31 PM
How to use Dynamic Lock on Windows 11
Apr 13, 2023 pm 08:31 PM
What is dynamic locking on Windows 11? Dynamic Lock is a Windows 11 feature that locks your computer when a connected Bluetooth device (your phone or wearable) goes out of range. The Dynamic Lock feature automatically locks your PC even if you forget to use the Windows Key + L shortcut while walking away. Dynamic Lock works with any connected device with Bluetooth, but it's best to use a device with enough battery power and range, such as your phone. Once your device becomes inaccessible for 30 seconds, Windows will automatically lock the screen. Pair a Bluetooth device with Windows 11 For everything to work properly, you need to first
 How to create a dynamic image carousel using HTML, CSS and jQuery
Oct 25, 2023 am 10:09 AM
How to create a dynamic image carousel using HTML, CSS and jQuery
Oct 25, 2023 am 10:09 AM
How to use HTML, CSS and jQuery to create a dynamic image carousel. In website design and development, image carousel is a frequently used function for displaying multiple images or advertising banners. Through the combination of HTML, CSS and jQuery, we can achieve a dynamic image carousel effect, adding vitality and appeal to the website. This article will introduce how to use HTML, CSS and jQuery to create a simple dynamic image carousel, and provide specific code examples. Step 1: Set up HTML junction
