

PS入门:详细讲解

在photoshop 7(re4get
注:汗啊,真正开始用ps是04年左右,几乎没怎么用过7)的许多的优点,也许你忽略了自动颜色这个命令。或者你仅仅是通过:图像(image)->调整(adjustments)去使用它,然后发现它给你一个不太吸引人的,偏冷的,对比强烈的结果,其效果和其他的自动调整命令(re4get:如自动色阶,自动对比度)基本一样,即是说这个命令没有太重要的作用。是的,如果完全的让这个命令自动处理,确实很令人失望,但是如果你稍微深入的挖掘一下,你会发现,通过做很少的调节,你就可以把它变成一个强大校正的工具:半自动颜色(re4get:说它半自动是因为你需要做一些参数的调整)
Confessions
of a Latter-Day John
Henry(re4get:这个实在不知道怎么翻译,熟知的朋友请赐教)
我曾经强烈的认为"自动处理"的东西在处理图像的时候是不可靠的。自动校正这些东西只有对那些业余爱好者或者新手才是有用的,但对于一个专业的环境下,我自己动手会比自动处理命令做的更好,(re4get:好多牛人用画笔就可以作出让人难望项背的效果,这里不说那个)更快,比任何的所谓算法都要。而且事实上以前版本的photohsop所提供的自动校正功能确实很糟糕(re4get:
原文说它是image-wreckers)自动色阶看来就是设计出来损害高光和阴影并且产生严重的的色彩偏移(re4get:原文为color
cast,这个翻译有待商榷 );而自动对比度同样损害着高光和阴影并保留了原来图片的一些颜色偏移(re4get:color
cast).我第一感到震惊是nikon相机的自动对焦比我用眼睛做的更好更快。(re4get:原文:My first hard lesson was the
harsh realization that Nikon's auto-focus did a better job, faster, than my
40-something eyes could)。所以当我在photoshop
7的一个早期的alpha版本中看到“自动颜色"这个命令的时候,我尽力让自己抛弃成见,去尝试使用这个命令。
.
从此我开始使用“自动颜色"这个命令,并且我开始将它当成校正图像的首要选择。我将它应用在扫描的图像和数码摄像所得的图像,它为我节省了许多的时间。但是你在使用它的时候确实需要小心一些。这篇文章里所要讲述的原则是通过几次微小的调整完成的,稍微的偏离一些,就可能是你的图像的到很糟糕的结果,所以请注意每一个步骤。(re4get:
注意每一个细节很重要)
自动, 但是你需要做一些调整
不要通过
图像(image)->调整(adjustments)去使用它,这样你无法根据你的需要去控制它。通过色阶(ctlr L)或者曲线(ctrl M)来使用它--
我更倾向使用色阶,因为色阶对话框小写,这样我可以看大更大的图像,。在色阶对话框(re4get:在曲线里也是一样)中按选项(Options)就可以打开”自动颜色校正“选项
如下图: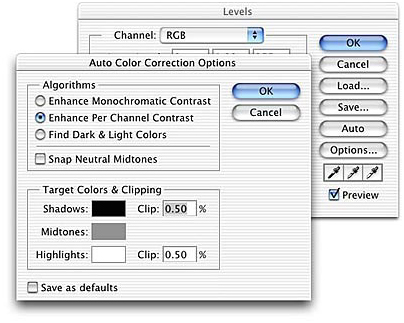
附:中文版对话框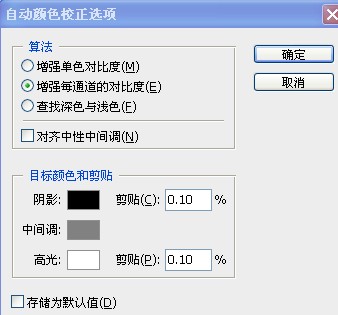
(re4get:
此图雪拂心尘提供,细心的话,可以看到数据的差别,这个差别在ps的帮助文档中有说明。这里的翻译中我觉得有些并不恰当的,这里不讨论,下文暂按这个翻译)
在这里有一个可以注意的地方:如果你改默认设置的话,每次进入这个对话框的时候,默认的选项都是自动色阶,更糟糕的是在算法(Algorithm
)下属的选项里使用了与菜单命令完全不同的描述,虽然这里的描述更详细。具体的对应如下:
”增强单色对比度“等同于自动对比度;
”增强每通道的对比度“等同于自动色阶;
”查找深色与浅色“等同于自动颜色。
(re4get:
这3个翻译中我觉得第一是有些不恰当的,这里不讨论,下文暂按这个翻译)
因此这里我们做的第一件事情是将对话框的默认选项设置为自动颜色,勾选”查找深色与浅色“选项(不用在乎现在图像发生了什么变化,再后面的步骤我们通过undo命令恢复这里的改变)并勾选”对齐中性中间调“
然后勾选”存储为默认值“如下图: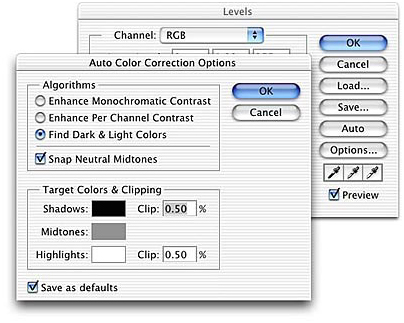
这一步的目的是是为了保证我们从色阶命令里按选项后,能直接使用”自动颜色“命令。所以这时候点按”确定“按钮(或者按键盘的 Enter )(re4get:
指windows系统)关闭”自动颜色校正“对话框,然后再次按”确定“按钮关闭色阶对话框。这时,按edit里的undo(re4get: 或者用ctrl
z)来撤销刚才的过程中对图像的改变。
现在我们开始使用”自动颜色“来调节图像。“自动颜色校正选项”这个面板可以让我们调整几个不同的参数,但是我通常只调节其中的3个:高光剪贴(re4get:
高光剪切更恰当些 ),阴影剪切(re4get: 阴影剪切更恰当些 )和中间调颜色,注意这个顺序。默认的剪贴(re4get:
哎,真的很别扭)数值是0.50%,这是为了照顾过去的成像设备比现在的要差的多原因,过去的成像设备所得到的图中有比现在多的多的无用信息。现在,对于大多数的图像,这个数值已经是很高的了(re4get: 在cs3版本中默认是0.1%),这样会导致高光和阴影区域信息的丢失。中间调颜色默认被设为RGB
128 灰,这个设置会在许多的时候,使得结果偏冷色。所以,大多情况下,我会稍微的将R值略微的调高一点点(re4get:
一点点的意思是什么呢?就是2个半点点也许^_^)并且把B值降低相等的数值。
恩,说了真么多,现在让我们看看在实际的例子里怎么样做。如下的图像是胶片没有洗出来的时候被x射线照过多次而造成的。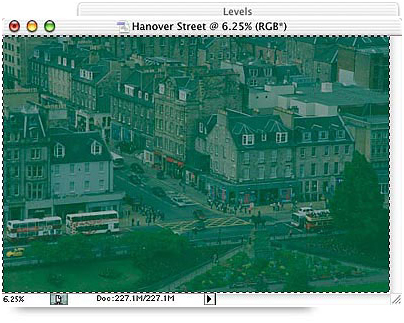
如果,我们接受默认的数值的话,会得到一个对比比较高而色调又偏冷的图像(re4get: 原作者好像一直在强调默认数值的糟糕),虽然图像看起来比开始的时候好多了,但一些高光如公交车的顶部被弄成了RGB 255 的白色,而一些阴影区也显得太黑了,如下图:

我们可以通过调节剪贴百分比来使得图像的质量有更好的提高,图像会随着我们在数据框中填写的数据而立即更新,即使说整个调节过程是交互的,一旦我们发现调整有些过头,可以立即发现。我建议先将这2个百分比调节为0(即无剪切),然后我们再开始调节,逐渐的增大数据直到我们得到一个满意的结果。从0到0.01%
的变化可能要比你所想象的大许多。(re4get:
j蝴蝶效应^_^)
一个比较方便的办法是,通过键盘上的方向键中的上下2个方向来调节数据,先将焦点设到需要调节的对话框中,然后通过按上下来增加或者减少0.01%。通过河shift键的合用可以改变0.1%。这样呢,我们在同时把光标移到信息面板以观察数据的变化。我大约耗费了3秒钟的时间,然后决定阴影剪贴用0%,高光剪贴用0.02%。结果如下图:

在上面说述的调节过程中,我们使得阴影做了令人满意的展开,并且高光处的点的值一致保持在250以下,但是色彩的平衡还是有些问题,色调偏冷。调整中性中间调颜色可以让我们修正这个。点按对话框中的灰色色块,打开拾色器。在这里我们可以改变中性中间调颜色,如下图:

同调整剪贴百分比一样,改变中性中间调颜色会立即的反应在图像上,这个操作也是交换的。我们可以通过数值去改变颜色,也可以通过在颜色面板里选择拖动那个小圆圈来改变颜色(re4get:
恩,还真是很佩服这么写,也许可以更详细的写成:在需要的颜色处点按鼠标左键,或者按住鼠标左键,然后拖动鼠标到需要的颜色处^_^)或者同时使用2个办法,我通常是通过改变HSB的值来达到目的,因为我感觉这样比用
RGB 调节的快些。
在对这个图片的调整中,我得到了如下图的数据,我的顺序是:首先调高R值,降低B值,然后拖追色样里的小圆圈到我满意为止。(re4get:
当然你可以调节到你认为满意为止,因为你要调整一个图像达到我的满意也许比较麻烦^_^)如下图:

虽然这个办法不是自动的,但是它很快且很容易
这是一个说起来很费劲,但是使用起来却很简单的办法(re4get:
伟人说一切反动派都是纸老虎。恩纳(re4get: ...this girls tone is because of one who's name
sailingsand, best wishes to you!
),是的,图像调整的办法有时也是纸老虎,要敢捅它啊)虽然我在这里的辛苦的逐条解释可能会让你觉得并不是这样。
好了,简化的版本是这样的
1、打开色阶.
2、按”选项“.
3、调整阴影剪贴.
4、调整高光剪贴.
5、按中性中间调颜色色块
6、调整中性中间调颜色.
7、按确认键关闭拾色器,按确认键关闭自动颜色校正选项。按确认键关闭色阶。完成图像调整,
(re4get:
好啰嗦的唐僧啊,难道关闭也都要写出来么,另外这篇文章有个矛盾,就是剪贴的顺序,阴影剪贴和高光剪贴的顺序,原作者有个疏漏,提出来近似有点鸡蛋挑骨头,在实际的应用中我们可以凭自己的喜好了)
作为一些小的练习,一下2张图都是需要做一些调节的,但它们比起上面我调节过的那个,看起来要好多了。

这是一幅旧金山下午时候的照片,那些金色的阳光很可爱,但是稍微有些过于金色了,你可以调节一下,和我比比看谁调的更好(re4get:
这里是我凭自己翻译的,原文不是这样的,^_^)
另外一幅如下,是旧金山的一处标志风景

调节数据和调节后的结果:


Hot AI Tools

Undresser.AI Undress
AI-powered app for creating realistic nude photos

AI Clothes Remover
Online AI tool for removing clothes from photos.

Undress AI Tool
Undress images for free

Clothoff.io
AI clothes remover

Video Face Swap
Swap faces in any video effortlessly with our completely free AI face swap tool!

Hot Article
Hot Tools

Notepad++7.3.1
Easy-to-use and free code editor

SublimeText3 Chinese version
Chinese version, very easy to use

Zend Studio 13.0.1
Powerful PHP integrated development environment

Dreamweaver CS6
Visual web development tools

SublimeText3 Mac version
God-level code editing software (SublimeText3)
Hot Topics
 1386
1386
 52
52

 A Diffusion Model Tutorial Worth Your Time, from Purdue University
Apr 07, 2024 am 09:01 AM
A Diffusion Model Tutorial Worth Your Time, from Purdue University
Apr 07, 2024 am 09:01 AM
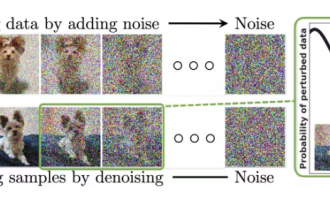
Diffusion can not only imitate better, but also "create". The diffusion model (DiffusionModel) is an image generation model. Compared with the well-known algorithms such as GAN and VAE in the field of AI, the diffusion model takes a different approach. Its main idea is a process of first adding noise to the image and then gradually denoising it. How to denoise and restore the original image is the core part of the algorithm. The final algorithm is able to generate an image from a random noisy image. In recent years, the phenomenal growth of generative AI has enabled many exciting applications in text-to-image generation, video generation, and more. The basic principle behind these generative tools is the concept of diffusion, a special sampling mechanism that overcomes the limitations of previous methods.
 Generate PPT with one click! Kimi: Let the 'PPT migrant workers' become popular first
Aug 01, 2024 pm 03:28 PM
Generate PPT with one click! Kimi: Let the 'PPT migrant workers' become popular first
Aug 01, 2024 pm 03:28 PM
Kimi: In just one sentence, in just ten seconds, a PPT will be ready. PPT is so annoying! To hold a meeting, you need to have a PPT; to write a weekly report, you need to have a PPT; to make an investment, you need to show a PPT; even when you accuse someone of cheating, you have to send a PPT. College is more like studying a PPT major. You watch PPT in class and do PPT after class. Perhaps, when Dennis Austin invented PPT 37 years ago, he did not expect that one day PPT would become so widespread. Talking about our hard experience of making PPT brings tears to our eyes. "It took three months to make a PPT of more than 20 pages, and I revised it dozens of times. I felt like vomiting when I saw the PPT." "At my peak, I did five PPTs a day, and even my breathing was PPT." If you have an impromptu meeting, you should do it
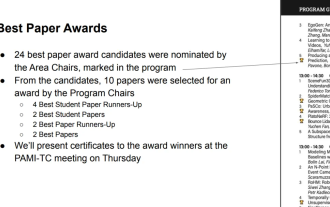 All CVPR 2024 awards announced! Nearly 10,000 people attended the conference offline, and a Chinese researcher from Google won the best paper award
Jun 20, 2024 pm 05:43 PM
All CVPR 2024 awards announced! Nearly 10,000 people attended the conference offline, and a Chinese researcher from Google won the best paper award
Jun 20, 2024 pm 05:43 PM
In the early morning of June 20th, Beijing time, CVPR2024, the top international computer vision conference held in Seattle, officially announced the best paper and other awards. This year, a total of 10 papers won awards, including 2 best papers and 2 best student papers. In addition, there were 2 best paper nominations and 4 best student paper nominations. The top conference in the field of computer vision (CV) is CVPR, which attracts a large number of research institutions and universities every year. According to statistics, a total of 11,532 papers were submitted this year, and 2,719 were accepted, with an acceptance rate of 23.6%. According to Georgia Institute of Technology’s statistical analysis of CVPR2024 data, from the perspective of research topics, the largest number of papers is image and video synthesis and generation (Imageandvideosyn
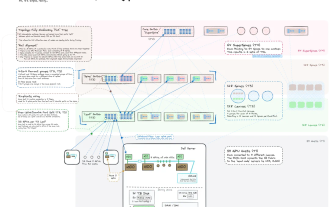 From bare metal to a large model with 70 billion parameters, here is a tutorial and ready-to-use scripts
Jul 24, 2024 pm 08:13 PM
From bare metal to a large model with 70 billion parameters, here is a tutorial and ready-to-use scripts
Jul 24, 2024 pm 08:13 PM
We know that LLM is trained on large-scale computer clusters using massive data. This site has introduced many methods and technologies used to assist and improve the LLM training process. Today, what we want to share is an article that goes deep into the underlying technology and introduces how to turn a bunch of "bare metals" without even an operating system into a computer cluster for training LLM. This article comes from Imbue, an AI startup that strives to achieve general intelligence by understanding how machines think. Of course, turning a bunch of "bare metal" without an operating system into a computer cluster for training LLM is not an easy process, full of exploration and trial and error, but Imbue finally successfully trained an LLM with 70 billion parameters. and in the process accumulate
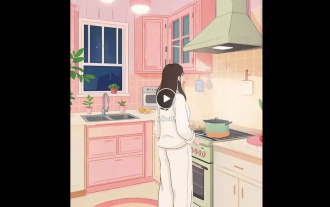 AI in use | AI created a life vlog of a girl living alone, which received tens of thousands of likes in 3 days
Aug 07, 2024 pm 10:53 PM
AI in use | AI created a life vlog of a girl living alone, which received tens of thousands of likes in 3 days
Aug 07, 2024 pm 10:53 PM
Editor of the Machine Power Report: Yang Wen The wave of artificial intelligence represented by large models and AIGC has been quietly changing the way we live and work, but most people still don’t know how to use it. Therefore, we have launched the "AI in Use" column to introduce in detail how to use AI through intuitive, interesting and concise artificial intelligence use cases and stimulate everyone's thinking. We also welcome readers to submit innovative, hands-on use cases. Video link: https://mp.weixin.qq.com/s/2hX_i7li3RqdE4u016yGhQ Recently, the life vlog of a girl living alone became popular on Xiaohongshu. An illustration-style animation, coupled with a few healing words, can be easily picked up in just a few days.
 A must-read for technical beginners: Analysis of the difficulty levels of C language and Python
Mar 22, 2024 am 10:21 AM
A must-read for technical beginners: Analysis of the difficulty levels of C language and Python
Mar 22, 2024 am 10:21 AM
Title: A must-read for technical beginners: Difficulty analysis of C language and Python, requiring specific code examples In today's digital age, programming technology has become an increasingly important ability. Whether you want to work in fields such as software development, data analysis, artificial intelligence, or just learn programming out of interest, choosing a suitable programming language is the first step. Among many programming languages, C language and Python are two widely used programming languages, each with its own characteristics. This article will analyze the difficulty levels of C language and Python
 Counting down the 12 pain points of RAG, NVIDIA senior architect teaches solutions
Jul 11, 2024 pm 01:53 PM
Counting down the 12 pain points of RAG, NVIDIA senior architect teaches solutions
Jul 11, 2024 pm 01:53 PM
Retrieval-augmented generation (RAG) is a technique that uses retrieval to boost language models. Specifically, before a language model generates an answer, it retrieves relevant information from an extensive document database and then uses this information to guide the generation process. This technology can greatly improve the accuracy and relevance of content, effectively alleviate the problem of hallucinations, increase the speed of knowledge update, and enhance the traceability of content generation. RAG is undoubtedly one of the most exciting areas of artificial intelligence research. For more details about RAG, please refer to the column article on this site "What are the new developments in RAG, which specializes in making up for the shortcomings of large models?" This review explains it clearly." But RAG is not perfect, and users often encounter some "pain points" when using it. Recently, NVIDIA’s advanced generative AI solution
 Linux Tips: Cancel automatic indentation when pasting in vim
Mar 07, 2024 am 08:30 AM
Linux Tips: Cancel automatic indentation when pasting in vim
Mar 07, 2024 am 08:30 AM
Preface: vim is a powerful text editing tool, which is very popular on Linux. Recently, I encountered a strange problem when using vim on another server: when I copied and pasted a locally written script into a blank file on the server, automatic indentation occurred. To use a simple example, the script I wrote locally is as follows: aaabbbcccddd. When I copy the above content and paste it into a blank file on the server, what I get is: aabbbcccddd. Obviously, this is what vim does automatically for us. Format indentation. However, this automatic is a bit unintelligent. Record the solution here. Solution: Set the .vimrc configuration file in our home directory, new
