
 Web Front-end
JS Tutorial
JavaScript event proxy and delegate instance analysis_javascript skills
Web Front-end
JS Tutorial
JavaScript event proxy and delegate instance analysis_javascript skills
JavaScript event proxy and delegate instance analysis_javascript skills

In JavaScript, we often encounter situations where we need to monitor multiple li items in a list. Suppose we have a list as follows:
- item1
- item2
- item3
- item4
If we want to implement the following function: when the mouse clicks on a certain li, alert outputs the content of the li. Our usual writing method is like this:
When there are few list items, directly add onclick events to each li
When there are many list items, call the listener for each list item during onload
The first method is relatively simple and direct, but it does not take into account the separation of html and JavaScript and is not recommended. The code for the second method is as follows:
window.onload=function(){
var ulNode=document.getElementById("list");
var liNodes=ulNode.childNodes||ulNode.children;
for(var i=0;i
alert(e.target.innerHTML);
},false);
}
}
As can be seen from the above, if you keep deleting or adding li, function() will also have to keep changing operations, which is prone to errors. Therefore, it is recommended to use an event proxy. Before using an event proxy, let’s take a look at it first. Event phase:
Event stage:
When a DOM event is triggered, it does not only trigger once on its origin object, but will go through three different stages. In short: the event initially flows from the root node of the document to the target object (capture phase), then is triggered upward on the target pair (target phase), and then traces back to the root node of the document (bubbling phase) as shown in the figure (Image from W3C):
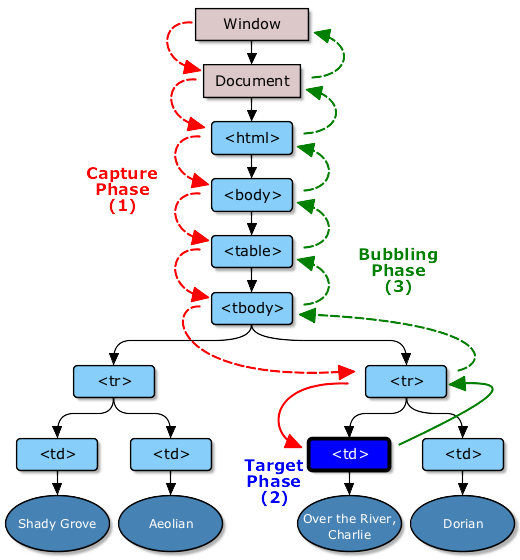
Event capture phase (Capture Phase)
The first phase of the event is the capture phase. The event starts from the root node of the document and flows to the target node of the event along with the structure of the DOM tree. It passes through DOM nodes at various levels on the way, and triggers capture events on each node until it reaches the target node of time. The main task of the capture phase is the resume propagation path. In the bubbling phase, time will be traced back to the document root node through this path.
element.removeEventListener(<event-name>,
We use the above function to set monitoring for the node. You can add a monitoring callback function for the capture phase of the event by setting ; to true. In actual applications, we don't have many use cases for using capture phase monitoring, but by handling events in the capture phase, we can prevent click events from being triggered on a specific element.
var form=document.querySeletor('form');
form.addEventListener('click',function(e){
e.stopPropagation();
},true);
이 사용법에 대해 잘 모르는 경우 버블링 단계에서 이벤트를 모니터링하기 위해 false 또는 정의되지 않음으로 설정하는 것이 가장 좋습니다.
목표 단계
이벤트가 대상 노드에 도달하면 이벤트가 대상 단계에 들어갑니다. 이벤트는 대상 노드에서 트리거된 다음 가장 바깥쪽 문서 노드로 전파될 때까지 뒤로 흐릅니다.
다중 레벨 중첩 노드의 경우 마우스 및 포인터 이벤트가 가장 안쪽 요소에 위치하는 경우가 많습니다. div 요소에 클릭 청취 기능을 설정하고 사용자가 div 요소 내부의 p 요소를 클릭하면 이때 p 요소가 대상 요소가 된다고 가정해 보겠습니다. 이벤트 버블링을 사용하면 이 div 또는 상위 수준 요소의 클릭 이벤트를 수신하고 시간 전파 중에 콜백 기능을 트리거할 수 있습니다.
버블 단계
대상 이벤트에서 이벤트가 트리거된 후에는 이 요소에서 종료되지 않습니다. 가장 바깥쪽 루트 노드에 도달할 때까지 DOM 트리를 따라 레이어별로 버블링됩니다. 즉, 대상 노드의 상위 노드, 상위 노드의 상위 노드... 가장 바깥쪽 노드까지 동일한 이벤트가 한 번 트리거됩니다.
대부분의 이벤트가 버블링되지만 전부는 아닙니다. 자세한 내용은 사양
을 참조하세요.위에서 우리는 이벤트 프록시를 사용하여 각 리를 모니터링할 수 있다고 생각할 수 있습니다. 코드는 다음과 같습니다.
window.onload=function(){
var ulNode=document.getElementById("목록");
ulNode.addEventListener('클릭',function(e){
If(e.target&&e.target.nodeName.toUpperCase()=="LI"){/*대상 이벤트가 li인지 확인*/
경고(e.target.innerHTML);
}
},거짓);
};
위 내용은 이 글의 전체 내용입니다. 모든 분들이 JavaScript 이벤트의 위임 및 프록시에 익숙해지는 데 도움이 되기를 바랍니다.
잠시 시간을 내어 기사를 친구들과 공유하거나 댓글을 남겨주세요. 여러분의 지원에 진심으로 감사드립니다!

Hot AI Tools

Undresser.AI Undress
AI-powered app for creating realistic nude photos

AI Clothes Remover
Online AI tool for removing clothes from photos.

Undress AI Tool
Undress images for free

Clothoff.io
AI clothes remover

AI Hentai Generator
Generate AI Hentai for free.

Hot Article
Hot Tools

Notepad++7.3.1
Easy-to-use and free code editor

SublimeText3 Chinese version
Chinese version, very easy to use

Zend Studio 13.0.1
Powerful PHP integrated development environment

Dreamweaver CS6
Visual web development tools

SublimeText3 Mac version
God-level code editing software (SublimeText3)
Hot Topics


 How to implement an online speech recognition system using WebSocket and JavaScript
Dec 17, 2023 pm 02:54 PM
How to implement an online speech recognition system using WebSocket and JavaScript
Dec 17, 2023 pm 02:54 PM
How to use WebSocket and JavaScript to implement an online speech recognition system Introduction: With the continuous development of technology, speech recognition technology has become an important part of the field of artificial intelligence. The online speech recognition system based on WebSocket and JavaScript has the characteristics of low latency, real-time and cross-platform, and has become a widely used solution. This article will introduce how to use WebSocket and JavaScript to implement an online speech recognition system.
 WebSocket and JavaScript: key technologies for implementing real-time monitoring systems
Dec 17, 2023 pm 05:30 PM
WebSocket and JavaScript: key technologies for implementing real-time monitoring systems
Dec 17, 2023 pm 05:30 PM
WebSocket and JavaScript: Key technologies for realizing real-time monitoring systems Introduction: With the rapid development of Internet technology, real-time monitoring systems have been widely used in various fields. One of the key technologies to achieve real-time monitoring is the combination of WebSocket and JavaScript. This article will introduce the application of WebSocket and JavaScript in real-time monitoring systems, give code examples, and explain their implementation principles in detail. 1. WebSocket technology
 JavaScript and WebSocket: Building an efficient real-time weather forecasting system
Dec 17, 2023 pm 05:13 PM
JavaScript and WebSocket: Building an efficient real-time weather forecasting system
Dec 17, 2023 pm 05:13 PM
JavaScript and WebSocket: Building an efficient real-time weather forecast system Introduction: Today, the accuracy of weather forecasts is of great significance to daily life and decision-making. As technology develops, we can provide more accurate and reliable weather forecasts by obtaining weather data in real time. In this article, we will learn how to use JavaScript and WebSocket technology to build an efficient real-time weather forecast system. This article will demonstrate the implementation process through specific code examples. We
 Simple JavaScript Tutorial: How to Get HTTP Status Code
Jan 05, 2024 pm 06:08 PM
Simple JavaScript Tutorial: How to Get HTTP Status Code
Jan 05, 2024 pm 06:08 PM
JavaScript tutorial: How to get HTTP status code, specific code examples are required. Preface: In web development, data interaction with the server is often involved. When communicating with the server, we often need to obtain the returned HTTP status code to determine whether the operation is successful, and perform corresponding processing based on different status codes. This article will teach you how to use JavaScript to obtain HTTP status codes and provide some practical code examples. Using XMLHttpRequest
 The No. 1 brother of Guoyou Fourteen years ago is now acquired by a Korean company? A breakdown of Ninetowns' awesome games
Apr 02, 2024 am 09:58 AM
The No. 1 brother of Guoyou Fourteen years ago is now acquired by a Korean company? A breakdown of Ninetowns' awesome games
Apr 02, 2024 am 09:58 AM
Fourteen years ago, there was such a company. It owned half of the domestic Internet games. Tencent nodded when it saw it, NetEase bowed when it saw it, and even large international companies like EA and Blizzard had to look at it. He acted with his eyes, and was nicknamed the No. 1 Brother in domestic games. But after more than ten years of hard work, the former No. 1 brother has become the last person. Not to mention running any games, even the company is about to be acquired by South Korea's Konishihachi... Today, let's review it , which introduced a series of outstanding games such as "World of Warcraft", "Guild Wars", and "Planetside 2" to the domestic outstanding company-The Ninth City. The peak after debut? It makes sense to rely on "Miracle MU" to conquer half of the domestic online games, even if there are so many such as Tencent, NetEase, MiHoYo, and Perfect World.
 How to get HTTP status code in JavaScript the easy way
Jan 05, 2024 pm 01:37 PM
How to get HTTP status code in JavaScript the easy way
Jan 05, 2024 pm 01:37 PM
Introduction to the method of obtaining HTTP status code in JavaScript: In front-end development, we often need to deal with the interaction with the back-end interface, and HTTP status code is a very important part of it. Understanding and obtaining HTTP status codes helps us better handle the data returned by the interface. This article will introduce how to use JavaScript to obtain HTTP status codes and provide specific code examples. 1. What is HTTP status code? HTTP status code means that when the browser initiates a request to the server, the service
 How to implement change event binding of select elements in jQuery
Feb 23, 2024 pm 01:12 PM
How to implement change event binding of select elements in jQuery
Feb 23, 2024 pm 01:12 PM
jQuery is a popular JavaScript library that can be used to simplify DOM manipulation, event handling, animation effects, etc. In web development, we often encounter situations where we need to change event binding on select elements. This article will introduce how to use jQuery to bind select element change events, and provide specific code examples. First, we need to create a dropdown menu with options using labels:
 How to build event-based applications using PHP
May 04, 2024 pm 02:24 PM
How to build event-based applications using PHP
May 04, 2024 pm 02:24 PM
Methods for building event-based applications in PHP include using the EventSourceAPI to create an event source and using the EventSource object to listen for events on the client side. Send events using Server Sent Events (SSE) and listen for events on the client side using an XMLHttpRequest object. A practical example is to use EventSource to update inventory counts in real time in an e-commerce website. This is achieved on the server side by randomly changing the inventory and sending updates, and the client listens for inventory updates through EventSource and displays them in real time.
