

仿开源中国,分享代码时候的多文件上传

有点标题党,不过确实是一个不错的多文件上传类。简洁实用。 这个类可以用来处理表单上传多个文件。 这个类可以检查文件是否不为空,也没有超过给定的大小限制。 它也可以检查文件类型对允许和拒绝的文件类型列表。 该类还可以通过用下划线代替空格使最终的文
有点标题党,不过确实是一个不错的多文件上传类。简洁实用。
这个类可以用来处理表单上传多个文件。
这个类可以检查文件是否不为空,也没有超过给定的大小限制。
它也可以检查文件类型对允许和拒绝的文件类型列表。
该类还可以通过用下划线代替空格使最终的文件名更安全。
如果在上传文件时出现错误,类抛出一个异常对象,该对象提供有关错误代码和说明错误消息的信息。
代码珠玑:http://www.codepearl.com/files/194.html
源码与演示:源码出处 演示出处


<?php
//http://www.codepearl.com
$action = isset($_GET['action'])?$_GET['action']:"";
require_once('main.class.php');

$auc = new auc();

if ($action == 'uploadfile') {
	$auc = new auc();
	//Comment: $auc->upload_dir("directory name", "create dir if it does not exist, false by default or true");
	//$auc->upload_dir("/path/to/uploads/folder/with/trailing/slash/", false);
	//Comment: $auc->make_safe = true || false (default); make the file name safe
	//$auc->make_safe = true;
	//Comment: $auc->max_file_size = size in bytes (1MB default) || false; set max file size in bytes or false not to check size
	//$auc->max_file_size = 1048576;
	//Comment: $auc->overwrite = true || false (default); overwrite if file exists
	//$auc->overwrite = true;
	//Comment: $auc->check_file_type = false (default) || allowed || denied;
	//$auc->check_file_type = 'allowed';
	$result = $auc->upload("file");
	if (is_array($result)) {
		echo 'Something Went Wrong';
		echo '<pre class="brush:php;toolbar:false">';
		var_dump($result);
echo '<?php
//http://www.codepearl.com
class auc {
public $errors = array(); //array used to store any errors that occur.
public $upload_dir = ''; //the upload_dir being used by the script
public $make_safe = false; //default don't modify the file name to safe version
public $max_file_size = 1048576; //Max File Size in Bytes, 1MB
public $overwrite = false; //default don't overwrite files that already exsist
public $check_file_type = false; //don't check for file type by default but can check for allowed and denied files.
public $allowed_mime_types = array('image/jpeg', 'image/png', 'image/gif', 'image/tiff'); //array of allowed mime types used when check_file_type is set to allowed
public $denied_mime_types = array('application/x-php', 'text/html'); //array of denied mime types used when check_file_type is set to denied
/**
* Check if the upload dir is valid, if it is not valid attempt to make the dir, if dir is succesfully created chmod it to 0777.
* If any elments fail return false else set upload_dir and return true.
* @param string $dir
* @param boolean $mkdir
* @return true or false
*/
public function upload_dir($dir, $mkdir = false) {
$errors =& $this->errors;
$status = true;
if (!is_dir($dir)) {
if ($mkdir) {
if (!mkdir($dir)) {
$status = false;
} else {
if (!chmod($dir, 0777)) $status = false;
}
} else {
$status = false;
}
}
if ($status) {
$this->upload_dir = $dir;
return true;
} else {
$errors['general'][] = 'Upload Dir is Not Valid and/or a dir could not be created/chmod.';
return false;
}
}
/**
* check that the upload dir is valid and that it is writeable
*
* @param string $dir
* @return true or false
*/
public function check_dir($dir) {
if (!is_dir($dir) || !is_writable($dir)) return false;
return true;
}
/**
* make the uploaded file name safe
*
* @param string $file_name
* @return safe file name
*/
public function make_safe($file_name) {
return str_replace(' ', '_', $file_name);
}
/**
* Check the Attemted Uploads for errors etc if everything goes good move the file, to the upload_dir.
*
* @param array $object
* @return unknown
*/
public function upload($object) {
$errors =& $this->errors;
if (empty($errors['general'])) {
if (empty($this->upload_dir)) $this->upload_dir = dirname(__FILE__).'/'; //if no default upload_dir has been specified used the current dir.
if ($this->check_dir($this->upload_dir)) {
$files = $_FILES[$object];
$count = count($files['name']) - 1;
echo '<pre class="brush:php;toolbar:false">';
var_dump($files);
echo '
Hot AI Tools

Undresser.AI Undress
AI-powered app for creating realistic nude photos

AI Clothes Remover
Online AI tool for removing clothes from photos.

Undress AI Tool
Undress images for free

Clothoff.io
AI clothes remover

Video Face Swap
Swap faces in any video effortlessly with our completely free AI face swap tool!

Hot Article
Hot Tools

Notepad++7.3.1
Easy-to-use and free code editor

SublimeText3 Chinese version
Chinese version, very easy to use

Zend Studio 13.0.1
Powerful PHP integrated development environment

Dreamweaver CS6
Visual web development tools

SublimeText3 Mac version
God-level code editing software (SublimeText3)
Hot Topics
 1386
1386
 52
52

 Ten recommended open source free text annotation tools
Mar 26, 2024 pm 08:20 PM
Ten recommended open source free text annotation tools
Mar 26, 2024 pm 08:20 PM
Text annotation is the work of corresponding labels or tags to specific content in text. Its main purpose is to provide additional information to the text for deeper analysis and processing, especially in the field of artificial intelligence. Text annotation is crucial for supervised machine learning tasks in artificial intelligence applications. It is used to train AI models to help more accurately understand natural language text information and improve the performance of tasks such as text classification, sentiment analysis, and language translation. Through text annotation, we can teach AI models to recognize entities in text, understand context, and make accurate predictions when new similar data appears. This article mainly recommends some better open source text annotation tools. 1.LabelStudiohttps://github.com/Hu
 15 recommended open source free image annotation tools
Mar 28, 2024 pm 01:21 PM
15 recommended open source free image annotation tools
Mar 28, 2024 pm 01:21 PM
Image annotation is the process of associating labels or descriptive information with images to give deeper meaning and explanation to the image content. This process is critical to machine learning, which helps train vision models to more accurately identify individual elements in images. By adding annotations to images, the computer can understand the semantics and context behind the images, thereby improving the ability to understand and analyze the image content. Image annotation has a wide range of applications, covering many fields, such as computer vision, natural language processing, and graph vision models. It has a wide range of applications, such as assisting vehicles in identifying obstacles on the road, and helping in the detection and diagnosis of diseases through medical image recognition. . This article mainly recommends some better open source and free image annotation tools. 1.Makesens
 What to do if the 0x80004005 error code appears. The editor will teach you how to solve the 0x80004005 error code.
Mar 21, 2024 pm 09:17 PM
What to do if the 0x80004005 error code appears. The editor will teach you how to solve the 0x80004005 error code.
Mar 21, 2024 pm 09:17 PM
When deleting or decompressing a folder on your computer, sometimes a prompt dialog box "Error 0x80004005: Unspecified Error" will pop up. How should you solve this situation? There are actually many reasons why the error code 0x80004005 is prompted, but most of them are caused by viruses. We can re-register the dll to solve the problem. Below, the editor will explain to you the experience of handling the 0x80004005 error code. Some users are prompted with error code 0X80004005 when using their computers. The 0x80004005 error is mainly caused by the computer not correctly registering certain dynamic link library files, or by a firewall that does not allow HTTPS connections between the computer and the Internet. So how about
 How to share NetEase Cloud Music to WeChat Moments_Tutorial on sharing NetEase Cloud Music to WeChat Moments
Mar 25, 2024 am 11:41 AM
How to share NetEase Cloud Music to WeChat Moments_Tutorial on sharing NetEase Cloud Music to WeChat Moments
Mar 25, 2024 am 11:41 AM
1. First, we enter NetEase Cloud Music, and then click on the software homepage interface to enter the song playback interface. 2. Then in the song playback interface, find the sharing function button in the upper right corner, as shown in the red box in the figure below, click to select the sharing channel; in the sharing channel, click the "Share to" option at the bottom, and then select the first "WeChat Moments" allows you to share content to WeChat Moments.
 Recommended: Excellent JS open source face detection and recognition project
Apr 03, 2024 am 11:55 AM
Recommended: Excellent JS open source face detection and recognition project
Apr 03, 2024 am 11:55 AM
Face detection and recognition technology is already a relatively mature and widely used technology. Currently, the most widely used Internet application language is JS. Implementing face detection and recognition on the Web front-end has advantages and disadvantages compared to back-end face recognition. Advantages include reducing network interaction and real-time recognition, which greatly shortens user waiting time and improves user experience; disadvantages include: being limited by model size, the accuracy is also limited. How to use js to implement face detection on the web? In order to implement face recognition on the Web, you need to be familiar with related programming languages and technologies, such as JavaScript, HTML, CSS, WebRTC, etc. At the same time, you also need to master relevant computer vision and artificial intelligence technologies. It is worth noting that due to the design of the Web side
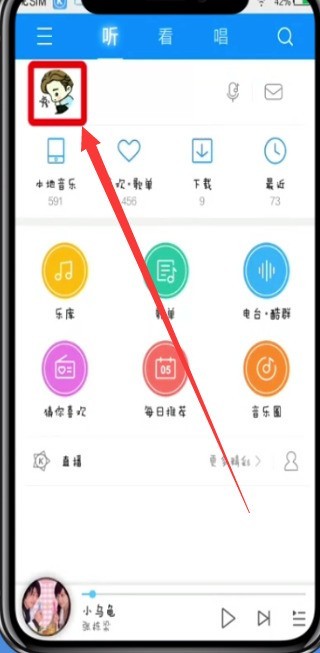 Simple steps to upload your own music on Kugou
Mar 25, 2024 pm 10:56 PM
Simple steps to upload your own music on Kugou
Mar 25, 2024 pm 10:56 PM
1. Open Kugou Music and click on your profile picture. 2. Click the settings icon in the upper right corner. 3. Click [Upload Music Works]. 4. Click [Upload Works]. 5. Select the song and click [Next]. 6. Finally, click [Upload].
 Alibaba 7B multi-modal document understanding large model wins new SOTA
Apr 02, 2024 am 11:31 AM
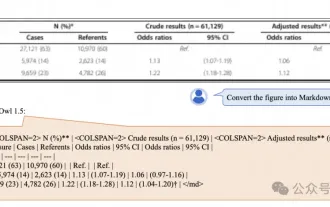
Alibaba 7B multi-modal document understanding large model wins new SOTA
Apr 02, 2024 am 11:31 AM
New SOTA for multimodal document understanding capabilities! Alibaba's mPLUG team released the latest open source work mPLUG-DocOwl1.5, which proposed a series of solutions to address the four major challenges of high-resolution image text recognition, general document structure understanding, instruction following, and introduction of external knowledge. Without further ado, let’s look at the effects first. One-click recognition and conversion of charts with complex structures into Markdown format: Charts of different styles are available: More detailed text recognition and positioning can also be easily handled: Detailed explanations of document understanding can also be given: You know, "Document Understanding" is currently An important scenario for the implementation of large language models. There are many products on the market to assist document reading. Some of them mainly use OCR systems for text recognition and cooperate with LLM for text processing.
 How to share files with friends on Baidu Netdisk
Mar 25, 2024 pm 06:52 PM
How to share files with friends on Baidu Netdisk
Mar 25, 2024 pm 06:52 PM
Recently, Baidu Netdisk Android client has ushered in a new version 8.0.0. This version not only brings many changes, but also adds many practical functions. Among them, the most eye-catching is the enhancement of the folder sharing function. Now, users can easily invite friends to join and share important files in work and life, achieving more convenient collaboration and sharing. So how do you share the files you need to share with your friends? Below, the editor of this site will give you a detailed introduction. I hope it can help you! 1) Open Baidu Cloud APP, first click to select the relevant folder on the homepage, and then click the [...] icon in the upper right corner of the interface; (as shown below) 2) Then click [+] in the "Shared Members" column 】, and finally check all
