Home > Web Front-end > JS Tutorial > JavaScript plug-in development tutorial (5)_javascript skills

JavaScript plug-in development tutorial (5)_javascript skills

WBOY
Release: 2016-05-16 16:16:36
Original
1243 people have browsed it

1, opening analysis

Hi, everyone! In the first two articles, we mainly talked about "how to develop plug-ins using jQuery", and how to design a plug-in by combining procedural design and object-oriented design. Both methods have their own advantages and disadvantages. Hey, hey, nonsense. Say less and get to the point. Directly upload the actual renderings:
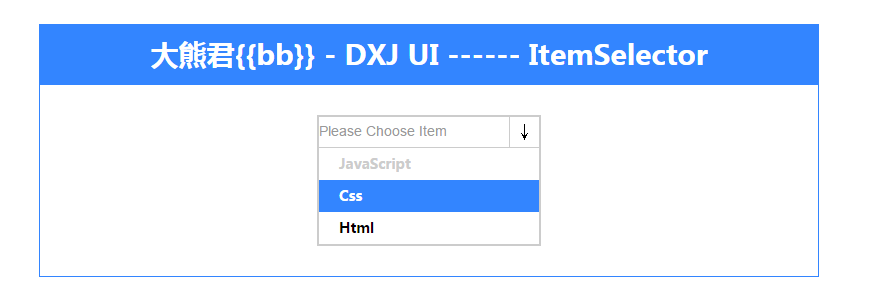
As you can see, this is a drop-down menu plug-in. In our daily development, what the system provides may sometimes make us feel that it is not very beautiful and has limited functions, causing users

The experience form and user interactivity are not very good, so today I will simulate a hey hey. Let’s analyze it in detail below.

(2), example analysis

(1), first determine what this plug-in does. Let’s take a look at how the plug-in is called and the configuration parameter description. The following code:

Copy code The code is as follows:

$(function(){
var itemSelector = new ItemSelector($("#item-selector"),{
           currentText: "Please Choose Item" ,
items: [
                 {
                   text: "JavaScript" ,
                   value: "js" ,
Disabled : "1"
                                                                                          {
                  text: "Css" ,
                   value: "css" ,
Disabled : "0"
                                                                                          {
                  text: "Html" ,
                   value: "html" ,
Disabled : "0"
            }
] ,
           mode: "0", // When it is "1", it supports checkbox multi-selection mode
​​​​​ change: function(value){
                            // put your code here
         }
}) ;
itemSelector.init() ;
setTimeout(function(){
console.log(itemSelector.getCurrentValue()); // Test to get the currently selected item
},2000) ;

"var itemSelector = new ItemSelector()" contains two parameters. The first is the dom node object, and the second is the plug-in parameter option. "currentText" represents the text in the selected text display area in the "ItemSelector" plug-in. describe.

"items" is an array, which contains the properties of the "ItemSelector" item, including text descriptions and option values. "disabled" represents the visibility of the list items, 0 represents display, and 1 represents not displayable.

"change" represents the operation callback function when selected, and the option data will be returned in the form of parameters.

(2), what are the functions involved

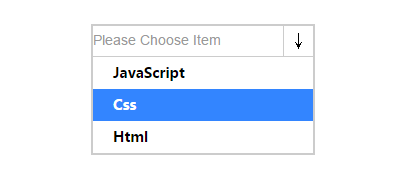
The displayable renderings are as follows:
The non-displayable renderings are as follows:
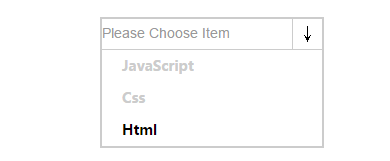
 The difference between the two is: the non-presentable status data will not be returned, and floating it will not have any effect.

3), complete code for learning. This code has been tested, including directory structure and related files.

 (1),html

Copy code The code is as follows:


                          Big Bear {{bb}} - DXJ UI ------ ItemSelector


(2), css


Copy code

The code is as follows:


 /* item-selector */
 #item-selector {
     margin : 0 auto;
     width : 220px ;
     overflow:hidden;
     border:2px solid #ccc;
 }
 #item-selector .title {
     border-bottom:1px solid #ccc;
     overflow:hidden;
 }
 #item-selector .title div {
     width:190px;
     border:0px ;
     color:#999;
     font-family: arial ;
     font-size: 14px;
     height:28px;
     line-height:28px;
     float:left;
     cursor:pointer;
 }
 #item-selector .title span {
     display:block;
     height:30px;
     line-height:30px;
     width:29px;
     float:left;
     text-align:center;
     border-left:1px solid #ccc;
     cursor:pointer;
 }
 #item-selector .content {
     width : 220px ;
     overflow:hidden;
 }
 #item-selector .content .items {
     overflow:hidden;
 }
 #item-selector .content .items div {
     padding-left:20px;
     width : 200px ;
     height:32px;
     line-height:32px;
     font-family: "微软雅黑" ;
     font-size: 14px;
     font-weight:bold;
     cursor:pointer;
 }
 .item-hover {
     background:#3385ff;
     color:#fff;
 }

 (3),"ItemSelector.js"

复制代码 代码如下:

function ItemSelector(elem,opts){
    this.elem = elem ;
    this.opts = opts ;
} ;
var ISProto = ItemSelector.prototype ;
ISProto.getElem = function(){
    return this.elem ;
} ;
ISProto.getOpts = function(){
    return this.opts ;
} ;
/* data manip*/
ISProto._setCurrent = function(current){
    this.getOpts()["current"] = current ;
} ;
ISProto.getCurrentValue = function(current){
    return this.getOpts()["current"] ;
} ;
/* data manip*/
ISProto.init = function(){
    var that = this ;
    this.getOpts()["current"] = null ; // 数据游标
    this._setItemValue(this.getOpts()["currentText"]) ;
    var itemsElem = that.getElem().find(".content .items") ;
    this.getElem().find(".title div").on("click",function(){
        itemsElem.toggle() ;
    }) ;
    this.getElem().find(".title span").on("click",function(){
        itemsElem.toggle() ;
    }) ;
    $.each(this.getOpts()["items"],function(i,item){
        item["id"] = (new Date().getTime()).toString() ;
        that._render(item) ;
    }) ;
} ;
ISProto._setItemValue = function(value){
    this.getElem().find(".title div").text(value)
} ;
ISProto._render = function(item){
    var that = this ;
    var itemElem = $("
")
    .text(item["text"])
    .attr("id",item["id"]) ;
    if("0" == item["disabled"]){
        itemElem.on("click",function(){
            var onChange = that.getOpts()["change"] ;
            that.getElem().find(".content .items").hide() ;
            that._setItemValue(item["text"]) ;
            that._setCurrent(item) ;
            onChange && onChange(item) ;
        })
        .mouseover(function(){
            $(this).addClass("item-hover") ;
        })
        .mouseout(function(){
            $(this).removeClass("item-hover") ;
        }) ;
    }
    else{
        itemElem.css("color","#ccc").on("click",function(){
            that.getElem().find(".content .items").hide() ;
            that._setItemValue(item["text"]) ;
        }) ;
    }
    itemElem.appendTo(this.getElem().find(".content .items")) ;
} ;

(四),最后总结

  (1),面向对象的思考方式合理分析功能需求。

  (2),以类的方式来组织我们的插件逻辑。

  (3),不断重构上面的实例,如何进行合理的重构那?不要设计过度,要游刃有余,推荐的方式是过程化设计与面向对象思想设计相结合。

    (4),下篇文章中会扩展相关功能,比如“mode”这个属性,为"1"时支持checkbox多选模式,现在只是默认下拉模式。

本文先到这里了,后续我们再继续讨论,希望小伙伴们能够喜欢本系列文章。

Related labels:
source:php.cn
Statement of this Website
The content of this article is voluntarily contributed by netizens, and the copyright belongs to the original author. This site does not assume corresponding legal responsibility. If you find any content suspected of plagiarism or infringement, please contact admin@php.cn
Popular Tutorials
More>
Latest Downloads
More>
Web Effects
Website Source Code
Website Materials
Front End Template