

mac os x安装ngigx+php fastcgi+mysql+memcache详细流程

Part 1: MacPorts Mac上装软件常用的是MacPorts和homebrew,这个软件会很方便地提供软件的 安装 。装这些前先得装Xcode,Xcode在appstore上有,一个多G,下载 安装 ,完成后在launchpad上回有Xcode图标,要点击才是正式 安装 ,装完后你在终端输入gcc -v,发
Part 1: MacPorts
Mac上装软件常用的是MacPorts和homebrew,这个软件会很方便地提供软件的安装。装这些前先得装Xcode,Xcode在appstore上有,一个多G,下载安装,完成后在launchpad上回有Xcode图标,要点击才是正式安装,装完后你在终端输入gcc -v,发现无此命令,没这个命令可没法装软件哦,应该是Xcode默认安装没有装完整,打开Xcode,点击左上方Xcode-》Open develop tools-》more develop tools,进入Xcode的网页搜索UNIX,安装command_line_tools_for_xcode_.dmg,完成后再进入终端,输入gcc -v,ok有了,哈哈哈。
我使用的是macports安装,macports到http://www.macports.org/install.php下载dmg文件安装就可以了,安装成功后,在终端输入
port list #可以看所有软件列表
port search xxx #可以搜索是否有该软件
port install xxx #安装
port uninstall xxx #卸载
port clean xxx #删除安装临时文件
Ps:homebrew的安装
首先:
sudo chown -R `whoami` /usr/local
然后可以正式开始安装,我推荐的安装方式是先用 git-osx-installer 装上 git,然后用 git 安装:
cd /usr/local
git init
git remote add origin git://github.com/mxcl/homebrew.git
git pull origin master
装完后命令与port命令差不多 比如 brew search;brew install
Part 2: Nginx
在终端上输入
sudo port install nginx spawn-fcgi
安装完成后启动nginx会说没有nginx.conf文件,到/opt/local/etc/nginx目录下看到以下几个文件:
fastcgi_params.example koi-utf koi-win mime.types.example nginx.conf.example win-utf
直接复制example文件:
sudo mv mime.types.example mime.types
sudo mv nginx.conf.example nginx.conf
启动nginx:
sudo nginx
访问http://127.0.0.1/,就可以看到Nginx的Welcome页面。
sudo nginx -t # 检测配置文件是否有效
sudo nginx -s reload # 重启
sudo nginx -h # 帮助
重点来了
1、让nginx开机自动启动
vi /Library/LaunchDaemons/org.macports.nginx.plist
内容为
/span>
"http://www.apple.com/DTDs/PropertyList-1.0.dtd" >
如果文件已经有内容直接退出vi
执行
sudo launchctl load -w /Library/LaunchDaemons/org.macports.nginx.plist
这样nginx开机就回自动启动
2、修改nginx.conf内容
vi /opt/local/etc/nginx/nginx.conf
下面是我的内容
#user nobody;
user www www;
worker_processes 1;
error_log /Users/apple/logs/nginx_errors.log;
events {
worker_connections 4098;
}
http {
include mime.types;
default_type application/octet-stream;
log_format main '$remote_addr - $remote_user [$time_local] "$request" '
'$status $body_bytes_sent "$http_referer" '
'"$http_user_agent" "$http_x_forwarded_for"';
access_log /Users/apple/logs/access.log main;
sendfile on;
tcp_nopush on;
tcp_nodelay on;
fastcgi_connect_timeout 300;
fastcgi_send_timeout 300;
fastcgi_read_timeout 300;
fastcgi_buffer_size 64k;
fastcgi_buffers 4 64k;
fastcgi_busy_buffers_size 128k;
fastcgi_temp_file_write_size 256k;
#keepalive_timeout 0;
keepalive_timeout 65;
gzip on;
gzip_disable "MSIE [1-6]\.(?!.*SV1)";
include /opt/local/etc/nginx/conf.d/*.conf;
include /opt/local/etc/nginx/sites-enabled/*;
}
然后建立目录
sudo mkdir /opt/local/etc/nginx/sites-enabled
进入cd /opt/local/etc/nginx/sites-enabled
编辑一个站点的conf文件
我建了一个default,内容如下
server {
listen 80; ## listen for ipv4
listen [::]:80 default ipv6only=on; ## listen for ipv6
server_name localhost;
access_log /Users/apple/logs/localhost.access.log;
location / {
root /Users/apple/phpdocs;
index index.php index.html index.htm;
}
location ~ \.php$ {
fastcgi_pass 127.0.0.1:9000;
fastcgi_index index.php;
fastcgi_param SCRIPT_FILENAME /Users/apple/phpdocs$fastcgi_script_name;
include fastcgi_params;
}
}
保存后在相应的路径上建立log文件和html文件
这个时候先不要放index.php,会出现bad gatway错误,咱们还没装php和fastcgi呢
Part 3: PHP
在终端上输入
安装php5,扩展模块根据自己的需要调整
port install php5 +fastcgi fcgi php5-gd php5-mysql php5-sqlite php5-eaccelerator php5-curl php5-iconv php5-mcrypt
安装完成后,到/opt/local/etc/php5下,cp php.ini-recommended php.ini
然后修改几个项:
error_reporting = E_ALL & ~E_NOTICE
display_errors = On
error_log = /Users/jonathan/logs/php5/error.log
date.timezone = Asia/Shanghai
手动创建/Users/jonathan/logs/php5/error.log日志
重点来了
我们要再写一个plist文件跑fastcgi
vi /Library/LaunchDaemons/org.macports.phpfcgi.plist
内容如下
保存后输入
sudo launchctl load -w /Library/LaunchDaemons/org.macports. phpfcgi.plist
这样就自动启动php fastcgi
现在去网站目录放个index.php,看下phpinfo()吧
Part4: 安装MySQL
安装mysql很方便,去mysql网站下个dmg吧,有三个文件要安装,一个是mysql安装文件,一个是mysql自动启动,一个是系统设置里的添加项控制mysql的开关。
装完以后下载phpmyadmin到网站目录,
将phpMyAdmin目录的config.sample.inc.php命名为config.inc.php
打开config.inc.php,做如下修改:
$cfg['blowfish_secret'] = '';//用于Cookie加密,随意的长字符串
$cfg['Servers'][$i]['host'] = '127.0.0.1';//MySQL守护程序做了IP绑定
$cfg['Servers'][$i]['AllowNoPassword'] = false;//可以访问无密码的MySQL
从web访问phpMyAdmin,并修改MySQL密码不为空。
Part4: 安装memcache
装这个本来以为可以用port install php5-memcache,结果port的编译包可能有问题,不能building memcache,只有自己编译了
先装libevent
port install libevent
安装完后去http://pecl.php.net/package/memcache下载最新的版本,下载完成后解压,进入到文件夹里,依次执行以下命令:
phpize
./configure
make
make install
编译完成后memcache.so会放到/opt/local/lib/php/extensions/debug-non-zts-xxxxxxx目录下
写一个php加载memcache的配置文件
vi /opt/local/var/db/php5/memcache.ini
内容为:extension=memcache.so
保存退出
然后写一个memcache的启动脚本
vi /etc/init.d/memcached
内容为:
#!/bin/bash
DAEMON=/opt/local/bin/memcached
NAME=memcached
DESC=memcached
USER=nobody
HOST=0.0.0.0
PORT=11211
MEM=32
LOG=/Users/apple/logs/memcached/info.log
case "$1" in
start)
echo -n "Startring $DESC: "
$DAEMON -m $MEM -p $PORT -l $HOST -u $USER -d -vv >> $LOG 2>&1
echo "$NAME."
;;
stop)
echo -n "Stopping $DESC: "
killall $NAME
echo "$NAME."
;;
restart)
echo -n "Restarting $DESC: "
killall $NAME
sleep 1
$DAEMON -m $MEM -p $PORT -l $HOST -u $USER -d -vv >> $LOG 2>&1
echo "$NAME."
;;
*)
echo "Usage: $NAME {start|stop|restart}" >&2
exit 1
;;
esac
exit 0
保存后记得赋予可执行权限:chmod +x /etc/init.d/memcached
最后不要忘记创建日志文件:/Users/apple/logs/memcached/info.log
然后让memcached开机启动
写一个plist文件
vi /Library/LaunchDaemons/org.memcache.plist
内容为
同样保存完后运行
sudo launchctl load -w /Library/LaunchDaemons/org.memcache.plist

Hot AI Tools

Undresser.AI Undress
AI-powered app for creating realistic nude photos

AI Clothes Remover
Online AI tool for removing clothes from photos.

Undress AI Tool
Undress images for free

Clothoff.io
AI clothes remover

Video Face Swap
Swap faces in any video effortlessly with our completely free AI face swap tool!

Hot Article
Hot Tools

Notepad++7.3.1
Easy-to-use and free code editor

SublimeText3 Chinese version
Chinese version, very easy to use

Zend Studio 13.0.1
Powerful PHP integrated development environment

Dreamweaver CS6
Visual web development tools

SublimeText3 Mac version
God-level code editing software (SublimeText3)
Hot Topics


 Solution to the problem that Win11 system cannot install Chinese language pack
Mar 09, 2024 am 09:48 AM
Solution to the problem that Win11 system cannot install Chinese language pack
Mar 09, 2024 am 09:48 AM
Solution to the problem that Win11 system cannot install Chinese language pack With the launch of Windows 11 system, many users began to upgrade their operating system to experience new functions and interfaces. However, some users found that they were unable to install the Chinese language pack after upgrading, which troubled their experience. In this article, we will discuss the reasons why Win11 system cannot install the Chinese language pack and provide some solutions to help users solve this problem. Cause Analysis First, let us analyze the inability of Win11 system to
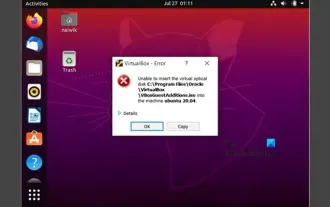 Unable to install guest additions in VirtualBox
Mar 10, 2024 am 09:34 AM
Unable to install guest additions in VirtualBox
Mar 10, 2024 am 09:34 AM
You may not be able to install guest additions to a virtual machine in OracleVirtualBox. When we click on Devices>InstallGuestAdditionsCDImage, it just throws an error as shown below: VirtualBox - Error: Unable to insert virtual disc C: Programming FilesOracleVirtualBoxVBoxGuestAdditions.iso into ubuntu machine In this post we will understand what happens when you What to do when you can't install guest additions in VirtualBox. Unable to install guest additions in VirtualBox If you can't install it in Virtua
 3 tips to easily customize your Mac computer name, host name and Bonjour name
Mar 06, 2024 pm 12:20 PM
3 tips to easily customize your Mac computer name, host name and Bonjour name
Mar 06, 2024 pm 12:20 PM
Many Mac users tend to keep the default name of their device and may never consider changing it. Many people choose to stick with the name from the initial setup, such as "Johnny's MacBook Air" or simply "iMac." Learning how to change the name of your Mac is a very useful skill, especially when you have multiple devices, as it can help you quickly distinguish and manage them. Next, we will teach you step by step how to change the computer name, host name and Bonjour name (local host name) in macOS system. Why should you change your Mac name? Changing the name of your Mac can not only show your personality, but also help improve the user experience: Personalize your Mac: The default name may not be to your taste, change it to a name you like.
 What should I do if Baidu Netdisk is downloaded successfully but cannot be installed?
Mar 13, 2024 pm 10:22 PM
What should I do if Baidu Netdisk is downloaded successfully but cannot be installed?
Mar 13, 2024 pm 10:22 PM
If you have successfully downloaded the installation file of Baidu Netdisk, but cannot install it normally, it may be that there is an error in the integrity of the software file or there is a problem with the residual files and registry entries. Let this site take care of it for users. Let’s introduce the analysis of the problem that Baidu Netdisk is successfully downloaded but cannot be installed. Analysis of the problem that Baidu Netdisk downloaded successfully but could not be installed 1. Check the integrity of the installation file: Make sure that the downloaded installation file is complete and not damaged. You can download it again, or try to download the installation file from another trusted source. 2. Turn off anti-virus software and firewall: Some anti-virus software or firewall programs may prevent the installation program from running properly. Try disabling or exiting the anti-virus software and firewall, then re-run the installation
 How to set up WeChat Mac to automatically convert voice messages into text - How to set up voice to text conversion
Mar 19, 2024 am 08:28 AM
How to set up WeChat Mac to automatically convert voice messages into text - How to set up voice to text conversion
Mar 19, 2024 am 08:28 AM
Recently, some friends have consulted the editor about how to set up WeChat Mac to automatically convert voice messages into text. The following is a method for setting up WeChat Mac to automatically convert voice messages into text. Friends in need can come and learn more. Step 1: First, open the Mac version of WeChat. As shown in the picture: Step 2: Next, click "Settings". As shown in the picture: Step 3: Then, click "General". As shown in the picture: Step 4: Then check the option "Automatically convert voice messages in chat to text". As shown in the picture: Step 5: Finally, close the window. As shown in the picture:
 How to install Android apps on Linux?
Mar 19, 2024 am 11:15 AM
How to install Android apps on Linux?
Mar 19, 2024 am 11:15 AM
Installing Android applications on Linux has always been a concern for many users. Especially for Linux users who like to use Android applications, it is very important to master how to install Android applications on Linux systems. Although running Android applications directly on Linux is not as simple as on the Android platform, by using emulators or third-party tools, we can still happily enjoy Android applications on Linux. The following will introduce how to install Android applications on Linux systems.
 3 Ways to Convert HEIC Photos to JPG on Mac
Mar 15, 2024 pm 08:43 PM
3 Ways to Convert HEIC Photos to JPG on Mac
Mar 15, 2024 pm 08:43 PM
By default, iPhone takes photos from the camera in HEIC format. HEIC stands for High Efficiency Image Container and can hold more pixel data than PNG or JPG files, taking up significantly less space on iPhone storage compared to other formats. These files work best on iPhones but are not widely accepted on the internet because they often result in blurry/grainy pictures when you share them with non-Apple devices. To ensure that HEIC images are compatible on other devices, you may need to convert them to JPG format. This article will introduce how to convert HEIC images to JPG on Mac. How to Convert HEIC Photos to JPG on Mac [3 Methods] Method
 How to install Podman on Ubuntu 24.04
Mar 22, 2024 am 11:26 AM
How to install Podman on Ubuntu 24.04
Mar 22, 2024 am 11:26 AM
If you have used Docker, you must understand daemons, containers, and their functions. A daemon is a service that runs in the background when a container is already in use in any system. Podman is a free management tool for managing and creating containers without relying on any daemon such as Docker. Therefore, it has advantages in managing containers without the need for long-term backend services. Additionally, Podman does not require root-level permissions to be used. This guide discusses in detail how to install Podman on Ubuntu24. To update the system, we first need to update the system and open the Terminal shell of Ubuntu24. During both installation and upgrade processes, we need to use the command line. a simple
