

win7下手动配置apache+php+mysql记

欢迎进入Windows社区论坛,与300万技术人员互动交流 >>进入 本来想学学php,于是就想搭建web服务器和sql环境,结果浪费掉了不少时间。 大致的总结下,也算是长个记性。 使用的安装包分别是httpd-2.2.22-win32-x86-no_ssl .msi,php-5.2.5-Win32.zip和mysql-ins
欢迎进入Windows社区论坛,与300万技术人员互动交流 >>进入
本来想学学php,于是就想搭建web服务器和sql环境,结果浪费掉了不少时间。
大致的总结下,也算是长个记性。
使用的安装包分别是httpd-2.2.22-win32-x86-no_ssl .msi,php-5.2.5-Win32.zip和mysql-installer-community-5.5.28.3.msi,很显然用的还算是比较新的安装包。安装apache还是比较顺利的,一路安装下来,默认监听本机所有ip的80端口,当然包括回环地址, 接着解压php到指定文件夹,接着安装mysql,打开安装目录下的httpd.conf文件,做如下调整:
ServerRoot "D:/Apache2.2" 服务器安装根目录
DocumentRoot "D:/phpWeb" 修改为自己的网站根目录
# This should be changed to whatever you set DocumentRoot to.
# DirectoryIndex: sets the file that Apache will serve if a directory
# is requested.
DirectoryIndex index.php index.html
LoadModule php5_module "D:/php/php5apache2_2.dll" 以模块的方式加载php,注意此处的php5apache2_2.dll对应的apache 版本
LoadFile "D:/php/php5ts.dll" 手动加载php动态链接库 或者 把这两个文件放到system32文件目录下
LoadFile "D:/php/libmysql.dll" 加载mysql动态链接库
PHPIniDir "D:/php" 非必要的配置
AddType application/x-httpd-php .php .html .htm 服务器端支持动态文件类型
保存修改后,测试apache,重启apache服务器,在浏览器中输入localhost or 回环地址,页面显示 "It works !"到此说明,apache工作了。
测试php,在phpWeb目录里编辑一个index.php 的文件,内容为,重复测试apache服务器的操作,页面显示php的配置信息,查看是否包括sql模块,很想然没有,因为php默认是不加载mysql模块的。然后修改php.ini 文件,主要改动点如下:
extension_dir = "D:/php/ext" 扩展dll库的位置
……
extension=php_mysql.dll 打开mysql的扩展
对于php.ini的修改相当郁闷,网上找了很多也做了各种修改,似懂非懂的就去尝试,后来都不管用。 想想mysql是否安装成功呢,开始用命令行查看,先看端口3306端口是否处于监听状态,使用netstat -a命令,再使用mysql workbench 测试与数据库的连接是否成功,结果成功说明mysql安装没有问题,mysql 的配置文件是my.ini ,暂时不用动,默认的配置可以工作。 于是问题出在php与mysql的衔接处,问题肯定出在php.ini文件。
开查php.ini,还是先看看phpinfo()给出的信息吧,看来看去怎么没有mysql模块,开始怀疑我之前是否打开了配置信息里的mysql 扩展。God,打开的竟然是extension=php_mssql.dll.此处省略无数字。
Wahtever, 问题总算找到,测试一下,瞬间OK,欲哭无泪。但是回顾整个过程,时间主要浪费在了细小的错误上。 总结教训: 面对问题不能不问百度google闭门造车但也不能盲信盲从 ; 面对问题更多的是持续关注问题,自己分析问题。
下一步详细分析httpd.conf php.ini my.ini ,灵活配置,并对web服务器和数据库服务器进行性能调优,然后移植网站到新崛起的Nginx web服务器等。貌似有点偏题了,当然主要目的还是学习可爱的PHP.


Hot AI Tools

Undresser.AI Undress
AI-powered app for creating realistic nude photos

AI Clothes Remover
Online AI tool for removing clothes from photos.

Undress AI Tool
Undress images for free

Clothoff.io
AI clothes remover

AI Hentai Generator
Generate AI Hentai for free.

Hot Article
Hot Tools

Notepad++7.3.1
Easy-to-use and free code editor

SublimeText3 Chinese version
Chinese version, very easy to use

Zend Studio 13.0.1
Powerful PHP integrated development environment

Dreamweaver CS6
Visual web development tools

SublimeText3 Mac version
God-level code editing software (SublimeText3)
Hot Topics
 1386
1386
 52
52

 What should I do if the Win7 taskbar does not display the icon? How to solve the problem of the computer taskbar icon disappearing
Jun 09, 2024 pm 01:49 PM
What should I do if the Win7 taskbar does not display the icon? How to solve the problem of the computer taskbar icon disappearing
Jun 09, 2024 pm 01:49 PM
Recently, many users using Win7 system have found that the icons in the taskbar suddenly disappeared, which makes the operation very inconvenient and they do not know how to solve the problem. This article will introduce to you how to solve the problem of disappearing taskbar icons in Win7 system. Bar! Cause Analysis When encountering such a situation, there are generally two situations: one is that the taskbar on the computer does not really disappear, but is just hidden, and the other is that the taskbar does disappear. Method 1: 1. There is a situation that you need to confirm first, that is, when the mouse is placed at the bottom of the screen, the taskbar will be displayed. You can directly click the mouse on the taskbar and select "Properties". 2. In the dialog box that opens, click & on the "Hide taskbar" option.
 How to clear all desktop background images in Win7? Tips for deleting personalized background images in Win7
Jun 02, 2024 am 09:01 AM
How to clear all desktop background images in Win7? Tips for deleting personalized background images in Win7
Jun 02, 2024 am 09:01 AM
In Win7 system, many users want to delete personalized desktop background images, but do not know how to delete them. This article will show you how to delete personalized background images in Win7 system. 1. First, open the control panel interface of the Win7 system and click to enter the "Appearance and Personalization" settings; 2. Then, in the opened interface, click the "Change Desktop Background" setting; 3. Then, click below "Desktop background" option; 4. Then, select Select all, and then click Clear all. Of course, you can also use it under "Customize", right-click the theme you want to delete, and then click &q on the shortcut menu
 How to add Windows credentials in Win7
Mar 26, 2024 pm 07:46 PM
How to add Windows credentials in Win7
Mar 26, 2024 pm 07:46 PM
1. First, select the Control Panel option in the Start button of the Win7 system. 2. Then in the control panel that pops up, click the [User Accounts and Family Safety] item. 3. Then click [Credential Manager] in the pop-up interface. 4. Finally, click [Add Windows Credentials] to create your credentials. The operation method of adding and managing windows credentials in win7 is shared here in detail with friends. More exciting tutorials are available on the PHP Chinese website!
 Where is the network discovery in Win7? Tips for enabling the network discovery function in Win7
Jun 04, 2024 am 09:02 AM
Where is the network discovery in Win7? Tips for enabling the network discovery function in Win7
Jun 04, 2024 am 09:02 AM
Many computer users know that network discovery is a network setting. This setting will affect whether the computer can find other computers and devices on the network and whether it can find the computer when other computers on the network are found. So how to enable network discovery in win7? The following computer System Home U Disk Installation will introduce you to the tutorial on how to enable network discovery in win7 system. 1. First, click the "Start Menu" icon on the desktop taskbar and choose to open the "Control Panel" interface. 2. Then, in the interface that opens, set "View by" to "Category", and then choose to enter "Network and Internet"
 How to delete vbs virus in win7
Mar 26, 2024 pm 09:21 PM
How to delete vbs virus in win7
Mar 26, 2024 pm 09:21 PM
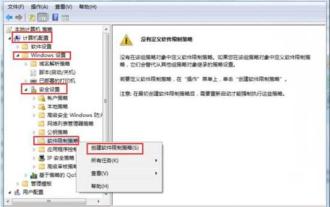
1. Click [Start → Run] and enter gpedit.msc. On the left side of the [Group Policy] window, click the [Computer Configuration → Windows Settings → Security Settings → Software Restriction Policy] item, and then click the [Action → Create New Policy] menu item. As shown in the picture: 2. Select [Other Rules] from the left. Right-click the blank space in the right pane and select the [New Path Rule] item in the menu. In the pop-up window, click the [Browse] button after [Path], select the wscript.exe file in the C: WindowsSystem32 folder, and set the [Security Level] to [Not Allowed]. Change C: System32, Dllcache and I386 under Windows
 How to quickly cancel the power-on password of WIN7
Mar 26, 2024 pm 06:56 PM
How to quickly cancel the power-on password of WIN7
Mar 26, 2024 pm 06:56 PM
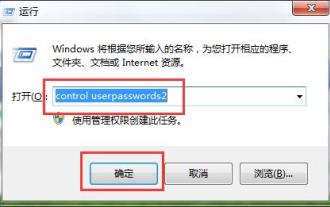
1. Press win+r to enter the run window, enter [controluserpasswords2] and press Enter. 2. In the user account window, uncheck [To use this machine, the user must enter a username and password (E)], and then click [Apply → OK].
 Introduction to how to change the startup sound of Windows 7 computer
Mar 26, 2024 pm 09:30 PM
Introduction to how to change the startup sound of Windows 7 computer
Mar 26, 2024 pm 09:30 PM
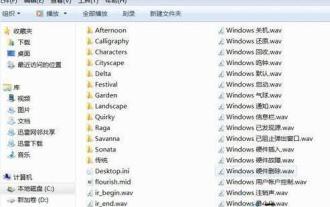
1. First copy the file you want to use as boot music to the corresponding directory of C: WindowsMedia. As shown in the figure: 2. Right-click the desktop on a single machine and select Personalize menu; as shown in the figure: 3. Select the sound option; as shown in the figure: 4. In the [Program Events] box in the [Sound] tab of the sound interface Select [Windows Login], then click [Browse]; as shown in the figure: 5. Select the music file that needs to be replaced, click Open, then click Apply and confirm to save the settings. as the picture shows:
 How to modify boot animation in Windows 7
Mar 26, 2024 pm 08:51 PM
How to modify boot animation in Windows 7
Mar 26, 2024 pm 08:51 PM
1. Press and hold the [Win+R] keys to open the run dialog box, enter [regedit] in the search box, and then confirm; as shown in the figure: 2. Open HKEY_LOCAL_MACHINESoftwareMicrosoftWindowsCurrentVersionAuthenticationLogonUIBackgroud in the opened registry editor; as shown in the figure Display: 3. Double-click [OEMBackground] and open it, change the default value [0] to [1], and then confirm to exit; as shown in the figure: 4. Rename the image backgroundDefault.jpg, (the image size cannot exceed 256k
