

1分钟完美安装最新CentOS+Nginx+PHP

PHP 5.3.1 MySQL 5.0.89 Nginx 0.8.33 或 0.7.65 (可选) 现在,我们可以快速全自动搞定 CentOS + Nginx + PHP-FPM + MySQL 的安装了 这个可比网上流传的什么一键安装包要好得多,强烈推荐此法安装,适合所有菜鸟和高手 我服务器上全用的源代码编译安装,也好
PHP 5.3.1
MySQL 5.0.89
Nginx 0.8.33 或 0.7.65 (可选)
现在,我们可以快速全自动搞定 CentOS + Nginx + PHP-FPM + MySQL 的安装了
这个可比网上流传的什么一键安装包要好得多,强烈推荐此法安装,适合所有菜鸟和高手
我服务器上全用的源代码编译安装,也好不到哪去,还很费劲
我这个装完已经包含PHP的一些常用扩展, PDO,eaccelerator,memcache,tidy等等
先新建一个 repo
<ol><li><span><span># vi /etc/yum.repos.d/centos.21andy.com.repo </span></span></li></ol>
放入如下内容
<ol>
<li><span><span>[21Andy.com]  </span></span></li>
<li>
<span></span><span><font>name</font></span><span>=</span><span><font>21Andy</font></span><span>.com Packages for Enterprise Linux 5 - $basearch  </span>
</li>
<li>
<span></span><span><font>baseurl</font></span><span>=</span><span><font>http</font></span><span>://www.21andy.com/centos/5/$basearch/  </span>
</li>
<li>
<span></span><span><font>enabled</font></span><span>=</span><span><font>1</font></span><span> </span>
</li>
<li>
<span></span><span><font>gpgcheck</font></span><span>=</span><span><font>0</font></span><span> </span>
</li>
<li>
<span></span><span><font>protect</font></span><span>=</span><span><font>1</font></span><span> </span>
</li>
</ol>
启用 EPEL repo
i386
<ol>
<li><span><span>rpm -ihv</span></span></li>
<li><span><span> http://download.fedora.redhat.com/pub/epel/5/i386/epel-release-5-4.noarch.rpm </span></span></li>
</ol>
x86_64
<ol>
<li><span><span>rpm -ihv   </span></span></li>
<li><span>http://download.fedora.redhat.com/pub/epel/5/x86_64/epel-release-5-4.noarch.rpm  </span></li>
</ol>
接着导入key
<ol><li><span><span>rpm --import /etc/pki/rpm-gpg/RPM-GPG-KEY-EPEL </span></span></li></ol>
好了,一键安装
<ol><li><span><span># yum install nginx php-fpm mysql-server </span></span></li></ol>
如果 nginx 你要用 0.7.65 最新稳定版,把yum -y install nginx换成yum -y install nginx-stable就可以了
更完整的安装
<ol>
<li><span><span>yum -y update  </span></span></li>
<li><span>yum -y mysql-server  </span></li>
<li><span>service mysqld start  </span></li>
<li><span>mysqladmin -u root password root  </span></li>
<li><span>service mysqld stop  </span></li>
<li><span>yum -y install nginx php-fpm   </span></li>
<li><span>php-cli php-pdo php-mysql php-mcrypt php-mbstring   </span></li>
<li><span>php-gd php-tidy php-xml php-xmlrpc   </span></li>
<li><span>php-pear php-pecl-memcache php-eaccelerator  </span></li>
<li><span># APC 和 eAccelerator 有冲突,2选1  </span></li>
<li><span>yum -y install php-pecl-apc  </span></li>
</ol>
看下我的完整安装,只要一句
yum -y install nginx mysql-server php-fpm php-cli php-pdo php-mysql php-mcrypt php-mbstring php-gd php-tidy php-xml php-xmlrpc php-pear php-pecl-memcache php-eaccelerator
安装结果,全自动
<ol>
<li><span><span>Dependencies </span><span><font>Resolved</font></span><span> </span></span></li>
<li><span>==========================================================  </span></li>
<li>
<span>Package Arch Version Repository </span><span><font>Size</font></span><span> </span>
</li>
<li><span>==========================================================  </span></li>
<li><span>Installing:  </span></li>
<li><span>mysql x86_64 5.0.89-1.el5 21Andy.com 3.5 M  </span></li>
<li><span>mysql-server x86_64 5.0.89-1.el5 21Andy.com 10 M  </span></li>
<li><span>nginx x86_64 0.8.33-3.el5 21Andy.com 422 k  </span></li>
<li><span>php-cli x86_64 5.3.1-2.el5 21Andy.com 2.4 M  </span></li>
<li><span>php-eaccelerator x86_64 2:0.9.6-1.el5 21Andy.com 118 k  </span></li>
<li><span>php-fpm x86_64 5.3.1-2.el5 21Andy.com 1.2 M  </span></li>
<li><span>php-gd x86_64 5.3.1-2.el5 21Andy.com 110 k  </span></li>
<li><span>php-mbstring x86_64 5.3.1-2.el5 21Andy.com 1.1 M  </span></li>
<li><span>php-mcrypt x86_64 5.3.1-2.el5 21Andy.com 27 k  </span></li>
<li><span>php-mysql x86_64 5.3.1-2.el5 21Andy.com 84 k  </span></li>
<li><span>php-pdo x86_64 5.3.1-2.el5 21Andy.com 91 k  </span></li>
<li><span>php-pear noarch 1:1.9.0-1.el5 21Andy.com 420 k  </span></li>
<li><span>php-pecl-memcache x86_64 2.2.5-3.el5 21Andy.com 44 k  </span></li>
<li><span>php-tidy x86_64 5.3.1-2.el5 21Andy.com 31 k  </span></li>
<li><span>php-xml x86_64 5.3.1-2.el5 21Andy.com 115 k  </span></li>
<li><span>php-xmlrpc x86_64 5.3.1-2.el5 21Andy.com 48 k  </span></li>
<li><span>Installing for dependencies:  </span></li>
<li><span>gmp x86_64 4.1.4-10.el5 base 201 k  </span></li>
<li><span>libXaw x86_64 1.0.2-8.1 base 329 k  </span></li>
<li><span>libXmu x86_64 1.0.2-5 base 63 k  </span></li>
<li><span>libXpm x86_64 3.5.5-3 base 44 k  </span></li>
<li><span>libedit x86_64 2.11-2.20080712cvs.el5 epel 80 k  </span></li>
<li><span>libmcrypt x86_64 2.5.8-4.el5.centos extras 105 k  </span></li>
<li><span>libtidy x86_64 0.99.0-14.20070615.el5 epel 140 k  </span></li>
<li><span>php-common x86_64 5.3.1-2.el5 21Andy.com 554 k  </span></li>
<li><span>sqlite2 x86_64 2.8.17-5.el5 21Andy.com 165 k  </span></li>
<li><span>t1lib x86_64 5.1.1-7.el5 epel 208 k  </span></li>
<li><span>Updating for dependencies:  </span></li>
<li><span>libevent x86_64 1.4.12-1.el5 21Andy.com 129 k  </span></li>
<li>
<span>Transaction </span><span><font>Summary</font></span><span> </span>
</li>
<li><span>==========================================================  </span></li>
<li><span>Install 26 Package(s)  </span></li>
<li><span>Update 1 Package(s)  </span></li>
<li><span>Remove 0 Package(s  </span></li>
</ol>
最后只要 yum -y update 一下,全是最新的
别忘了开机启动
<ol>
<li><span><span>chkconfig --level 345 mysqld on  </span></span></li>
<li><span>chkconfig --level 345 php-fpm on  </span></li>
<li><span>chkconfig --level 345 nginx on  </span></li>
</ol>
来看看我用虚拟机测试的强大结果
http://www.21andy.com/blog/20100219/1703.html
补充:所有的配置文件都在 /etc 目录下,包括 nginx, php-fpm, mysql 的配置文件,请自行查找设置,以下为我的 nginx 的配置范例
先新建一个 /www 目录,网站和日志也全放在这里
别忘了建日志存放目录,你在配置文件中 access_log 用到的 /www/logs
注意:fastcgi_params 要加入这一行
# vim /etc/nginx/fastcgi_params
<ol><li><span><span><font>fastcgi_param SCRIPT_FILENAME $document_root$fastcgi_script_name; </font></span></span></li></ol>
# vi /etc/nginx/nginx.conf
<ol>
<li><span><span>user nobody nobody;  </span></span></li>
<li><span> </span></li>
<li><span>worker_processes 8; #这里根据你的CPU和内存配置, 设置2到10都OK  </span></li>
<li><span> </span></li>
<li>
<span>error_log</span><span>  /www/logs/nginx_error.log  crit;  </span>
</li>
<li><span> </span></li>
<li><span>pid        /usr/local/nginx/logs/nginx.pid;  </span></li>
<li><span> </span></li>
<li>
<span>#Specifies the value </span><span><strong><font>for</font></strong></span><span> maximum file descriptors that can be opened by this process.  </span>
</li>
<li><span>worker_rlimit_nofile 51200;  </span></li>
<li><span> </span></li>
<li><span>events {  </span></li>
<li>
<span>    </span><span><strong><font>use</font></strong></span><span> epoll;  </span>
</li>
<li><span>    worker_connections 51200;  </span></li>
<li><span>}  </span></li>
<li><span> </span></li>
<li><span>http {  </span></li>
<li>
<span>    </span><span><strong><font>include</font></strong></span><span>       mime.types;  </span>
</li>
<li><span>    default_type  application/octet-stream;  </span></li>
<li><span> </span></li>
<li><span>    #charse  gb2312; # 默认编码,可以不设置  </span></li>
<li><span> </span></li>
<li><span>    server_names_hash_bucket_size 128;  </span></li>
<li><span>    client_header_buffer_size 16k;  </span></li>
<li><span>    large_client_header_buffers 4 16k;  </span></li>
<li><span>    client_max_body_size 8m;  </span></li>
<li><span> </span></li>
<li><span>    sendfile on;  </span></li>
<li><span>    tcp_nopush     on;  </span></li>
<li><span> </span></li>
<li><span>    keepalive_timeout 60;  </span></li>
<li><span> </span></li>
<li><span>    tcp_nodelay on;  </span></li>
<li><span> </span></li>
<li><span>    fastcgi_connect_timeout 300;  </span></li>
<li><span>    fastcgi_send_timeout 300;  </span></li>
<li><span>    fastcgi_read_timeout 300;  </span></li>
<li><span>    fastcgi_buffer_size 64k;  </span></li>
<li><span>    fastcgi_buffers 4 64k;  </span></li>
<li><span>    fastcgi_busy_buffers_size 128k;  </span></li>
<li><span>    fastcgi_temp_file_write_size 128k;  </span></li>
<li><span> </span></li>
<li><span>    gzip on;  </span></li>
<li><span>    gzip_min_length  1k;  </span></li>
<li><span>    gzip_buffers     4 16k;  </span></li>
<li><span>    gzip_http_version 1.0;  </span></li>
<li><span>    gzip_comp_level 5;  </span></li>
<li><span>    gzip_types       text/plain text/javascript application/x-javascript text/css application/xml;  </span></li>
<li><span>    gzip_vary on;  </span></li>
<li><span> </span></li>
<li>
<span>    #limit_zone  crawler  </span><span><font>$binary_remote_addr</font></span><span>  10m;  </span>
</li>
<li><span>    server {  </span></li>
<li><span>        listen 80;  </span></li>
<li><span>        server_name localhost;  </span></li>
<li><span>        root  /www;  </span></li>
<li><span>        location /status {  </span></li>
<li><span>            stub_status on;  </span></li>
<li><span>            access_log  off;  </span></li>
<li><span>        }  </span></li>
<li><span>        location / {  </span></li>
<li><span>            # 这里是把所有不存在的文件和目录,全都转到 index.php 处理  </span></li>
<li>
<span>            try_files </span><span><font>$uri</font></span><span> </span><span><font>$uri</font></span><span>/ /index.php?q=</span><span><font>$uri</font></span><span>&</span><span><font>$args</font></span><span>;  </span>
</li>
<li><span>        }  </span></li>
<li><span>          </span></li>
<li><span>        # 这里分开放到 server.conf 是为了再开 server 的时候方便,统一调用,放到/etc/nginx/ 目录下  </span></li>
<li>
<span>        </span><span><strong><font>include</font></strong></span><span> server.conf;  </span>
</li>
<li><span> </span></li>
<li>
<span>        log_format  access  </span><span><font>'$remote_addr - $remote_user [$time_local] "$request" '</font></span><span> </span>
</li>
<li>
<span>             </span><span><font>'$status $body_bytes_sent "$http_referer" '</font></span><span> </span>
</li>
<li>
<span>             </span><span><font>'"$http_user_agent" $http_x_forwarded_for'</font></span><span>;  </span>
</li>
<li><span>        access_log  /www/logs/access.log  access;  </span></li>
<li><span>    }  </span></li>
<li><span> </span></li>
<li><span>    server {  </span></li>
<li><span>        listen 80;  </span></li>
<li><span>        server_name www.21andy.com 21andy.com *.21andy.com;  </span></li>
<li><span>        root  /www/21andy.com;  </span></li>
<li>
<span>        </span><span><strong><font>if</font></strong></span><span> (</span><span><font>$host</font></span><span> !~* 21andy\.com$) {  </span>
</li>
<li>
<span>            </span><span><strong><font>return</font></strong></span><span> 444;  </span>
</li>
<li><span>        }  </span></li>
<li><span>        location / {  </span></li>
<li>
<span>            try_files </span><span><font>$uri</font></span><span> </span><span><font>$uri</font></span><span>/ /index.php?q=</span><span><font>$uri</font></span><span>&</span><span><font>$args</font></span><span>;  </span>
</li>
<li><span>        }  </span></li>
<li>
<span>        </span><span><strong><font>include</font></strong></span><span> server.conf; # 这里复用了,这段就省了  </span>
</li>
<li><span>        access_log  /www/logs/21andy.com_access.log  access;  </span></li>
<li><span>    }  </span></li>
<li><span>} </span></li>
</ol># vi /etc/nginx/server.conf
<ol>
<li><span><span>index index.html index.htm index.php;  </span></span></li>
<li><span> </span></li>
<li><span>#limit_conn   crawler  20;  </span></li>
<li><span> </span></li>
<li><span>location ~ /\.ht {  </span></li>
<li><span>    deny all;  </span></li>
<li><span>}  </span></li>
<li><span> </span></li>
<li><span>location ~ .*\.(sqlite|sq3)$ {  </span></li>
<li><span>    deny all;  </span></li>
<li><span>}  </span></li>
<li><span> </span></li>
<li><span>location ~ .*\.php$ {  </span></li>
<li><span>    fastcgi_pass  unix:/tmp/php-cgi.sock;  </span></li>
<li><span>    #fastcgi_pass  127.0.0.1:9000;  </span></li>
<li><span>    fastcgi_index index.php;  </span></li>
<li>
<span>    </span><span><strong><font>include</font></strong></span><span> fastcgi_params;  </span>
</li>
<li><span>}  </span></li>
<li><span> </span></li>
<li><span>location ~ .*\.(gif|jpg|jpeg|png|bmp|swf|ico)$ {  </span></li>
<li><span>    expires      30d;  </span></li>
<li><span>    access_log   off;  </span></li>
<li><span>}  </span></li>
<li><span> </span></li>
<li><span>location ~ .*\.(js|css)?$ {  </span></li>
<li><span>    expires      30d;  </span></li>
<li><span>    access_log   off;  </span></li>
<li><span>} </span></li>
</ol>本行以下内容可以略过
php-fpm 也可以用以下设置,但建议用上面的,比较稳定
<ol>
<li><span><span>location ~ \.php$ {  </span></span></li>
<li><span>    root           /www;  </span></li>
<li><span>    fastcgi_pass   127.0.0.1:9000;  </span></li>
<li><span>    fastcgi_index  index.php;  </span></li>
<li><span>    #下面这一行要加在 /etc/nginx/fastcgi_params 里  </span></li>
<li>
<span>    #fastcgi_param  SCRIPT_FILENAME  </span><font><span>$document_root</span><span>$fastcgi_script_name</span></font><span>;  </span>
</li>
<li>
<span>    </span><span><strong><font>include</font></strong></span><span>        fastcgi_params;  </span>
</li>
<li><span>} </span></li>
</ol>不管是使用 php-cgi.sock 或 9000 端口方法,nginx 和 php-fpm 都要同时设置成一样的
nginx 的设置上面已经提过,记得同时修改 php-fpm.conf 相应的地方


Hot AI Tools

Undresser.AI Undress
AI-powered app for creating realistic nude photos

AI Clothes Remover
Online AI tool for removing clothes from photos.

Undress AI Tool
Undress images for free

Clothoff.io
AI clothes remover

AI Hentai Generator
Generate AI Hentai for free.

Hot Article
Hot Tools

Notepad++7.3.1
Easy-to-use and free code editor

SublimeText3 Chinese version
Chinese version, very easy to use

Zend Studio 13.0.1
Powerful PHP integrated development environment

Dreamweaver CS6
Visual web development tools

SublimeText3 Mac version
God-level code editing software (SublimeText3)
Hot Topics
 1359
1359
 52
52

 Solution to the problem that Win11 system cannot install Chinese language pack
Mar 09, 2024 am 09:48 AM
Solution to the problem that Win11 system cannot install Chinese language pack
Mar 09, 2024 am 09:48 AM
Solution to the problem that Win11 system cannot install Chinese language pack With the launch of Windows 11 system, many users began to upgrade their operating system to experience new functions and interfaces. However, some users found that they were unable to install the Chinese language pack after upgrading, which troubled their experience. In this article, we will discuss the reasons why Win11 system cannot install the Chinese language pack and provide some solutions to help users solve this problem. Cause Analysis First, let us analyze the inability of Win11 system to
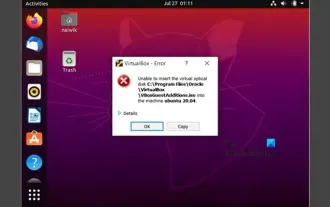 Unable to install guest additions in VirtualBox
Mar 10, 2024 am 09:34 AM
Unable to install guest additions in VirtualBox
Mar 10, 2024 am 09:34 AM
You may not be able to install guest additions to a virtual machine in OracleVirtualBox. When we click on Devices>InstallGuestAdditionsCDImage, it just throws an error as shown below: VirtualBox - Error: Unable to insert virtual disc C: Programming FilesOracleVirtualBoxVBoxGuestAdditions.iso into ubuntu machine In this post we will understand what happens when you What to do when you can't install guest additions in VirtualBox. Unable to install guest additions in VirtualBox If you can't install it in Virtua
 What should I do if Baidu Netdisk is downloaded successfully but cannot be installed?
Mar 13, 2024 pm 10:22 PM
What should I do if Baidu Netdisk is downloaded successfully but cannot be installed?
Mar 13, 2024 pm 10:22 PM
If you have successfully downloaded the installation file of Baidu Netdisk, but cannot install it normally, it may be that there is an error in the integrity of the software file or there is a problem with the residual files and registry entries. Let this site take care of it for users. Let’s introduce the analysis of the problem that Baidu Netdisk is successfully downloaded but cannot be installed. Analysis of the problem that Baidu Netdisk downloaded successfully but could not be installed 1. Check the integrity of the installation file: Make sure that the downloaded installation file is complete and not damaged. You can download it again, or try to download the installation file from another trusted source. 2. Turn off anti-virus software and firewall: Some anti-virus software or firewall programs may prevent the installation program from running properly. Try disabling or exiting the anti-virus software and firewall, then re-run the installation
 How to install Android apps on Linux?
Mar 19, 2024 am 11:15 AM
How to install Android apps on Linux?
Mar 19, 2024 am 11:15 AM
Installing Android applications on Linux has always been a concern for many users. Especially for Linux users who like to use Android applications, it is very important to master how to install Android applications on Linux systems. Although running Android applications directly on Linux is not as simple as on the Android platform, by using emulators or third-party tools, we can still happily enjoy Android applications on Linux. The following will introduce how to install Android applications on Linux systems.
 How to install Podman on Ubuntu 24.04
Mar 22, 2024 am 11:26 AM
How to install Podman on Ubuntu 24.04
Mar 22, 2024 am 11:26 AM
If you have used Docker, you must understand daemons, containers, and their functions. A daemon is a service that runs in the background when a container is already in use in any system. Podman is a free management tool for managing and creating containers without relying on any daemon such as Docker. Therefore, it has advantages in managing containers without the need for long-term backend services. Additionally, Podman does not require root-level permissions to be used. This guide discusses in detail how to install Podman on Ubuntu24. To update the system, we first need to update the system and open the Terminal shell of Ubuntu24. During both installation and upgrade processes, we need to use the command line. a simple
 How to Install and Run the Ubuntu Notes App on Ubuntu 24.04
Mar 22, 2024 pm 04:40 PM
How to Install and Run the Ubuntu Notes App on Ubuntu 24.04
Mar 22, 2024 pm 04:40 PM
While studying in high school, some students take very clear and accurate notes, taking more notes than others in the same class. For some, note-taking is a hobby, while for others, it is a necessity when they easily forget small information about anything important. Microsoft's NTFS application is particularly useful for students who wish to save important notes beyond regular lectures. In this article, we will describe the installation of Ubuntu applications on Ubuntu24. Updating the Ubuntu System Before installing the Ubuntu installer, on Ubuntu24 we need to ensure that the newly configured system has been updated. We can use the most famous "a" in Ubuntu system
 How to install creo-creo installation tutorial
Mar 04, 2024 pm 10:30 PM
How to install creo-creo installation tutorial
Mar 04, 2024 pm 10:30 PM
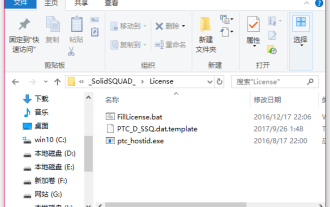
Many novice friends still don’t know how to install creo, so the editor below brings relevant tutorials on creo installation. Friends in need should take a look at it. I hope it can help you. 1. Open the downloaded installation package and find the License folder, as shown in the figure below: 2. Then copy it to the directory on the C drive, as shown in the figure below: 3. Double-click to enter and see if there is a license file, as shown below As shown in the picture: 4. Then copy the license file to this file, as shown in the following picture: 5. In the PROGRAMFILES file of the C drive, create a new PLC folder, as shown in the following picture: 6. Copy the license file as well Click in, as shown in the figure below: 7. Double-click the installation file of the main program. To install, check the box to install new software.
 Detailed steps to install Go language on Win7 computer
Mar 27, 2024 pm 02:00 PM
Detailed steps to install Go language on Win7 computer
Mar 27, 2024 pm 02:00 PM
Detailed steps to install Go language on Win7 computer Go (also known as Golang) is an open source programming language developed by Google. It is simple, efficient and has excellent concurrency performance. It is suitable for the development of cloud services, network applications and back-end systems. . Installing the Go language on a Win7 computer allows you to quickly get started with the language and start writing Go programs. The following will introduce in detail the steps to install the Go language on a Win7 computer, and attach specific code examples. Step 1: Download the Go language installation package and visit the Go official website
