

无须修改php.ini等配置文件,修复session

首先,不废话,把解决方案写下来 因此解决方案就是把头输出删除。 具体来说,不用修改任何php.ini,也不用写ob_start() 等来缓存header,直接在session_start前调用一句 ob_end_clean() 即可了。 原创人:surance#gmail.com(请把#替换为@) 后面是解决步骤
首先,不废话,把解决方案写下来
因此解决方案就是把头输出删除。
具体来说,不用修改任何php.ini,也不用写ob_start() 等来缓存header,直接在session_start前调用一句
ob_end_clean()
即可了。
原创人:surance#gmail.com(请把#替换为@)
后面是解决步骤
从phpnow换到xampp后,出现了好多问题(phpnow的主要问题是无法安装zend_extention_ts,道行太浅,怎么也装不上。)。
花了很多时间解决这些问题,也学到很多东西。
这里来记录一下怎样解决session_start的问题。
明明已经没有写任何输出,还是会报headers already sent错误。
网上有人说修改配置文件,有的说修改
output_buffering = On
这样可以把头文件缓存暂不输出;有的说直接把session auto start设置成On,更有人用不着边际的把报错关闭。
其实头2种方法我试过,还是可以的。只是如果网页没有用session,默认开启不是亏了;另外,全部header缓存是否会有问题也难说。
那么,session_start前到底输出了哪些字符呢?可以在session_start前调用
var_dump( headers_list());
来查看一下。
我发现,主要是出现了 X-PoweredBy: 和Content-Type 2个输出。修改PHP.ini的expose_php = off可以关闭x-poweredBy,但是如何关闭输出content-type我就不知道了。
但是,我知道这2个都是没有用的。
因此解决方案就是把头输出删除。
具体来说,不用修改任何php.ini,也不用写ob_start() 等来缓存header,直接在session_start前调用一句
ob_end_clean()
即可了。
可以在php代码里面调用 ob_start()来缓存head的输出

Hot AI Tools

Undresser.AI Undress
AI-powered app for creating realistic nude photos

AI Clothes Remover
Online AI tool for removing clothes from photos.

Undress AI Tool
Undress images for free

Clothoff.io
AI clothes remover

AI Hentai Generator
Generate AI Hentai for free.

Hot Article
Hot Tools

Notepad++7.3.1
Easy-to-use and free code editor

SublimeText3 Chinese version
Chinese version, very easy to use

Zend Studio 13.0.1
Powerful PHP integrated development environment

Dreamweaver CS6
Visual web development tools

SublimeText3 Mac version
God-level code editing software (SublimeText3)
Hot Topics
 1377
1377
 52
52

 How to change the personal name in the group on DingTalk_How to modify the personal name in the group on DingTalk
Mar 29, 2024 pm 08:41 PM
How to change the personal name in the group on DingTalk_How to modify the personal name in the group on DingTalk
Mar 29, 2024 pm 08:41 PM
1. First open DingTalk. 2. Open the group chat and click the three dots in the upper right corner. 3. Find my nickname in this group. 4. Click to enter to modify and save.
 This Apple ID is not yet in use in the iTunes Store: Fix
Jun 10, 2024 pm 05:42 PM
This Apple ID is not yet in use in the iTunes Store: Fix
Jun 10, 2024 pm 05:42 PM
When logging into iTunesStore using AppleID, this error saying "This AppleID has not been used in iTunesStore" may be thrown on the screen. There are no error messages to worry about, you can fix them by following these solution sets. Fix 1 – Change Shipping Address The main reason why this prompt appears in iTunes Store is that you don’t have the correct address in your AppleID profile. Step 1 – First, open iPhone Settings on your iPhone. Step 2 – AppleID should be on top of all other settings. So, open it. Step 3 – Once there, open the “Payment & Shipping” option. Step 4 – Verify your access using Face ID. step
 Comprehensive Guide to PHP 500 Errors: Causes, Diagnosis and Fixes
Mar 22, 2024 pm 12:45 PM
Comprehensive Guide to PHP 500 Errors: Causes, Diagnosis and Fixes
Mar 22, 2024 pm 12:45 PM
A Comprehensive Guide to PHP 500 Errors: Causes, Diagnosis, and Fixes During PHP development, we often encounter errors with HTTP status code 500. This error is usually called "500InternalServerError", which means that some unknown errors occurred while processing the request on the server side. In this article, we will explore the common causes of PHP500 errors, how to diagnose them, and how to fix them, and provide specific code examples for reference. Common causes of 1.500 errors 1.
 How to fix the volume cannot be adjusted in WIN10
Mar 27, 2024 pm 05:16 PM
How to fix the volume cannot be adjusted in WIN10
Mar 27, 2024 pm 05:16 PM
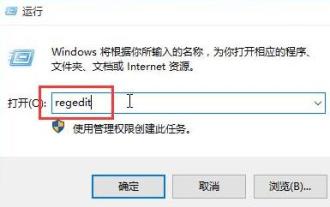
1. Press win+r to open the run window, enter [regedit] and press Enter to open the registry editor. 2. In the opened registry editor, click to expand [HKEY_LOCAL_MACHINESOFTWAREMicrosoftWindowsCurrentVersionRun]. In the blank space on the right, right-click and select [New - String Value], and rename it to [systray.exe]. 3. Double-click to open systray.exe, modify its numerical data to [C:WindowsSystem32systray.exe], and click [OK] to save the settings.
 Can Douyin Blue V change its name? What are the steps to change the name of corporate Douyin Blue V account?
Mar 22, 2024 pm 12:51 PM
Can Douyin Blue V change its name? What are the steps to change the name of corporate Douyin Blue V account?
Mar 22, 2024 pm 12:51 PM
Douyin Blue V certification is the official certification of a company or brand on the Douyin platform, which helps enhance brand image and credibility. With the adjustment of corporate development strategy or the update of brand image, the company may want to change the name of Douyin Blue V certification. So, can Douyin Blue V change its name? The answer is yes. This article will introduce in detail the steps to modify the name of the enterprise Douyin Blue V account. 1. Can Douyin Blue V change its name? You can change the name of Douyin Blue V account. According to Douyin’s official regulations, corporate Blue V certified accounts can apply to change their account names after meeting certain conditions. Generally speaking, enterprises need to provide relevant supporting materials, such as business licenses, organization code certificates, etc., to prove the legality and necessity of changing the name. 2. What are the steps to modify the name of corporate Douyin Blue V account?
 Win10 sleep time modification tips revealed
Mar 08, 2024 pm 06:39 PM
Win10 sleep time modification tips revealed
Mar 08, 2024 pm 06:39 PM
Win10 Sleep Time Modification Tips Revealed As one of the currently widely used operating systems, Windows 10 has a sleep function to help users save power and protect the screen when not using the computer. However, sometimes the default sleep time does not meet the needs of users, so it is particularly important to know how to modify the Win10 sleep time. This article will reveal the tips for modifying the sleep time of Win10, allowing you to easily customize the system’s sleep settings. 1. Modify Win10 sleep time through “Settings” First, the simplest fix
 iPhone stuck in airplane mode: How to fix it
Jun 15, 2024 pm 02:16 PM
iPhone stuck in airplane mode: How to fix it
Jun 15, 2024 pm 02:16 PM
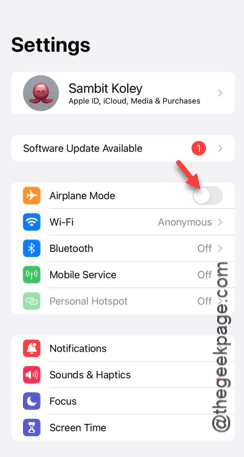
Airplane mode is very convenient in some situations. However, the same airplane mode may give you a headache if your iPhone suddenly gets stuck on it. In this article, we have designed this set of solutions to get your iPhone out of airplane mode. Quick fix – 1. Try disabling Airplane Mode directly from Control Center. 2. If you are unable to disable Airplane Mode from Control Center, you can disable Airplane Mode directly from the Settings tab – If these tips don’t work, follow the fixes below to resolve the issue. Fix 1 – Force Restart Your Device The process of force restarting your device is very simple. All you have to do is follow these step-by-step instructions. Step 1 – You can start the process by pressing and releasing the Volume Up button. step
 Where is the win10 user profile? How to set the user profile in Win10
Jun 25, 2024 pm 05:55 PM
Where is the win10 user profile? How to set the user profile in Win10
Jun 25, 2024 pm 05:55 PM
Recently, many Win10 system users want to change the user profile, but they don’t know how to do it. This article will show you how to set the user profile in Win10 system! How to set up user profile in Win10 1. First, press the "Win+I" keys to open the settings interface, and click to enter the "System" settings. 2. Then, in the opened interface, click "About" on the left, then find and click "Advanced System Settings". 3. Then, in the pop-up window, switch to the "" option bar and click "User Configuration" below.
