

asm10g&11g升级降级测试

--1 修改参数 vi /etc/inittab #h1:35:respawn:/etc/init.d/init.ohasd run /dev/null 21 /dev/null #h1:35:respawn:/etc/init.d/init.cssd run /dev/null 21 /dev/null --2 清理文件 mv init.ohasd init.ohasd20141219 mv ohasd ohasd20141219 mv init.cssd
--1 修改参数vi /etc/inittab
#h1:35:respawn:/etc/init.d/init.ohasd run >/dev/null 2>&1 /null
#h1:35:respawn:/etc/init.d/init.cssd run >/dev/null 2>&1 /null
--2 清理文件
mv init.ohasd init.ohasd20141219
mv ohasd ohasd20141219
mv init.cssd init.cssd20141219
--3 启动cssd
[root@oratest init.d]# /opt/oracle/product/10.2.0/bin/localconfig addSuccessfully accumulated necessary OCR keys.
Creating OCR keys for user 'root', privgrp 'root'..
Operation successful.
Configuration for local CSS has been initialized
Adding to inittab
Startup will be queued to init within 30 seconds.
Checking the status of new Oracle init process...
Expecting the CRS daemons to be up within 600 seconds.
CSS is active on these nodes.
oratest
CSS is active on all nodes.
Oracle CSS service is installed and running under init(1M)
[root@oratest init.d]# ps -ef|grep css
root 6171 1 0 00:58 ? 00:00:00 /bin/sh /etc/init.d/init.cssd run
oracle 6412 6171 4 00:58 ? 00:00:01 /opt/oracle/product/10.2.0/bin/ocssd.bin
root 6439 4631 0 00:59 pts/2 00:00:00 grep css
[root@oratest init.d]# clear
--5 删除
[root@oratest init.d]# /opt/oracle/product/10.2.0/bin/localconfig delete
Stopping CSSD.
Shutting down CSS daemon.
--6 关键文件被移除
[root@oratest init.d]# ll |grep css
-rwxr-xr-x 1 root root 55164 Nov 17 23:32 init.cssd20141219
[root@oratest init.d]# ll |grep has
-rwxr-x--- 1 root root 8880 Oct 9 14:06 init.ohasd20141219
-rwxr-x--- 1 root root 6749 Oct 9 14:06 ohasd20141219
[root@oratest init.d]#
--7 inittab文件更新
# Run xdm in runlevel 5
x:3:respawn:/etc/X11/prefdm -nodaemon
#h1:35:respawn:/etc/init.d/init.ohasd run >/dev/null 2>&1 /null
--8 重新添加css
[root@oratest init.d]# /opt/oracle/product/10.2.0/bin/localconfig add
Successfully accumulated necessary OCR keys.
Creating OCR keys for user 'root', privgrp 'root'..
Operation successful.
Configuration for local CSS has been initialized
Adding to inittab
Startup will be queued to init within 30 seconds.
Checking the status of new Oracle init process...
Expecting the CRS daemons to be up within 600 seconds.
CSS is active on these nodes.
oratest
CSS is active on all nodes.
Oracle CSS service is installed and running under init(1M)
[root@oratest init.d]# ps -ef|grep css
root 6961 1 0 01:04 ? 00:00:00 /bin/sh /etc/init.d/init.cssd run
oracle 7201 6961 5 01:04 ? 00:00:01 /opt/oracle/product/10.2.0/bin/ocssd.bin
root 7221 4631 0 01:04 pts/2 00:00:00 grep css
[root@oratest init.d]#
Shutdown request successfully issued.
Shutdown has begun. The daemons should exit soon.
[root@oratest init.d]# ps -ef|grep css
root 6665 4631 0 01:02 pts/2 00:00:00 grep css
[root@oratest init.d]#
--9 创建asm磁盘vol9
[root@oratest init.d]# oracleasm init
Creating /dev/oracleasm mount point: /dev/oracleasm
Loading module "oracleasm": oracleasm
Mounting ASMlib driver filesystem: /dev/oracleasm
[root@oratest init.d]# oracleasm scandisks
Reloading disk partitions: done
Cleaning any stale ASM disks...
Scanning system for ASM disks...
Instantiating disk "VOL1"
Instantiating disk "VOL2"
[root@oratest init.d]# oracleasm listdisks
VOL1
VOL2
[root@oratest init.d]# oracleasm createdisk vol9 /dev/sdg1
Writing disk header: done
Instantiating disk: done
[root@oratest init.d]# oracleasm listdisks
VOL1
VOL2
VOL9
[root@oratest init.d]#
--10 确认asm磁盘信息
[root@oratest init.d]# oracleasm configure
ORACLEASM_ENABLED=false
ORACLEASM_UID=
ORACLEASM_GID=
ORACLEASM_SCANBOOT=true
ORACLEASM_SCANORDER=""
ORACLEASM_SCANEXCLUDE=""
[root@oratest init.d]#
--11 重新配置
[root@oratest ~]# oracleasm configure -i
Configuring the Oracle ASM library driver.
This will configure the on-boot properties of the Oracle ASM library
driver. The following questions will determine whether the driver is
loaded on boot and what permissions it will have. The current values
will be shown in brackets ('[]'). Hitting
answer will keep that current value. Ctrl-C will abort.
Default user to own the driver interface []: oracle
Default group to own the driver interface []: oinstall
Start Oracle ASM library driver on boot (y/n) [n]: y
Scan for Oracle ASM disks on boot (y/n) [y]: y
[root@oratest disks]# ll
total 0
[root@oratest disks]# oracleasm scandisks
Reloading disk partitions: done
Cleaning any stale ASM disks...
Scanning system for ASM disks...
Instantiating disk "VOL1"
Instantiating disk "VOL2"
Instantiating disk "VOL9"
[root@oratest disks]# ll
total 0
brw-rw---- 1 oracle oinstall 8, 17 Nov 18 01:44 VOL1
brw-rw---- 1 oracle oinstall 8, 33 Nov 18 01:44 VOL2
brw-rw---- 1 oracle oinstall 8, 97 Nov 18 01:44 VOL9
[root@oratest disks]# cd ..
[root@oratest oracleasm]# l
-bash: l: command not found
[root@oratest oracleasm]# ll
total 0
drwxr-xr-x 1 root root 0 Nov 18 01:39 disks
drwxrwx--- 1 root root 0 Nov 18 01:39 iid
[root@oratest oracleasm]#
--创建dg
SQL> create diskgroup dgtest
2 external redundancy disk '/dev/oracleasm/disks/VOL9'
3 /
Diskgroup created.
SQL> select name from v$asm_diskgroup;
NAME
------------------------------
DG1
DGTEST
-- DB 无法连接asm
[root@oratest ~]# ps -ef|grep css
root 4451 1 0 02:25 ? 00:00:00 /bin/sh /etc/init.d/init.cssd run
oracle 5016 4451 0 02:25 ? 00:00:06 /opt/oracle/product/10.2.0/bin/ocssd.bin
root 7777 7735 0 05:20 pts/5 00:00:00 grep css
[root@oratest ~]# ps -ef|grep asmb
root 7779 7735 0 05:20 pts/5 00:00:00 grep asmb
[root@oratest ~]# ps -ef|grep asm
oracle 5109 1 0 02:26 ? 00:00:02 asm_pmon_+ASM
oracle 5111 1 0 02:26 ? 00:00:00 asm_psp0_+ASM
oracle 5113 1 0 02:26 ? 00:00:00 asm_mman_+ASM
oracle 5115 1 0 02:26 ? 00:00:00 asm_dbw0_+ASM
oracle 5117 1 0 02:26 ? 00:00:00 asm_lgwr_+ASM
oracle 5119 1 0 02:26 ? 00:00:00 asm_ckpt_+ASM
oracle 5121 1 0 02:26 ? 00:00:00 asm_smon_+ASM
oracle 5123 1 0 02:26 ? 00:00:00 asm_rbal_+ASM
oracle 5125 1 0 02:26 ? 00:00:02 asm_gmon_+ASM
root 7781 7735 0 05:20 pts/5 00:00:00 grep asm
[root@oratest ~]#
--重新安装后可以
--10g 磁盘头备份
1051 kfed read /dev/oracleasm/disks/VOL9 > vol9_10g_kefd.bk
1052 kfed read /dev/oracleasm/disks/VOL1 > vol1_10g_kefd.bk
1053 kfed read /dev/oracleasm/disks/VOL2 > vol2_10g_kefd.bk
1054 dd if=/dev/oracleasm/disks/VOL9 of=vol9_10g_dd.bk bs=4096 count=1
1055 dd if=/dev/oracleasm/disks/VOL2 of=vol2_10g_dd.bk bs=4096 count=1
1056 dd if=/dev/oracleasm/disks/VOL1 of=vol1_10g_dd.bk bs=4096 count=1
--备份注册信息
[root@oratest etc]# history|grep cp
cp -r -p oracle oracle10g
cp oraInst.loc oraInst.loc10g
--停止css
[root@oratest /]# /opt/oracle/product/10g/bin/localconfig delete
Stopping CSSD.
Shutting down CSS daemon.
Shutdown request successfully issued.
Shutdown has begun. The daemons should exit soon.
[root@oratest /]#
[root@oratest /]#
[root@oratest ~]# /opt/oracle/product/11g/grid/crs/install/roothas.pl -deconfig -force
Using configuration parameter file: /opt/oracle/product/11g/grid/crs/install/crsconfig_params
Creating trace directory
Failure in execution (rc=-1, 256, No such file or directory) for command /opt/oracle/product/11g/grid/bin/crsctl stop resource ora.cssd -f
Failure in execution (rc=-1, 256, No such file or directory) for command /opt/oracle/product/11g/grid/bin/crsctl delete resource ora.cssd -f
Failure in execution (rc=-1, 256, No such file or directory) for command /opt/oracle/product/11g/grid/bin/crsctl stop has -f
You must kill ohasd processes or reboot the system to properly
cleanup the processes started by Oracle clusterware
Either /etc/oracle/olr.loc does not exist or is not readable
Make sure the file exists and it has read and execute access
Failure in execution (rc=-1, 256, No such file or directory) for command /etc/init.d/ohasd deinstall
Successfully deconfigured Oracle Restart stack
--安装CSS
[root@oratest ~]# /opt/oracle/product/11g/grid/crs/install/roothas.pl
Using configuration parameter file: /opt/oracle/product/11g/grid/crs/install/crsconfig_paramsUser ignored Prerequisites during installation
LOCAL ADD MODE
Creating OCR keys for user 'oracle', privgrp 'oinstall'..
Operation successful.
LOCAL ONLY MODE
Successfully accumulated necessary OCR keys.
Creating OCR keys for user 'root', privgrp 'root'..
Operation successful.
CRS-4664: Node oratest successfully pinned.
Adding Clusterware entries to inittab
oratest 2014/11/18 08:42:57 /opt/oracle/product/11g/grid/cdata/oratest/backup_20141118_084257.olr
Successfully configured Oracle Grid Infrastructure for a Standalone Server
[root@oratest ~]#
[oracle@oratest ~]$ crsctl check has
CRS-4638: Oracle High Availability Services is online
[oracle@oratest ~]$
[oracle@oratest ~]$ crs_stat -t
Name Type Target State Host
------------------------------------------------------------
ora.cssd ora.cssd.type OFFLINE OFFLINE
ora.diskmon ora....on.type OFFLINE OFFLINE
ora.evmd ora.evm.type ONLINE ONLINE oratest
ora.ons ora.ons.type OFFLINE OFFLINE
netca
asmca
--10g database startup
[oracle@oratest kefd]$ sqlplus / as sysdba
SQL*Plus: Release 10.2.0.5.0 - Production on Tue Nov 18 09:00:36 2014
Copyright (c) 1982, 2010, Oracle. All Rights Reserved.
Connected to an idle instance.
SQL> startup
ORACLE instance started.
Total System Global Area 1052770304 bytes
Fixed Size 1277676 bytes
Variable Size 260047124 bytes
Database Buffers 788529152 bytes
Redo Buffers 2916352 bytes
Database mounted.
Database opened.
SQL> create table hj as select * from dba_objects;
Table created.
SQL>
SQL> select name from v$datafile;
NAME
--------------------------------------------------------------------------------
+DG10/d10g/datafile/system.256.863939381
+DG10/d10g/datafile/undotbs1.258.863939383
+DG10/d10g/datafile/sysaux.257.863939381
+DG10/d10g/datafile/users.259.863939383
SQL>
kfed read /dev/oracleasm/disks/VOL9 > vol9_11g_kefd.bk
--asm磁盘升级后信息比较
c7
---
> kfbh.check: 2117325354 ; 0x00c: 0x7e33d22a
29,30c29,30
---
> kfdhdb.mntstmp.hi: 33009224 ; 0x0b0: HOUR=0x8 DAYS=0x12 MNTH=0xb YEAR=0x7de
> kfdhdb.mntstmp.lo: 3820626944 ; 0x0b4: USEC=0x0 MSEC=0x289 SECS=0x3b MINS=0x38
[oracle@oratest kefd]$ kfed read /dev/oracleasm/disks/VOL2 > vol2_11g_kefd.bk
[oracle@oratest kefd]$ ll
total 48
-rw-r--r-- 1 oracle oinstall 4096 Nov 18 07:50 vol1_10g_dd.bk
-rw-r--r-- 1 oracle oinstall 655 Nov 18 07:49 vol1_10g_kefd.bk
-rw-r--r-- 1 oracle oinstall 4096 Nov 18 07:50 vol2_10g_dd.bk
-rw-r--r-- 1 oracle oinstall 6608 Nov 18 07:49 vol2_10g_kefd.bk
-rw-r--r-- 1 oracle oinstall 6605 Nov 18 09:08 vol2_11g_kefd.bk
-rw-r--r-- 1 oracle oinstall 4096 Nov 18 07:50 vol9_10g_dd.bk
-rw-r--r-- 1 oracle oinstall 6607 Nov 18 07:49 vol9_10g_kefd.bk
-rw-r--r-- 1 oracle oinstall 6608 Nov 18 09:02 vol9_11g_kefd.bk
[oracle@oratest kefd]$ diff vol2_11g_kefd.bk vol9_11g_kefd.bk
7c7
---
> kfbh.check: 2117325354 ; 0x00c: 0x7e33d22a
12,13c12,13
---
> kfdhdb.driver.provstr: ORCLDISKVOL9 ; 0x000: length=12
> kfdhdb.driver.reserved[0]: 961302358 ; 0x008: 0x394c4f56
19c19
---
> kfdhdb.compat: 168820736 ; 0x020: 0x0a100000
23,25c23,25
---
> kfdhdb.dskname: DG10_0000 ; 0x028: length=9
> kfdhdb.grpname: DG10 ; 0x048: length=4
> kfdhdb.fgname: DG10_0000 ; 0x068: length=9
27,30c27,30
---
> kfdhdb.crestmp.hi: 33009223 ; 0x0a8: HOUR=0x7 DAYS=0x12 MNTH=0xb YEAR=0x7de
> kfdhdb.crestmp.lo: 558790656 ; 0x0ac: USEC=0x0 MSEC=0x39e SECS=0x14 MINS=0x8
> kfdhdb.mntstmp.hi: 33009224 ; 0x0b0: HOUR=0x8 DAYS=0x12 MNTH=0xb YEAR=0x7de
> kfdhdb.mntstmp.lo: 3820626944 ; 0x0b4: USEC=0x0 MSEC=0x289 SECS=0x3b MINS=0x38
45,46c45,46
---
> kfdhdb.grpstmp.hi: 33009223 ; 0x0e4: HOUR=0x7 DAYS=0x12 MNTH=0xb YEAR=0x7de
> kfdhdb.grpstmp.lo: 558645248 ; 0x0e8: USEC=0x0 MSEC=0x310 SECS=0x14 MINS=0x8
--10g 数据库因为版本不一样,只能读取一个文件
SQL> select path from v$asm_disk;
PATH
--------------------------------------------------------------------------------
/dev/oracleasm/disks/VOL9
SQL>
[oracle@oratest kefd]$ ll
total 56
-rw-r--r-- 1 oracle oinstall 4096 Nov 18 07:50 vol1_10g_dd.bk
-rw-r--r-- 1 oracle oinstall 655 Nov 18 07:49 vol1_10g_kefd.bk
-rw-r--r-- 1 oracle oinstall 6607 Nov 18 09:19 vol1_11g_kefd.bk
-rw-r--r-- 1 oracle oinstall 4096 Nov 18 07:50 vol2_10g_dd.bk
-rw-r--r-- 1 oracle oinstall 6608 Nov 18 07:49 vol2_10g_kefd.bk
-rw-r--r-- 1 oracle oinstall 6605 Nov 18 09:08 vol2_11g_kefd.bk
-rw-r--r-- 1 oracle oinstall 4096 Nov 18 07:50 vol9_10g_dd.bk
-rw-r--r-- 1 oracle oinstall 6607 Nov 18 07:49 vol9_10g_kefd.bk
-rw-r--r-- 1 oracle oinstall 6608 Nov 18 09:02 vol9_11g_kefd.bk
[oracle@oratest kefd]$ diff vol1_11g_kefd.bk vol2_11g_kefd.bk
7c7
---
> kfbh.check: 3081658923 ; 0x00c: 0xb7ae622b
12,13c12,13
---
> kfdhdb.driver.provstr: ORCLDISKVOL2 ; 0x000: length=12
> kfdhdb.driver.reserved[0]: 843861846 ; 0x008: 0x324c4f56
19c19
---
> kfdhdb.compat: 186646528 ; 0x020: 0x0b200000
23,25c23,25
---
> kfdhdb.dskname: DG11_0000 ; 0x028: length=9
> kfdhdb.grpname: DG11 ; 0x048: length=4
> kfdhdb.fgname: DG11_0000 ; 0x068: length=9
28c28
---
> kfdhdb.crestmp.lo: 542999552 ; 0x0ac: USEC=0x0 MSEC=0x361 SECS=0x5 MINS=0x8
30c30
---
> kfdhdb.mntstmp.lo: 555575296 ; 0x0b4: USEC=0x0 MSEC=0x35a SECS=0x11 MINS=0x8
44c44
---
> kfdhdb.dbcompat: 168820736 ; 0x0e0: 0x0a100000
46c46
---
> kfdhdb.grpstmp.lo: 542457856 ; 0x0e8: USEC=0x0 MSEC=0x150 SECS=0x5 MINS=0x8
[oracle@oratest kefd]$ kfed read /dev/oracleasm/disks/VOL1 > vol1_11g_kefd.bk1
[oracle@oratest kefd]$ diff vol1_11g_kefd.bk vol1_11g_kefd.bk1
7c7
---
> kfbh.check: 3739372075 ; 0x00c: 0xdee24a2b
19c19
---
> kfdhdb.compat: 186646528 ; 0x020: 0x0b200000
[oracle@oratest kefd]$
[oracle@oratest ~]$ crsctl stop has
CRS-2791: Starting shutdown of Oracle High Availability Services-managed resources on 'oratest'
CRS-2673: Attempting to stop 'ora.LISTENER.lsnr' on 'oratest'
CRS-2673: Attempting to stop 'ora.DG10.dg' on 'oratest'
CRS-2673: Attempting to stop 'ora.DG11.dg' on 'oratest'
CRS-2673: Attempting to stop 'ora.DG12.dg' on 'oratest'
CRS-2677: Stop of 'ora.DG10.dg' on 'oratest' succeeded
CRS-2677: Stop of 'ora.DG11.dg' on 'oratest' succeeded
CRS-2677: Stop of 'ora.DG12.dg' on 'oratest' succeeded
CRS-2673: Attempting to stop 'ora.asm' on 'oratest'
CRS-2677: Stop of 'ora.LISTENER.lsnr' on 'oratest' succeeded
CRS-2677: Stop of 'ora.asm' on 'oratest' succeeded
CRS-2673: Attempting to stop 'ora.cssd' on 'oratest'
CRS-2677: Stop of 'ora.cssd' on 'oratest' succeeded
CRS-2673: Attempting to stop 'ora.evmd' on 'oratest'
CRS-2677: Stop of 'ora.evmd' on 'oratest' succeeded
CRS-2793: Shutdown of Oracle High Availability Services-managed resources on 'oratest' has completed
CRS-4133: Oracle High Availability Services has been stopped.
--卸载11g asm 启动10g asm
[root@oratest ~]# /opt/oracle/product/11g/grid/crs/install/roothas.pl -deconfig -force
Using configuration parameter file: /opt/oracle/product/11g/grid/crs/install/crsconfig_params
CRS-4639: Could not contact Oracle High Availability Services
CRS-4000: Command Stop failed, or completed with errors.
CRS-4639: Could not contact Oracle High Availability Services
CRS-4000: Command Delete failed, or completed with errors.
CRS-4544: Unable to connect to OHAS
CRS-4000: Command Stop failed, or completed with errors.
Successfully deconfigured Oracle Restart stack
[root@oratest ~]# /opt/oracle/product/10.2.0/bin/localconfig add
-bash: /opt/oracle/product/10.2.0/bin/localconfig: No such file or directory
[root@oratest ~]# /opt/oracle/product/10g/bin/localconfig add
Successfully accumulated necessary OCR keys.
Creating OCR keys for user 'root', privgrp 'root'..
Operation successful.
Configuration for local CSS has been initialized
Adding to inittab
Startup will be queued to init within 30 seconds.
Checking the status of new Oracle init process...
Expecting the CRS daemons to be up within 600 seconds.
CSS is active on these nodes.
oratest
CSS is active on all nodes.
Oracle CSS service is installed and running under init(1M)
[root@oratest ~]#
SQL> l
1* select name,state from v$asm_diskgroup
SQL> /
NAME STATE
------------------------------ -----------
DG10 MOUNTED
DG11 DISMOUNTED
DG12 DISMOUNTED
SQL> SELECT PATH FROM V$AMS_DISK;
SELECT PATH FROM V$AMS_DISK
*
ERROR at line 1:
ORA-01219: database not open: queries allowed on fixed tables/views only
SQL> SELECT PATH FROM V$ASM_DISK;
PATH
--------------------------------------------------------------------------------
/dev/oracleasm/disks/VOL2
/dev/oracleasm/disks/VOL1
/dev/oracleasm/disks/VOL9
SQL>
--数据库可以直接挂载
[oracle@oratest kefd]$ sqlplus / as sysdba
SQL*Plus: Release 10.2.0.5.0 - Production on Tue Nov 18 09:41:39 2014
Copyright (c) 1982, 2010, Oracle. All Rights Reserved.
Connected to an idle instance.
SQL> startup
ORACLE instance started.
Total System Global Area 1052770304 bytes
Fixed Size 1277676 bytes
Variable Size 260047124 bytes
Database Buffers 788529152 bytes
Redo Buffers 2916352 bytes
Database mounted.
Database opened.
SQL> create table hj10g as select * from dba_objects;
Table created.
SQL>
--磁盘重新挂在后信息的差异:ASM实例的修改
kfed read /dev/oracleasm/disks/VOL9 > vol9_10g_kefd.bk1
[oracle@oratest kefd]$ diff vol9_10g_kefd.bk vol9_10g_kefd.bk1
7c7
---
> kfbh.check: 127173163 ; 0x00c: 0x0794822b
29,30c29,30
---
> kfdhdb.mntstmp.hi: 33009225 ; 0x0b0: HOUR=0x9 DAYS=0x12 MNTH=0xb YEAR=0x7de
> kfdhdb.mntstmp.lo: 2585621504 ; 0x0b4: USEC=0x0 MSEC=0x35d SECS=0x21 MINS=0x26
[oracle@oratest kefd]$
ASM磁盘头信息保存在每个磁盘的前4K里面,这个信息的备份对于ASM的恢复非常重要,有下面的几种方法1.直接做dd来备份磁盘的前4K,磁盘头信息丢失时,dd回来
备份:dd if=/dev/raw/raw1 of=/gyj/asmheader.dd bs=4096 count=1
恢复:dd if=/gyj/asmheader.dd of=/dev/raw/raw1
2.利用oracle的kfed工具来备份,将磁盘头信息转换成文本明文形式记录下来,恢复时使用kfed merge进去
备份:kfed read /dev/raw/raw1 aunum=0 blknum=0 text=raw1.txt
恢复:kfed write /dev/raw/raw1 aunum=0 blknum=0 text=raw1.txt
3.11G asmcmd里面增加了md_backup,md_restore备份指令,但这个只是备份DG的meta结构信息,他的恢复必须是DG已经mount,然
后导入结构信息,类似于exp/imp,这种方式对于DG损坏是不起作用的
备份:asmcmd md_backup -b /gyj/asmheader.20130130.txt
恢复:asmcmd md_restore -t full -g dg2 -i -b /gyj/asmheader.20130130.txt
--自动备份的位置
[oracle@oratest kefd]$ kfed read /dev/oracleasm/disks/VOL9 blkn=0 |grep KFBTYP
kfbh.type: 1 ; 0x002: KFBTYP_DISKHEAD
[oracle@oratest kefd]$ kfed read /dev/oracleasm/disks/VOL9 blkn=510 |grep KFBTYP
kfbh.type: 1 ; 0x002: KFBTYP_DISKHEAD
[oracle@oratest kefd]$
[oracle@oratest kefd]$ kfed repair /dev/oracleasm/disks/VOL9
[oracle@oratest kefd]$
结论:
从Oracle 10.2.0.5开始,ASM磁盘已经开始自动将头块进行备份,备份块的位置在第2个AU的倒数第2个块上(对于默认1M的AU来说,是第510个块), 如果头块损坏,可以用kfed repair命令来修复。因此对于选用ASM存储作为生产环境的用户来说,尽快升级到10.2.0.5是明智的选择。
[root@oratest 11g]# /opt/oracle/grid/product/11.2.0/grid/rootupgrade.sh
Performing root user operation for Oracle 11g
The following environment variables are set as:
ORACLE_OWNER= oracle
ORACLE_HOME= /opt/oracle/grid/product/11.2.0/grid
Enter the full pathname of the local bin directory: [/usr/local/bin]:
The file "dbhome" already exists in /usr/local/bin. Overwrite it? (y/n)
[n]:
The file "oraenv" already exists in /usr/local/bin. Overwrite it? (y/n)
[n]:
The file "coraenv" already exists in /usr/local/bin. Overwrite it? (y/n)
[n]:
Entries will be added to the /etc/oratab file as needed by
Database Configuration Assistant when a database is created
Finished running generic part of root script.
Now product-specific root actions will be performed.
Using configuration parameter file: /opt/oracle/grid/product/11.2.0/grid/crs/install/crsconfig_params
Creating trace directory
LOCAL ADD MODE
Creating OCR keys for user 'oracle', privgrp 'oinstall'..
Operation successful.
CSS appears healthy
Stopping CSSD.
Shutting down CSS daemon.
Shutdown request successfully issued.
Shutdown has begun. The daemons should exit soon.
LOCAL ONLY MODE
Successfully accumulated necessary OCR keys.
Creating OCR keys for user 'root', privgrp 'root'..
Operation successful.
CRS-4664: Node oratest successfully pinned.
Replacing Clusterware entries in inittab
oratest 2014/11/18 10:35:07 /opt/oracle/grid/product/11.2.0/grid/cdata/oratest/backup_20141118_103507.olr
Successfully configured Oracle Grid Infrastructure for a Standalone Server
[root@oratest 11g]#

Outils d'IA chauds

Undresser.AI Undress
Application basée sur l'IA pour créer des photos de nu réalistes

AI Clothes Remover
Outil d'IA en ligne pour supprimer les vêtements des photos.

Undress AI Tool
Images de déshabillage gratuites

Clothoff.io
Dissolvant de vêtements AI

AI Hentai Generator
Générez AI Hentai gratuitement.

Article chaud
Outils chauds

Bloc-notes++7.3.1
Éditeur de code facile à utiliser et gratuit

SublimeText3 version chinoise
Version chinoise, très simple à utiliser

Envoyer Studio 13.0.1
Puissant environnement de développement intégré PHP

Dreamweaver CS6
Outils de développement Web visuel

SublimeText3 version Mac
Logiciel d'édition de code au niveau de Dieu (SublimeText3)


 Comment changer le nom personnel dans le groupe sur DingTalk_Comment modifier le nom personnel dans le groupe sur DingTalk
Mar 29, 2024 pm 08:41 PM
Comment changer le nom personnel dans le groupe sur DingTalk_Comment modifier le nom personnel dans le groupe sur DingTalk
Mar 29, 2024 pm 08:41 PM
1. Ouvrez d’abord DingTalk. 2. Ouvrez la discussion de groupe et cliquez sur les trois points dans le coin supérieur droit. 3. Trouvez mon pseudo dans ce groupe. 4. Cliquez pour entrer pour modifier et enregistrer.
 Que pensez-vous de furmark ? - Comment furmark est-il considéré comme qualifié ?
Mar 19, 2024 am 09:25 AM
Que pensez-vous de furmark ? - Comment furmark est-il considéré comme qualifié ?
Mar 19, 2024 am 09:25 AM
Que pensez-vous de furmark ? 1. Définissez le « Mode d'exécution » et le « Mode d'affichage » dans l'interface principale, ajustez également le « Mode de test » et cliquez sur le bouton « Démarrer ». 2. Après avoir attendu un moment, vous verrez les résultats du test, y compris divers paramètres de la carte graphique. Comment Furmark est-il qualifié ? 1. Utilisez une machine à pâtisserie Furmark et vérifiez les résultats pendant environ une demi-heure. Elle oscille essentiellement autour de 85 degrés, avec une valeur maximale de 87 degrés et une température ambiante de 19 degrés. Grand châssis, 5 ports de ventilateur de châssis, deux à l'avant, deux en haut et un à l'arrière, mais un seul ventilateur est installé. Tous les accessoires ne sont pas overclockés. 2. Dans des circonstances normales, la température normale de la carte graphique doit être comprise entre « 30 et 85 ℃ ». 3. Même en été, lorsque la température ambiante est trop élevée, la température normale est de « 50 à 85 ℃.
 Tutoriel sur la façon de résoudre le problème de l'impossibilité d'accéder à Internet après la mise à niveau du système Win10
Mar 27, 2024 pm 02:26 PM
Tutoriel sur la façon de résoudre le problème de l'impossibilité d'accéder à Internet après la mise à niveau du système Win10
Mar 27, 2024 pm 02:26 PM
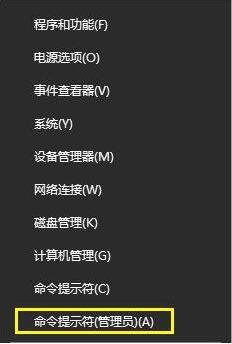
1. Utilisez la touche de raccourci win+x pour ouvrir le menu et sélectionnez [Invite de commandes (administrateur) (A)], comme indiqué ci-dessous : 2. Après être entré dans l'interface d'invite de commande, entrez la commande [ipconfig/flushdns] et appuyez sur Entrée. , comme le montre la figure ci-dessous : 3. Entrez ensuite la commande [netshwinsockresetcatalog] et appuyez sur Entrée, comme le montre la figure ci-dessous : 4. Entrez enfin la commande [netshintipreset] et appuyez sur Entrée, redémarrez l'ordinateur et vous pourrez accéder à Internet. , comme le montre la figure ci-dessous :
 Mar 22, 2024 pm 12:51 PM
La certification Douyin Blue V est la certification officielle d'une entreprise ou d'une marque sur la plateforme Douyin, qui contribue à renforcer l'image et la crédibilité de la marque. Avec l'ajustement de la stratégie de développement de l'entreprise ou la mise à jour de l'image de marque, l'entreprise souhaitera peut-être changer le nom de la certification Douyin Blue V. Alors, Douyin Blue V peut-il changer de nom ? La réponse est oui. Cet article présentera en détail les étapes pour modifier le nom du compte de l'entreprise Douyin Blue V. 1. Douyin Blue V peut-il changer de nom ? Vous pouvez changer le nom du compte Douyin Blue V. Selon la réglementation officielle de Douyin, les comptes d'entreprise certifiés Blue V peuvent demander à changer de nom de compte après avoir rempli certaines conditions. D'une manière générale, les entreprises doivent fournir des documents justificatifs pertinents, tels que des licences commerciales, des certificats de code d'organisation, etc., pour prouver la légalité et la nécessité de changer de nom. 2. Quelles sont les étapes pour modifier le nom du compte d'entreprise Douyin Blue V ?
 Xiaoyi est devenu un agent intelligent ! L'intelligence native HarmonyOS NEXT Hongmeng ouvre une nouvelle ère de l'IA
Jun 22, 2024 am 01:56 AM
Xiaoyi est devenu un agent intelligent ! L'intelligence native HarmonyOS NEXT Hongmeng ouvre une nouvelle ère de l'IA
Jun 22, 2024 am 01:56 AM
Le 21 juin, la Huawei Developer Conference 2024 (HDC2024) s'est à nouveau réunie au lac Songshan, à Dongguan. Lors de cette conférence, la chose la plus frappante est que HarmonyOSNEXT lance officiellement la version bêta pour les développeurs et les utilisateurs pionniers, et démontre de manière exhaustive les trois fonctionnalités innovantes « bouleversantes » d'HarmonyOSNEXT dans tous les scénarios, l'intelligence native et la sécurité native. Intelligence native HarmonyOSNEXT : ouvrir une nouvelle ère de l'IA Après avoir abandonné le framework Android, HarmonyOSNEXT est devenu un système d'exploitation véritablement indépendant d'Android et d'iOS, ce que l'on peut qualifier de renaissance sans précédent. Parmi ses nombreuses nouvelles fonctionnalités, l’intelligence native est sans aucun doute la nouvelle fonctionnalité qui peut le mieux apporter aux utilisateurs des sensations intuitives et des améliorations d’expérience.
 Comment mettre à niveau Xiaomi 14Pro vers ThePaper OS ?
Mar 18, 2024 pm 07:34 PM
Comment mettre à niveau Xiaomi 14Pro vers ThePaper OS ?
Mar 18, 2024 pm 07:34 PM
Le Mi 14 Pro est le dernier téléphone phare de Xiaomi, et ThePaper OS est un nouveau système d'exploitation développé indépendamment par Xiaomi, dédié à offrir une expérience utilisateur plus fluide et plus intelligente. Avec le développement continu de la technologie, ThePaper OS est également constamment mis à jour et mis à niveau. Tant d'utilisateurs qui utilisent des téléphones mobiles Xiaomi pour la première fois demandent aux utilisateurs de Xiaomi 14Pro comment mettre à niveau ThePaper OS ? Comment mettre à niveau le Xiaomi Mi 14 Pro vers Thermal OS ? Il n'est pas nécessaire de mettre à jour l'usine d'origine avec Thermal OS. Comment mettre à jour d'autres modèles prenant en charge ThePaper OS : 1. Ouvrez l'application de paramètres de votre téléphone et recherchez l'option de mise à jour du système. 2. Le système détectera automatiquement la version actuelle du système et vous demandera lorsqu'une nouvelle version est disponible pour la mise à jour. 3. Cliquez simplement sur « Mettre à jour maintenant » et le système commencera automatiquement le téléchargement.
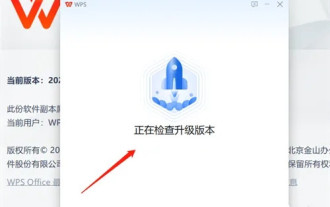 Comment mettre à jour la version de wps ? Comment mettre à jour la version de wps office ?
Mar 14, 2024 am 08:43 AM
Comment mettre à jour la version de wps ? Comment mettre à jour la version de wps office ?
Mar 14, 2024 am 08:43 AM
WPS est un logiciel informatique indispensable pour de nombreux utilisateurs. Les mises à jour régulières des nouvelles versions peuvent permettre aux utilisateurs d'obtenir une meilleure expérience utilisateur et davantage de fonctionnalités. Alors, comment mettre à jour la version de wps ? Il existe trois méthodes principales pour mettre à niveau wpsoffice. Jetons un coup d’œil ci-dessous. Méthode 1 : Téléchargez la nouvelle version depuis le site officiel Vous pouvez télécharger la dernière version du package d'installation depuis le site officiel de WPSOffice. Après avoir accédé au site officiel de WPSOffice (https://www.wps.cn/), cliquez sur le bouton « Télécharger », sélectionnez la version que vous devez télécharger, puis suivez les instructions pour l'installer. Remarque : lors de l'installation d'une nouvelle version, vous devez désinstaller l'ancienne version, sinon cela provoquerait des conflits logiciels et empêcherait une utilisation normale. Méthode 2 : dans WPSDe
 Explication détaillée de la façon de mettre à niveau les téléphones mobiles Honor vers le système Hongmeng
Mar 25, 2024 am 11:51 AM
Explication détaillée de la façon de mettre à niveau les téléphones mobiles Honor vers le système Hongmeng
Mar 25, 2024 am 11:51 AM
Dans un nouveau domaine technologique, les nouveaux systèmes d'exploitation attirent toujours beaucoup d'attention. Récemment, les téléphones mobiles Honor ont annoncé qu'ils seraient mis à niveau vers Hongmeng OS, un nouveau système d'exploitation développé par Huawei. C’est sans aucun doute une bonne nouvelle pour de nombreux utilisateurs de téléphones mobiles Honor. Cependant, de nombreux utilisateurs peuvent encore avoir des doutes sur la manière de passer au système Hongmeng. Cet article expliquera en détail comment mettre à niveau les téléphones mobiles Honor vers le système Hongmeng pour aider les utilisateurs à mieux le comprendre et l'utiliser. Tout d'abord, pour mettre à niveau un téléphone Honor vers le système Hongmeng, les utilisateurs doivent s'assurer que le téléphone est connecté au réseau et dispose de suffisamment de puissance. ce
