本文实例讲解的是一般的hadoop入门程序“WordCount”,就是首先写一个map程序用来将输入的字符串分割成单个的单词,然后reduce这些单个的单词,相同的单词就对其进行计数,不同的单词分别输出,结果输出每一个单词出现的频数。
注意:关于数据的输入输出是通过sys.stdin(系统标准输入)和sys.stdout(系统标准输出)来控制数据的读入与输出。所有的脚本执行之前都需要修改权限,否则没有执行权限,例如下面的脚本创建之前使用“chmod +x mapper.py”
1.mapper.py
#!/usr/bin/env python
import sys

for line in sys.stdin: # 遍历读入数据的每一行

  line = line.strip() # 将行尾行首的空格去除
  words = line.split() #按空格将句子分割成单个单词
  for word in words:
    print '%s\t%s' %(word, 1)
2.reducer.py
#!/usr/bin/env python

from operator import itemgetter
import sys

current_word = None # 为当前单词
current_count = 0 # 当前单词频数
word = None

for line in sys.stdin:
  words = line.strip() # 去除字符串首尾的空白字符
  word, count = words.split('\t') # 按照制表符分隔单词和数量

  try:
    count = int(count) # 将字符串类型的‘1'转换为整型1
  except ValueError:
    continue

  if current_word == word: # 如果当前的单词等于读入的单词
    current_count += count # 单词频数加1
  else:
    if current_word: # 如果当前的单词不为空则打印其单词和频数
      print '%s\t%s' %(current_word, current_count)
    current_count = count # 否则将读入的单词赋值给当前单词,且更新频数
    current_word = word

if current_word == word:
  print '%s\t%s' %(current_word, current_count)
在shell中运行以下脚本,查看输出结果:
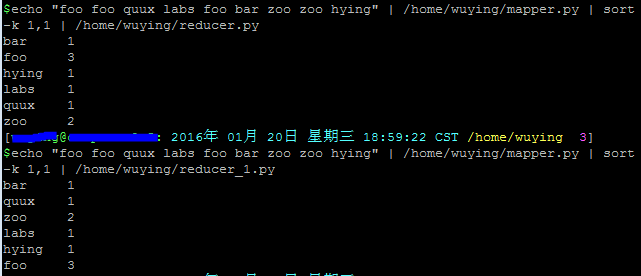
echo "foo foo quux labs foo bar zoo zoo hying" | /home/wuying/mapper.py | sort -k 1,1 | /home/wuying/reducer.py

# echo是将后面“foo ****”字符串输出,并利用管道符“|”将输出数据作为mapper.py这个脚本的输入数据,并将mapper.py的数据输入到reducer.py中,其中参数sort -k 1,1是将reducer的输出内容按照第一列的第一个字母的ASCII码值进行升序排序
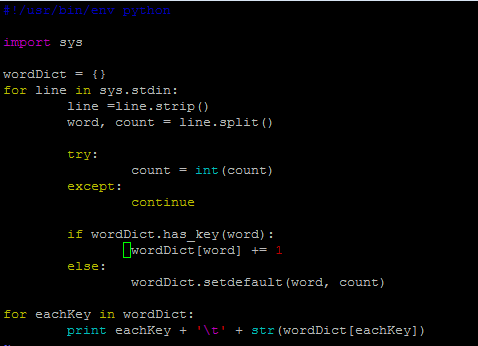
其实,我觉得后面这个reducer.py处理单词频数有点麻烦,将单词存储在字典里面,单词作为‘key',每一个单词出现的频数作为'value',进而进行频数统计感觉会更加高效一点。因此,改进脚本如下:
mapper_1.py

但是,貌似写着写着用了两个循环,反而效率低了。关键是不太明白这里的current_word和current_count的作用,如果从字面上老看是当前存在的单词,那么怎么和遍历读取的word和count相区别?
下面看一些脚本的输出结果:

我们可以看到,上面同样的输入数据,同样的shell换了不同的reducer,结果后者并没有对数据进行排序,实在是费解~
让Python代码在hadoop上跑起来!
一、准备输入数据
接下来,先下载三本书:
$ mkdir -p tmp/gutenberg
$ cd tmp/gutenberg
$ wget http://www.gutenberg.org/ebooks/20417.txt.utf-8
$ wget http://www.gutenberg.org/files/5000/5000-8.txt
$ wget http://www.gutenberg.org/ebooks/4300.txt.utf-8
然后把这三本书上传到hdfs文件系统上:
 $ hdfs dfs -mkdir /user/${whoami}/input # 在hdfs上的该用户目录下创建一个输入文件的文件夹
 $ hdfs dfs -put /home/wuying/tmp/gutenberg/*.txt /user/${whoami}/input # 上传文档到hdfs上的输入文件夹中
寻找你的streaming的jar文件存放地址,注意2.6的版本放到share目录下了,可以进入hadoop安装目录寻找该文件:
$ cd $HADOOP_HOME
$ find ./ -name "*streaming*"
然后就会找到我们的share文件夹中的hadoop-straming*.jar文件:

寻找速度可能有点慢,因此你最好是根据自己的版本号到对应的目录下去寻找这个streaming文件,由于这个文件的路径比较长,因此我们可以将它写入到环境变量:
$ vi ~/.bashrc # 打开环境变量配置文件
# 在里面写入streaming路径
export STREAM=$HADOOP_HOME/share/hadoop/tools/lib/hadoop-streaming-*.jar
由于通过streaming接口运行的脚本太长了,因此直接建立一个shell名称为run.sh来运行:
hadoop jar $STREAM \
-files ./mapper.py,./reducer.py \
-mapper ./mapper.py \
-reducer ./reducer.py \
-input /user/$(whoami)/input/*.txt \
-output /user/$(whoami)/output
然后"source run.sh"来执行mapreduce。结果就响当当的出来啦。这里特别要提醒一下:
1、一定要把本地的输入文件转移到hdfs系统上面,否则无法识别你的input内容;
2、一定要有权限,一定要在你的hdfs系统下面建立你的个人文件夹否则就会被denied,是的,就是这两个错误搞得我在服务器上面痛不欲生,四处问人的感觉真心不如自己清醒对待来的好;
3、如果你是第一次在服务器上面玩hadoop,建议在这之前请在自己的虚拟机或者linux系统上面配置好伪分布式然后入门hadoop来的比较不那么头疼,之前我并不知道我在服务器上面运维没有给我运行的权限,后来在自己的虚拟机里面运行一下example实例以及wordcount才找到自己的错误。
好啦,然后不出意外,就会complete啦,你就可以通过如下方式查看计数结果:

以上就是本文的全部内容,希望对大家学习python软件编程有所帮助。