

Dans cet article de blog, nous vous guiderons pas à pas tout au long du processus d'intégration de l'authentification faciale de FACEIO dans votre application Next.js, de la configuration de votre compte FACEIO à la mise en œuvre de l'intégration dans votre base de code.
Prérequis
Avant de plonger, assurez-vous d'avoir mis en place les éléments suivants :
Node.js et npm : Assurez-vous que Node.js et npm sont installés sur votre machine de développement. Vous pouvez télécharger la dernière version sur le site officiel de Node.js.
Next.js : Vous devrez avoir configuré un projet Next.js. Si vous n'en avez pas, vous pouvez en créer un nouveau :
Configuration de l'application FACEIO
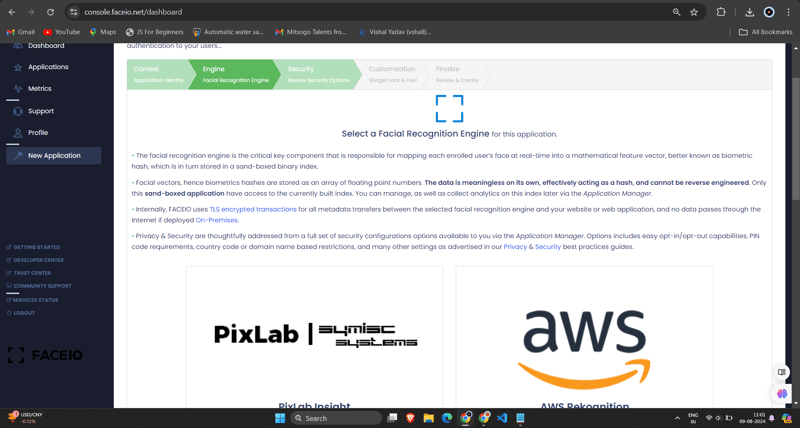
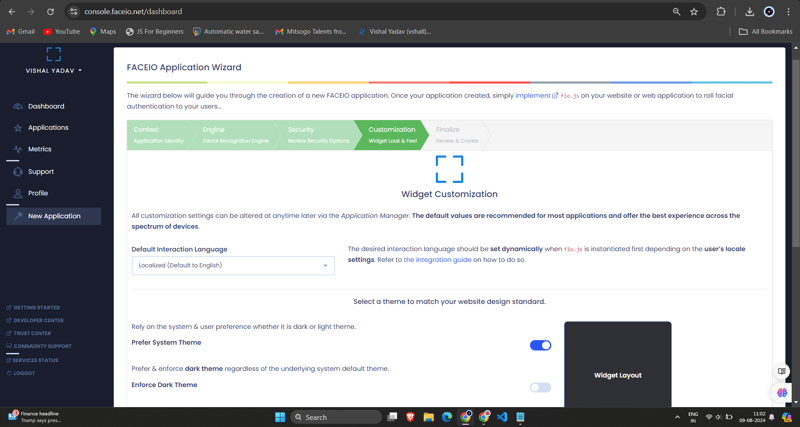
1.Créer une nouvelle application FACEIO : Connectez-vous à votre console FACEIO et cliquez sur le bouton "Créer une nouvelle application".
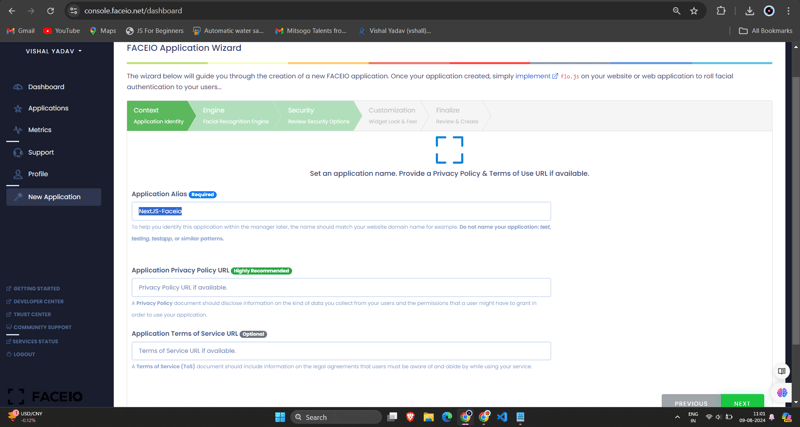
2.Configurer l'application : Remplissez les informations requises, telles que le nom de l'application, la description et l'URL de rappel (qui sera l'URL de votre application Next.js). Une fois que vous avez rempli le formulaire, cliquez sur "Créer une application".
3.Obtenez le FACEIO_APP_ID : Après avoir créé l'application, vous recevrez un FACEIO_APP_ID unique. C'est l'identifiant que vous utiliserez pour intégrer FACEIO dans votre application Next.js.
Intégrer FACEIO dans votre application Next.js
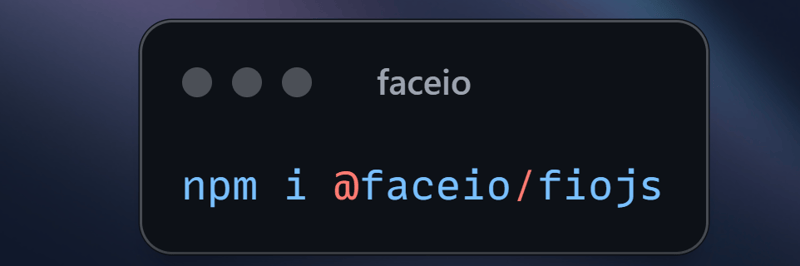
1.Installez le package FACEIO NPM : Dans votre projet Next.js, installez le package faceio-npm en utilisant npm ou Yarn :
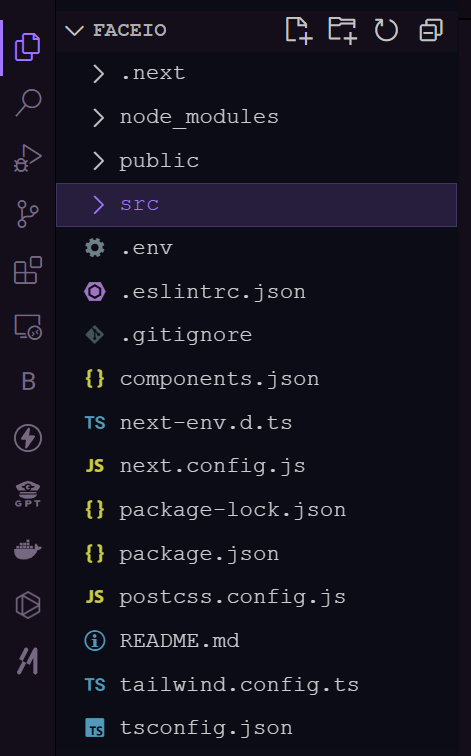
2.Créez un composant d'authentification faciale : Dans votre projet Next.js, créez un nouveau fichier appelé Components/Dashboard.tsx (ou tout autre nom de votre choix) avec le code suivant :
// Dashboard.tsx
import React from "react";
import { Card, CardHeader, CardTitle, CardContent } from "@/components/ui/card";
import { Button } from "@/components/ui/button";
import { FaUserCircle, FaLock, FaCode, FaChartBar, FaSignOutAlt } from 'react-icons/fa';

interface DashboardProps {
  userEmail: string;
  onLogout: () => void;
}

const Dashboard: React.FC<DashboardProps> = ({ userEmail, onLogout }) => {
  return (
    <div className="max-w-7xl mx-auto p-4 md:p-6 space-y-6">
      <Card className="w-full bg-black text-white">
        <CardHeader className="flex flex-col sm:flex-row items-start sm:items-center justify-between space-y-4 sm:space-y-0">
          <div>
            <CardTitle className="text-2xl sm:text-3xl font-bold">Welcome to FaceIO</CardTitle>
            <p className="text-base sm:text-lg mt-2">Email: {userEmail}</p>
          </div>
          <Button
            variant="secondary"
            size="sm"
            onClick={onLogout}
            className="flex items-center w-full sm:w-auto justify-center mt-8"
          >
            <FaSignOutAlt className="mr-2" /> Logout
          </Button>
        </CardHeader>
        <CardContent>
          <p className="text-lg sm:text-xl mb-4">You have successfully logged in.</p>
        </CardContent>
      </Card>

      <h2 className="text-xl sm:text-2xl font-bold text-center my-6">Facial Authentication for the Web</h2>

      <div className="grid grid-cols-1 sm:grid-cols-2 gap-4 sm:gap-6">
        <Card>
          <CardHeader>
            <CardTitle className="flex items-center text-base sm:text-lg">
              <FaUserCircle className="mr-2" /> Secure & Easy
            </CardTitle>
          </CardHeader>
          <CardContent>
            <p className="text-sm sm:text-base">Cross-browser, secure & easy to implement. Passwordless Authentication SDKs powered by Face Recognition for Web Sites & Apps.</p>
          </CardContent>
        </Card>

        <Card>
          <CardHeader>
            <CardTitle className="flex items-center text-base sm:text-lg">
              <FaLock className="mr-2" /> Privacy-Focused
            </CardTitle>
          </CardHeader>
          <CardContent>
            <p className="text-sm sm:text-base">Your facial data is encrypted and securely stored. We prioritize user privacy and data protection.</p>
          </CardContent>
        </Card>

        <Card>
          <CardHeader>
            <CardTitle className="flex items-center text-base sm:text-lg">
              <FaCode className="mr-2" /> Developer-Friendly
            </CardTitle>
          </CardHeader>
          <CardContent>
            <p className="text-sm sm:text-base">Easy integration with clear documentation. Get started quickly and implement facial authentication in your projects.</p>
          </CardContent>
        </Card>

        <Card>
          <CardHeader>
            <CardTitle className="flex items-center text-base sm:text-lg">
              <FaChartBar className="mr-2" /> Analytics & Insights
            </CardTitle>
          </CardHeader>
          <CardContent>
            <p className="text-sm sm:text-base">Gain valuable insights into user authentication patterns and improve your applications security.</p>
          </CardContent>
        </Card>
      </div>

      <div className="flex flex-col sm:flex-row justify-center items-center space-y-4 sm:space-y-0 sm:space-x-4 mt-8">
        <Button variant="default" size="lg" className="w-full sm:w-auto">
          Get Started →
        </Button>
        <Button variant="outline" size="lg" className="w-full sm:w-auto">
          Integration Guide →
        </Button>
        <Button variant="secondary" size="lg" className="w-full sm:w-auto">
          FACEIO Console →
        </Button>
      </div>

      <Card className="mt-8 bg-gray-100">
        <CardContent className="text-center py-6">
          <p className="text-base sm:text-lg font-semibold">Ready to implement facial authentication in your project?</p>
          <p className="mt-2 text-sm sm:text-base">Check out our documentation and start securing your application today!</p>
        </CardContent>
      </Card>
    </div>
  );
};

export default Dashboard;
3.Importez votre composant Dashboard.tsx dans le composant Login.tsx :
/* eslint-disable react-hooks/exhaustive-deps */
"use client";
import {
  Card,
  CardContent,
  CardDescription,
  CardFooter,
  CardHeader,
  CardTitle,
} from "@/components/ui/card";
import { Terminal } from "lucide-react";
import { MailIcon, CheckCircleIcon } from "lucide-react";
import { Alert, AlertDescription, AlertTitle } from "@/components/ui/alert";
import { Input } from "@/components/ui/input";
import { Label } from "@/components/ui/label";
import { Button } from "./ui/button";
import faceIO from "@faceio/fiojs";
import { useEffect, useRef, useState } from "react";
import Link from "next/link";
import { toast } from "sonner";
import Dashboard from "./Dashboard";

type Props = {};

const Login: React.FC<Props> = ({}) => {
  const faceioRef = useRef<faceIO | null>(null);
  const [email, setEmail] = useState("");
  const [userLogin, setUserLogin] = useState("");
  const [isLoggedIn, setIsLoggedIn] = useState(false);

  const publicKey = process.env.NEXT_PUBLIC_FACEIO_PUBLIC_ID as string;

  const initialiseFaceio = async () => {
    try {
      faceioRef.current = new faceIO(publicKey);
      console.log("FaceIO initialized successfully");
    } catch (error) {
      console.log(error);
      handleError(error);
    }
  };

  useEffect(() => {
    initialiseFaceio();
  }, []);

  const handleRegister = async () => {
    try {
      if (!faceioRef.current) {
        console.error("FaceIO instance is not initialized");
        return;
      }

      await faceioRef.current?.enroll({
        userConsent: false,
        locale: "auto",
        payload: { email: `${email}` },
      });
      toast.success("Successfully Registered user.");
    } catch (error) {
      handleError(error);
      faceioRef.current?.restartSession();
    }
  };

  const handleLogin = async () => {
    try {
      const authenticate = await faceioRef.current?.authenticate();
      console.log("User authenticated successfully:", authenticate);
      setUserLogin(authenticate.payload.email);
      setIsLoggedIn(true);
      toast.success("Successfully logged in.");
    } catch (error) {
      console.log(error);
      handleError(error);
    }
  };

  const handleLogout = () => {
    setIsLoggedIn(false);
    setUserLogin("");
    toast.success("Successfully logged out.");
  };

  function handleError(errCode: any) {
    const fioErrs = faceioRef.current?.fetchAllErrorCodes()!;
    switch (errCode) {
      case fioErrs.PERMISSION_REFUSED:
        toast.info("Access to the Camera stream was denied by the end user");
        break;
      case fioErrs.NO_FACES_DETECTED:
        toast.info(
          "No faces were detected during the enroll or authentication process"
        );
        break;
      case fioErrs.UNRECOGNIZED_FACE:
        toast.info("Unrecognized face on this application's Facial Index");
        break;
      case fioErrs.MANY_FACES:
        toast.info("Two or more faces were detected during the scan process");
        break;
      case fioErrs.FACE_DUPLICATION:
        toast.info(
          "User enrolled previously (facial features already recorded). Cannot enroll again!"
        );
        break;
      case fioErrs.MINORS_NOT_ALLOWED:
        toast.info("Minors are not allowed to enroll on this application!");
        break;
      case fioErrs.PAD_ATTACK:
        toast.info(
          "Presentation (Spoof) Attack (PAD) detected during the scan process"
        );
        break;
      case fioErrs.FACE_MISMATCH:
        toast.info(
          "Calculated Facial Vectors of the user being enrolled do not matches"
        );
        break;
      case fioErrs.WRONG_PIN_CODE:
        toast.info("Wrong PIN code supplied by the user being authenticated");
        break;
      case fioErrs.PROCESSING_ERR:
        toast.info("Server side error");
        break;
      case fioErrs.UNAUTHORIZED:
        toast.info(
          "Your application is not allowed to perform the requested operation (eg. Invalid ID, Blocked, Paused, etc.). Refer to the FACEIO Console for additional information"
        );
        break;
      case fioErrs.TERMS_NOT_ACCEPTED:
        toast.info(
          "Terms & Conditions set out by FACEIO/host application rejected by the end user"
        );
        break;
      case fioErrs.UI_NOT_READY:
        toast.info(
          "The FACEIO Widget could not be (or is being) injected onto the client DOM"
        );
        break;
      case fioErrs.SESSION_EXPIRED:
        toast.info(
          "Client session expired. The first promise was already fulfilled but the host application failed to act accordingly"
        );
        break;
      case fioErrs.TIMEOUT:
        toast.info(
          "Ongoing operation timed out (eg, Camera access permission, ToS accept delay, Face not yet detected, Server Reply, etc.)"
        );
        break;
      case fioErrs.TOO_MANY_REQUESTS:
        toast.info(
          "Widget instantiation requests exceeded for freemium applications. Does not apply for upgraded applications"
        );
        break;
      case fioErrs.EMPTY_ORIGIN:
        toast.info("Origin or Referer HTTP request header is empty or missing");
        break;
      case fioErrs.FORBIDDDEN_ORIGIN:
        toast.info("Domain origin is forbidden from instantiating fio.js");
        break;
      case fioErrs.FORBIDDDEN_COUNTRY:
        toast.info(
          "Country ISO-3166-1 Code is forbidden from instantiating fio.js"
        );
        break;
      case fioErrs.SESSION_IN_PROGRESS:
        toast.info(
          "Another authentication or enrollment session is in progress"
        );
        break;
      case fioErrs.NETWORK_IO:
      default:
        toast.info(
          "Error while establishing network connection with the target FACEIO processing node"
        );
        break;
    }
  }

  if (isLoggedIn) {
    return <Dashboard userEmail={userLogin} onLogout={handleLogout} />;
  }

  return (
    <div className="min-h-screen bg-gradient-to-r from-cyan-500 to-blue-500 flex items-center justify-center p-4 w-full">
      <Card className="w-[400px] bg-white shadow-xl rounded-xl overflow-hidden">
        <CardHeader className="bg-gray-50 border-b p-6">
          <CardTitle className="text-2xl font-bold text-gray-800">
            Secure Workspace
          </CardTitle>
          <CardDescription className="text-sm text-gray-600">
            Authenticate to access your personalized work environment
          </CardDescription>
        </CardHeader>
        <CardContent className="p-6 space-y-4">
          <div className="space-y-2">
            <Label
              htmlFor="email"
              className="text-sm font-medium text-gray-700"
            >
              Work Email
            </Label>
            <Input
              id="email"
              type="email"
              placeholder="you@company.com"
              className="w-full px-3 py-2 border rounded-md"
              onChange={(e) => setEmail(e.target.value)}
            />
          </div>
          <div className="space-y-4">
            <Button
              className="w-full bg-blue-600 hover:bg-blue-700 text-white font-medium py-2 rounded-md transition duration-300 ease-in-out"
              onClick={handleLogin}
            >
              Access Workspace
            </Button>
            <Button
              className="w-full bg-gray-100 hover:bg-gray-200 text-gray-800 font-medium py-2 rounded-md transition duration-300 ease-in-out"
              onClick={handleRegister}
              disabled={!email.includes("@")}
            >
              Register New Account
            </Button>
          </div>
        </CardContent>
        <CardFooter className="bg-gray-50 border-t p-4">
          <div className="w-full text-center text-xs text-gray-500">
            Protected by FaceIO™ Technology.
            <Link
              href="https://faceio.net/security-policy"
              className="text-blue-600 hover:underline ml-1"
            >
              Learn about our security measures
            </Link>
          </div>
        </CardFooter>
      </Card>

      {userLogin && !isLoggedIn && (
        <div className="fixed bottom-4 right-4 bg-green-100 border-l-4 border-green-500 text-green-700 p-4 rounded-md shadow-lg">
          <div className="flex">
            <div className="flex-shrink-0">
              <CheckCircleIcon className="h-5 w-5 text-green-500" />
            </div>
            <div className="ml-3">
              <p className="text-sm font-medium">Workspace Access Granted</p>
              <p className="text-xs mt-1">Logged in as: {userLogin}</p>
            </div>
          </div>
        </div>
      )}
    </div>
  );
};

export default Login;
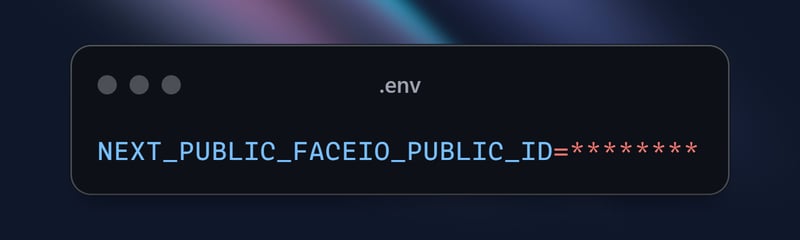
N'oubliez pas de remplacer 'NEXT_PUBLIC_FACEIO_PUBLIC_ID' par le FACEIO_APP_ID réel que vous avez obtenu à partir de la console FACEIO.
import { buttonVariants } from "@/components/ui/button";
import { cn } from "@/lib/utils";
import Link from "next/link";
import { FaUserShield, FaImage, FaCode, FaRobot } from 'react-icons/fa';

export default function Home() {
  const demos = [
    { title: "FACIO Web Authentication", href: "/faceio", icon: FaUserShield },
    { title: "Image Processing", href: "/imageprocessing", icon: FaImage },
    { title: "Code Generation", href: "/codegeneration", icon: FaCode },
    { title: "AI Assistant", href: "/aiassistant", icon: FaRobot },
  ];

  return (
    <div className="max-h-screen  bg-gradient-to-br from-purple-700 via-blue-600 to-teal-500 text-white p-8 w-full">
      <div className="max-w-6xl mx-auto">
        <h1 className="text-5xl md:text-7xl font-bold text-center mb-8 animate-fade-in-down">
          PixLab Faceio
        </h1>
        <p className="text-xl text-center mb-12 animate-fade-in-up">
          Explore cutting-edge technologies and innovative solutions
        </p>

        <div className="grid grid-cols-1 md:grid-cols-2 gap-8">
          {demos.map((demo, index) => (
            <Link
              key={demo.href}
              href={demo.href}
              className={cn(
                buttonVariants({ variant: "outline" }),
                "h-40 text-lg font-semibold flex flex-col items-center justify-center space-y-4 bg-white bg-opacity-10 backdrop-filter backdrop-blur-lg rounded-xl hover:bg-opacity-20 transition-all duration-300 animate-fade-in",
                { 'animate-delay-100': index % 2 === 1 }
              )}
            >
              <demo.icon className="text-4xl" />
              {demo.title}
            </Link>
          ))}
        </div>

        <div className="mt-16 text-center animate-fade-in-up animate-delay-300">
          <h2 className="text-3xl font-bold mb-4">Why Choose PixLab?</h2>
          <ul className="text-lg space-y-2">
            <li>✨ Cutting-edge technologies</li>
            <li>? High-performance solutions</li>
            <li>? Advanced security features</li>
            <li>? Seamless integrations</li>
          </ul>
        </div>

        <footer className="mt-16 text-center text-sm opacity-75 animate-fade-in-up animate-delay-500">
          © 2024 PixLab. All rights reserved. Empowering innovation through technology.
        </footer>
      </div>
    </div>
  );
}
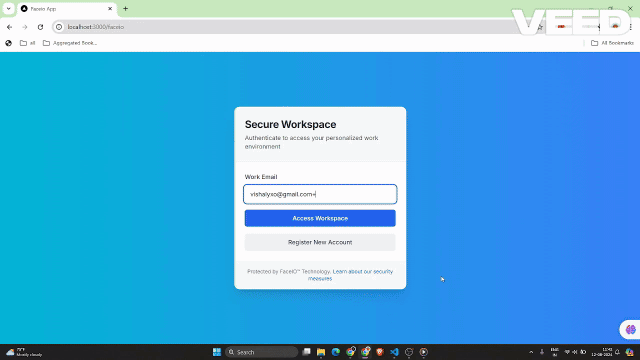
C'est ça ! Vous avez désormais intégré l'authentification faciale de FACEIO dans votre application Next.js. Lorsque les utilisateurs cliquent sur le bouton « Authentifier avec Face », le widget FACEIO apparaît, les guidant tout au long du processus d'authentification.
Capturer le widget FACEIO en action - S'inscrire
Pour démontrer la fonctionnalité du widget FACEIO, capturons un GIF du processus d'inscription :
Ce GIF présente l'expérience utilisateur du processus d'enregistrement du visage FACEIO au sein de l'application Next.js. L'utilisateur peut facilement enregistrer son visage, qui sera utilisé pour une authentification transparente lors des futures connexions.
Capturer le widget FACEIO en action
Pour démontrer la fonctionnalité du widget FACEIO, capturons un GIF du processus d'authentification :
Ce GIF présente l'expérience utilisateur du processus d'authentification faciale FACEIO au sein de l'application Next.js.
Meilleures pratiques de sécurité clés pour les applications FACEIO
Éliminer les inscriptions en double : activez les paramètres pour empêcher le même utilisateur de s'inscrire plusieurs fois, évitant ainsi les conflits potentiels ou les utilisations abusives.
Améliorez les mesures anti-usurpation : activez des fonctionnalités pour détecter et bloquer les tentatives d'usurpation de visage, garantissant ainsi que le système n'interagit qu'avec des utilisateurs réels et en direct.
Garantir l'unicité du code PIN : assurez-vous que le code PIN de chaque utilisateur est unique dans l'application pour empêcher tout accès non autorisé.
Mettre en œuvre des restrictions géographiques : limitez l'instanciation du widget FACEIO aux noms de domaine et aux pays autorisés pour un contrôle de sécurité supplémentaire.
Avantages de l'utilisation de FACEIO dans votre application Next.js
L'intégration de FACEIO dans votre application Next.js offre plusieurs avantages :
Expérience utilisateur améliorée : le widget FACEIO offre un flux d'authentification transparent et intuitif, permettant aux utilisateurs de se connecter facilement à votre application.
Compatibilité multiplateforme : FACEIO fonctionne sur différents appareils et navigateurs, garantissant une expérience utilisateur cohérente.
Intégration facile : Le package faceio-npm simplifie le processus d'intégration, vous permettant d'ajouter rapidement une authentification faciale à votre application Next.js.
Forum de la communauté FACEIO : Vous pouvez obtenir de l'aide en cas de problèmes auprès de la communauté FACEIO.
Conclusion
Dans cet article de blog, vous avez appris comment intégrer le service d'authentification faciale de FACEIO dans votre application Next.js. En suivant les étapes décrites ici, vous pouvez désormais offrir à vos utilisateurs une expérience d'authentification sécurisée et conviviale, améliorant ainsi la qualité globale de votre application Web.
Si vous avez d'autres questions ou avez besoin d'aide supplémentaire, n'hésitez pas à contacter l'équipe d'assistance FACEIO ou à explorer la documentation complète de FACEIO.
Bon codage !
Pour le code source complet de cette implémentation, vous pouvez visiter le référentiel GitHub et explorer le projet en détail.
Ce qui précède est le contenu détaillé de. pour plus d'informations, suivez d'autres articles connexes sur le site Web de PHP en chinois!
 Comment résoudre l'erreur 504 dans CDN
 Comment insérer une vidéo en HTML
 Quels sont les avantages et les inconvénients de la décentralisation
 Solution de rapport d'erreur de fichier SQL d'importation Mysql
 MySQL change la méthode du moteur de stockage d'une table
 Comment centrer un div en CSS
 Qu'est-ce que cela signifie lorsqu'un message a été envoyé mais rejeté par l'autre partie ?
 À quel point Dimensity 9000 équivaut-il à Snapdragon ?


![[Web front-end] Démarrage rapide de Node.js](https://img.php.cn/upload/course/000/000/067/662b5d34ba7c0227.png)


