

Hé, je m'appelle Sam, un ingénieur backend avec beaucoup d'expérience avec Django. Je voulais faire le saut et apprendre l'interface pour une application full stack. J'ai rapidement fait l'expérience de la nature ardue d'un projet React-with-Django et j'ai pensé que la douleur n'était qu'une partie du processus de développement. Cependant, je suis tombé sur un nouveau framework full stack très sympa appelé Wasp.
Wasp est un outil de développement incroyable pour les applications full stack. En combinant des éléments comme React, Node.js et Prisma, Wasp permet d'accélérer le développement d'une manière jamais vue auparavant.
Dans cet article, je vais expliquer la création d'une application full stack dans Django versus Wasp pour prouver la simplicité de Wasp par rapport à une technologie full-stack très conventionnelle. Je vais également réaliser une interface de réaction connectée à Django. Le but est de mettre en évidence les inefficacités, les difficultés et les problèmes qui peuvent (et surviendront) survenir avec Django/react et qui sont considérablement simplifiés via
Cet article n'est pas destiné à expliquer comment faire, mais je fournis du code pour mettre en évidence la nature exhaustive d'une application Django.

Cette partie est à peu près la seule où il y a un chevauchement significatif entre Django et Wasp. À partir du terminal, créons une application de tâches simple (je suppose que Django et Wasp sont installés et sur votre chemin).
Django ?
django-admin startproject
python manage.py starapp Todo
Guêpe ?
wasp new Todo
wasp start
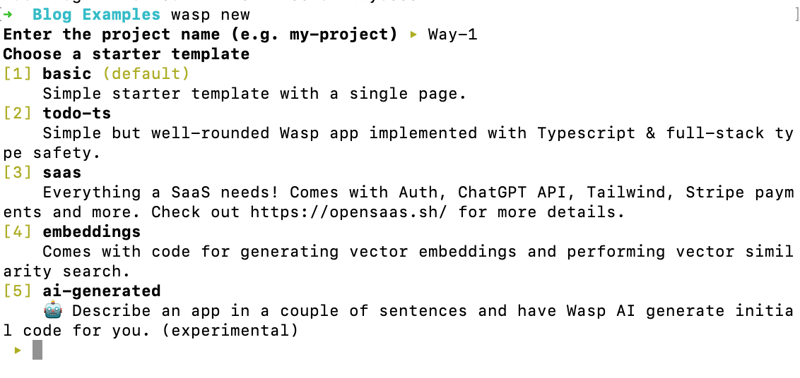
Maintenant, Wasp démarre à chaud dès le départ. Consultez le menu qui vous est proposé ci-dessous. Wasp peut soit démarrer une application de base pour vous, soit choisir parmi une multitude de modèles prédéfinis (y compris une application SaaS entièrement fonctionnelle) ou même utiliser une application générée par l'IA en fonction de votre description !

Pendant ce temps, Django fonctionne comme un projet avec des applications au sein du projet (encore une fois, il s'agit essentiellement d'opérations backend) et il peut y avoir plusieurs applications dans un projet Django. Ainsi, vous devez enregistrer chaque application dans les paramètres du projet Django.
python `manage.py` startapp todo
settings.py :
INSTALLED_APPS [
...
'Todo'
]
Alors maintenant, nous avons besoin d'une base de données, et c'est un autre domaine dans lequel Wasp brille vraiment. Avec Django, nous devons créer un modèle dans le fichier models.py. Wasp, quant à lui, utilise Prisma comme ORM, ce qui nous permet de définir clairement les champs nécessaires et de simplifier la création de bases de données d'une manière facile à comprendre.
Django ?
models.py :
from django.db import models

class Task(models.Model):
    title = models.CharField(max_length=200)
    completed = models.BooleanField(default=False)

    def __str__(self):
        return self.title
Guêpe ?
schéma.prisma :
model Task {
    id          Int     @id @default(autoincrement())
    description String
    isDone      Boolean @default(false)
}
Django et Wasp partagent des méthodes similaires pour migrer des bases de données :
Django ?
python manage.py makemigrations
python manage.py migrate
Guêpe ?
wasp db migrate-dev
Mais avec Wasp, vous pouvez également faire des trucs de base de données assez astucieux que Django ne peut pas.
Nous utilisons actuellement SQLite, mais que diriez-vous de configurer instantanément une base de données Posgres de développement ? Wasp peut faire ça avec :
wasp db start
C'est ça ! Avec cela, vous disposez d'un conteneur Docker exécutant une instance Postgres et il est instantanément connecté à votre application Wasp. ?
Ou que se passe-t-il si vous souhaitez voir votre base de données en temps réel via l'interface utilisateur du studio de base de données Prisma, ce qui n'est pas possible sans extensions tierces avec Django. Pour cela, lancez simplement :
wasp db studio
Commencez-vous à voir ce que je veux dire maintenant ?
Les itinéraires dans Django et Wasp suivent un modèle assez similaire. Cependant, si vous connaissez React, alors le système de Wasp est de loin supérieur.
Django fonctionne via le backend (views.py, que j'aborderai plus tard dans cet article) qui effectue toutes les opérations CRUD. Ces fonctions d'affichage sont associées à un itinéraire spécifique au sein d'une application au sein d'un projet (j'en sais beaucoup), et cela peut devenir plus compliqué si vous commencez à utiliser des clés primaires et des identifiants. Vous devez créer un fichier urls.py et diriger votre fichier de vues et vos fonctions spécifiques vers un itinéraire. Ces URL d'application sont ensuite connectées aux URL du projet. Ouf.
À la Guêpe : définir un itinéraire et le diriger vers un composant.
Django ?
todo/urls.py :
from django.urls import path
from . import views

urlpatterns = [
    path('', views.index, name='index'),
    path('update/<str:pk>/', views.updateTask, name='update_task'),
    path('delete/<str:pk>/', views.deleteTask, name='delete_task'),
]
./urls.py :
from django.contrib import admin
from django.urls import path, include

urlpatterns = [
    path('admin/', admin.site.urls),
    path('', include('todo.urls')),
]
Guêpe ?
main.wasp :
route TaskRoute { path: "/", to: TaskPage }
page TaskPage {
  component: import { TaskPage } from "@src/TaskPage"
}
Ok, c'est là que les avantages de Wasp sont sur le point de devenir encore plus apparents.
Firstly, I am going to revisit the views.py file. This is where magic is going to happen for Django backend. Here is a simple version of what the create, update, and delete functions could look like for our Task/Todo example:
Django ?
todo/views.py:
from django.shortcuts import render, redirect
from .models import Task
from .forms import TaskForm

def index(request):
    tasks = Task.objects.all()
    form = TaskForm()
    if request.method == 'POST':
        form = TaskForm(request.POST)
        if form.is_valid():
            form.save()
        return redirect('/')
    context = {'tasks': tasks, 'form': form}
    return render(request, 'todo/index.html', context)

def updateTask(request, pk):
    task = Task.objects.get(id=pk)
    form = TaskForm(instance=task)
    if request.method == 'POST':
        form = TaskForm(request.POST, instance=task)
        if form.is_valid():
            form.save()
        return redirect('/')
    context = {'form': form}
    return render(request, 'todo/update_task.html', context)

def deleteTask(request, pk):
    task = Task.objects.get(id=pk)
    if request.method == 'POST':
        task.delete()
        return redirect('/')
    context = {'task': task}
    return render(request, 'todo/delete.html', context)
app/forms.py:
from django import forms
from .models import Task

class TaskForm(forms.ModelForm):
    class Meta:
        model = Task
        fields = ['title', 'completed']
Wasp ?
main.wasp:
query getTasks {
  fn: import { getTasks } from "@src/operations",
  // Tell Wasp that this operation affects the `Task` entity. Wasp will automatically
  // refresh the client (cache) with the results of the operation when tasks are modified.
  entities: [Task]
}

action updateTask {
  fn: import { updateTask } from "@src/operations",
  entities: [Task]
}

action deleteTask {
  fn: import { deleteTask } from "@src/operations",
  entities: [Task]
}
operations.js:
export const getTasks = async (args, context) => {
  return context.entities.Task.findMany({
    orderBy: { id: 'asc' },
  })
}

export const updateTask = async ({ id, data }, context) => {
  return context.entities.Task.update({
    where: { id },
    data
  })
}

export const deleteTask = async ({ id }, context) => {
  return context.entities.Task.delete({
    where: { id }
  })
}
So right now, Wasp has a fully functioning backend with middleware configured for you. At this point we can create some React components, and then import and call these operations from the client. That is not the case with Django, unfortunately there is still a lot we need to do to configure React in our app and get things working together, which we will look at below.

At this point we could just create a simple client with HTML and CSS to go with our Django app, but then this wouldn't be a fair comparison, as Wasp is a true full-stack framework and gives you a managed React-NodeJS-Prisma app out-of-the-box. So let's see what we'd have to do to get the same thing set up with Django.
Note that this section is going to highlight Django, so keep in mind that you can skip all the following steps if you just use Wasp. :)
Django ?
First thing’s first. Django needs a REST framework and CORS (Cross Origin Resource Sharing):
pip install djangorestframework
pip install django-cors-headers
Include Rest Framework and Cors Header as installed apps, CORS headers as middleware, and then also set a local host for the react frontend to be able to communicate with the backend (Django) server (again, there is no need to do any of this initial setup in Wasp as it's all handled for you).
settings.py:
INSTALLED_APPS = [
    ...
    'corsheaders',
]

MIDDLEWARE = [
    ...
    'corsheaders.middleware.CorsMiddleware',
    ...
]

CORS_ALLOWED_ORIGINS = [
    'http://localhost:3000',
]
And now a very important step, which is to serialize all the data from Django to be able to work in json format for React frontend.
app/serializers.py:
from rest_framework import serializers
from .models import Task

class TaskSerializer(serializers.ModelSerializer):
    class Meta:
        model = Task
        fields = '__all__'
Now, since we are handling CRUD on the React side, we can change the views.py file:
from rest_framework import viewsets
from .models import Task
from .serializers import TaskSerializer

class TaskViewSet(viewsets.ModelViewSet):
    queryset = Task.objects.all()
    serializer_class = TaskSerializer
And now we need to change both app and project URLS since we have a frontend application on a different url than our backend.
urls.py:
from django.contrib import admin
from django.urls import path, include

urlpatterns = [
    path('admin/', admin.site.urls),
    path('api/', include('todo.urls')),  # Add this line
]
from django.urls import path, include
from rest_framework.routers import DefaultRouter
from .views import TaskViewSet

router = DefaultRouter()
router.register(r'tasks', TaskViewSet)

urlpatterns = [
    path('', include(router.urls)),
]
By now you should be understanding why I've made the switch to using Wasp when building full-stack apps. Anyways, now we are actually able to make a react component with a Django backend ?
Ok, so now we can actually get back to comparing Wasp and Django.
Django ?
To start, lets create our React app in our Django project:
npx create-react-app frontend
Finally, we can make a component in React. A few things:
I am using axios in the Django project here. Wasp comes bundled with React-Query (aka Tanstack Query), so the execution of (CRUD) operations is a lot more elegant and powerful.
The api call is to my local server, obviously this will change in development.
You can make this many different ways, I tried to keep it simple.
main.jsx:
import React, { useEffect, useState } from 'react';
import axios from 'axios';

const TaskList = () => {
  const [tasks, setTasks] = useState([]);
  const [newTask, setNewTask] = useState('');
  const [editingTask, setEditingTask] = useState(null);

  useEffect(() => {
      fetchTasks();
  }, []);

  const fetchTasks = () => {
    axios.get('http://127.0.0.1:8000/api/tasks/')
      .then(response => {
        setTasks(response.data);
      })
      .catch(error => {
        console.error('There was an error fetching the tasks!', error);
      });
  };

  const handleAddTask = () => {
    if (newTask.trim()) {
      axios.post('http://127.0.0.1:8000/api/tasks/', { title: newTask, completed: false })
        .then(() => {
          setNewTask('');
          fetchTasks();
        })
        .catch(error => {
          console.error('There was an error adding the task!', error);
        });
    }
  };

  const handleUpdateTask = (task) => {
    axios.put(`http://127.0.0.1:8000/api/tasks/${task.id}/`, task)
      .then(() => {
        fetchTasks();
        setEditingTask(null);
      })
      .catch(error => {
        console.error('There was an error updating the task!', error);
      });
  };

  const handleDeleteTask = (taskId) => {
    axios.delete(`http://127.0.0.1:8000/api/tasks/${taskId}/`)
      .then(() => {
        fetchTasks();
      })
      .catch(error => {
        console.error('There was an error deleting the task!', error);
      });
  };

  const handleEditTask = (task) => {
    setEditingTask(task);
  };

  const handleChange = (e) => {
    setNewTask(e.target.value);
  };

  const handleEditChange = (e) => {
    setEditingTask({ ...editingTask, title: e.target.value });
  };

  const handleEditCompleteToggle = () => {
    setEditingTask({ ...editingTask, completed: !editingTask.completed });
  };

  return (
    <div>
      <h1>To-Do List</h1>
      <input type="text" value={newTask} onChange={handleChange} placeholder="Add new task" />
      <button onClick={handleAddTask}>Add Task</button>
      <ul>
        {tasks.map(task => (
          <li key={task.id}>
            {editingTask && editingTask.id === task.id ? (
              <div>
                <input type="text" value={editingTask.title} onChange={handleEditChange} />
                <button onClick={() => handleUpdateTask(editingTask)}>Save</button>
                <button onClick={() => setEditingTask(null)}>Cancel</button>
                <button onClick={handleEditCompleteToggle}>
                  {editingTask.completed ? 'Mark Incomplete' : 'Mark Complete'}
                </button>
              </div>
          ) : (
            <div>
              {task.title} - {task.completed ? 'Completed' : 'Incomplete'}
              <button onClick={() => handleEditTask(task)}>Edit</button>
              <button onClick={() => handleDeleteTask(task.id)}>Delete</button>
            </div>
            )}
          </li>
        ))}
      </ul>
    </div>
  );
};

export default TaskList;
Wasp ?
And here's the Wasp React client for comparison. Take note how we're able to import the operations we defined earlier and call them here easily on the client with less configuration than the Django app. We also get the built-in caching power of the useQuery hook, as well as the ability to pass in our authenticated user as a prop (we'll get into this more below).
Main.jsx:
import React, { FormEventHandler, FormEvent } from "react";
import { type Task } from "wasp/entities";
import { type AuthUser, getUsername } from "wasp/auth";
import { logout } from "wasp/client/auth";
import { createTask, updateTask, deleteTasks, useQuery, getTasks } from "wasp/client/operations";
import waspLogo from "./waspLogo.png";

import "./Main.css";

export const MainPage = ({ user }) => {
  const { data: tasks, isLoading, error } = useQuery(getTasks);

  if (isLoading) return "Loading...";
  if (error) return "Error: " + error;

  const completed = tasks?.filter((task) => task.isDone).map((task) => task.id);

  return (
    <main>
      <img src={waspLogo} alt="wasp logo" />
      {user && user.identities.username && (
        <h1>
          {user.identities.username.id}
          {`'s tasks :)`}
        </h1>
      )}
      <NewTaskForm />
      {tasks && <TasksList tasks={tasks} />}
      <div className="buttons">
        <button
          className="logout"
          onClick={() => deleteTasks(completed ?? [])}
        >
          Delete completed
        </button>
        <button className="logout" onClick={logout}>
          Logout
        </button>
      </div>
    </main>
  );
};

function Todo({ id, isDone, description }) {
  const handleIsDoneChange = async (
    event
  ) => {
    try {
      await updateTask({
        id,
        isDone: event.currentTarget.checked,
      });
    } catch (err: any) {
      window.alert("Error while updating task " + err?.message);
    }
  };

  return (
    <li>
      <span className="todo-item">
        <input
          type="checkbox"
          id={id.toString()}
          checked={isDone}
          onChange={handleIsDoneChange}
        />
        <span>{description}</span>
        <button onClick={() => void deleteTasks([id])}>Delete</button>
      </span>
    </li>
  );
}

function TasksList({ tasks }) {
  if (tasks.length === 0) return <p>No tasks yet.</p>;
  return (
    <ol className="tasklist">
      {tasks.map((task, idx) => (
        <Todo {...task} key={idx} />
      ))}
    </ol>
  );
}

function NewTaskForm() {
  const handleSubmit = async (event) => {
    event.preventDefault();

    try {
      const description = event.currentTarget.description.value;
      console.log(description);
      event.currentTarget.reset();
      await createTask({ description });
    } catch (err: any) {
      window.alert("Error: " + err?.message);
    }
  };

  return (
    <form onSubmit={handleSubmit}>
      <input name="description" type="text" defaultValue="" />
      <input type="submit" value="Create task" />
    </form>
  );
}
Very nice! In the Wasp app you can see how much easier it is to call the server-side code via Wasp operations. Plus, Wasp gives you the added benefit of refreshing the client-side cache for the Entity that's referenced in the operation definition (in this case Task). And the cherry on top is how easy it is to pass the authenticated user to the component, something we haven't even touched on in the Django app, and which we will talk about more below.

So we already started to get a feel in the above code for how simple it is to pass an authenticated user around in Wasp. But how do we actually go about implementing full-stack Authentication in Wasp and Django.
This is one of Wasp’s biggest advantages. It couldn't be easier or more intuitive. On the other hand, the Django implementation is so long and complicated I'm not going to even bother showing you the code and I'll just list out the stps instead;
Wasp ?
main.wasp:
app TodoApp {
  wasp: {
    version: "^0.14.0"
  },

  title: "Todo App",

  auth: {
    userEntity: User,
    methods: {
      usernameAndPassword: {}
    }
  }

  //...
And that's all it takes to implement full-stack Auth with Wasp! But that's just one example, you can also add other auth methods easily, like google: {}, gitHub: {} and discord: {} social auth, after configuring the apps and adding your environment variables.
Wasp allows you to get building without worrying about so many things. I don’t need to worry about password hashing, multiple projects and apps, CORS headers, etc. I just need to add a couple lines of code.
Wasp just makes sense.

Django ?
Let's check out what it takes to add a simple username and password auth implementation to a Django app (remember, this isn't even the code, just a checklist!):
Install Necessary Packages:
Update Django Settings:
Set Up URL Routing:
Implement Authentication Context in React:
Create Login Component in React:
Protect React Routes and Components:
Implement Task Update and Delete Functionality:
Add Authentication to Django Views:
I just want to highlight one more aspect of Wasp that I really love. In Django, we're completely responsible for dealing with all the boilerplate code when setting up a new app. In other words, we have to set up new apps from scratch every time (even if it's been done before a million times by us and other devs). But with Wasp we can scaffold a new app template in a number of ways to really jump start the development process.
Let's check out these other ways to get a full-stack app started in Wasp.
A simple wasp new in the terminal shows numerous starting options and app templates. If I really want to make a todo app for example, well there you have it, option 2.
Right out of the box you have a to-do application with authentication, CRUD functionality, and some basic styling. All of this is ready to be amended for your specific use case.
Or what if you want to turn code into money? Well, you can also get a fully functioning SaaS app. Interested in the latest AI offereings? You also have a vector embeddings template, or an AI full-stack app protoyper! 5 options that save you from having to write a ton of boilerplate code.
Just throw a name, prompt, and select a few of your desired settings and boom, you get a fully functioning prototype app. From here you can use other other AI tools, like Cursor's AI code editor, to generate new features and help you debug!
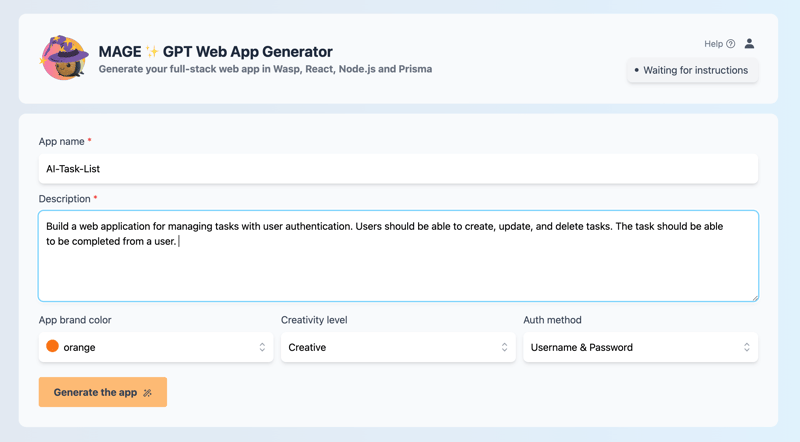
? Note that the Mage functionality is also achievable via the terminal ("ai-generated"), but you need to provide your own open-ai api key for it to work.

Êtes-vous intéressé par plus de contenu comme celui-ci ? Inscrivez-vous à notre newsletter et donnez-nous une étoile sur GitHub ! Nous avons besoin de votre soutien pour continuer à faire avancer nos projets ?
⭐️ Star Wasp sur GitHub ?
Alors voilà. Comme je l'ai dit au début, venant de Django, j'ai été étonné de voir à quel point il était facile de créer des applications full-stack avec Wasp, c'est ce qui m'a inspiré pour écrire cet article.
J'espère avoir pu vous montrer pourquoi rompre avec Django au profit de Wasp peut être bénéfique en termes de temps, d'énergie et d'émotion.
Ce qui précède est le contenu détaillé de. pour plus d'informations, suivez d'autres articles connexes sur le site Web de PHP en chinois!
 La différence entre vscode et visual studio
 propriété de gradient linéaire
 Caractéristiques des systèmes d'information de gestion
 Quel système oa est le meilleur ?
 Comment ouvrir des fichiers HTML sur iPad
 Comment vérifier les enregistrements d'appels supprimés
 Pourquoi les Himalayens ne peuvent-ils pas se connecter à Internet ?
 Utilisation de la suppression de base de données


![[Web front-end] Démarrage rapide de Node.js](https://img.php.cn/upload/course/000/000/067/662b5d34ba7c0227.png)


