HTML, connu sous le nom de HyperText Markup Language, est l'un des langages les plus populaires utilisés pour concevoir des pages Web et structurer le contenu. HTML utilise des balises, des éléments, des images et certains composants les plus récents pour rendre les pages Web plus attrayantes et plus conviviales.
En combinant HTML avec CSS, l'apparence d'une page Web peut être facilement personnalisée. HTML joue un rôle crucial dans la structuration correcte des pages Web sur le World Wide Web. Il peut être modifié à l'aide d'éditeurs de texte simples, permettant aux utilisateurs d'apporter des modifications à tout moment.


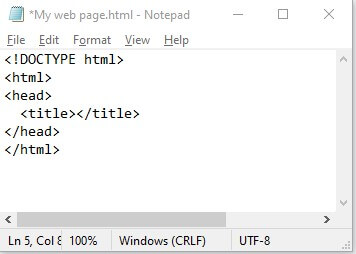
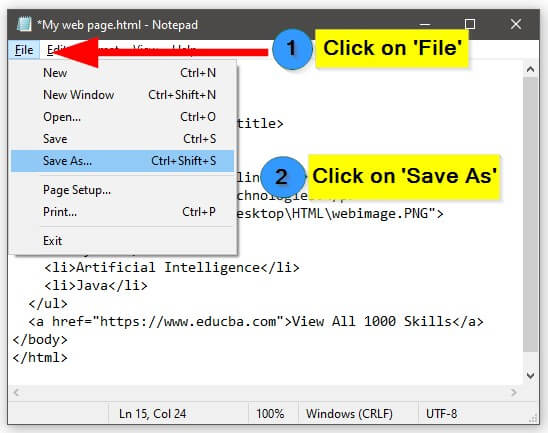
Pour une meilleure compréhension, voici le code :
<!DOCTYPE html>
<html>
<head>
<title>My First Web Page</title>
</head>
<body>
<h1>Unlock the Power of Online Learning</h1>
<p>Master 1000+ Tools & Technologies.</p>
<img src="C:\Users\Demo2\Desktop\HTML\webimage.PNG">
<ul>
<li>Python</li>
<li>Artificial Intelligence</li>
<li>Java</li>
</ul>
<a href="https://www.educba.com">View All 1000 Skills</a>
</body>
</html>


Sortie :

Voici une liste de balises et d'éléments HTML essentiels qui sont cruciaux pour la conception de pages Web en HTML.
| HTML Tag/Element | Purpose | |||||||||||||||||||||||||||||||
to |
Define different levels of headings | |||||||||||||||||||||||||||||||
| Define paragraphs of text | ||||||||||||||||||||||||||||||||
| Create line breaks | ||||||||||||||||||||||||||||||||
| Create an ordered list | ||||||||||||||||||||||||||||||||
| Create an unordered list | ||||||||||||||||||||||||||||||||
| Define items within a list | ||||||||||||||||||||||||||||||||
| Create hyperlinks | ||||||||||||||||||||||||||||||||
| Insert images | ||||||||||||||||||||||||||||||||
Examples of Design Web Pages in HTMLLet’s create some web pages to see the resultant web page. Example #1: Travel WebpageHere, we will create an amazing travel webpage showcasing places to visit in Switzerland. We will set one background image and add some text using HTML Code and Styling. HTML Code: <head>
<style>
.card {
max-width: 380px;
margin: auto;
text-align: center;
}
#main {
background-image: url('switzerland.jpg');
background-repeat: no-repeat;
background-size: cover;
}
.price {
color: #f1294a;
font-size: 18px;
}
.card button {
padding: 10px;
color: white;
background-color: #f1294a;
text-align: center;
}
</style>
</head>
<body id="main">
<h2 style="text-align:center">Places to Visit in Switzerland</h2>
<div class="card">
<h1><b>Explore Switzerland</b></h1>
<h3 class="price">Starting from CHF 2000</h3>
<h2>
<ul>
<li>Zurich</li>
<li>Geneva</li>
<li>Lucerne</li>
<li>Interlaken</li>
<li>Zermatt</li>
</ul>
</h2>
<p><button>Book Here</button></p>
</div>
</body>Copier après la connexion Output: Example #2: Feedback FormWe will build one Feedback form in the form of a web page in this example. <!DOCTYPE html>
<html>
<head>
<meta name="viewport" content="width=device-width, initial-scale=1">
<style>
body {
font-family: Arial, sans-serif;
}
input[type=text], select, textarea {
width: 100%;
padding: 8px;
border: 1px solid #ccc;
border-radius: 4px;
margin-top: 4px;
margin-bottom: 10px;
}
input[type=submit] {
background-color: #4CAF50;
color: white;
padding: 8px 12px;
border: none;
border-radius: 4px;
cursor: pointer;
}
.container {
width: 80%;
max-width: 500px;
margin: 0 auto;
border-radius: 6px;
background-color: #F2F2F2;
padding: 20px;
}
h3 {
text-align: center;
}
label {
font-weight: bold;
}
textarea {
resize: vertical;
}
/* Optional: Add additional styles to make it more visually appealing */
.container {
box-shadow: 0 2px 4px rgba(0, 0, 0, 0.1);
}
input[type=submit]:hover {
background-color: #45a049;
}
</style>
</head>
<body>
<h3>We Value Your Suggestions!</h3>
<div class="container">
<form>
<label for="fname">First Name</label>
<input type="text" id="fname" name="firstname" placeholder="Enter your name">
<label for="lname">Last Name</label>
<input type="text" id="lname" name="lastname" placeholder="Enter your last name">
<label for="email">Email</label>
<input type="text" id="email" name="email" placeholder="Enter your email here">
<label for="subject">Suggestion</label>
<textarea id="subject" name="subject" placeholder="Provide your suggestion" style="height: 100px"></textarea>
<input type="submit" value="Submit">
</form>
</div>
</body>
</html>Copier après la connexion Output: Example #3: OTT Platform HomepageIn this example, we will create another web page that showcases an amazing homepage for an OTT platform. HTML Code: <!DOCTYPE html>
<html>
<head>
<title>My OTT Platform</title>
<style>
/* CSS styles for the website */
body {
font-family: Arial, sans-serif;
margin: 0;
padding: 0;
background-color: #000;
color: #fff;
}
header {
background-color: #e50914;
padding: 20px;
text-align: center;
}
header h1 {
margin: 0;
font-size: 28px;
text-transform: uppercase;
color: #fff;
}
nav {
background-color: #000;
padding: 10px;
text-align: center;
}
nav a {
text-decoration: none;
margin: 10px;
color: #fff;
font-weight: bold;
}
main {
padding: 20px;
}
footer {
background-color: #e50914;
padding: 20px;
text-align: center;
}
.video {
display: flex;
flex-wrap: wrap;
justify-content: center;
margin-bottom: 20px;
}
.video .thumbnail {
position: relative;
width: 250px;
height: 140px;
margin: 10px;
overflow: hidden;
transition: transform 0.3s;
background-color: #333;
}
.video .thumbnail img {
width: 100%;
height: 100%;
object-fit: cover;
}
.video .thumbnail:hover {
transform: scale(1.1);
}
.video .title {
position: absolute;
bottom: 0;
left: 0;
width: 100%;
background-color: rgba(0, 0, 0, 0.7);
color: #fff;
padding: 10px;
margin: 0;
font-weight: bold;
}
/* Additional styles for Netflix-like appearance */
header, nav, main, footer {
max-width: 1200px;
margin: 0 auto;
}
.video .thumbnail {
width: 275px;
height: 155px;
}
.video .title {
font-size: 14px;
padding: 8px;
}
</style>
</head>
<body>
<header>
<h1>Welcome to My OTT Platform</h1>
</header>
<nav>
<a href="#">Home</a>
<a href="#">Movies</a>
<a href="#">TV Shows</a>
<a href="#">Documentaries</a>
<a href="#">My Account</a>
</nav>
<main>
<h2>Trending Now</h2>
<div class="video">
<div class="thumbnail">
<img src="video5.jpg" alt="Video 5">
<div class="title">Movie1</div>
</div>
<div class="thumbnail">
<img src="video6.jpg" alt="Video 6">
<div class="title">Movie2</div>
</div>
<div class="thumbnail">
<img src="video7.jpg" alt="Video 7">
<div class="title">Movie3</div>
</div>
</div>
<h2>Top 3 Shows</h2>
<div class="video">
<div class="thumbnail">
<img src="video8.jpg" alt="Video 8">
<div class="title">Show1</div>
</div>
<div class="thumbnail">
<img src="video9.jpg" alt="Video 9">
<div class="title">Show2</div>
</div>
<div class="thumbnail">
<img src="video10.jpg" alt="Video 10">
<div class="title">Show3</div>
</div>
</div>
<h2>International Movies</h2>
<div class="video">
<div class="thumbnail">
<img src="video11.jpg" alt="Video 11">
<div class="title">Movie1</div>
</div>
<div class="thumbnail">
<img src="video12.jpg" alt="Video 12">
<div class="title">Movie2</div>
</div>
<div class="thumbnail">
<img src="video13.jpg" alt="Video 13">
<div class="title">Movie3</div>
</div>
</div>
</main>
<footer>
<p>© 2023 My OTT Platform. All rights reserved.</p>
</footer>
</body>
</html>Copier après la connexion Output: Example #4 Newsletter Subscription PageIn this example, let’s create a simple subscription page where users can subscribe to a newsletter. <form action="newsletter.php" method="post" style="background-color: #f2f2f2; padding: 20px; border-radius: 10px;"> <h2 style="color: #333;">Join our Newsletter!</h2> <div class="form-group"> <label for="name" style="color: #333;">Name:</label> <input type="text" id="name" name="name" placeholder="Enter your name" required style="padding: 5px; border: 1px solid #ccc; border-radius: 5px;"> </div> <div class="form-group"> <label for="email" style="color: #333;">Email:</label> <input type="email" id="email" name="email" placeholder="Enter your email" required style="padding: 5px; border: 1px solid #ccc; border-radius: 5px;"> </div> <div class="form-group"> <label for="interests" style="color: #333;">Interests:</label> <select id="interests" name="interests" multiple style="padding: 5px; border: 1px solid #ccc; border-radius: 5px;"> <option value="technology">Technology</option> <option value="fashion">Fashion</option> <option value="food">Food</option> <option value="travel">Travel</option> <option value="sports">Sports</option> </select> </div> <button type="submit" style="background-color: #04aa6d; color: #fff; padding: 10px 20px; border: none; border-radius: 5px; cursor: pointer;">Subscribe Now!</button> </form> Copier après la connexion Output: Example #5: Guess the Number GameIn this instance, we will design a simple game where users have to guess the number generated by the system. <!DOCTYPE html>
<html>
<head>
<title>Guessing Game</title>
<style>
body {
text-align: center;
padding-top: 100px;
font-family: Arial, sans-serif;
background-color: #f2f2f2;
}
h1 {
color: #333333;
}
p {
color: #666666;
}
input {
padding: 10px;
font-size: 16px;
border-radius: 4px;
border: 1px solid #cccccc;
}
button {
padding: 10px 20px;
font-size: 16px;
background-color: #4CAF50;
color: white;
border-radius: 4px;
border: none;
cursor: pointer;
}
button:hover {
background-color: #45a049;
}
#result {
margin-top: 20px;
font-weight: bold;
}
</style>
</head>
<body>
<h1>Guessing Game</h1>
<p>Guess a number between 1 and 10:</p>
<input type="number" id="guess" min="1" max="10">
<button onclick="checkGuess()">Submit</button>
<p id="result"></p>
<script>
function checkGuess() {
var guess = parseInt(document.getElementById("guess").value);
var randomNumber = Math.floor(Math.random() * 10) + 1;
if (guess === randomNumber) {
document.getElementById("result").innerHTML = "Congratulations! You guessed the correct number.";
} else {
document.getElementById("result").innerHTML = "Wrong guess. The correct number was " + randomNumber + ".";
}
}
</script>
</body>
</html>Copier après la connexion Output: ConclusionFrom all the above discussion, we can say that Web pages are created by using HTML code in a very simplified manner. Just simply put your HTML code in any one editor, save it with the .html extension, and open it within any browser. Ce qui précède est le contenu détaillé de. pour plus d'informations, suivez d'autres articles connexes sur le site Web de PHP en chinois!
Étiquettes associées:
Déclaration de ce site Web
Le contenu de cet article est volontairement contribué par les internautes et les droits d'auteur appartiennent à l'auteur original. Ce site n'assume aucune responsabilité légale correspondante. Si vous trouvez un contenu suspecté de plagiat ou de contrefaçon, veuillez contacter admin@php.cn
Derniers articles par auteur
Derniers numéros
angulaire.js - Quelqu'un sait-il comment lier du HTML à l'aide de ng-bind-html. Mais le HTML est échappé
Depuis 1970-01-01 08:00:00
0
0
0
Devez-vous créer un dossier HTML correspondant pour chaque code HTML sous le dossier d'affichage ?
Depuis 1970-01-01 08:00:00
0
0
0
Rubriques connexes
Plus>
|