
Les pilotes d'affichage facilitent la communication entre le système d'exploitation Windows (ou tout autre système d'exploitation) et votre GPU. Mais si le pilote d'affichage rencontre un problème, vous verrez des erreurs inattendues comme l'erreur « Échec du démarrage du pilote d'affichage ».
Les raisons notables derrière cette erreur incluent des connexions problématiques, des pilotes obsolètes ou corrompus, des problèmes de registre et des problèmes matériels. Essayez ces dix méthodes pour résoudre l'erreur et faire fonctionner la carte graphique parfaitement.
Avant de plonger dans des correctifs plus avancés, redémarrez les pilotes graphiques de votre PC Windows. Cette méthode s'applique à tous les fabricants de GPU afin qu'elle fonctionne sur les PC équipés de GPU NVIDIA, AMD ou Intel.
Appuyez immédiatement sur le raccourci clavier Windows Ctrl Shift B pour lancer le redémarrage. Votre écran clignotera et pourrait même s'assombrir pendant quelques secondes. Après cela, l'affichage réapparaîtra.
Si vous utilisez un écran externe avec un ordinateur portable, la connexion de l'écran externe ne sera pas restaurée après le redémarrage. Vous devrez ouvrir l'application Paramètres et reconfigurer pour étendre ou dupliquer l'écran sur l'écran externe.
L'erreur « Échec du chargement du pilote d'affichage » entraîne le basculement de Windows vers le pilote d'affichage de base. Cependant, si vous utilisez un adaptateur VGA-USB de base pour connecter un moniteur externe via USB, vous devez passer à un adaptateur VGA-USB alimenté. En effet, les GPU les plus récents ne prennent pas en charge la norme VGA.
Donc, si vous devez vous connecter à un moniteur avec d'anciennes options d'entrée comme VGA, utilisez un adaptateur VGA-USB alimenté. Inspectez également toutes les connexions physiques des câbles des composants, y compris le GPU.
Des pilotes obsolètes et corrompus peuvent produire des erreurs et fonctionner mal avec les mises à jour plus récentes du système d'exploitation. Vous devez donc les mettre à jour à l'aide du Gestionnaire de périphériques. Voici comment :
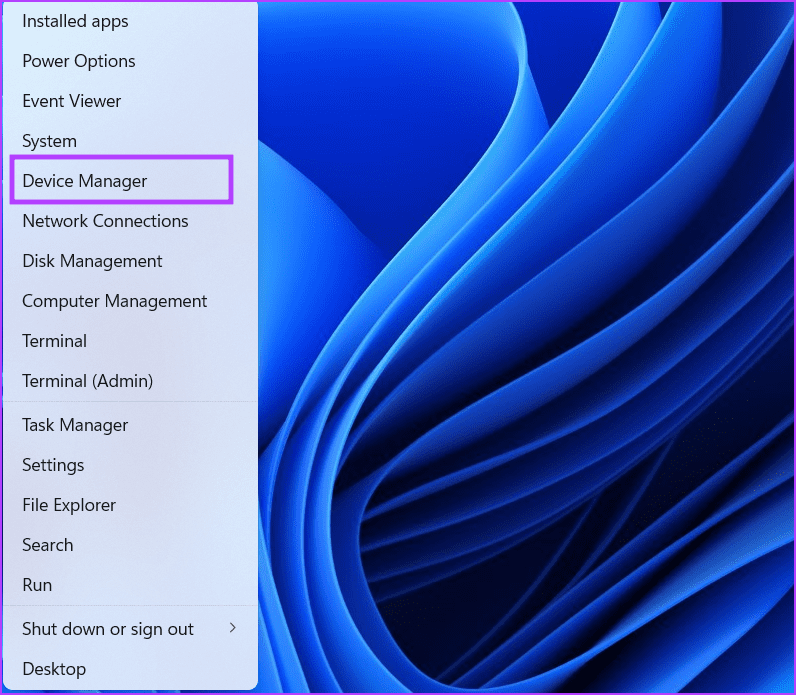
Étape 1 : Appuyez sur le raccourci de la touche Windows X pour ouvrir le menu Power User. Cliquez sur l'option Gestionnaire de périphériques.
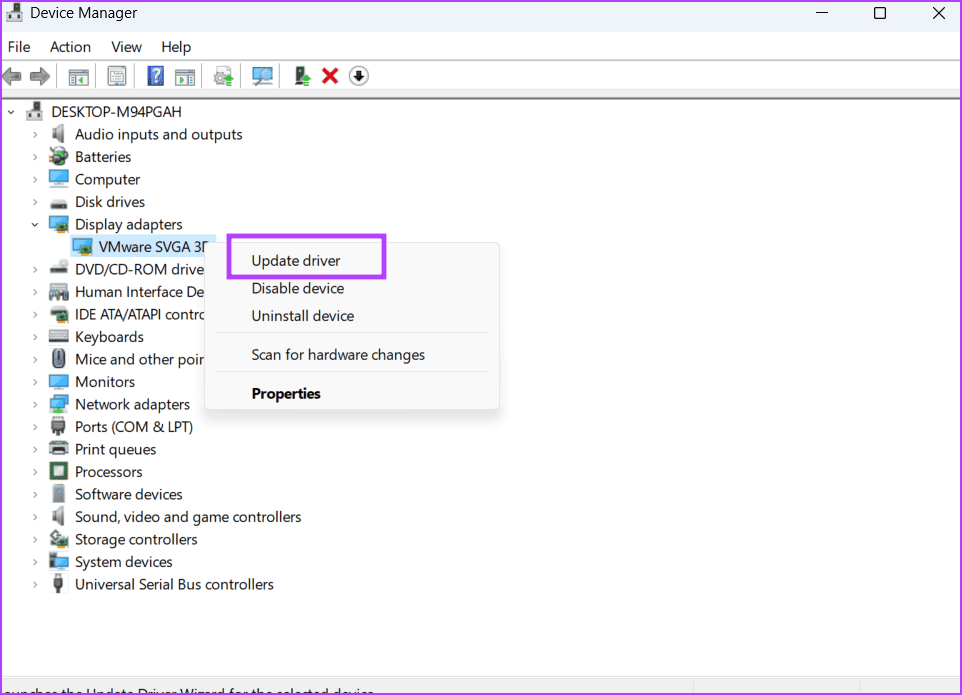
Étape 2 : Cliquez sur l'option Adaptateurs graphiques. Ensuite, faites un clic droit sur le nom du GPU et sélectionnez l'option Mettre à jour le pilote.
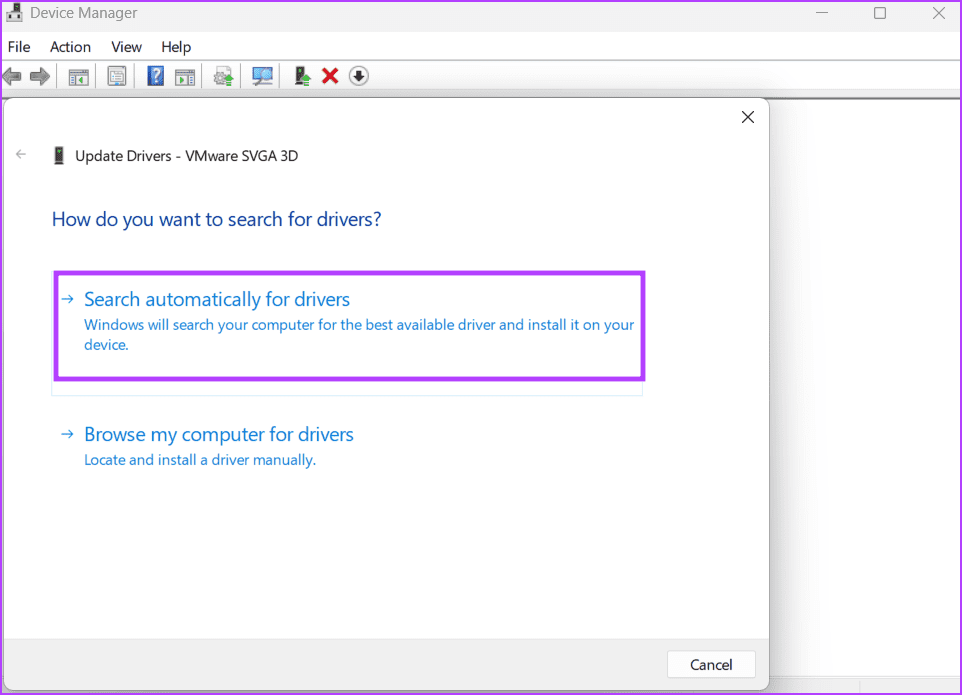
Étape 3 : Cliquez sur l'option « Rechercher automatiquement les pilotes ». Attendez qu'il télécharge et installe les derniers pilotes GPU pour votre PC.
Étape 4 : Fermez le Gestionnaire de périphériques.
L'utilitaire de résolution des problèmes de matériel et de périphériques peut identifier et résoudre les problèmes avec votre PC. Microsoft a l'intention de supprimer l'outil, mais vous pouvez toujours y accéder à l'aide de l'invite de commande. Voici comment :
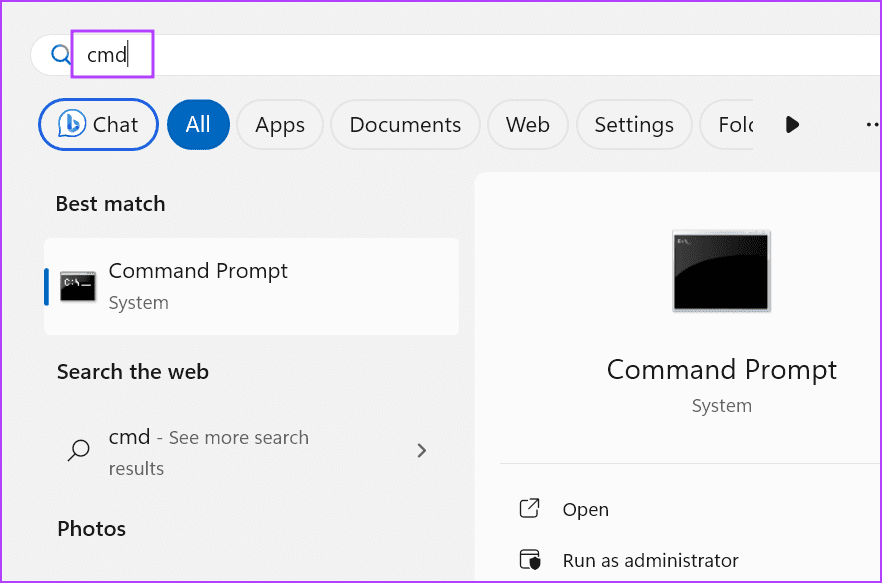
Étape 1 : Appuyez sur la touche Windows pour ouvrir le menu Démarrer. Tapez cmd dans la zone de recherche et appuyez simultanément sur le raccourci clavier Ctrl Shift Enter.
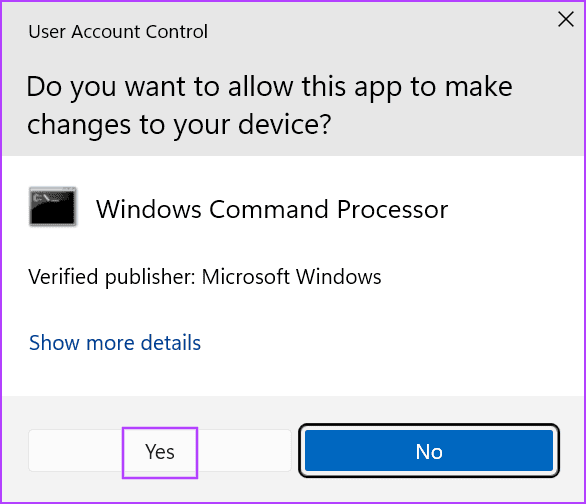
Étape 2 : La fenêtre Contrôle de compte d'utilisateur se lancera. Cliquez sur le bouton Oui pour ouvrir l'invite de commande avec les privilèges d'administrateur.
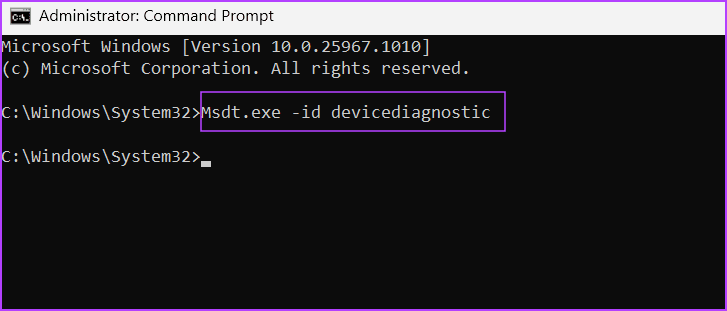
Étape 3 : Tapez la commande suivante et appuyez sur Entrée pour lancer l'utilitaire de résolution des problèmes de matériel et de périphériques :
<code>Msdt.exe -id devicediagnostic</code>
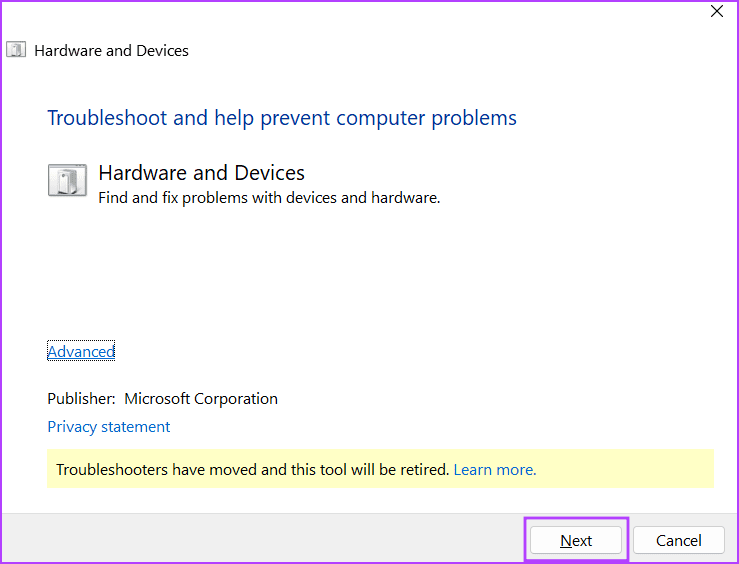
Étape 4 : Cliquez sur le bouton Suivant.
Step 5: Wait for the utility to identify and automatically fix problems on your PC.
Step 6: Close the troubleshooter window.
You must change the Windows Performance settings to fix your PC’s ‘display driver failed to load’ issue. This method worked wonders for some users whose Desktop Window Management program crash was the reason behind the display driver problem. Here’s how:
Step 1: Press the Windows key to open the Start menu. Type the following command in the search box and press Enter to launch the advanced setting window:
<code>%windir%\system32\SystemPropertiesPerformance.exe</code>
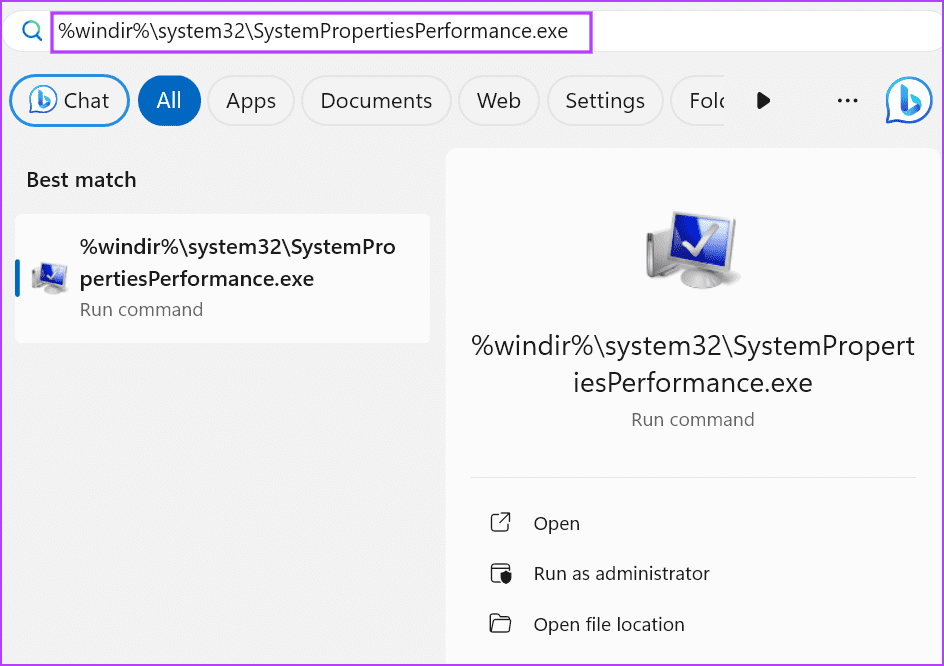
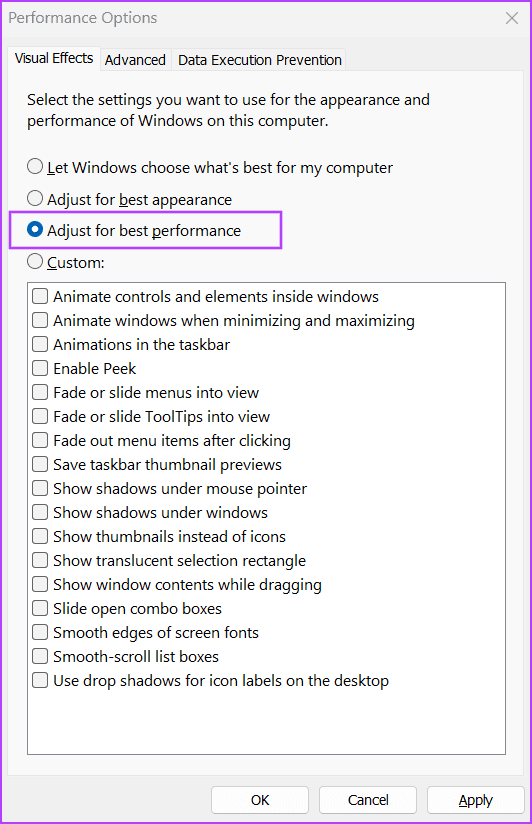
Step 2: Click on the ‘Adjust for best performance’ radio button.
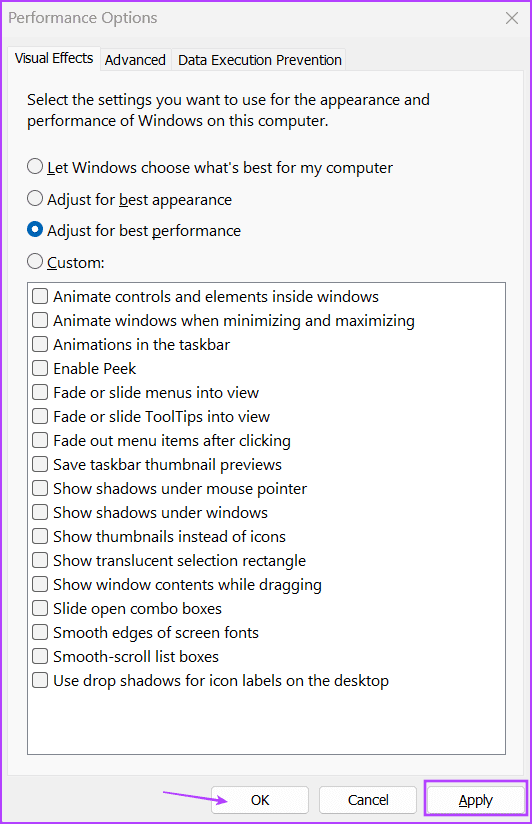
Step 3: Click on the Apply button and then click on the OK button.
Step 4: Restart your PC.
If updating the graphics card drivers and running the hardware and devices troubleshooter doesn’t have any effect, and you still see the ‘failed to initialize display adapter’ error, you must remove and reinstall the GPU drivers. For this, you can use the Display Driver Uninstaller (DDU) tool, which wipes all the remnant files related to the GPU drivers. Here’s how:
Step 1: Download the portable version of the Display Driver Uninstaller (DDU) tool.
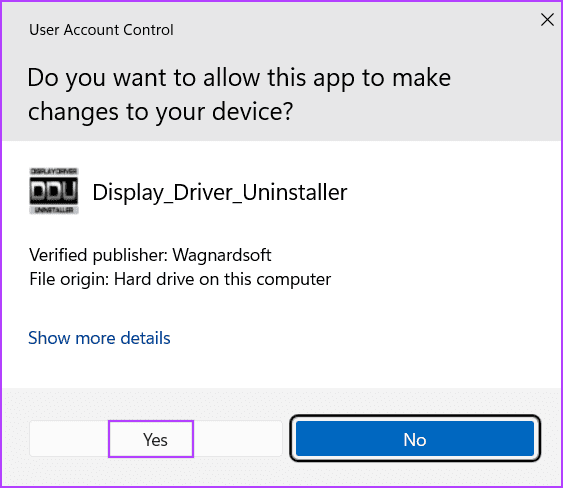
Step 2: Extract the tool and launch it using the executable file. When the User Account Control window pops up, click on the Yes button.
Step 3: Click on the Select device type drop-down list. Then click on the GPU option.
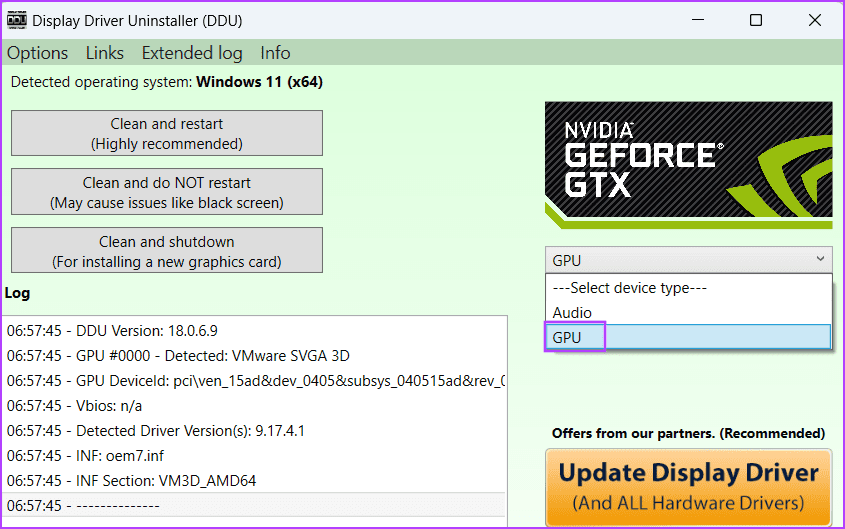
Step 4: Click on the device drop-down list to expand it. Select your GPU name in the list.
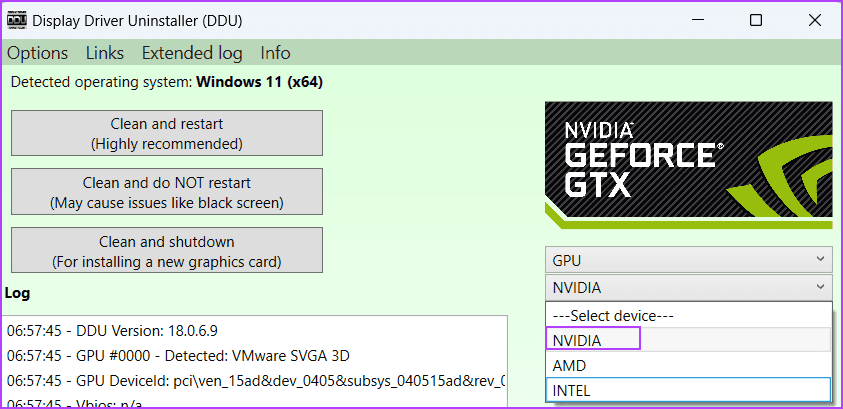
Step 5: Click on the Clean and restart option.
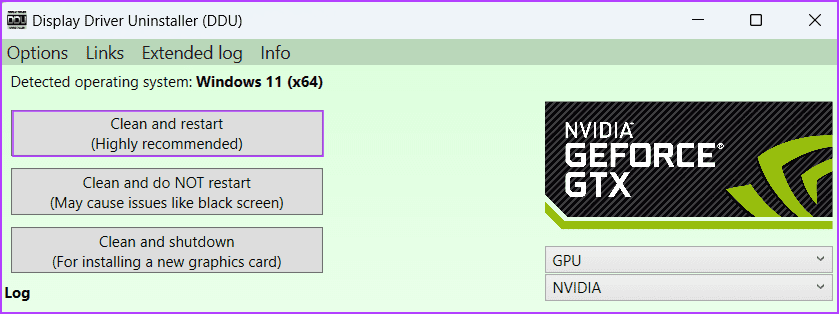
Step 6: Display Driver Uninstaller will start the GPU driver removal process and restart your PC.
Download the latest version of the graphics drivers from your GPU manufacturer’s website and install it on your PC.
You can modify the TDR values to resolve this bothersome graphics driver in Windows 11. This change will make Windows wait longer for a response from the GPU. But before doing that, create a registry backup and export it to an external storage drive. Then, repeat the following steps:
Step 1: Press the Windows key to open the Start menu. Type cmd in the search box and simultaneously press Ctrl + Shift + Enter keyboard shortcut.

Step 2: The User Account Control window will open. Click on the Yes button to launch the Command Prompt with admin privileges.

Step 3: Type the following command and press Enter to set a timeout of 60 seconds:
<code>reg add "HKEY_LOCAL_MACHINE\SYSTEM\CurrentControlSet\Control\GraphicsDrivers" /v TdrDelay /t REG_DWORD /d 60 /f</code>
Step 4: Execute the following command to increase the time before Windows throws a bug-check:
<code>reg add "HKEY_LOCAL_MACHINE\SYSTEM\CurrentControlSet\Control\GraphicsDrivers" /v TdrDdiDelay /t REG_DWORD /d 60 /f</code>
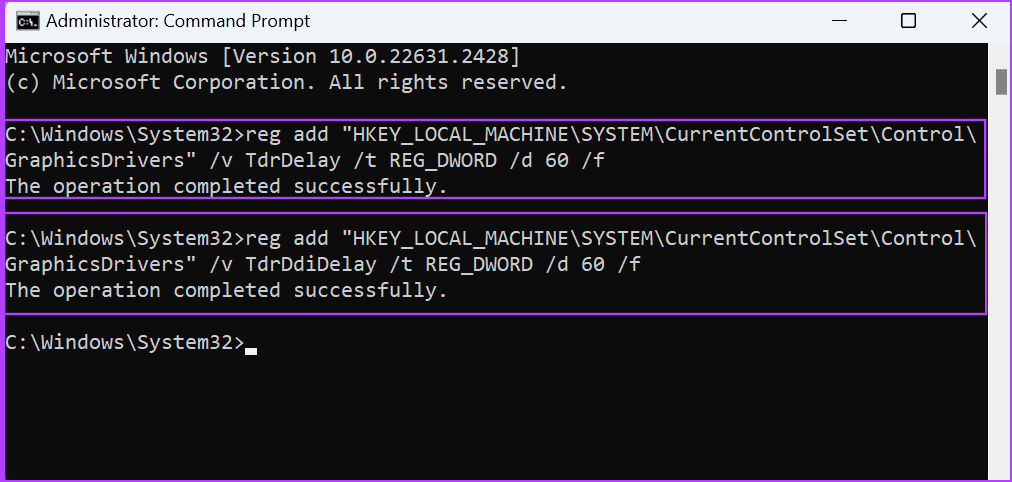
Step 5: Close the Command Prompt window and restart your PC.
If modifying the registry failed to impact the error, try applying a System Restore point. Here’s how:
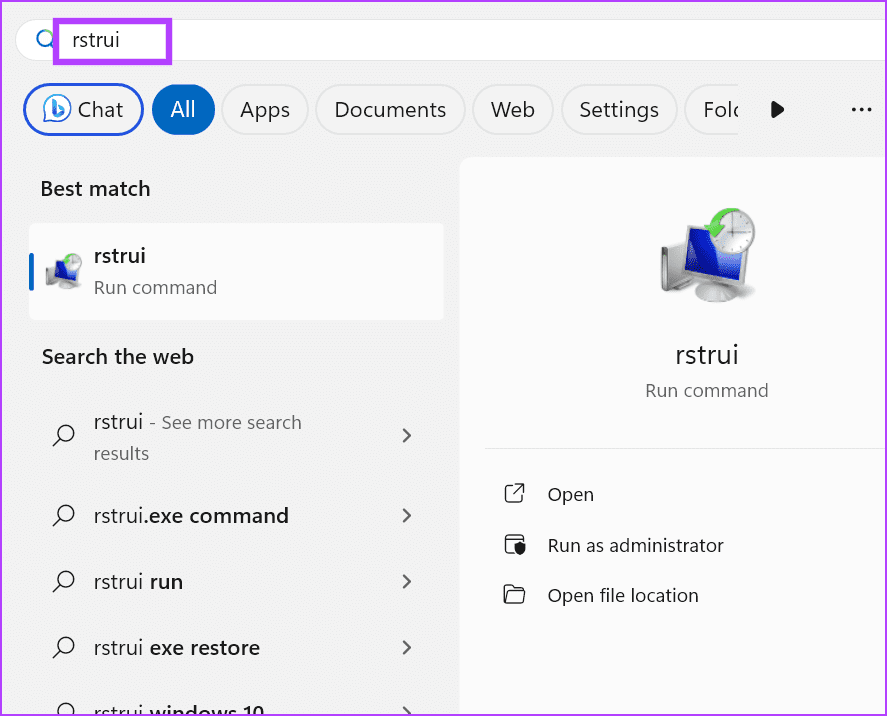
Step 1: Press the Windows key to open the Start menu. Type rstrui in the search bar and press Enter to open the System Restore window.
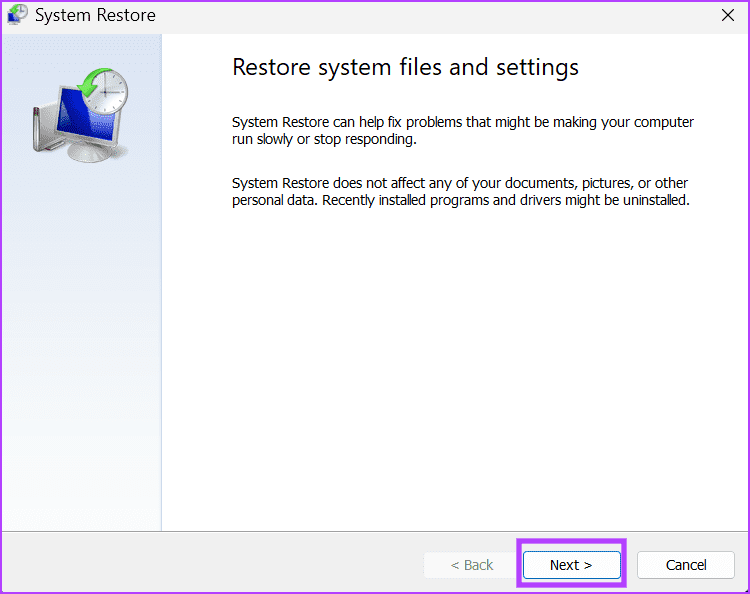
Step 2: Click on the Next button.
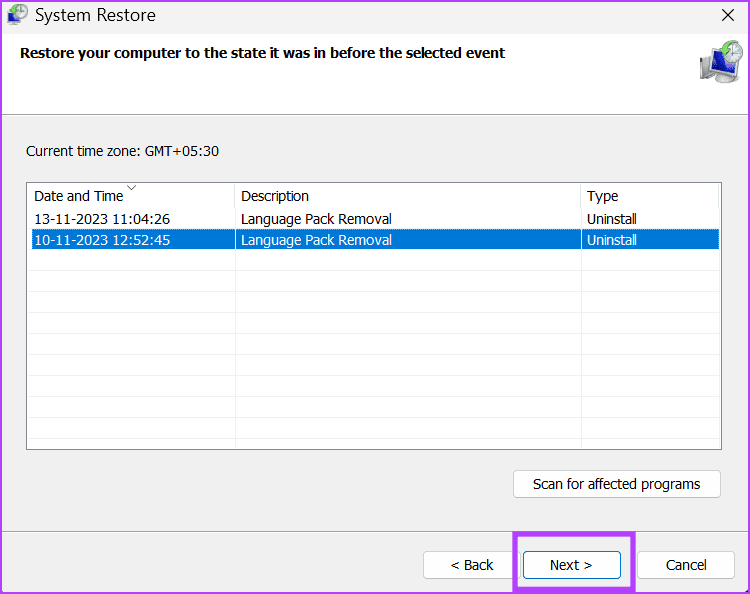
Step 3: Pick a restore point from the list and follow the on-screen instructions to apply the restore points on your PC.
Performing an In-place Upgrade is a great way to keep all the personal files and installed apps. But since it will keep the installed drivers, it is better to reset your PC. You can choose to save the personal files but will have to install the GPU drivers and all other programs manually. Here’s how to do it:
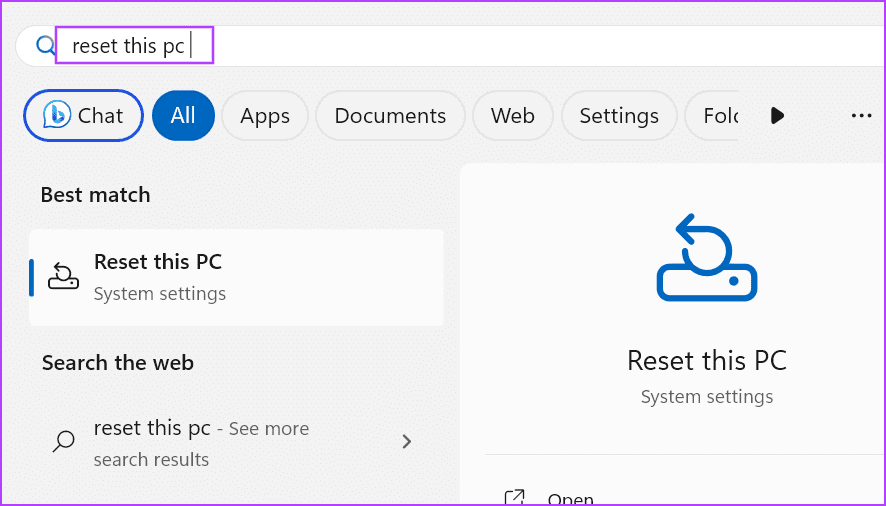
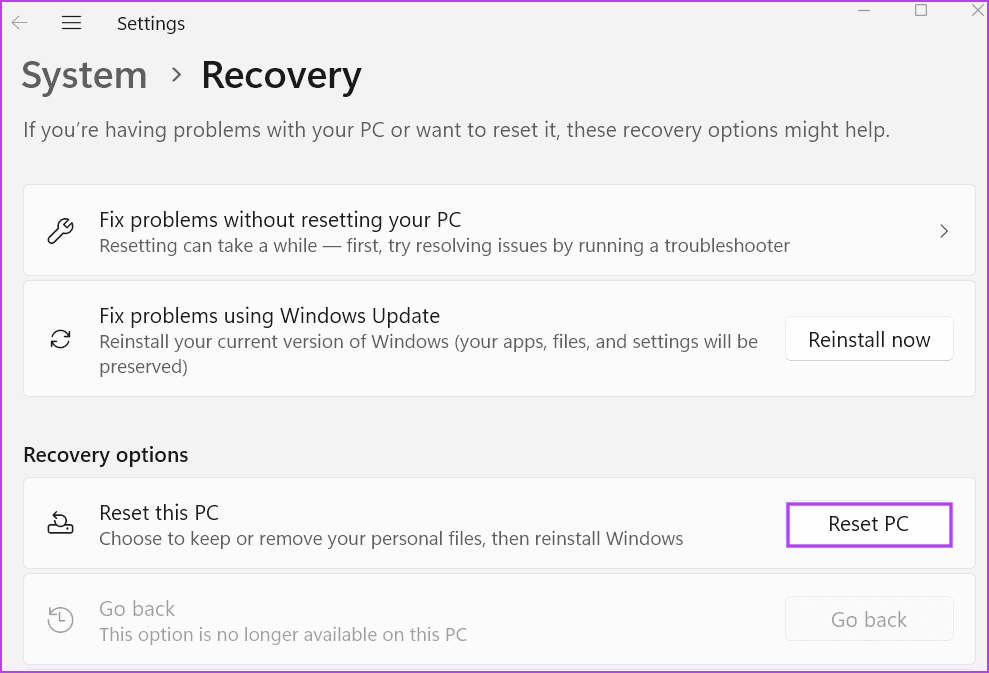
Step 1: Press the Windows key to open the Start menu. Type reset this pc in the search bar and press Enter to open the Settings app.
Step 2: Go to the Recovery options section. Click on the Reset PC button.
Step 3: Select the Keep my files in the Reset this PC window to save your personal files from deletion.
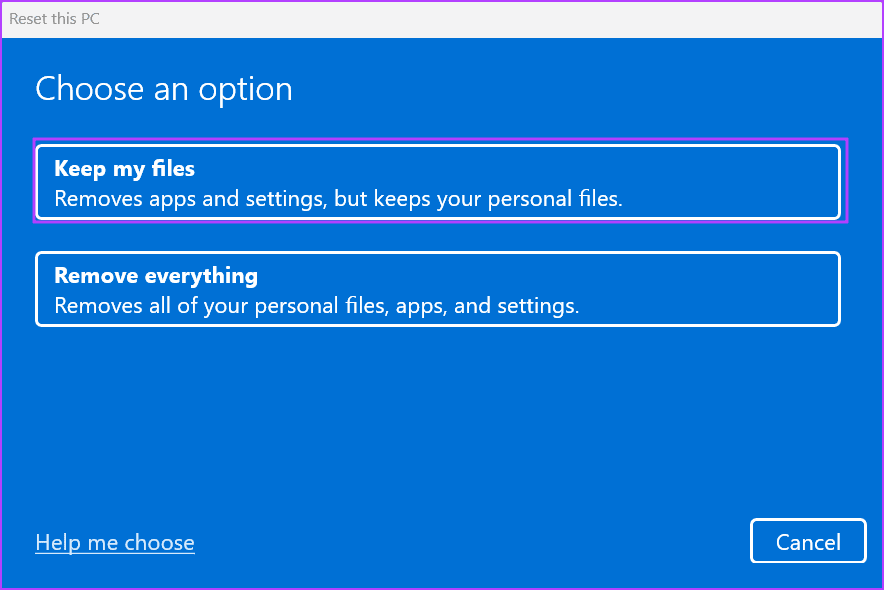
Follow the on-screen instructions to begin the reset process. Your PC will restart several times to reinstall Windows and boot to the lock screen.
After logging in, download and install all the system drivers from your OEM manufacturer’s website or using the driver disk or ISO file provided by your manufacturer. In the case of a custom PC, you must download drivers for each component separately.
After exhausting all the software-related fixes, if you still face the display driver issue, it’s time to get the GPU inspected by a technician for hardware defects. Some users also face issues due to a weak or faulty power supply unit, so ensure get that checked and replaced, if required.
These were the ten methods to fix the ‘Display Driver Failed to Start’ error in Windows 10 and 11 PCs. Restart GPU drivers, inspect physical connections, and use a powered VGA-USB adapter. After that, update or reinstall the drivers, adjust the Windows performance settings, and modify the system registry. Lastly, do a system reset and replace faulty hardware.
Ce qui précède est le contenu détaillé de. pour plus d'informations, suivez d'autres articles connexes sur le site Web de PHP en chinois!
 arithmétique binaire
 Comment utiliser la lecture aléatoire
 Comment acheter de vraies pièces Ripple
 Comment redémarrer le service dans le framework swoole
 commande telnet
 utilisation de la fonction informix
 Comment définir une bordure pointillée CSS
 Dernier classement des échanges de devises numériques
 Quels sont les sept principes des spécifications du code PHP ?