 développement back-end
 Tutoriel Python
 Workflow local : orchestrer l'ingestion de données dans Airtable
Workflow local : orchestrer l'ingestion de données dans Airtable

Introduction
Le cycle de vie global des données commence par la génération de données et leur stockage d'une manière ou d'une autre, quelque part. Appelons cela le cycle de vie des données à un stade précoce et nous explorerons comment automatiser l'ingestion de données dans Airtable à l'aide d'un flux de travail local. Nous couvrirons la configuration d'un environnement de développement, la conception du processus d'ingestion, la création d'un script batch et la planification du flux de travail - en gardant les choses simples, locales/reproductibles et accessibles.
Parlons d’abord d’Airtable. Airtable est un outil puissant et flexible qui allie la simplicité d'une feuille de calcul à la structure d'une base de données. Je le trouve parfait pour organiser des informations, gérer des projets, suivre des tâches, et il dispose d'un niveau gratuit !
Préparer l'environnement
Mise en place de l'environnement de développement
Nous développerions ce projet avec python, alors lancez votre IDE préféré et créez un environnement virtuel
# from your terminal
python -m venv <environment_name>
<environment_name>\Scripts\activate
Pour démarrer avec Airtable, rendez-vous sur le site Web d'Airtable. Une fois que vous avez créé un compte gratuit, vous devrez créer un nouvel espace de travail. Considérez un espace de travail comme un conteneur pour toutes vos tables et données associées.
Ensuite, créez une nouvelle table dans votre espace de travail. Un tableau est essentiellement une feuille de calcul dans laquelle vous stockerez vos données. Définissez les champs (colonnes) de votre tableau pour qu'ils correspondent à la structure de vos données.
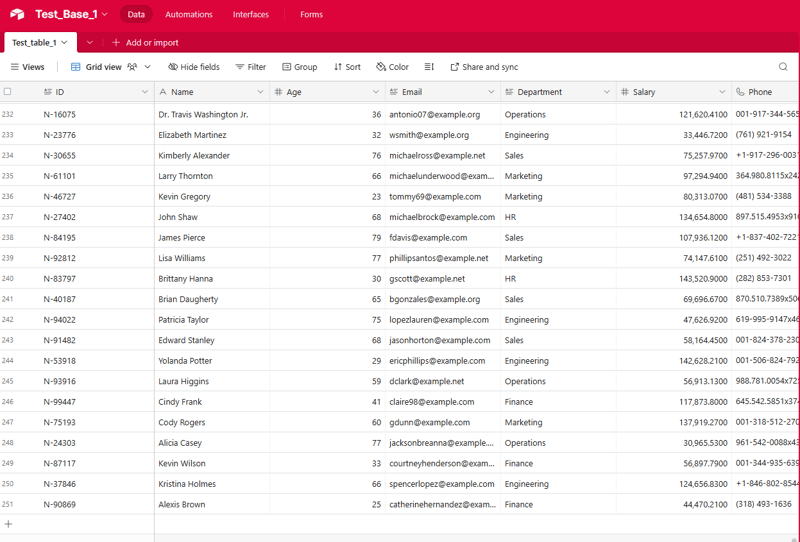
Voici un extrait des champs utilisés dans le tutoriel, c'est une combinaison de Textes, Dates et Nombres :

Pour connecter votre script à Airtable, vous devrez générer une clé API ou un jeton d'accès personnel. Cette clé agit comme un mot de passe, permettant à votre script d'interagir avec vos données Airtable. Pour générer une clé, accédez aux paramètres de votre compte Airtable, recherchez la section API et suivez les instructions pour créer une nouvelle clé.
*N'oubliez pas de conserver votre clé API en sécurité. Évitez de le partager publiquement ou de le confier à des référentiels publics. *
Installation des dépendances nécessaires (Python, bibliothèques, etc.)
Ensuite, appuyez sur exigences.txt. Dans ce fichier .txt placez les packages suivants :
pyairtable
schedule
faker
python-dotenv
exécutez maintenant pip install -r Requirements.txt pour installer les packages requis.
Organisation de la structure du projet
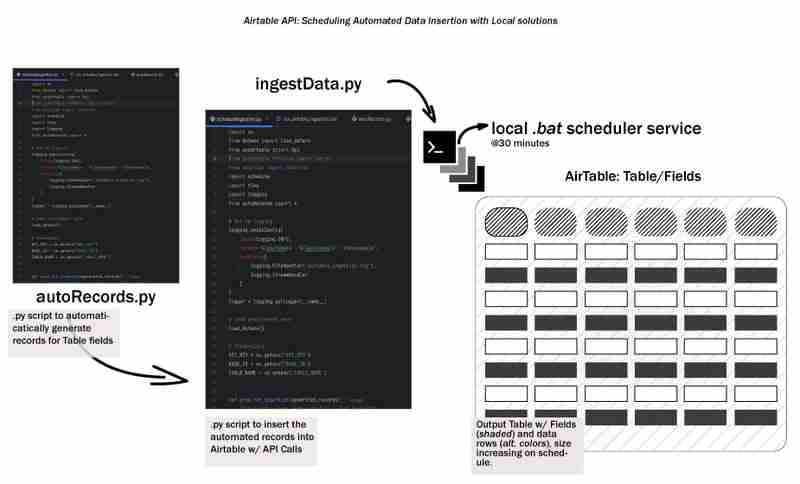
Cette étape est l'endroit où nous créons les scripts, .env est l'endroit où nous stockerons nos informations d'identification, autoRecords.py - pour générer de manière aléatoire des données pour les champs définis et le ingestData.py pour insérer les enregistrements dans Airtable.
Conception du processus d'ingestion : variables d'environnement

# from your terminal
python -m venv <environment_name>
<environment_name>\Scripts\activate
Conception du processus d'ingestion : enregistrements automatisés
Ça a l'air bien, créons un contenu de sous-thème ciblé pour votre article de blog sur ce générateur de données sur les employés.
Générer des données réalistes sur les employés pour vos projets
Lorsque vous travaillez sur des projets impliquant des données sur les employés, il est souvent utile de disposer d'un moyen fiable pour générer des exemples de données réalistes. Que vous construisiez un système de gestion des ressources humaines, un annuaire d'employés ou quoi que ce soit entre les deux, avoir accès à des données de test robustes peut rationaliser votre développement et rendre votre application plus résiliente.
Dans cette section, nous explorerons un script Python qui génère des enregistrements d'employés aléatoires avec une variété de champs pertinents. Cet outil peut être un atout précieux lorsque vous avez besoin de remplir votre application avec des données réalistes rapidement et facilement.
Générer des identifiants uniques
La première étape de notre processus de génération de données consiste à créer des identifiants uniques pour chaque dossier d'employé. Il s’agit d’une considération importante, car votre candidature nécessitera probablement un moyen de référencer de manière unique chaque employé. Notre script comprend une fonction simple pour générer ces identifiants :
pyairtable
schedule
faker
python-dotenv
Cette fonction génère un identifiant unique au format "N-#####", où le numéro est une valeur aléatoire à 5 chiffres. Vous pouvez personnaliser ce format en fonction de vos besoins spécifiques.
Générer des dossiers d'employés aléatoires
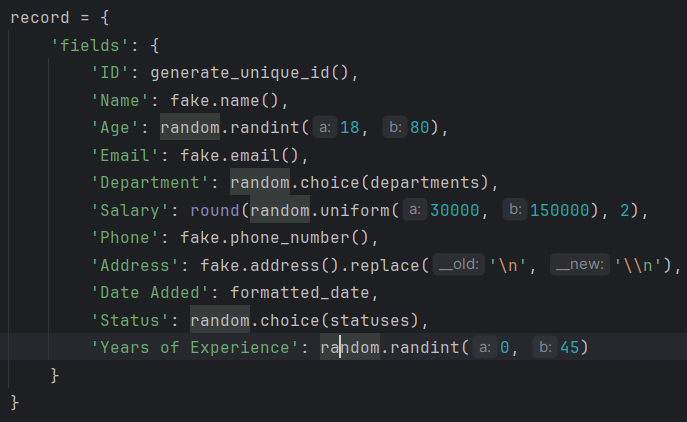
Ensuite, regardons la fonction principale qui génère les enregistrements des employés eux-mêmes. La fonction generate_random_records() prend le nombre d'enregistrements à créer en entrée et renvoie une liste de dictionnaires, où chaque dictionnaire représente un employé avec différents champs :
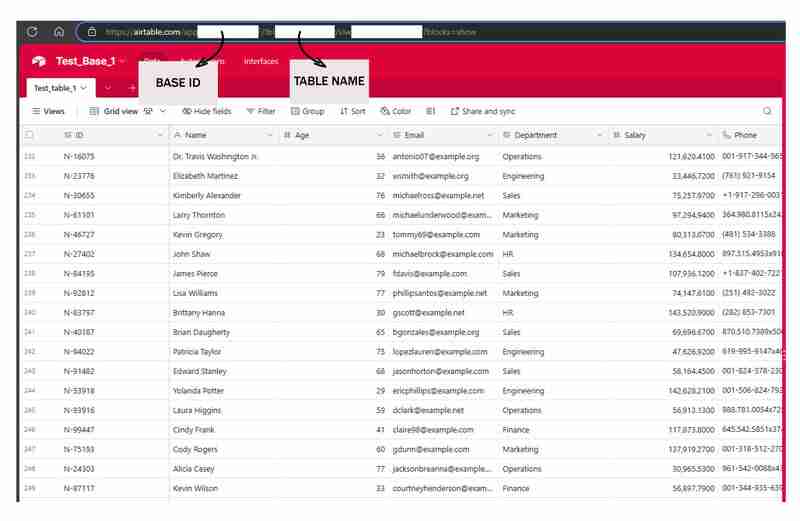
"https://airtable.com/app########/tbl######/viw####?blocks=show"
BASE_ID = 'app########'
TABLE_NAME = 'tbl######'
API_KEY = '#######'
Cette fonction utilise la bibliothèque Faker pour générer des données réalistes pour divers champs d'employés, tels que le nom, l'e-mail, le numéro de téléphone et l'adresse. Il comprend également quelques contraintes de base, comme limiter la tranche d'âge et la tranche salariale à des valeurs raisonnables.
La fonction renvoie une liste de dictionnaires, où chaque dictionnaire représente un enregistrement d'employé dans un format compatible avec Airtable.
Préparation des données pour Airtable
Enfin, regardons la fonction prepare_records_for_airtable(), qui prend la liste des enregistrements des employés et extrait la partie « champs » de chaque enregistrement. C'est le format qu'Airtable attend pour importer des données :
def generate_unique_id():
    """Generate a Unique ID in the format N-#####"""
    return f"N-{random.randint(10000, 99999)}"
Cette fonction simplifie la structure des données, ce qui facilite le travail lors de l'intégration des données générées avec Airtable ou d'autres systèmes.
Rassembler tout cela
Pour utiliser cet outil de génération de données, nous pouvons appeler la fonction generate_random_records() avec le nombre d'enregistrements souhaité, puis transmettre la liste résultante à la fonction prepare_records_for_airtable() :
# from your terminal
python -m venv <environment_name>
<environment_name>\Scripts\activate
Cela générera 2 enregistrements d'employés aléatoires, les imprimera dans leur format d'origine, puis imprimera les enregistrements dans le format plat adapté à Airtable.
Exécuter :
pyairtable
schedule
faker
python-dotenv
Sortie :
"https://airtable.com/app########/tbl######/viw####?blocks=show"
BASE_ID = 'app########'
TABLE_NAME = 'tbl######'
API_KEY = '#######'
Intégration des données générées avec Airtable
En plus de générer des données réalistes sur les employés, notre script fournit également des fonctionnalités permettant d'intégrer de manière transparente ces données avec Airtable
Configuration de la connexion Airtable
Avant de pouvoir commencer à insérer nos données générées dans Airtable, nous devons établir une connexion à la plateforme. Notre script utilise la bibliothèque pyairtable pour interagir avec l'API Airtable. Nous commençons par charger les variables d'environnement nécessaires, y compris la clé API Airtable et l'ID de base et le nom de la table où nous souhaitons stocker les données :
def generate_unique_id():
    """Generate a Unique ID in the format N-#####"""
    return f"N-{random.randint(10000, 99999)}"
Avec ces informations d'identification, nous pouvons ensuite initialiser le client API Airtable et obtenir une référence à la table spécifique avec laquelle nous voulons travailler :
def generate_random_records(num_records=10):
    """
    Generate random records with reasonable constraints
    :param num_records: Number of records to generate
    :return: List of records formatted for Airtable
    """
    records = []

    # Constants
    departments = ['Sales', 'Engineering', 'Marketing', 'HR', 'Finance', 'Operations']
    statuses = ['Active', 'On Leave', 'Contract', 'Remote']

    for _ in range(num_records):
        # Generate date in the correct format
        random_date = datetime.now() - timedelta(days=random.randint(0, 365))
        formatted_date = random_date.strftime('%Y-%m-%dT%H:%M:%S.000Z')

        record = {
            'fields': {
                'ID': generate_unique_id(),
                'Name': fake.name(),
                'Age': random.randint(18, 80),
                'Email': fake.email(),
                'Department': random.choice(departments),
                'Salary': round(random.uniform(30000, 150000), 2),
                'Phone': fake.phone_number(),
                'Address': fake.address().replace('\n', '\n'),  # Escape newlines
                'Date Added': formatted_date,
                'Status': random.choice(statuses),
                'Years of Experience': random.randint(0, 45)
            }
        }
        records.append(record)

    return records
Insertion des données générées
Maintenant que la connexion est établie, nous pouvons utiliser la fonction generate_random_records() de la section précédente pour créer un lot d'enregistrements d'employés, puis les insérer dans Airtable :
def prepare_records_for_airtable(records):
    """Convert records from nested format to flat format for Airtable"""
    return [record['fields'] for record in records]
La fonction prep_for_insertion() est chargée de convertir le format d'enregistrement imbriqué renvoyé par generate_random_records() au format plat attendu par l'API Airtable. Une fois les données préparées, nous utilisons la méthode table.batch_create() pour insérer les enregistrements en une seule opération groupée.
Gestion des erreurs et journalisation
Pour garantir que notre processus d'intégration est robuste et facile à déboguer, nous avons également inclus des fonctionnalités de base de gestion des erreurs et de journalisation. Si des erreurs se produisent pendant le processus d'insertion des données, le script enregistrera le message d'erreur pour faciliter le dépannage :
if __name__ == "__main__":
    records = generate_random_records(2)
    print(records)
    prepared_records = prepare_records_for_airtable(records)
    print(prepared_records)
En combinant les puissantes capacités de génération de données de notre script précédent avec les fonctionnalités d'intégration présentées ici, vous pouvez remplir rapidement et de manière fiable vos applications basées sur Airtable avec des données réalistes sur les employés.
Planification de l'ingestion automatisée de données avec un script batch
Pour rendre le processus d'ingestion de données entièrement automatisé, nous pouvons créer un script batch (fichier .bat) qui exécutera le script Python selon un calendrier régulier. Cela vous permet de configurer l'ingestion de données pour qu'elle se fasse automatiquement sans intervention manuelle.
Voici un exemple de script batch qui peut être utilisé pour exécuter le script ingestData.py :
python autoRecords.py
Décomposons les éléments clés de ce script :
- @echo off : Cette ligne supprime l'impression de chaque commande sur la console, rendant la sortie plus propre.
- echo Démarrage du service d'ingestion de données automatisé Airtable... : Cette ligne imprime un message sur la console, indiquant que le script a démarré.
- cd /d C:UsersbuascPycharmProjectsscrapEngineering : Cette ligne remplace le répertoire de travail actuel par le répertoire du projet où se trouve le script ingestData.py.
- appelez C:UsersbuascPycharmProjectsscrapEngineeringvenv_airtableScriptsactivate.bat : Cette ligne active l'environnement virtuel où sont installées les dépendances Python nécessaires.
- python ingestData.py : Cette ligne exécute le script Python ingestData.py.
- if %ERRORLEVEL% NEQ 0 (... ) : Ce bloc vérifie si le script Python a rencontré une erreur (c'est-à-dire si le ERRORLEVEL n'est pas nul). Si une erreur s'est produite, il imprime un message d'erreur et met le script en pause, vous permettant d'enquêter sur le problème.
Pour planifier l'exécution automatique de ce script batch, vous pouvez utiliser le Planificateur de tâches Windows. Voici un bref aperçu des étapes :
- Ouvrez le menu Démarrer et recherchez « Planificateur de tâches ».
Ou
Windows R et

- Dans le Planificateur de tâches, créez une nouvelle tâche et donnez-lui un nom descriptif (par exemple, « Ingestion de données Airtable »).
- Dans l'onglet "Actions", ajoutez une nouvelle action et spécifiez le chemin d'accès à votre script batch (par exemple, C:UsersbuascPycharmProjectsscrapEngineeringingestData.bat).
- Configurez le calendrier d'exécution du script, par exemple quotidiennement, hebdomadairement ou mensuellement.
- Enregistrez la tâche et activez-la.

Désormais, le planificateur de tâches Windows exécutera automatiquement le script batch aux intervalles spécifiés, garantissant ainsi que vos données Airtable sont mises à jour régulièrement sans intervention manuelle.
Conclusion
Cela peut être un outil inestimable à des fins de test, de développement et même de démonstration.
Tout au long de ce guide, vous avez appris à configurer l'environnement de développement nécessaire, à concevoir un processus d'ingestion, à créer un script batch pour automatiser la tâche et à planifier le flux de travail pour une exécution sans surveillance. Nous comprenons désormais parfaitement comment exploiter la puissance de l'automatisation locale pour rationaliser nos opérations d'ingestion de données et débloquer des informations précieuses à partir d'un écosystème de données alimenté par Airtable.
Maintenant que vous avez configuré le processus automatisé d'ingestion de données, il existe de nombreuses façons de vous appuyer sur cette base et de débloquer encore plus de valeur à partir de vos données Airtable. Je vous encourage à expérimenter le code, à explorer de nouveaux cas d'utilisation et à partager vos expériences avec la communauté.
Voici quelques idées pour vous aider à démarrer :
- Personnaliser la génération de données
- Exploiter les données ingérées [analyse exploratoire des données basée sur Markdown (EDA), créer des tableaux de bord ou des visualisations interactifs à l'aide d'outils tels que Tableau, Power BI ou Plotly, expérimenter des workflows d'apprentissage automatique (prédire le roulement du personnel ou identifier les plus performants)]
- Intégrer avec d'autres systèmes [fonctions cloud, webhooks ou entrepôts de données]
Les possibilités sont infinies ! Je suis ravi de voir comment vous exploitez ce processus automatisé d'ingestion de données et débloquez de nouvelles informations et de la valeur à partir de vos données Airtable. N'hésitez pas à expérimenter, collaborer et partager vos progrès. Je suis là pour vous soutenir tout au long du chemin.
Voir le code complet https://github.com/AkanimohOD19A/scheduling_airtable_insertion, un didacticiel vidéo complet est en route.
Ce qui précède est le contenu détaillé de. pour plus d'informations, suivez d'autres articles connexes sur le site Web de PHP en chinois!

Outils d'IA chauds

Undresser.AI Undress
Application basée sur l'IA pour créer des photos de nu réalistes

AI Clothes Remover
Outil d'IA en ligne pour supprimer les vêtements des photos.

Undress AI Tool
Images de déshabillage gratuites

Clothoff.io
Dissolvant de vêtements AI

Video Face Swap
Échangez les visages dans n'importe quelle vidéo sans effort grâce à notre outil d'échange de visage AI entièrement gratuit !

Article chaud

Outils chauds

Bloc-notes++7.3.1
Éditeur de code facile à utiliser et gratuit

SublimeText3 version chinoise
Version chinoise, très simple à utiliser

Envoyer Studio 13.0.1
Puissant environnement de développement intégré PHP

Dreamweaver CS6
Outils de développement Web visuel

SublimeText3 version Mac
Logiciel d'édition de code au niveau de Dieu (SublimeText3)

Sujets chauds
 Comment résoudre le problème des autorisations rencontré lors de la visualisation de la version Python dans le terminal Linux?
Apr 01, 2025 pm 05:09 PM
Solution aux problèmes d'autorisation Lors de la visualisation de la version Python dans Linux Terminal Lorsque vous essayez d'afficher la version Python dans Linux Terminal, entrez Python ...
 Comment éviter d'être détecté par le navigateur lors de l'utilisation de Fiddler partout pour la lecture de l'homme au milieu?
Apr 02, 2025 am 07:15 AM
Comment éviter d'être détecté lors de l'utilisation de FiddlereVerywhere pour les lectures d'homme dans le milieu lorsque vous utilisez FiddlereVerywhere ...
 Comment copier efficacement la colonne entière d'une dataframe dans une autre dataframe avec différentes structures dans Python?
Apr 01, 2025 pm 11:15 PM
Lorsque vous utilisez la bibliothèque Pandas de Python, comment copier des colonnes entières entre deux frames de données avec différentes structures est un problème courant. Supposons que nous ayons deux dats ...
 Comment Uvicorn écoute-t-il en permanence les demandes HTTP sans servir_forever ()?
Apr 01, 2025 pm 10:51 PM
Comment Uvicorn écoute-t-il en permanence les demandes HTTP? Uvicorn est un serveur Web léger basé sur ASGI. L'une de ses fonctions principales est d'écouter les demandes HTTP et de procéder ...
 Comment gérer les paramètres de requête de liste séparés par les virgules dans FastAPI?
Apr 02, 2025 am 06:51 AM
Fastapi ...
 Comment résoudre les problèmes d'autorisation lors de l'utilisation de la commande python --version dans le terminal Linux?
Apr 02, 2025 am 06:36 AM
Utilisation de Python dans Linux Terminal ...
 Comment enseigner les bases de la programmation novice en informatique dans le projet et les méthodes axées sur les problèmes dans les 10 heures?
Apr 02, 2025 am 07:18 AM
Comment enseigner les bases de la programmation novice en informatique dans les 10 heures? Si vous n'avez que 10 heures pour enseigner à l'informatique novice des connaissances en programmation, que choisissez-vous d'enseigner ...
 Comment obtenir des données d'information en contournant le mécanisme anti-frawler d'Investing.com?
Apr 02, 2025 am 07:03 AM
Comprendre la stratégie anti-rampe d'investissement.com, Beaucoup de gens essaient souvent de ramper les données d'actualités sur Investing.com (https://cn.investing.com/news/latest-news) ...


