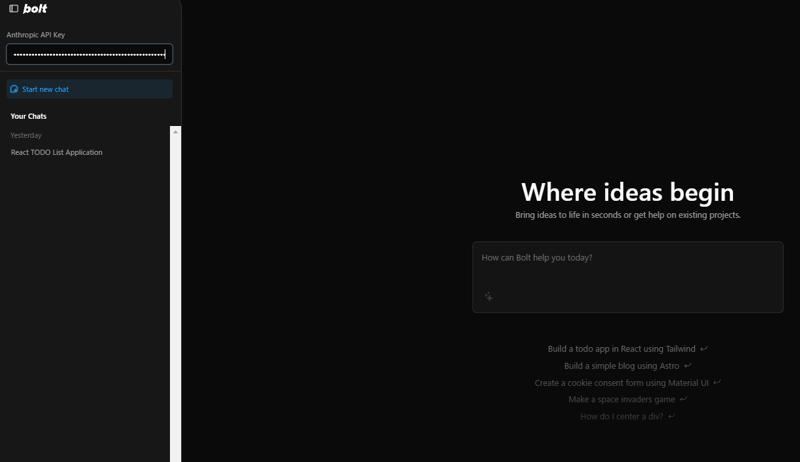
Dans bolt.new, la clé API peut être configurée à l'aide de variables d'environnement, mais cette fois, nous allons la modifier pour permettre la saisie de la clé API directement depuis l'interface.
Nous activerons la saisie de la clé API directement depuis la barre latérale.
Dans la barre latérale, qui affiche actuellement l'historique des discussions, nous ajoutons un nouveau formulaire en haut pour saisir la clé API.
Pour y parvenir, modifiez le fichier bolt.new/app/components/sidebar/Menu.client.tsx.
Tout d'abord, importez la fonction pour gérer la saisie de la clé API :
import { ApiKeyInput } from '~/components/sidebar/ApiKeyInput';
Le fichier bolt.new/app/components/sidebar/ApiKeyInput.tsx sera créé ultérieurement.
Ensuite, ajoutez un formulaire pour saisir la clé API dans le menu.
...
  return (
      <motion.div
        ref={menuRef}
        initial="closed"
        animate={open ? 'open' : 'closed'}
        variants={menuVariants}
        className="flex flex-col side-menu fixed top-0 w-[350px] h-full bg-bolt-elements-background-depth-2 border-r rounded-r-3xl border-bolt-elements-borderColor z-sidebar shadow-xl shadow-bolt-elements-sidebar-dropdownShadow text-sm"
      >
        <div className="flex items-center h-[var(--header-height)]">{/* Placeholder */}</div>
        <div className="flex-1 flex flex-col h-full w-full overflow-hidden">
          <ApiKeyInput /> {/* Add this line */}
          <div className="p-4">
...
Le code ajouté doit être placé ici.
Ensuite, créez le fichier bolt.new/app/components/sidebar/ApiKeyInput.tsx avec le contenu suivant :
import React, { useState } from 'react';

export function ApiKeyInput() {
  const [apiKey, setApiKey] = useState(localStorage.getItem('apiKey') || '');

  const handleChange = (event: React.ChangeEvent<HTMLInputElement>) => {
    const value = event.target.value;
    setApiKey(value);
    localStorage.setItem('apiKey', value);
    // Trigger API key change event
    window.dispatchEvent(new Event('apiKeyChanged'));
  };

  return (
    <div className="px-4 py-3 border-b border-bolt-elements-borderColor">
      <label
        htmlFor="api-key"
        className="block text-bolt-elements-textSecondary text-sm mb-2"
      >
        Anthropic API Key
      </label>
      <input
        type="password"
       >


<p>This component will allow the user to input and store the API key in localStorage and trigger a custom event when the key is changed.  </p>

<h3>


  Chat Screen Modification
</h3>

<p>Update the chat screen to disable message sending until an API key is entered.<br><br>
Below is the revised code for bolt.new/app/components/chat/BaseChat.client.tsx, with additions marked between // Append start and // Append end:<br>
</p>

<pre class="brush:php;toolbar:false">export const BaseChat = React.forwardRef<HTMLDivElement, BaseChatProps>(
  (
    {
      textareaRef,
      messageRef,
      scrollRef,
      showChat = true,
      chatStarted = false,
      isStreaming = false,
      enhancingPrompt = false,
      promptEnhanced = false,
      messages,
      input = '',
      sendMessage,
      handleInputChange,
      enhancePrompt,
      handleStop,
    },
    ref,
  ) => {
    // Append start
    const [isApiKeyMissing, setIsApiKeyMissing] = useState(true); // Track API key presence

    useEffect(() => {
      const checkApiKey = () => {
        const apiKey = localStorage.getItem('apiKey');
        console.log('apiKey:', apiKey);
        setIsApiKeyMissing(!apiKey);
      };

      // Initial check
      checkApiKey();

      // Add listener for API key changes
      window.addEventListener('apiKeyChanged', checkApiKey);

      return () => {
        window.removeEventListener('apiKeyChanged', checkApiKey);
      };
    }, []);
    // Append end

    const TEXTAREA_MAX_HEIGHT = chatStarted ? 400 : 200;

    return (
      <div
        ref={ref}
        className={classNames(
          styles.BaseChat,
          'relative flex h-full w-full overflow-hidden bg-bolt-elements-background-depth-1',
        )}
        data-chat-visible={showChat}
      >
        <ClientOnly>{() => <Menu />}</ClientOnly>
        <div ref={scrollRef} className="flex overflow-y-auto w-full h-full">
          <div className={classNames(styles.Chat, 'flex flex-col flex-grow min-w-[var(--chat-min-width)] h-full')}>
            {!chatStarted && (
              <div>


<p>This ensures that users cannot send messages until they enter an API key, with clear visual feedback provided.</p>

<h3>


  Passing the API Key to the LLM
</h3>

<p>To ensure the API key entered on the interface is accessible to the LLM, update the file bolt.new/app/lib/.server/llm/api-key.ts as follows:<br>
</p>

<pre class="brush:php;toolbar:false">import { env } from 'node:process';

export function getAPIKey(cloudflareEnv: Env) {
  // Append start
  const localApiKey = typeof window !== 'undefined' ? localStorage.getItem('apiKey') : null;
  return localApiKey || env.ANTHROPIC_API_KEY || cloudflareEnv.ANTHROPIC_API_KEY;
  // Append end
}
Cela garantit que le système donne la priorité à la clé API saisie via l'interface utilisateur (localApiKey). Si aucune clé n'est trouvée dans localStorage, elle reviendra aux variables d'environnement (env.ANTHROPIC_API_KEY ou cloudflareEnv.ANTHROPIC_API_KEY).
Après avoir terminé les modifications, utilisez les commandes suivantes pour créer et démarrer bolt.new :
pnpm run build
pnpm run start


Ces étapes garantissent que la fonctionnalité se comporte comme prévu après les modifications.
Ce qui précède est le contenu détaillé de. pour plus d'informations, suivez d'autres articles connexes sur le site Web de PHP en chinois!
 Comment importer des données dans Access
 La différence entre un téléphone de remplacement officiel et un téléphone neuf
 Que signifie le réseau maillé ?
 Comment ouvrir le fichier php
 format pdf au format xml
 Quels sont les moteurs de workflow Java ?
 Fonction d'assistant de pilote Windows
 outil de test d'application