

Prédiction de prix Bitcoin à l'aide de mlops

Vous ne savez pas grand-chose sur le bitcoin ou ses fluctuations de prix, mais vous souhaitez prendre des décisions d'investissement pour faire des bénéfices? Ce modèle d'apprentissage automatique a le dos. Il peut prédire les prix bien mieux qu'un astrologue. Dans cet article, nous construirons un modèle ML pour prévoir et prédire le prix du bitcoin, en utilisant ZenML et MLFlow. Commençons donc notre voyage pour comprendre comment n'importe qui peut utiliser des outils ML et MLOPS pour prédire l'avenir.
Objectifs d'apprentissage
- Apprenez à récupérer efficacement les données en direct en utilisant API.
- comprendre ce qu'est le zenml, pourquoi nous utilisons mlflow, et comment vous pouvez l'intégrer avec Zenml.
- Explorez le processus de déploiement des modèles d'apprentissage automatique, de l'idée à la production.
- Découvrez comment créer une application de rationalisation conviviale pour les prédictions de modèle d'interactive d'apprentissage automatique.
Cet article a été publié dans le cadre du Data Science Blogathon.
Table des matières
- Instruction Problème
- Implémentation du projet
- Étape 1: Accéder à l'API
- Étape 2: Connexion à la base de données à l'aide de MongoDB
- Étape 3: Intégration de Mlflow avec Zenml
- Étape 4: Data Ingrestion STAPE
- 5: Nettoyage des données
- Étape 6: Engineering des fonctionnalités
- Étape 7: Fractionnement des données
- Étape 8: Formation du modèle
- Étape 9: Évaluation du modèle
- Étape 10: Déploiement du modèle
- Étape 11: Frépater l'application Stream
- Fréquerie. Questions
Instruction Problème
Les prix du bitcoin sont très volatils et faire des prédictions est presque impossible. Dans notre projet, nous utilisons le meilleur pratique de Mlops pour construire un modèle LSTM pour prévoir les prix et les tendances bitcoin et les tendances.
Avant de mettre en œuvre le projet, examinons l'architecture du projet.
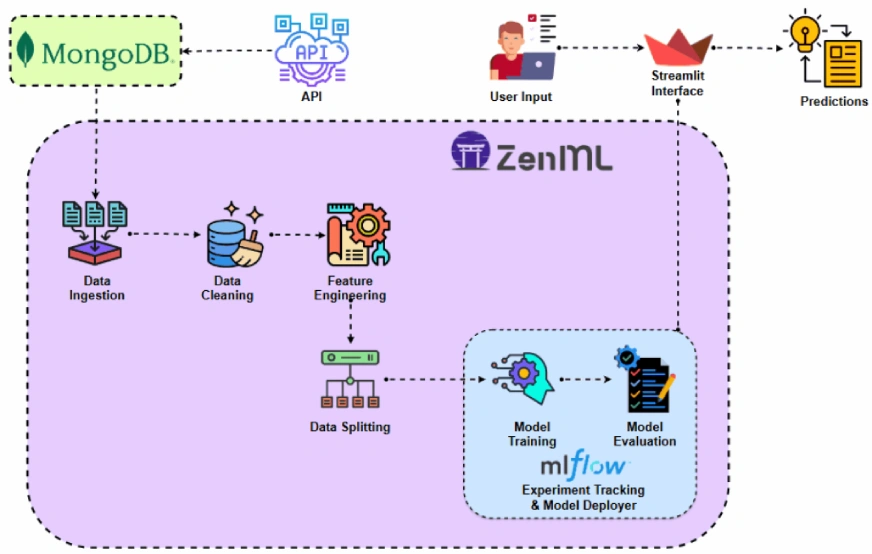
Implémentation du projet
Commençons par accéder à l'API.
Pourquoi faisons-nous cela? Vous pouvez obtenir des données historiques de prix Bitcoin à partir de différents ensembles de données, mais avec une API, nous pouvons avoir accès aux données du marché en direct.
Étape 1: Accès à l'API
- Inscrivez-vous à l'accès à l'API:
Une fois que vous vous êtes inscrit sur la page API ThecData. Vous pouvez obtenir la clé API gratuite à partir de cette pagehttps: //developers.cryptocompare.com/documentation/data-api/index_cc_v1_historical_days
- Répondez des données de prix Bitcoin:
Avec le code ci-dessous, vous pouvez récupérer les données de prix Bitcoin de l'API CCDATA et les convertir en un Pandas DataFrame. Gardez également la clé API dans le fichier .env.
import requests
import pandas as pd
from dotenv import load_dotenv
import os

# Load the .env file
load_dotenv()

def fetch_crypto_data(api_uri):
    response = requests.get(
        api_uri,
        params={
            "market": "cadli",
            "instrument": "BTC-USD",
            "limit": 5000,
            "aggregate": 1,
            "fill": "true",
            "apply_mapping": "true",
            "response_format": "JSON"
        },
        headers={"Content-type": "application/json; charset=UTF-8"}
    )

    if response.status_code == 200:
        print('API Connection Successful! \nFetching the data...')

        data = response.json()
        data_list = data.get('Data', [])

        df = pd.DataFrame(data_list)

        df['DATE'] = pd.to_datetime(df['TIMESTAMP'], unit='s')

        return df  # Return the DataFrame
    else:
raise Exception(f"API Error: {response.status_code} - {response.text}")Étape 2: Connexion à la base de données à l'aide de MongoDB
MongoDB est une base de données NoSQL connue pour son adaptabilité, son extensibilité et sa capacité à stocker des données non structurées dans un format de type JSON.
import requests
import pandas as pd
from dotenv import load_dotenv
import os

# Load the .env file
load_dotenv()

def fetch_crypto_data(api_uri):
    response = requests.get(
        api_uri,
        params={
            "market": "cadli",
            "instrument": "BTC-USD",
            "limit": 5000,
            "aggregate": 1,
            "fill": "true",
            "apply_mapping": "true",
            "response_format": "JSON"
        },
        headers={"Content-type": "application/json; charset=UTF-8"}
    )

    if response.status_code == 200:
        print('API Connection Successful! \nFetching the data...')

        data = response.json()
        data_list = data.get('Data', [])

        df = pd.DataFrame(data_list)

        df['DATE'] = pd.to_datetime(df['TIMESTAMP'], unit='s')

        return df  # Return the DataFrame
    else:
raise Exception(f"API Error: {response.status_code} - {response.text}")Ce code se connecte à MongoDB, récupère les données de prix Bitcoin via une API et met à jour la base de données avec toutes les nouvelles entrées après la dernière date enregistrée.
Présentation du zenml
zenmlis Une plate-forme open source adaptée aux opérations d'apprentissage automatique, soutenant la création de pipelines flexibles et prêts pour la production. De plus, ZenML s'intègre à plusieurs outils d'apprentissage automatique LikeMlflow, Bentoml, etc., pour créer des pipelines ML sans couture.
⚠️ Si vous êtes un utilisateur de Windows, essayez d'installer WSL sur votre système. Zenml ne prend pas en charge les fenêtres.
Dans ce projet, nous implémenterons un pipeline traditionnel, qui utilise ZENML, et nous intégrerons MLFlow à ZenML, pour le suivi des expériences.
pré-requis et commandes de base zenml
- Python 3.12 ou supérieur: Vous pouvez l'obtenir à partir d'ici: https: //www.python.org/downloads/
- Activez votre environnement virtuel:
import os
from pymongo import MongoClient
from dotenv import load_dotenv
from data.management.api import fetch_crypto_data  # Import the API function
import pandas as pd

load_dotenv()

MONGO_URI = os.getenv("MONGO_URI")
API_URI = os.getenv("API_URI")

client = MongoClient(MONGO_URI, ssl=True, ssl_certfile=None, ssl_ca_certs=None)
db = client['crypto_data']
collection = db['historical_data']

try:
    latest_entry = collection.find_one(sort=[("DATE", -1)])  # Find the latest date
    if latest_entry:
        last_date = pd.to_datetime(latest_entry['DATE']).strftime('%Y-%m-%d')
    else:
        last_date = '2011-03-27'  # Default start date if MongoDB is empty

    print(f"Fetching data starting from {last_date}...")
    new_data_df = fetch_crypto_data(API_URI)

    if latest_entry:
        new_data_df = new_data_df[new_data_df['DATE'] > last_date]

    if not new_data_df.empty:
        data_to_insert = new_data_df.to_dict(orient='records')
        result = collection.insert_many(data_to_insert)
        print(f"Inserted {len(result.inserted_ids)} new records into MongoDB.")
    else:
        print("No new data to insert.")
except Exception as e:
print(f"An error occurred: {e}")- Commandes zenml:
Toutes les commandes zenml de base ainsi que leurs fonctionnalités sont fournies ci-dessous:
#create a virtual environment
python3 -m venv venv

#Activate your virtual environmnent in your project folder
source venv/bin/activate
Étape 3: Intégration de mlflow avec zenml
Nous utilisons MLFlow pour le suivi des expériences, pour suivre nos valeurs de modèle, d'artefacts, de métriques et d'hyperparamètre. Nous enregistrons MLFlow pour le suivi des expériences et le déploiement du modèle ici:
#Install zenml
pip install zenml

#To Launch zenml server and dashboard locally
pip install "zenml[server]"

#To check the zenml Version:
zenml version

#To initiate a new repository
zenml init

#To run the dashboard locally:
zenml login --local

#To know the status of our zenml Pipelines
zenml show

#To shutdown the zenml server
zenml clean
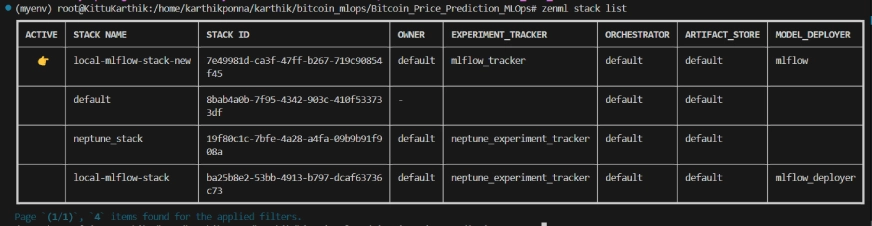
Liste de pile zenml
Structure du projet
Ici, vous pouvez voir la disposition du projet. Maintenant, discutons-le un par un en détail.
#Integrating mlflow with ZenML
zenml integration install mlflow -y

#Register the experiment tracker
zenml experiment-tracker register mlflow_tracker --flavor=mlflow

#Registering the model deployer
zenml model-deployer register mlflow --flavor=mlflow

#Registering the stack
zenml stack register local-mlflow-stack-new -a default -o default -d mlflow -e mlflow_tracker --set

#To view the stack list
zenml stack --list
Étape 4: Ingestion de données
Nous ingérons d'abord des données de l'API à MongoDB et les convertissons en pandas dataframe.
bitcoin_price_prediction_mlops/        # Project directory
├── data/
│   └── management/
│       ├── api_to_mongodb.py          # Code to fetch data and save it to MongoDB
│       └── api.py                     # API-related utility functions
│
├── pipelines/
│   ├── deployment_pipeline.py         # Deployment pipeline
│   └── training_pipeline.py           # Training pipeline
│
├── saved_models/                      # Directory for storing trained models
├── saved_scalers/                     # Directory for storing scalers used in data preprocessing
│
├── src/                               # Source code
│   ├── data_cleaning.py               # Data cleaning and preprocessing
│   ├── data_ingestion.py              # Data ingestion
│   ├── data_splitter.py               # Data splitting
│   ├── feature_engineering.py         # Feature engineering
│   ├── model_evaluation.py            # Model evaluation
│   └── model_training.py              # Model training
│
├── steps/                             # ZenML steps
│   ├── clean_data.py                  # ZenML step for cleaning data
│   ├── data_splitter.py               # ZenML step for data splitting
│   ├── dynamic_importer.py            # ZenML step for importing dynamic data
│   ├── feature_engineering.py         # ZenML step for feature engineering
│   ├── ingest_data.py                 # ZenML step for data ingestion
│   ├── model_evaluation.py            # ZenML step for model evaluation
│   ├── model_training.py              # ZenML step for training the model
│   ├── prediction_service_loader.py   # ZenML step for loading prediction services
│   ├── predictor.py                   # ZenML step for prediction
│   └── utils.py                       # Utility functions for steps
│
├── .env                               # Environment variables file
├── .gitignore                         # Git ignore file
│
├── app.py                             # Streamlit user interface app
│
├── README.md                          # Project documentation
├── requirements.txt                   # List of required packages
├── run_deployment.py                  # Code for running deployment and prediction pipeline
├── run_pipeline.py                    # Code for running training pipeline
└── .zen/                              # ZenML directory (created automatically after ZenML initialization)
Nous ajoutons @Step en tant que décorateur à la fonction ingest_data () pour le déclarer comme une étape de notre pipeline de formation. De la même manière, nous écrire du code pour chaque étape de l'architecture du projet et créerons le pipeline.
Pour voir comment j'ai utilisé le décorateur @step , consultez le lien github ci-dessous (dossier des étapes) pour passer par le code pour les autres étapes du pipeline, c'est-à-dire le nettoyage des données, l'ingénierie des fonctionnalités, la fractionnement des données, la formation du modèle et l'évaluation du modèle.
Étape 5: Nettoyage des données
Dans cette étape, nous créerons différentes stratégies pour nettoyer les données ingérées. Nous supprimerons les colonnes indésirables et les valeurs manquantes dans les données.
import requests
import pandas as pd
from dotenv import load_dotenv
import os

# Load the .env file
load_dotenv()

def fetch_crypto_data(api_uri):
    response = requests.get(
        api_uri,
        params={
            "market": "cadli",
            "instrument": "BTC-USD",
            "limit": 5000,
            "aggregate": 1,
            "fill": "true",
            "apply_mapping": "true",
            "response_format": "JSON"
        },
        headers={"Content-type": "application/json; charset=UTF-8"}
    )

    if response.status_code == 200:
        print('API Connection Successful! \nFetching the data...')

        data = response.json()
        data_list = data.get('Data', [])

        df = pd.DataFrame(data_list)

        df['DATE'] = pd.to_datetime(df['TIMESTAMP'], unit='s')

        return df  # Return the DataFrame
    else:
raise Exception(f"API Error: {response.status_code} - {response.text}")Étape 6: Fonctionne d'ingénierie
Cette étape prend les données nettoyées à partir de l'étape DATA_CLEANING antérieure. Nous créons de nouvelles fonctionnalités telles que la moyenne mobile simple (SMA), la moyenne mobile exponentielle (EMA) et les statistiques décalées et le roulement pour capturer les tendances, réduire le bruit et faire des prédictions plus fiables à partir des données de la série temporelle. De plus, nous adaptons les fonctionnalités et les variables cibles en utilisant la mise à l'échelle de Minmax.
import os
from pymongo import MongoClient
from dotenv import load_dotenv
from data.management.api import fetch_crypto_data  # Import the API function
import pandas as pd

load_dotenv()

MONGO_URI = os.getenv("MONGO_URI")
API_URI = os.getenv("API_URI")

client = MongoClient(MONGO_URI, ssl=True, ssl_certfile=None, ssl_ca_certs=None)
db = client['crypto_data']
collection = db['historical_data']

try:
    latest_entry = collection.find_one(sort=[("DATE", -1)])  # Find the latest date
    if latest_entry:
        last_date = pd.to_datetime(latest_entry['DATE']).strftime('%Y-%m-%d')
    else:
        last_date = '2011-03-27'  # Default start date if MongoDB is empty

    print(f"Fetching data starting from {last_date}...")
    new_data_df = fetch_crypto_data(API_URI)

    if latest_entry:
        new_data_df = new_data_df[new_data_df['DATE'] > last_date]

    if not new_data_df.empty:
        data_to_insert = new_data_df.to_dict(orient='records')
        result = collection.insert_many(data_to_insert)
        print(f"Inserted {len(result.inserted_ids)} new records into MongoDB.")
    else:
        print("No new data to insert.")
except Exception as e:
print(f"An error occurred: {e}")Étape 7: Fractionnement des données
Maintenant, nous avons divisé les données traitées en ensembles de données de formation et de test dans le rapport de 80:20.
#create a virtual environment
python3 -m venv venv

#Activate your virtual environmnent in your project folder
source venv/bin/activate
Étape 8: formation du modèle
Dans cette étape, nous formons le modèle thelstm avec un arrêt précoce pour empêcher le sur-ajustement, et en utilisant la journalisation automatisée de MLFlow pour suivre notre modèle et nos expériences et enregistrer le modèle formé comme lstm_model.keras .
#Install zenml
pip install zenml

#To Launch zenml server and dashboard locally
pip install "zenml[server]"

#To check the zenml Version:
zenml version

#To initiate a new repository
zenml init

#To run the dashboard locally:
zenml login --local

#To know the status of our zenml Pipelines
zenml show

#To shutdown the zenml server
zenml clean
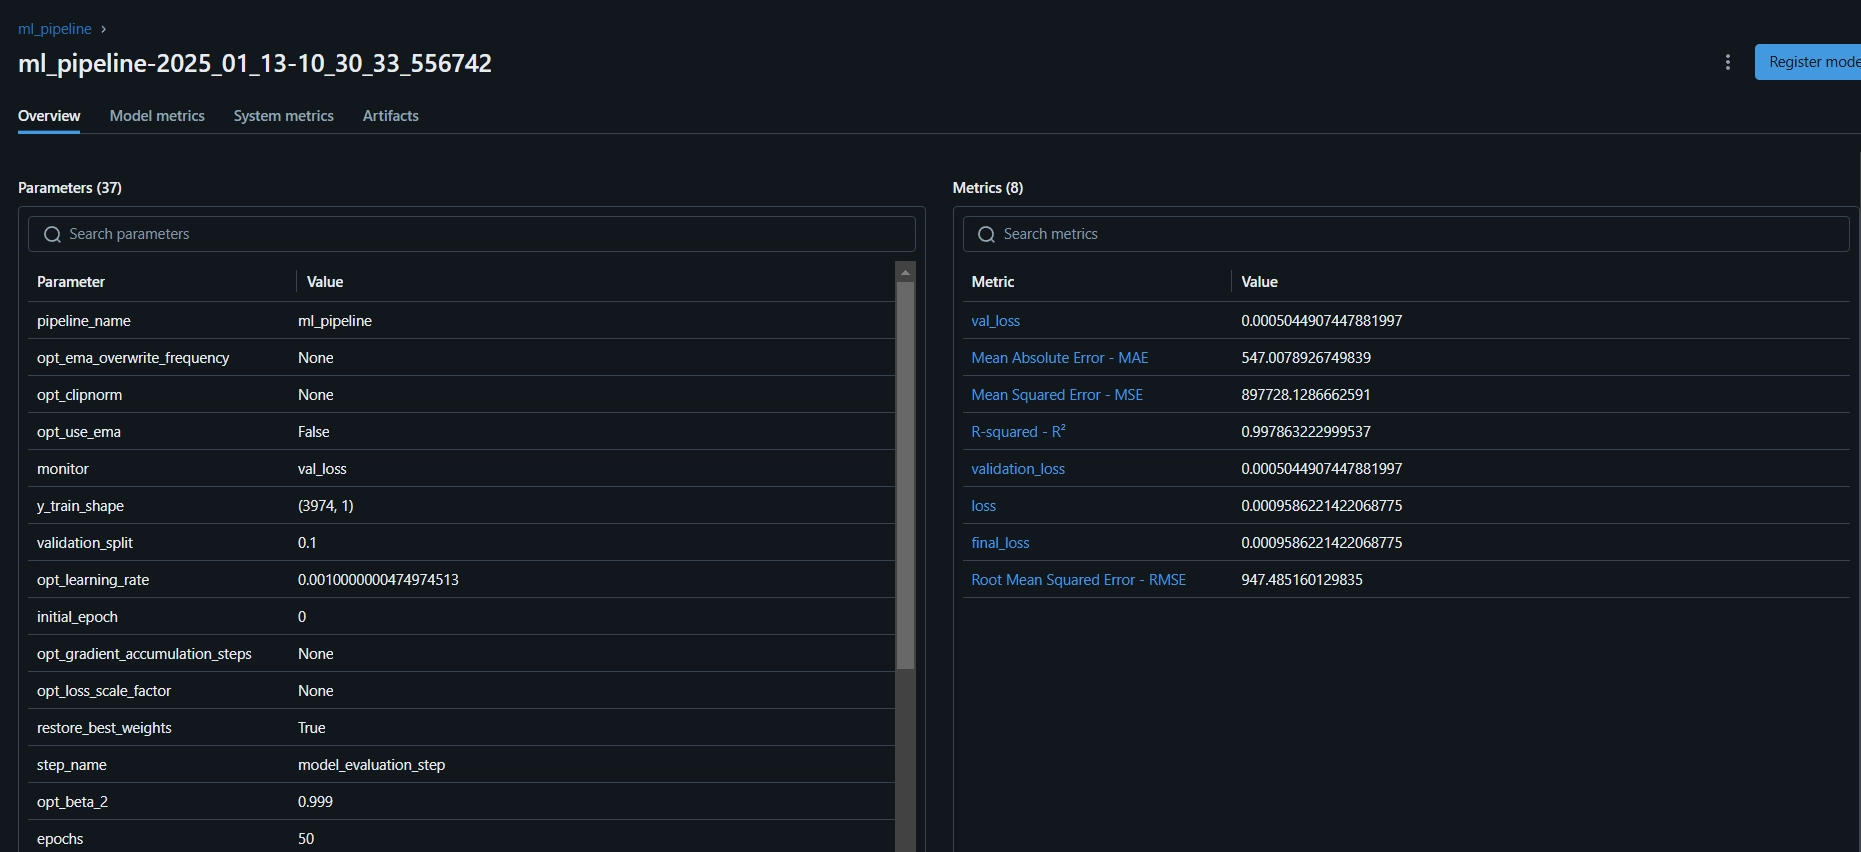
Étape 9: Évaluation du modèle
Comme il s'agit d'un problème de régression, nous utilisons des mesures d'évaluation comme l'erreur quadratique moyenne (MSE), l'erreur quadratique moyenne (MSE), l'erreur absolue moyenne (MAE) et le r-carré.
#Integrating mlflow with ZenML
zenml integration install mlflow -y

#Register the experiment tracker
zenml experiment-tracker register mlflow_tracker --flavor=mlflow

#Registering the model deployer
zenml model-deployer register mlflow --flavor=mlflow

#Registering the stack
zenml stack register local-mlflow-stack-new -a default -o default -d mlflow -e mlflow_tracker --set

#To view the stack list
zenml stack --list
Maintenant, nous organiserons toutes les étapes ci-dessus dans un pipeline. Créons un nouveau fichier Training_pipeline.py.
bitcoin_price_prediction_mlops/        # Project directory
├── data/
│   └── management/
│       ├── api_to_mongodb.py          # Code to fetch data and save it to MongoDB
│       └── api.py                     # API-related utility functions
│
├── pipelines/
│   ├── deployment_pipeline.py         # Deployment pipeline
│   └── training_pipeline.py           # Training pipeline
│
├── saved_models/                      # Directory for storing trained models
├── saved_scalers/                     # Directory for storing scalers used in data preprocessing
│
├── src/                               # Source code
│   ├── data_cleaning.py               # Data cleaning and preprocessing
│   ├── data_ingestion.py              # Data ingestion
│   ├── data_splitter.py               # Data splitting
│   ├── feature_engineering.py         # Feature engineering
│   ├── model_evaluation.py            # Model evaluation
│   └── model_training.py              # Model training
│
├── steps/                             # ZenML steps
│   ├── clean_data.py                  # ZenML step for cleaning data
│   ├── data_splitter.py               # ZenML step for data splitting
│   ├── dynamic_importer.py            # ZenML step for importing dynamic data
│   ├── feature_engineering.py         # ZenML step for feature engineering
│   ├── ingest_data.py                 # ZenML step for data ingestion
│   ├── model_evaluation.py            # ZenML step for model evaluation
│   ├── model_training.py              # ZenML step for training the model
│   ├── prediction_service_loader.py   # ZenML step for loading prediction services
│   ├── predictor.py                   # ZenML step for prediction
│   └── utils.py                       # Utility functions for steps
│
├── .env                               # Environment variables file
├── .gitignore                         # Git ignore file
│
├── app.py                             # Streamlit user interface app
│
├── README.md                          # Project documentation
├── requirements.txt                   # List of required packages
├── run_deployment.py                  # Code for running deployment and prediction pipeline
├── run_pipeline.py                    # Code for running training pipeline
└── .zen/                              # ZenML directory (created automatically after ZenML initialization)
Ici, @Pipeline Le décorateur est utilisé pour définir la fonctionml_pipeline () comme pipeline en zenml.
Pour afficher le tableau de bord pour le pipeline d'entraînement, exécutez simplement le script run_pipeline.py. Créons un fichier run_pipeline.py.
import os
import logging
from pymongo import MongoClient
from dotenv import load_dotenv
from zenml import step
import pandas as pd

# Load the .env file
load_dotenv()

# Get MongoDB URI from environment variables
MONGO_URI = os.getenv("MONGO_URI")

def fetch_data_from_mongodb(collection_name:str, database_name:str):
    """
    Fetches data from MongoDB and converts it into a pandas DataFrame.

    collection_name:
        Name of the MongoDB collection to fetch data.
    database_name:
        Name of the MongoDB database.
    return:
        A pandas DataFrame containing the data
    """
    # Connect to the MongoDB client
    client = MongoClient(MONGO_URI)
    db = client[database_name]  # Select the database
    collection = db[collection_name]  # Select the collection

    # Fetch all documents from the collection
    try:
        logging.info(f"Fetching data from MongoDB collection: {collection_name}...")
        data = list(collection.find())  # Convert cursor to a list of dictionaries

        if not data:
            logging.info("No data found in the MongoDB collection.")


        # Convert the list of dictionaries into a pandas DataFrame
        df = pd.DataFrame(data)

        # Drop the MongoDB ObjectId field if it exists (optional)
        if '_id' in df.columns:
            df = df.drop(columns=['_id'])

        logging.info("Data successfully fetched and converted to a DataFrame!")
        return df

    except Exception as e:
        logging.error(f"An error occurred while fetching data: {e}")
        raise e


@step(enable_cache=False)
def ingest_data(collection_name: str = "historical_data", database_name: str = "crypto_data") -> pd.DataFrame:

    logging.info("Started data ingestion process from MongoDB.")

    try:
        # Use the fetch_data_from_mongodb function to fetch data
        df = fetch_data_from_mongodb(collection_name=collection_name, database_name=database_name)

        if df.empty:
            logging.warning("No data was loaded. Check the collection name or the database content.")
        else:
            logging.info(f"Data ingestion completed. Number of records loaded: {len(df)}.")

        return df

    except Exception as e:
        logging.error(f"Error while reading data from {collection_name} in {database_name}: {e}")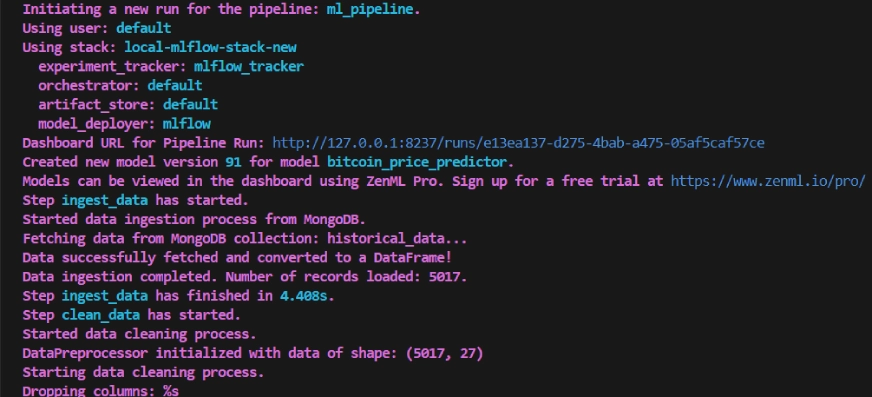
raise e Maintenant, nous avons terminé la création du pipeline. Exécutez la commande ci-dessous pour afficher le tableau de bord du pipeline.
class DataPreprocessor:
def __init__(self, data: pd.DataFrame):
self.data = data
logging.info("DataPreprocessor initialized with data of shape: %s", data.shape)
def clean_data(self) -> pd.DataFrame:
"""
Performs data cleaning by removing unnecessary columns, dropping columns with missing values,
and returning the cleaned DataFrame.
Returns:
pd.DataFrame: The cleaned DataFrame with unnecessary and missing-value columns removed.
"""
logging.info("Starting data cleaning process.")
# Drop unnecessary columns, including '_id' if it exists
columns_to_drop = [
'UNIT', 'TYPE', 'MARKET', 'INSTRUMENT',
'FIRST_MESSAGE_TIMESTAMP', 'LAST_MESSAGE_TIMESTAMP',
'FIRST_MESSAGE_VALUE', 'HIGH_MESSAGE_VALUE', 'HIGH_MESSAGE_TIMESTAMP',
'LOW_MESSAGE_VALUE', 'LOW_MESSAGE_TIMESTAMP', 'LAST_MESSAGE_VALUE',
'TOTAL_INDEX_UPDATES', 'VOLUME_TOP_TIER', 'QUOTE_VOLUME_TOP_TIER',
'VOLUME_DIRECT', 'QUOTE_VOLUME_DIRECT', 'VOLUME_TOP_TIER_DIRECT',
'QUOTE_VOLUME_TOP_TIER_DIRECT', '_id' # Adding '_id' to the list
]
logging.info("Dropping columns: %s")
self.data = self.drop_columns(self.data, columns_to_drop)
# Drop columns where the number of missing values is greater than 0
logging.info("Dropping columns with missing values.")
self.data = self.drop_columns_with_missing_values(self.data)
logging.info("Data cleaning completed. Data shape after cleaning: %s", self.data.shape)
return self.data
def drop_columns(self, data: pd.DataFrame, columns: list) -> pd.DataFrame:
"""
Drops specified columns from the DataFrame.
Returns:
pd.DataFrame: The DataFrame with the specified columns removed.
"""
logging.info("Dropping columns: %s", columns)
return data.drop(columns=columns, errors='ignore')
def drop_columns_with_missing_values(self, data: pd.DataFrame) -> pd.DataFrame:
"""
Drops columns with any missing values from the DataFrame.
Parameters:
data: pd.DataFrame
The DataFrame from which columns with missing values will be removed.
Returns:
pd.DataFrame: The DataFrame with columns containing missing values removed.
"""
missing_columns = data.columns[data.isnull().sum() > 0]
if not missing_columns.empty:
logging.info("Columns with missing values: %s", missing_columns.tolist())
else:
logging.info("No columns with missing values found.")
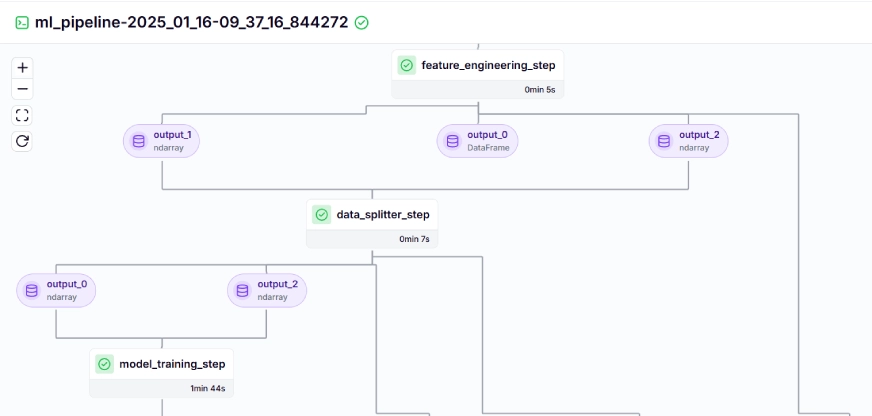
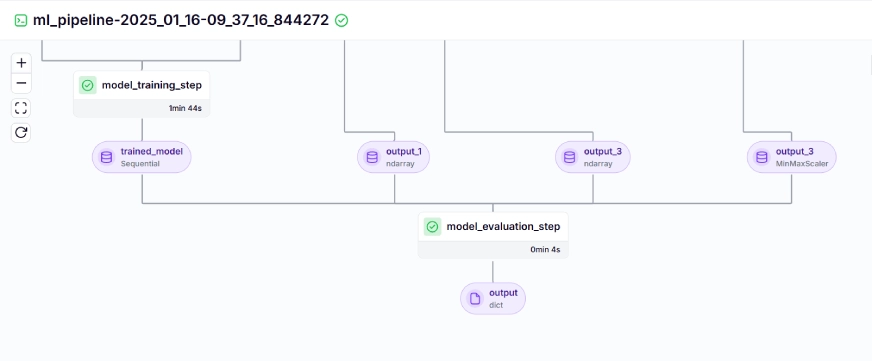
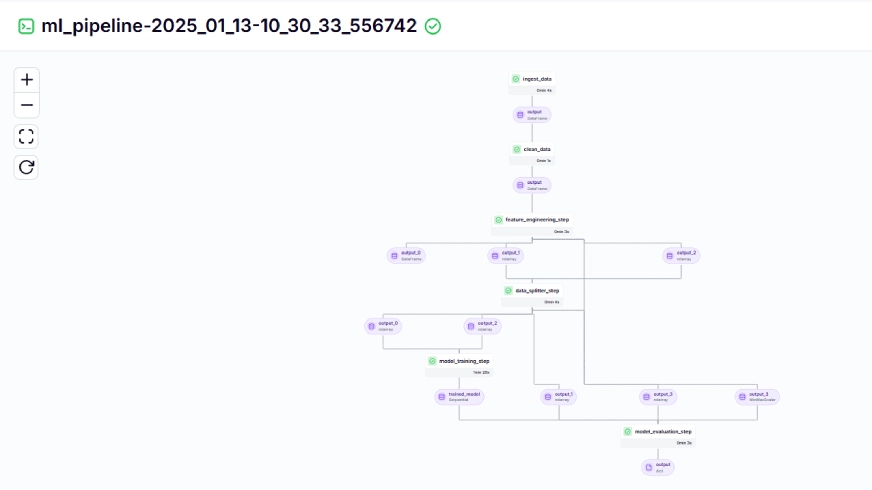
return data.loc[:, data.isnull().sum() == 0]Après avoir exécuté la commande ci-dessus, il renverra l'URL du tableau de bord de suivi, qui ressemble à ceci.
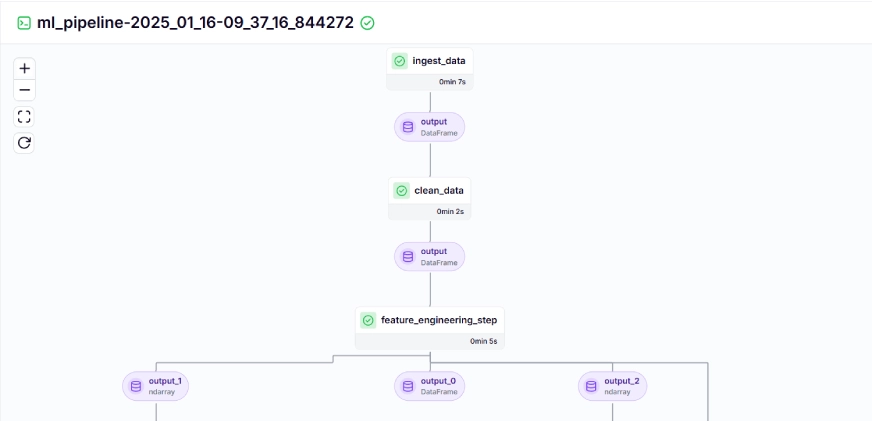
Le pipeline d'entraînement ressemble à ceci dans le tableau de bord, indiqué ci-dessous:
Étape 10: Déploiement du modèle
Jusqu'à présent, nous avons construit le modèle et les pipelines. Poussons maintenant le pipeline en production où les utilisateurs peuvent faire des prédictions.
pipeline de déploiement continu
import joblib
import pandas as pd
from abc import ABC, abstractmethod
from sklearn.preprocessing import MinMaxScaler


# Abstract class for Feature Engineering strategy
class FeatureEngineeringStrategy(ABC):
    @abstractmethod
    def generate_features(self, df: pd.DataFrame) -> pd.DataFrame:
        pass


# Concrete class for calculating SMA, EMA, RSI, and other features
class TechnicalIndicators(FeatureEngineeringStrategy):
    def generate_features(self, df: pd.DataFrame) -> pd.DataFrame:

        # Calculate SMA, EMA, and RSI
        df['SMA_20'] = df['CLOSE'].rolling(window=20).mean()
        df['SMA_50'] = df['CLOSE'].rolling(window=50).mean()
        df['EMA_20'] = df['CLOSE'].ewm(span=20, adjust=False).mean()

        # Price difference features
        df['OPEN_CLOSE_diff'] = df['OPEN'] - df['CLOSE']
        df['HIGH_LOW_diff'] = df['HIGH'] - df['LOW']
        df['HIGH_OPEN_diff'] = df['HIGH'] - df['OPEN']
        df['CLOSE_LOW_diff'] = df['CLOSE'] - df['LOW']

        # Lagged features
        df['OPEN_lag1'] = df['OPEN'].shift(1)
        df['CLOSE_lag1'] = df['CLOSE'].shift(1)
        df['HIGH_lag1'] = df['HIGH'].shift(1)
        df['LOW_lag1'] = df['LOW'].shift(1)

        # Rolling statistics
        df['CLOSE_roll_mean_14'] = df['CLOSE'].rolling(window=14).mean()
        df['CLOSE_roll_std_14'] = df['CLOSE'].rolling(window=14).std()

        # Drop rows with missing values (due to rolling windows, shifts)
        df.dropna(inplace=True)

        return df

# Abstract class for Scaling strategy
class ScalingStrategy(ABC):
    @abstractmethod
    def scale(self, df: pd.DataFrame, features: list, target: str):
        pass

# Concrete class for MinMax Scaling
class MinMaxScaling(ScalingStrategy):
    def scale(self, df: pd.DataFrame, features: list, target: str):
        """
        Scales the features and target using MinMaxScaler.

        Parameters:
            df: pd.DataFrame
                The DataFrame containing the features and target.
            features: list
                List of feature column names.
            target: str
                The target column name.

        Returns:
            pd.DataFrame, pd.DataFrame: Scaled features and target
        """
        scaler_X = MinMaxScaler(feature_range=(0, 1))
        scaler_y = MinMaxScaler(feature_range=(0, 1))

        X_scaled = scaler_X.fit_transform(df[features].values)
        y_scaled = scaler_y.fit_transform(df[[target]].values)

        joblib.dump(scaler_X, 'saved_scalers/scaler_X.pkl')
        joblib.dump(scaler_y, 'saved_scalers/scaler_y.pkl')

        return X_scaled, y_scaled, scaler_y


# FeatureEngineeringContext: This will use the Strategy Pattern
class FeatureEngineering:
    def __init__(self, feature_strategy: FeatureEngineeringStrategy, scaling_strategy: ScalingStrategy):
        self.feature_strategy = feature_strategy
        self.scaling_strategy = scaling_strategy

    def process_features(self, df: pd.DataFrame, features: list, target: str):
        # Generate features using the provided strategy
        df_with_features = self.feature_strategy.generate_features(df)

        # Scale features and target using the provided strategy
        X_scaled, y_scaled, scaler_y = self.scaling_strategy.scale(df_with_features, features, target)
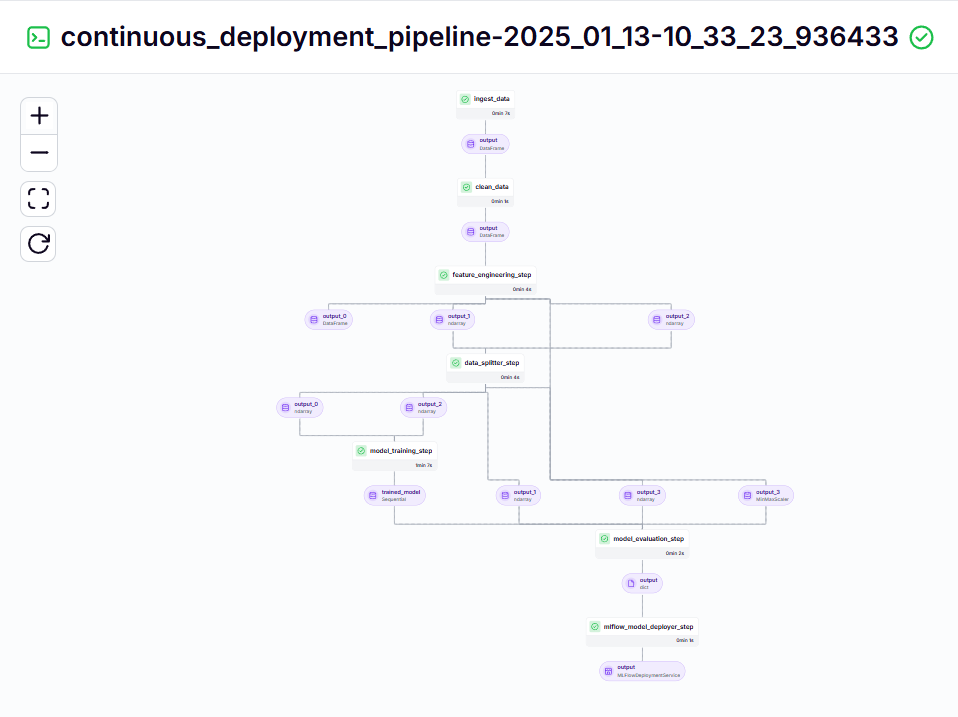
return df_with_features, X_scaled, y_scaled, scaler_yCe pipeline est responsable du déploiement continue des modèles formés. Il exécute d'abord le ml_pipeline () à partir du fichier Training_pipeline.py pour former le modèle, puis utilise le modèle MLFlow Deployeur pour déployer le modèle formé en utilisant le continu_deployment_pipeline () .
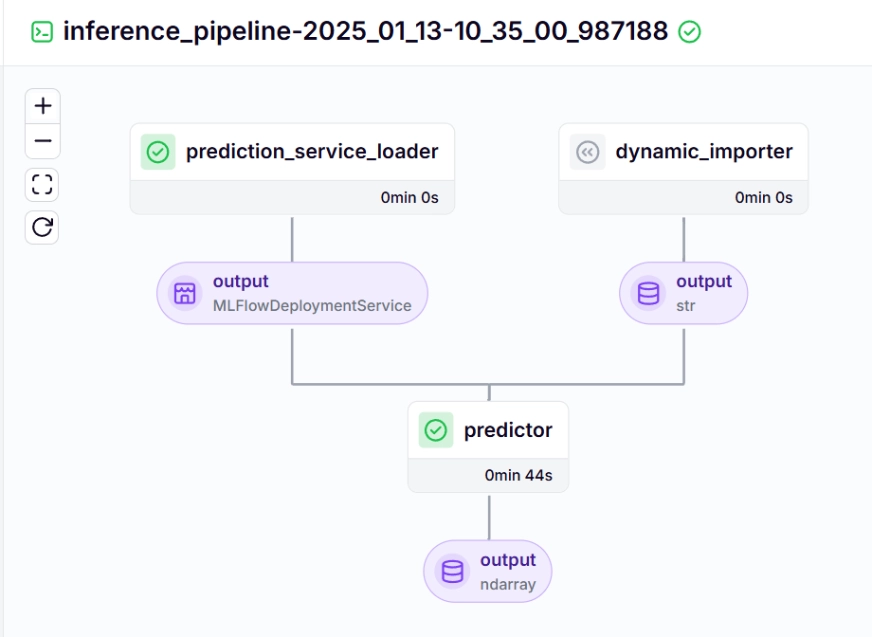
pipeline d'inférence
Nous utilisons un pipeline d'inférence pour faire des prédictions sur les nouvelles données, en utilisant le modèle déployé. Voyons comment nous avons mis en œuvre ce pipeline dans notre projet.
import requests
import pandas as pd
from dotenv import load_dotenv
import os

# Load the .env file
load_dotenv()

def fetch_crypto_data(api_uri):
    response = requests.get(
        api_uri,
        params={
            "market": "cadli",
            "instrument": "BTC-USD",
            "limit": 5000,
            "aggregate": 1,
            "fill": "true",
            "apply_mapping": "true",
            "response_format": "JSON"
        },
        headers={"Content-type": "application/json; charset=UTF-8"}
    )

    if response.status_code == 200:
        print('API Connection Successful! \nFetching the data...')

        data = response.json()
        data_list = data.get('Data', [])

        df = pd.DataFrame(data_list)

        df['DATE'] = pd.to_datetime(df['TIMESTAMP'], unit='s')

        return df  # Return the DataFrame
    else:
raise Exception(f"API Error: {response.status_code} - {response.text}")Voyons à propos de chacune des fonctions appelées dans le pipeline d'inférence ci-dessous:
dynamic_impporter ()
Cette fonction charge les nouvelles données, effectue un traitement des données et renvoie les données.
import os
from pymongo import MongoClient
from dotenv import load_dotenv
from data.management.api import fetch_crypto_data  # Import the API function
import pandas as pd

load_dotenv()

MONGO_URI = os.getenv("MONGO_URI")
API_URI = os.getenv("API_URI")

client = MongoClient(MONGO_URI, ssl=True, ssl_certfile=None, ssl_ca_certs=None)
db = client['crypto_data']
collection = db['historical_data']

try:
    latest_entry = collection.find_one(sort=[("DATE", -1)])  # Find the latest date
    if latest_entry:
        last_date = pd.to_datetime(latest_entry['DATE']).strftime('%Y-%m-%d')
    else:
        last_date = '2011-03-27'  # Default start date if MongoDB is empty

    print(f"Fetching data starting from {last_date}...")
    new_data_df = fetch_crypto_data(API_URI)

    if latest_entry:
        new_data_df = new_data_df[new_data_df['DATE'] > last_date]

    if not new_data_df.empty:
        data_to_insert = new_data_df.to_dict(orient='records')
        result = collection.insert_many(data_to_insert)
        print(f"Inserted {len(result.inserted_ids)} new records into MongoDB.")
    else:
        print("No new data to insert.")
except Exception as e:
print(f"An error occurred: {e}")Prediction_Service_Loader ()
Cette fonction est décorée avec @step . Nous chargeons le service de déploiement w.r.t le modèle déployé basé sur le pipeline_name, et Step_name, où notre modèle déployé est prêt à traiter les requêtes de prédiction pour les nouvelles données.
La ligne existant_services = mlflow_model_deployer_component.find_model_server () recherche un service de déploiement disponible basé sur les paramètres donnés comme le nom du pipeline et le nom étape du pipeline. Si aucun service n'est disponible, il indique que le pipeline de déploiement n'a pas été effectué ou rencontré de problème avec le pipeline de déploiement, il lance donc une éERROR RUNIET.
#create a virtual environment
python3 -m venv venv

#Activate your virtual environmnent in your project folder
source venv/bin/activate
prédicteur ()
La fonction adopte le modèle déploré MLFlow via le MlflowDeployments Service et les nouvelles données. Les données sont traitées plus loin pour correspondre au format attendu du modèle pour effectuer des inférences en temps réel.
#Install zenml
pip install zenml

#To Launch zenml server and dashboard locally
pip install "zenml[server]"

#To check the zenml Version:
zenml version

#To initiate a new repository
zenml init

#To run the dashboard locally:
zenml login --local

#To know the status of our zenml Pipelines
zenml show

#To shutdown the zenml server
zenml clean
Pour visualiser le pipeline de déploiement et d'inférence continu, nous devons exécuter le script run_deployment.py, où les configurations de déploiement et de prédiction seront définies. (Veuillez vérifier le code run_deployment.py dans le github donné ci-dessous).
#Integrating mlflow with ZenML
zenml integration install mlflow -y

#Register the experiment tracker
zenml experiment-tracker register mlflow_tracker --flavor=mlflow

#Registering the model deployer
zenml model-deployer register mlflow --flavor=mlflow

#Registering the stack
zenml stack register local-mlflow-stack-new -a default -o default -d mlflow -e mlflow_tracker --set

#To view the stack list
zenml stack --list
Maintenant, exécutons le fichier run_deployment.py pour voir le tableau de bord du pipeline de déploiement continu et du pipeline d'inférence.
bitcoin_price_prediction_mlops/        # Project directory
├── data/
│   └── management/
│       ├── api_to_mongodb.py          # Code to fetch data and save it to MongoDB
│       └── api.py                     # API-related utility functions
│
├── pipelines/
│   ├── deployment_pipeline.py         # Deployment pipeline
│   └── training_pipeline.py           # Training pipeline
│
├── saved_models/                      # Directory for storing trained models
├── saved_scalers/                     # Directory for storing scalers used in data preprocessing
│
├── src/                               # Source code
│   ├── data_cleaning.py               # Data cleaning and preprocessing
│   ├── data_ingestion.py              # Data ingestion
│   ├── data_splitter.py               # Data splitting
│   ├── feature_engineering.py         # Feature engineering
│   ├── model_evaluation.py            # Model evaluation
│   └── model_training.py              # Model training
│
├── steps/                             # ZenML steps
│   ├── clean_data.py                  # ZenML step for cleaning data
│   ├── data_splitter.py               # ZenML step for data splitting
│   ├── dynamic_importer.py            # ZenML step for importing dynamic data
│   ├── feature_engineering.py         # ZenML step for feature engineering
│   ├── ingest_data.py                 # ZenML step for data ingestion
│   ├── model_evaluation.py            # ZenML step for model evaluation
│   ├── model_training.py              # ZenML step for training the model
│   ├── prediction_service_loader.py   # ZenML step for loading prediction services
│   ├── predictor.py                   # ZenML step for prediction
│   └── utils.py                       # Utility functions for steps
│
├── .env                               # Environment variables file
├── .gitignore                         # Git ignore file
│
├── app.py                             # Streamlit user interface app
│
├── README.md                          # Project documentation
├── requirements.txt                   # List of required packages
├── run_deployment.py                  # Code for running deployment and prediction pipeline
├── run_pipeline.py                    # Code for running training pipeline
└── .zen/                              # ZenML directory (created automatically after ZenML initialization)
pipeline de déploiement continu - sortie
Pipeline d'inférence - sortie
Après avoir exécuté le fichier run_deployment.py, vous pouvez voir le lien de tableau de bord mlflow qui ressemble à ceci.
import os
import logging
from pymongo import MongoClient
from dotenv import load_dotenv
from zenml import step
import pandas as pd

# Load the .env file
load_dotenv()

# Get MongoDB URI from environment variables
MONGO_URI = os.getenv("MONGO_URI")

def fetch_data_from_mongodb(collection_name:str, database_name:str):
    """
    Fetches data from MongoDB and converts it into a pandas DataFrame.

    collection_name:
        Name of the MongoDB collection to fetch data.
    database_name:
        Name of the MongoDB database.
    return:
        A pandas DataFrame containing the data
    """
    # Connect to the MongoDB client
    client = MongoClient(MONGO_URI)
    db = client[database_name]  # Select the database
    collection = db[collection_name]  # Select the collection

    # Fetch all documents from the collection
    try:
        logging.info(f"Fetching data from MongoDB collection: {collection_name}...")
        data = list(collection.find())  # Convert cursor to a list of dictionaries

        if not data:
            logging.info("No data found in the MongoDB collection.")


        # Convert the list of dictionaries into a pandas DataFrame
        df = pd.DataFrame(data)

        # Drop the MongoDB ObjectId field if it exists (optional)
        if '_id' in df.columns:
            df = df.drop(columns=['_id'])

        logging.info("Data successfully fetched and converted to a DataFrame!")
        return df

    except Exception as e:
        logging.error(f"An error occurred while fetching data: {e}")
        raise e


@step(enable_cache=False)
def ingest_data(collection_name: str = "historical_data", database_name: str = "crypto_data") -> pd.DataFrame:

    logging.info("Started data ingestion process from MongoDB.")

    try:
        # Use the fetch_data_from_mongodb function to fetch data
        df = fetch_data_from_mongodb(collection_name=collection_name, database_name=database_name)

        if df.empty:
            logging.warning("No data was loaded. Check the collection name or the database content.")
        else:
            logging.info(f"Data ingestion completed. Number of records loaded: {len(df)}.")

        return df

    except Exception as e:
        logging.error(f"Error while reading data from {collection_name} in {database_name}: {e}")
raise e Maintenant, vous devez copier et coller le lien d'interface utilisateur mlflow ci-dessus dans votre ligne de commande et l'exécuter.
Voici le tableau de bord MLFlow, où vous pouvez voir les métriques d'évaluation et les paramètres du modèle:
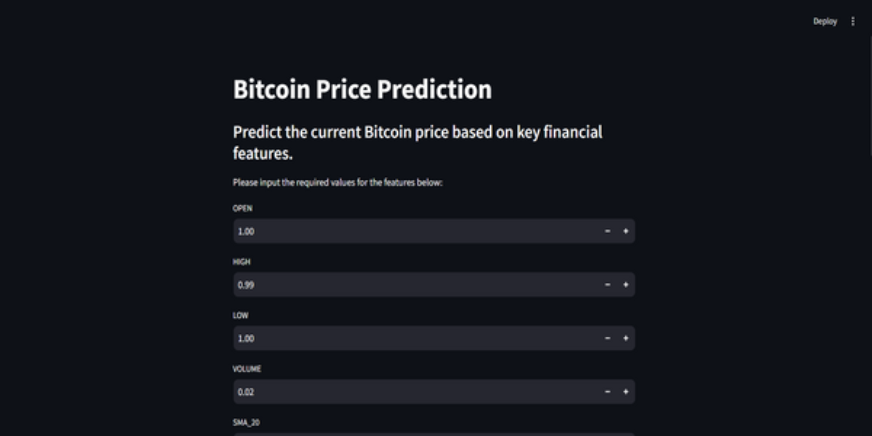
Étape 11: Construire l'application Streamlit
Streamlit est un framework open source open source, utilisé pour créer des internes interactives, nous pouvons utiliser Streamlit pour créer des applications Web rapidement, sans connaître le développement du backend ou du frontage. Tout d'abord, nous devons installer Streamlit sur notre système.
class DataPreprocessor:
    def __init__(self, data: pd.DataFrame):

        self.data = data
        logging.info("DataPreprocessor initialized with data of shape: %s", data.shape)

    def clean_data(self) -> pd.DataFrame:
        """
        Performs data cleaning by removing unnecessary columns, dropping columns with missing values,
        and returning the cleaned DataFrame.

        Returns:
            pd.DataFrame: The cleaned DataFrame with unnecessary and missing-value columns removed.
        """
        logging.info("Starting data cleaning process.")

        # Drop unnecessary columns, including '_id' if it exists
        columns_to_drop = [
            'UNIT', 'TYPE', 'MARKET', 'INSTRUMENT',
            'FIRST_MESSAGE_TIMESTAMP', 'LAST_MESSAGE_TIMESTAMP',
            'FIRST_MESSAGE_VALUE', 'HIGH_MESSAGE_VALUE', 'HIGH_MESSAGE_TIMESTAMP',
            'LOW_MESSAGE_VALUE', 'LOW_MESSAGE_TIMESTAMP', 'LAST_MESSAGE_VALUE',
            'TOTAL_INDEX_UPDATES', 'VOLUME_TOP_TIER', 'QUOTE_VOLUME_TOP_TIER',
            'VOLUME_DIRECT', 'QUOTE_VOLUME_DIRECT', 'VOLUME_TOP_TIER_DIRECT',
            'QUOTE_VOLUME_TOP_TIER_DIRECT', '_id'  # Adding '_id' to the list
        ]
        logging.info("Dropping columns: %s")
        self.data = self.drop_columns(self.data, columns_to_drop)

        # Drop columns where the number of missing values is greater than 0
        logging.info("Dropping columns with missing values.")
        self.data = self.drop_columns_with_missing_values(self.data)

        logging.info("Data cleaning completed. Data shape after cleaning: %s", self.data.shape)
        return self.data

    def drop_columns(self, data: pd.DataFrame, columns: list) -> pd.DataFrame:
        """
        Drops specified columns from the DataFrame.

        Returns:
            pd.DataFrame: The DataFrame with the specified columns removed.
        """
        logging.info("Dropping columns: %s", columns)
        return data.drop(columns=columns, errors='ignore')

    def drop_columns_with_missing_values(self, data: pd.DataFrame) -> pd.DataFrame:
        """
        Drops columns with any missing values from the DataFrame.

        Parameters:
            data: pd.DataFrame
                The DataFrame from which columns with missing values will be removed.

        Returns:
            pd.DataFrame: The DataFrame with columns containing missing values removed.
        """
        missing_columns = data.columns[data.isnull().sum() > 0]
        if not missing_columns.empty:
            logging.info("Columns with missing values: %s", missing_columns.tolist())
        else:
            logging.info("No columns with missing values found.")
return data.loc[:, data.isnull().sum() == 0]Encore une fois, vous pouvez trouver le code sur GitHub pour l'application Streamlit.
Voici le code GitHub et l'explication vidéo du projet pour votre meilleure compréhension.
Conclusion
Dans cet article, nous avons réussi à construire avec succès un projet de prédiction de prix Bitcoin de bout en bout et de prédiction de prix Bitcoin. De l'acquisition de données via une API et de son prétraitement pour modéliser la formation, l'évaluation et le déploiement, notre projet met en évidence le rôle essentiel des MLOPS dans la connexion du développement à la production. Nous sommes à un pas de plus pour façonner l'avenir de la prévision des prix du bitcoin en temps réel. Les API fournissent un accès en douceur aux données externes, comme les données de prix Bitcoin de l'API CCDATA, éliminant le besoin d'un ensemble de données préexistant.
Les plats clés
- Les API permettent un accès transparent aux données externes, comme les données de prix Bitcoin de l'API CCDATA, éliminant le besoin d'un ensemble de données préexistant.
- zenml et mlflow sont des outils robustes qui facilitent le développement, le suivi et le déploiement de modèles d'apprentissage automatique dans les applications du monde réel.
- Nous avons suivi les meilleures pratiques en effectuant correctement l'ingestion de données, le nettoyage, l'ingénierie des caractéristiques, la formation des modèles et l'évaluation.
- Le déploiement continu et les pipelines d'inférence sont essentiels pour garantir que les modèles restent efficaces et disponibles dans les environnements de production.
Les questions fréquemment posées
Q1. Zenml est-il libre à utiliser?a. Oui, ZENML est un cadre MOLPS entièrement open source qui rend la transition du développement local aux pipelines de production aussi simple que 1 ligne de code.
Q2. À quoi sert MlFlow?a. MLFlow facilite le développement de l'apprentissage automatique en offrant des outils pour le suivi des expériences, les modèles de version et les déploiement.
Q3. Comment déboguer le démon du serveur ne fonctionne pas d'erreur?a. Il s'agit d'une erreur courante à laquelle vous serez confronté dans le projet. Il suffit d'exécuter `Zenml Logout –Local` puis de` Zenml Clean`, puis de `Zenml Login –Local`, exécutez à nouveau le pipeline. Il sera résolu.
Ce qui précède est le contenu détaillé de. pour plus d'informations, suivez d'autres articles connexes sur le site Web de PHP en chinois!

Outils d'IA chauds

Undresser.AI Undress
Application basée sur l'IA pour créer des photos de nu réalistes

AI Clothes Remover
Outil d'IA en ligne pour supprimer les vêtements des photos.

Undress AI Tool
Images de déshabillage gratuites

Clothoff.io
Dissolvant de vêtements AI

Video Face Swap
Échangez les visages dans n'importe quelle vidéo sans effort grâce à notre outil d'échange de visage AI entièrement gratuit !

Article chaud
Outils chauds

Bloc-notes++7.3.1
Éditeur de code facile à utiliser et gratuit

SublimeText3 version chinoise
Version chinoise, très simple à utiliser

Envoyer Studio 13.0.1
Puissant environnement de développement intégré PHP

Dreamweaver CS6
Outils de développement Web visuel

SublimeText3 version Mac
Logiciel d'édition de code au niveau de Dieu (SublimeText3)
Sujets chauds


 Meilleurs générateurs d'art AI (gratuit & amp; payé) pour des projets créatifs
Apr 02, 2025 pm 06:10 PM
Meilleurs générateurs d'art AI (gratuit & amp; payé) pour des projets créatifs
Apr 02, 2025 pm 06:10 PM
L'article passe en revue les meilleurs générateurs d'art AI, discutant de leurs fonctionnalités, de leur aptitude aux projets créatifs et de la valeur. Il met en évidence MidJourney comme la meilleure valeur pour les professionnels et recommande Dall-E 2 pour un art personnalisable de haute qualité.
 Début avec Meta Llama 3.2 - Analytics Vidhya
Apr 11, 2025 pm 12:04 PM
Début avec Meta Llama 3.2 - Analytics Vidhya
Apr 11, 2025 pm 12:04 PM
META'S LLAMA 3.2: un bond en avant dans l'IA multimodal et mobile Meta a récemment dévoilé Llama 3.2, une progression importante de l'IA avec de puissantes capacités de vision et des modèles de texte légers optimisés pour les appareils mobiles. S'appuyer sur le succès o
 Meilleurs chatbots AI comparés (Chatgpt, Gemini, Claude & amp; plus)
Apr 02, 2025 pm 06:09 PM
Meilleurs chatbots AI comparés (Chatgpt, Gemini, Claude & amp; plus)
Apr 02, 2025 pm 06:09 PM
L'article compare les meilleurs chatbots d'IA comme Chatgpt, Gemini et Claude, en se concentrant sur leurs fonctionnalités uniques, leurs options de personnalisation et leurs performances dans le traitement et la fiabilité du langage naturel.
 Assistants d'écriture de l'IA pour augmenter votre création de contenu
Apr 02, 2025 pm 06:11 PM
Assistants d'écriture de l'IA pour augmenter votre création de contenu
Apr 02, 2025 pm 06:11 PM
L'article traite des meilleurs assistants d'écriture d'IA comme Grammarly, Jasper, Copy.ai, WireSonic et Rytr, en se concentrant sur leurs fonctionnalités uniques pour la création de contenu. Il soutient que Jasper excelle dans l'optimisation du référencement, tandis que les outils d'IA aident à maintenir le ton
 Vendre une stratégie d'IA aux employés: le manifeste du PDG de Shopify
Apr 10, 2025 am 11:19 AM
Vendre une stratégie d'IA aux employés: le manifeste du PDG de Shopify
Apr 10, 2025 am 11:19 AM
La récente note du PDG de Shopify Tobi Lütke déclare hardiment la maîtrise de l'IA une attente fondamentale pour chaque employé, marquant un changement culturel important au sein de l'entreprise. Ce n'est pas une tendance éphémère; C'est un nouveau paradigme opérationnel intégré à P
 AV Bytes: Meta & # 039; S Llama 3.2, Google's Gemini 1.5, et plus
Apr 11, 2025 pm 12:01 PM
AV Bytes: Meta & # 039; S Llama 3.2, Google's Gemini 1.5, et plus
Apr 11, 2025 pm 12:01 PM
Le paysage de l'IA de cette semaine: un tourbillon de progrès, de considérations éthiques et de débats réglementaires. Les principaux acteurs comme Openai, Google, Meta et Microsoft ont déclenché un torrent de mises à jour, des nouveaux modèles révolutionnaires aux changements cruciaux de LE
 10 extensions de codage générateur AI dans le code vs que vous devez explorer
Apr 13, 2025 am 01:14 AM
10 extensions de codage générateur AI dans le code vs que vous devez explorer
Apr 13, 2025 am 01:14 AM
Hé là, codant ninja! Quelles tâches liées au codage avez-vous prévues pour la journée? Avant de plonger plus loin dans ce blog, je veux que vous réfléchissiez à tous vos malheurs liés au codage - les énumérez. Fait? - Let & # 8217
 Choisir le meilleur générateur de voix d'IA: les meilleures options examinées
Apr 02, 2025 pm 06:12 PM
Choisir le meilleur générateur de voix d'IA: les meilleures options examinées
Apr 02, 2025 pm 06:12 PM
L'article examine les meilleurs générateurs de voix d'IA comme Google Cloud, Amazon Polly, Microsoft Azure, IBM Watson et Descript, en se concentrant sur leurs fonctionnalités, leur qualité vocale et leur aptitude à différents besoins.
