jQuery模板技术和数据绑定实现代码_jquery
好消息来了,微软开发出了这样的框架,这是对jQuery的一个扩展,从此以后要在浏览器上动态显示服务器端Web Service返回的数据将变得如同用服务器端控件显示数据一样容易。
这个技术就叫jQuery templates and data linking ,这是微软对jQuery做的一个扩展。这种扩展需要jQuery官方的审核,然后才能被包含在jQuery中。据ScottGu的博客上说,此扩展正在等待审核阶段。但是这些功能却是非常强大而且实用,我就先把它转过来了,先睹为快。
在编写AJAX应用时,经常需要利用JavaScript在页面上显示数据,jQuery模板(jQuery Templates)和数据绑定(Data Linking)提供了一种方便的途径将JavaScript数据显示在HTML页面上,数据可以呈现为各种元素,如普通文本、TextBox、列表等。Data Linking这个单词直译应该作数据链接,但是我觉得数据绑定这个词更加能够反映这种技术的能容,而且符合ASP.NET习惯用法。在Scott Guthrie的博客中也这样说,原来他们也想称这种技术为data binding而不是data linking,但是由于jQuery中已经有binding这个术语了,指的是另外的东西,为了不至于引起混淆,所以就只好另外给它起个名字,叫data linking了。
我下面把这个博客转过来,有时间则翻译一下。
以下全文引用自ScottGu的博客。
jQuery Templates and Data Linking (and Microsoft contributing to jQuery)
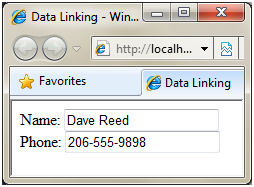
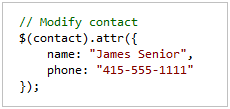
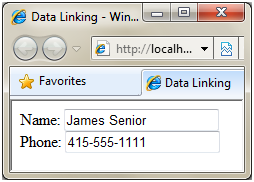
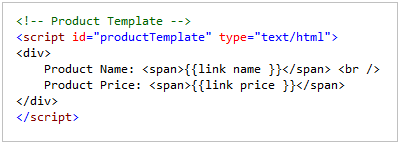
The jQuery library has a passionate community of developers, and it is now the most widely used JavaScript library on the web today. Two years ago I announced that Microsoft would begin offering product support for jQuery, and that we'd be including it in new versions of Visual Studio going forward. By default, when you create new ASP.NET Web Forms and ASP.NET MVC projects with VS 2010 you'll find jQuery automatically added to your project. A few weeks ago during my second keynote at the MIX 2010 conference I announced that Microsoft would also begin contributing to the jQuery project. During the talk, John Resig -- the creator of the jQuery library and leader of the jQuery developer team – talked a little about our participation and discussed an early prototype of a new client templating API for jQuery. In this blog post, I'm going to talk a little about how my team is starting to contribute to the jQuery project, and discuss some of the specific features that we are working on such as client-side templating and data linking (data-binding). jQuery has a fantastic developer community, and a very open way to propose suggestions and make contributions. Microsoft is following the same process to contribute to jQuery as any other member of the community. As an example, when working with the jQuery community to improve support for templating to jQuery my team followed the following steps: There has been an amazing amount of participation by the jQuery community in response to the original templating proposal (over 100 posts in the jQuery forum), and the design of the templating proposal has evolved significantly based on community feedback. The jQuery team is the ultimate determiner on what happens with the templating proposal – they might include it in jQuery core, or make it an official plugin, or reject it entirely. My team is excited to be able to participate in the open source process, and make suggestions and contributions the same way as any other member of the community. Client-side templates enable jQuery developers to easily generate and render HTML UI on the client. Templates support a simple syntax that enables either developers or designers to declaratively specify the HTML they want to generate. Developers can then programmatically invoke the templates on the client, and pass JavaScript objects to them to make the content rendered completely data driven. These JavaScript objects can optionally be based on data retrieved from a server. Because the jQuery templating proposal is still evolving in response to community feedback, the final version might look very different than the version below. This blog post gives you a sense of how you can try out and use templating as it exists today (you can download the prototype by the jQuery core team at http://github.com/jquery/jquery-tmpl or the latest submission from my team at http://github.com/nje/jquery-tmpl). jQuery Client Templates You create client-side jQuery templates by embedding content within a The {{= name }} and {{= phone }} expressions are used within the contact template above to display the names and phone numbers of “contact” objects passed to the template. We can use the template to display either an array of JavaScript objects or a single object. The JavaScript code below demonstrates how you can render a JavaScript array of “contact” object using the above template. The render() method renders the data into a string and appends the string to the “contactContainer” DIV element: When the page is loaded, the list of contacts is rendered by the template. All of this template rendering is happening on the client-side within the browser: Templating Commands and Conditional Display Logic The current templating proposal supports a small set of template commands - including if, else, and each statements. The number of template commands was deliberately kept small to encourage people to place more complicated logic outside of their templates. Even this small set of template commands is very useful though. Imagine, for example, that each contact can have zero or more phone numbers. The contacts could be represented by the JavaScript array below: The template below demonstrates how you can use the if and each template commands to conditionally display and loop the phone numbers for each contact: If a contact has one or more phone numbers then each of the phone numbers is displayed by iterating through the phone numbers with the each template command: The jQuery team designed the template commands so that they are extensible. If you have a need for a new template command then you can easily add new template commands to the default set of commands. The ASP.NET team recently submitted another proposal and prototype to the jQuery forums (http://forum.jquery.com/topic/proposal-for-adding-data-linking-to-jquery). This proposal describes a new feature named data linking. Data Linking enables you to link a property of one object to a property of another object - so that when one property changes the other property changes. Data linking enables you to easily keep your UI and data objects synchronized within a page. If you are familiar with the concept of data-binding then you will be familiar with data linking (in the proposal, we call the feature data linking because jQuery already includes a bind() method that has nothing to do with data-binding). Imagine, for example, that you have a page with the following HTML elements: The following JavaScript code links the two INPUT elements above to the properties of a JavaScript “contact” object that has a “name” and “phone” property: When you execute this code, the value of the first INPUT element (#name) is set to the value of the contact name property, and the value of the second INPUT element (#phone) is set to the value of the contact phone property. The properties of the contact object and the properties of the INPUT elements are also linked – so that changes to one are also reflected in the other. Because the contact object is linked to the INPUT element, when you request the page, the values of the contact properties are displayed: More interesting, the values of the linked INPUT elements will change automatically whenever you update the properties of the contact object they are linked to. For example, we could programmatically modify the properties of the “contact” object using the jQuery attr() method like below: Because our two INPUT elements are linked to the “contact” object, the INPUT element values will be updated automatically (without us having to write any code to modify the UI elements): Note that we updated the contact object above using the jQuery attr() method. In order for data linking to work, you must use jQuery methods to modify the property values. Two Way Linking The linkBoth() method enables two-way data linking. The contact object and INPUT elements are linked in both directions. When you modify the value of the INPUT element, the contact object is also updated automatically. For example, the following code adds a client-side JavaScript click handler to an HTML button element. When you click the button, the property values of the contact object are displayed using an alert() dialog: The following demonstrates what happens when you change the value of the Name INPUT element and click the Save button. Notice that the name property of the “contact” object that the INPUT element was linked to was updated automatically: The above example is obviously trivially simple. Instead of displaying the new values of the contact object with a JavaScript alert, you can imagine instead calling a web-service to save the object to a database. The benefit of data linking is that it enables you to focus on your data and frees you from the mechanics of keeping your UI and data in sync. Converters The current data linking proposal also supports a feature called converters. A converter enables you to easily convert the value of a property during data linking. For example, imagine that you want to represent phone numbers in a standard way with the “contact” object phone property. In particular, you don't want to include special characters such as ()- in the phone number - instead you only want digits and nothing else. In that case, you can wire-up a converter to convert the value of an INPUT element into this format using the code below: Notice above how a converter function is being passed to the linkFrom() method used to link the phone property of the “contact” object with the value of the phone INPUT element. This convertor function strips any non-numeric characters from the INPUT element before updating the phone property. Now, if you enter the phone number (206) 555-9999 into the phone input field then the value 2065559999 is assigned to the phone property of the contact object: You can also use a converter in the opposite direction also. For example, you can apply a standard phone format string when displaying a phone number from a phone property. Our goal in submitting these two proposals for templating and data linking is to make it easier to work with data when building websites and applications with jQuery. Templating makes it easier to display a list of database records retrieved from a database through an Ajax call. Data linking makes it easier to keep the data and user interface in sync for update scenarios. Currently, we are working on an extension of the data linking proposal to support declarative data linking. We want to make it easy to take advantage of data linking when using a template to display data. For example, imagine that you are using the following template to display an array of product objects: Notice the {{link name}} and {{link price}} expressions. These expressions enable declarative data linking between the SPAN elements and properties of the product objects. The current jQuery templating prototype supports extending its syntax with custom template commands. In this case, we are extending the default templating syntax with a custom template command named “link”. The benefit of using data linking with the above template is that the SPAN elements will be automatically updated whenever the underlying “product” data is updated. Declarative data linking also makes it easier to create edit and insert forms. For example, you could create a form for editing a product by using declarative data linking like this: Whenever you change the value of the INPUT elements in a template that uses declarative data linking, the underlying JavaScript data object is automatically updated. Instead of needing to write code to scrape the HTML form to get updated values, you can instead work with the underlying data directly – making your client-side code much cleaner and simpler. You can download this .zip file to get with working code examples of the above scenarios. The .zip file includes 4 static HTML page: You can un-zip the file to the file-system and then run each page to see the concepts in action. We are excited to be able to begin participating within the open-source jQuery project. We've received lots of encouraging feedback in response to our first two proposals, and we will continue to actively contribute going forward. These features will hopefully make it easier for all developers (including ASP.NET developers) to build great Ajax applications. Hope this helps,Contributing to jQuery
jQuery Template Support
Support for Client Data-Linking
Combining Templating and Data Linking
Downloading Working Code Examples of the Above Scenarios
Summary
jQuery 模板和数据绑定演示代码

Outils d'IA chauds

Undresser.AI Undress
Application basée sur l'IA pour créer des photos de nu réalistes

AI Clothes Remover
Outil d'IA en ligne pour supprimer les vêtements des photos.

Undress AI Tool
Images de déshabillage gratuites

Clothoff.io
Dissolvant de vêtements AI

Video Face Swap
Échangez les visages dans n'importe quelle vidéo sans effort grâce à notre outil d'échange de visage AI entièrement gratuit !

Article chaud

Outils chauds

Bloc-notes++7.3.1
Éditeur de code facile à utiliser et gratuit

SublimeText3 version chinoise
Version chinoise, très simple à utiliser

Envoyer Studio 13.0.1
Puissant environnement de développement intégré PHP

Dreamweaver CS6
Outils de développement Web visuel

SublimeText3 version Mac
Logiciel d'édition de code au niveau de Dieu (SublimeText3)
 Comment utiliser la méthode de requête PUT dans jQuery ?
Feb 28, 2024 pm 03:12 PM
Comment utiliser la méthode de requête PUT dans jQuery ? Dans jQuery, la méthode d'envoi d'une requête PUT est similaire à l'envoi d'autres types de requêtes, mais vous devez faire attention à certains détails et paramètres. Les requêtes PUT sont généralement utilisées pour mettre à jour des ressources, comme la mise à jour de données dans une base de données ou la mise à jour de fichiers sur le serveur. Ce qui suit est un exemple de code spécifique utilisant la méthode de requête PUT dans jQuery. Tout d'abord, assurez-vous d'inclure le fichier de la bibliothèque jQuery, puis vous pourrez envoyer une requête PUT via : $.ajax({u
 Comment ajouter un masque PPT
Mar 20, 2024 pm 12:28 PM
Concernant le masquage PPT, beaucoup de gens ne doivent pas le connaître. La plupart des gens ne le comprennent pas complètement lorsqu'ils créent un PPT, mais l'inventent simplement pour créer ce qu'ils aiment. Par conséquent, beaucoup de gens ne savent pas ce que signifie le masquage PPT et ne le comprennent pas non plus. Je sais ce que fait ce masque, et je ne sais même pas s'il peut rendre l'image moins monotone. Amis qui veulent apprendre, venez apprendre et ajoutez des masques PPT à vos images PPT. Alors, comment ajouter un masque PPT ? S'il vous plaît lire ci-dessous. 1. Nous ouvrons d'abord PPT, sélectionnons une image vierge, puis cliquons avec le bouton droit sur [Définir le format d'arrière-plan] et sélectionnons une couleur unie. 2. Cliquez sur [Insérer], Word Art, entrez le mot 3. Cliquez sur [Insérer], cliquez sur [Forme]
 Conseils jQuery : modifiez rapidement le texte de toutes les balises a de la page
Feb 28, 2024 pm 09:06 PM
Titre : jQuery Astuces : Modifier rapidement le texte de toutes les balises a de la page En développement web, nous avons souvent besoin de modifier et d'exploiter des éléments de la page. Lorsque vous utilisez jQuery, vous devez parfois modifier le contenu textuel de toutes les balises de la page en même temps, ce qui peut économiser du temps et de l'énergie. Ce qui suit explique comment utiliser jQuery pour modifier rapidement le texte de toutes les balises a de la page et donne des exemples de code spécifiques. Tout d'abord, nous devons introduire le fichier de la bibliothèque jQuery et nous assurer que le code suivant est introduit dans la page : <
 Effets de la spécialisation des modèles C++ sur la surcharge et la réécriture des fonctions
Apr 20, 2024 am 09:09 AM
Les spécialisations de modèles C++ affectent la surcharge et la réécriture des fonctions : Surcharge de fonctions : les versions spécialisées peuvent fournir différentes implémentations d'un type spécifique, affectant ainsi les fonctions que le compilateur choisit d'appeler. Remplacement de fonction : la version spécialisée dans la classe dérivée remplacera la fonction modèle dans la classe de base, affectant le comportement de l'objet de classe dérivée lors de l'appel de la fonction.
 Utilisez jQuery pour modifier le contenu textuel de toutes les balises
Feb 28, 2024 pm 05:42 PM
Titre : utilisez jQuery pour modifier le contenu textuel de toutes les balises. jQuery est une bibliothèque JavaScript populaire largement utilisée pour gérer les opérations DOM. En développement web, nous rencontrons souvent le besoin de modifier le contenu textuel de la balise de lien (une balise) sur la page. Cet article expliquera comment utiliser jQuery pour atteindre cet objectif et fournira des exemples de code spécifiques. Tout d’abord, nous devons introduire la bibliothèque jQuery dans la page. Ajoutez le code suivant dans le fichier HTML :
 Comprendre le rôle et les scénarios d'application de eq dans jQuery
Feb 28, 2024 pm 01:15 PM
jQuery est une bibliothèque JavaScript populaire largement utilisée pour gérer la manipulation DOM et la gestion des événements dans les pages Web. Dans jQuery, la méthode eq() est utilisée pour sélectionner des éléments à une position d'index spécifiée. Les scénarios d'utilisation et d'application spécifiques sont les suivants. Dans jQuery, la méthode eq() sélectionne l'élément à une position d'index spécifiée. Les positions d'index commencent à compter à partir de 0, c'est-à-dire que l'index du premier élément est 0, l'index du deuxième élément est 1, et ainsi de suite. La syntaxe de la méthode eq() est la suivante : $("s
 Comment savoir si un élément jQuery possède un attribut spécifique ?
Feb 29, 2024 am 09:03 AM
Comment savoir si un élément jQuery possède un attribut spécifique ? Lorsque vous utilisez jQuery pour exploiter des éléments DOM, vous rencontrez souvent des situations dans lesquelles vous devez déterminer si un élément possède un attribut spécifique. Dans ce cas, nous pouvons facilement implémenter cette fonction à l'aide des méthodes fournies par jQuery. Ce qui suit présentera deux méthodes couramment utilisées pour déterminer si un élément jQuery possède des attributs spécifiques et joindra des exemples de code spécifiques. Méthode 1 : utilisez la méthode attr() et l'opérateur typeof // pour déterminer si l'élément a un attribut spécifique
 Comparaison des modèles C++ et des génériques ?
Jun 04, 2024 pm 04:24 PM
La différence entre les modèles et les génériques en C++ : Modèles : définis au moment de la compilation, clairement typés, haute efficacité et petite taille de code. Génériques : typage à l'exécution, interface abstraite, offre flexibilité, faible efficacité.


