
 interface Web
tutoriel HTML
在每次创建一个新的dialog和对它进行拖拽和拉伸之后,怎么保存下每个dialog的位置和大小代码如下。_html/css_WEB-ITnose
interface Web
tutoriel HTML
在每次创建一个新的dialog和对它进行拖拽和拉伸之后,怎么保存下每个dialog的位置和大小代码如下。_html/css_WEB-ITnose
在每次创建一个新的dialog和对它进行拖拽和拉伸之后,怎么保存下每个dialog的位置和大小代码如下。_html/css_WEB-ITnose

nbsp;html PUBLIC "-//W3C//DTD XHTML 1.0 Transitional//EN" "http://www.w3.org/TR/xhtml1/DTD/xhtml1-transitional.dtd">
<script> <br /> var z=1,i=1,left=10 <br /> var isIE = (document.all) ? true : false; <br /> var $ = function (id) { <br /> return document.getElementById(id); <br /> }; <br /> var Extend = function(destination, source) { <br /> for (var property in source) { <br /> destination[property] = source[property]; <br /> } <br /> } <br /> var Bind = function(object, fun,args) { <br /> return function() { <br /> return fun.apply(object,args||[]); <br /> } <br /> } <br /> var BindAsEventListener = function(object, fun) { <br /> var args = Array.prototype.slice.call(arguments).slice(2); <br /> return function(event) { <br /> return fun.apply(object, [event || window.event].concat(args)); <br /> } <br /> } <br /> var CurrentStyle = function(element){ <br /> return element.currentStyle || document.defaultView.getComputedStyle(element, null); <br /> } <br /> function create(elm,parent,fn){var element = document.createElement(elm);fn&&fn(element); parent&&parent.appendChild(element);return element}; <br /> function addListener(element,e,fn){ element.addEventListener?element.addEventListener(e,fn,false):element.attachEvent("on" + e,fn)}; <br /> function removeListener(element,e,fn){ element.removeEventListener?element.removeEventListener(e,fn,false):element.detachEvent("on" + e,fn)}; <br /> var Class = function(properties){ <br /> var _class = function(){return (arguments[0] !== null && this.initialize && typeof(this.initialize) == 'function') ? this.initialize.apply(this, arguments) : this;}; <br /> _class.prototype = properties; <br /> return _class; <br /> }; <br /> var Dialog = new Class({ <br /> options:{ <br /> Width : 400, <br /> Height : 400, <br /> Left : 100, <br /> Top : 100, <br /> Titleheight : 26, <br /> Minwidth : 200, <br /> Minheight : 200, <br /> CancelIco : true, <br /> ResizeIco : false, <br /> Info : "新闻标题", <br /> Content : "无内容", <br /> Zindex : 2 <br /> }, <br /> initialize:function(options){ <br /> this._dragobj = null; <br /> this._resize = null; <br /> this._cancel = null; <br /> this._body = null; <br /> this._x = 0; <br /> this._y = 0; <br /> this._fM = BindAsEventListener(this, this.Move); <br /> this._fS = Bind(this, this.Stop); <br /> this._isdrag = null; <br /> this._Css = null; <br /> this.Width = this.options.Width; <br /> this.Height = this.options.Height; <br /> this.Left = this.options.Left; <br /> this.Top = this.options.Top; <br /> this.CancelIco = this.options.CancelIco; <br /> this.Info = this.options.Info; <br /> this.Content = this.options.Content; <br /> this.Minwidth = this.options.Minwidth; <br /> this.Minheight = this.options.Minheight; <br /> this.Titleheight= this.options.Titleheight; <br /> this.Zindex = this.options.Zindex; <br /> Extend(this,options); <br /> Dialog.Zindex = this.Zindex <br /> //构造dialog <br /> var obj = ['dialogcontainter','dialogtitle','dialogtitleinfo','dialogtitleico','dialogbody','dialogbottom']; <br /> for(var i = 0;i<obj.length;i++) <br /> { obj[i]=create('div',null,function(elm){elm.className = obj[i];}); } <br /> obj[2].innerHTML = this.Info; <br /> obj[4].innerHTML = this.Content; <br /> obj[1].appendChild(obj[2]); <br /> obj[1].appendChild(obj[3]); <br /> obj[0].appendChild(obj[1]); <br /> obj[0].appendChild(obj[4]); <br /> obj[0].appendChild(obj[5]); <br /> document.body.appendChild(obj[0]); <br /> this._dragobj = obj[0]; <br /> this._resize = obj[5]; <br /> this._cancel = obj[3]; <br /> this._body = obj[4]; <br /> ///o,x1,x2 <br /> ////设置Dialog的长 宽 ,left ,top <br /> with(this._dragobj.style){ <br /> height = this.Height + "px";top = this.Top + "px";width = this.Width +"px";left = this.Left + "px";zIndex = this.Zindex; <br /> } <br /> this._body.style.height = this.Height - this.Titleheight-parseInt(CurrentStyle(this._body).paddingLeft)*2+'px'; <br /> /////////////////////////////////////////////////////////////////////////////// 添加事件 <br /> addListener(this._dragobj,'mousedown',BindAsEventListener(this, this.Start,true)); <br /> addListener(this._cancel,'mouseover',Bind(this,this.Changebg,[this._cancel,'0px 0px','-21px 0px'])); <br /> addListener(this._cancel,'mouseout',Bind(this,this.Changebg,[this._cancel,'0px 0px','-21px 0px'])); <br /> addListener(this._cancel,'mousedown',BindAsEventListener(this,this.Disappear)); <br /> addListener(this._body,'mousedown',BindAsEventListener(this, this.Cancelbubble)); <br /> addListener(this._resize,'mousedown',BindAsEventListener(this, this.Start,false)); <br /> }, <br /> Disappear:function(e){ <br /> this.Cancelbubble(e); <br /> document.body.removeChild(this._dragobj); <br /> }, <br /> Cancelbubble:function(e){ <br /> this._dragobj.style.zIndex = ++Dialog.Zindex; <br /> document.all?(e.cancelBubble=true):(e.stopPropagation()) <br /> }, <br /> Changebg:function(o,x1,x2){ <br /> o.style.backgroundPosition =(o.style.backgroundPosition==x1)?x2:x1; <br /> }, <br /> Start:function(e,isdrag){ <br /> if(!isdrag){this.Cancelbubble(e);} <br /> this._Css = isdrag?{x:"left",y:"top"}:{x:"width",y:"height"} <br /> this._dragobj.style.zIndex = ++Dialog.Zindex; <br /> this._isdrag = isdrag; <br /> this._x = isdrag?(e.clientX - this._dragobj.offsetLeft||0):(this._dragobj.offsetLeft||0) ; <br /> this._y = isdrag?(e.clientY - this._dragobj.offsetTop ||0):(this._dragobj.offsetTop||0); <br /> if(isIE) <br /> { <br /> addListener(this._dragobj, "losecapture", this._fS); <br /> this._dragobj.setCapture(); <br /> } <br /> else <br /> { <br /> e.preventDefault(); <br /> addListener(window, "blur", this._fS); <br /> } <br /> addListener(document,'mousemove',this._fM) <br /> addListener(document,'mouseup',this._fS) <br /> }, <br /> Move:function(e){ <br /> window.getSelection ? window.getSelection().removeAllRanges() : document.selection.empty(); <br /> var i_x = e.clientX - this._x, i_y = e.clientY - this._y; <br /> this._dragobj.style[this._Css.x] = (this._isdrag?Math.max(i_x,0):Math.max(i_x,this.Minwidth))+'px'; <br /> this._dragobj.style[this._Css.y] = (this._isdrag?Math.max(i_y,0):Math.max(i_y,this.Minheight))+'px' <br /> if(!this._isdrag) <br /> this._body.style.height = Math.max(i_y -this.Titleheight,this.Minheight-this.Titleheight)-2*parseInt(CurrentStyle(this._body).paddingLeft)+'px'; <br /> }, <br /> Stop:function(){ <br /> removeListener(document,'mousemove',this._fM); <br /> removeListener(document,'mouseup',this._fS); <br /> if(isIE) <br /> { <br /> removeListener(this._dragobj, "losecapture", this._fS); <br /> this._dragobj.releaseCapture(); <br /> } <br /> else <br /> { <br /> removeListener(window, "blur", this._fS); <br /> }; <br /> } <br /> }) <br /> new Dialog({Width:400,Height:400,Left:700,Top:100}); <br /> new Dialog({Info:"欢迎",Content:"欢迎光临 "}); <br /> function creat(){ <br /> new Dialog({Info:title="标题"+i,Left:300+left,Top:300+left,Content:'内容'+i,Zindex:(++Dialog.Zindex)}); <br /> i++;left +=10; <br /> var width=Left; <br /> } <br /> </script>
回复讨论(解决方案)
在创建的时候保存一下相关信息,在拖动的时候保存一下相关信息。如果拖动的时候有性能问题,可以在加个setTimeout进行延迟处理。时间有限,只能修改到这:
<!DOCTYPE html PUBLIC "-//W3C//DTD XHTML 1.0 Transitional//EN" "http://www.w3.org/TR/xhtml1/DTD/xhtml1-transitional.dtd"><html xmlns="http://www.w3.org/1999/xhtml"><head> <meta charset="utf-8"/> <title>JS模拟Dialog实现可创建可拖拽拉伸可拖动可关闭的浮动div层</title> <style type="text/css"> .dialogcontainter{ height:400px; width:400px; border:1px solid #14495f; position:absolute; font-size:13px; } .dialogtitle{ height:26px; width:auto; background-image:url(/imagesforcode/201209/103444839_p.gif); } .dialogtitleinfo{ float:left; height:20px; margin-top:2px; margin-left:10px; line-height:20px; vertical-align:middle; color:#FFFFFF; font-weight:bold; } .dialogtitleico{ float:right; height:20px; width:21px; margin-top:2px; margin-right:5px; text-align:center; line-height:20px; vertical-align:middle; background-image:url(/imagesforcode/201209/103419495_p.gif); background-position:-21px 0px } .dialogbody{ padding:10px; width:auto; background-color:#FFFFFF; } .dialogbottom{ bottom:1px; right:1px; cursor:nw-resize; position:absolute; background-image:url(imagesforcode/201209/103419495_p.gif); background-position:-42px -10px; width:10px; height:10px; font-size:0; } </style></head><body><input value="创建" type="button" onclick="creat()"/><div id='aa'></div><script> var z = 1, i = 1, left = 10 var isIE = (document.all) ? true : false; var $ = function (id) { return document.getElementById(id); }; var Extend = function (destination, source) { for (var property in source) { destination[property] = source[property]; } } var Bind = function (object, fun, args) { return function () { return fun.apply(object, args || []); } } var BindAsEventListener = function (object, fun) { var args = Array.prototype.slice.call(arguments).slice(2); return function (event) { return fun.apply(object, [event || window.event].concat(args)); } } var CurrentStyle = function (element) { return element.currentStyle || document.defaultView.getComputedStyle(element, null); } function create(elm, parent, fn) { var element = document.createElement(elm); fn && fn(element); parent && parent.appendChild(element); return element } function addListener(element, e, fn) { element.addEventListener ? element.addEventListener(e, fn, false) : element.attachEvent("on" + e, fn) } function removeListener(element, e, fn) { element.removeEventListener ? element.removeEventListener(e, fn, false) : element.detachEvent("on" + e, fn) } var Class = function (properties) { var _class = function () { return (arguments[0] !== null && this.initialize && typeof(this.initialize) == 'function') ? this.initialize.apply(this, arguments) : this; }; _class.prototype = properties; return _class; }; var Dialog = new Class({ options : { Width : 400, Height : 400, Left : 100, Top : 100, Titleheight : 26, Minwidth : 200, Minheight : 200, CancelIco : true, ResizeIco : false, Info : "新闻标题", Content : "无内容", Zindex : 2 }, initialize : function (options) { this._dragobj = null; this._resize = null; this._cancel = null; this._body = null; this._x = 0; this._y = 0; this._fM = BindAsEventListener(this, this.Move); this._fS = Bind(this, this.Stop); this._isdrag = null; this._Css = null; this.Width = this.options.Width; this.Height = this.options.Height; this.Left = this.options.Left; this.Top = this.options.Top; this.CancelIco = this.options.CancelIco; this.Info = this.options.Info; this.Content = this.options.Content; this.Minwidth = this.options.Minwidth; this.Minheight = this.options.Minheight; this.Titleheight = this.options.Titleheight; this.Zindex = this.options.Zindex; Extend(this, options); Dialog.Zindex = this.Zindex //构造dialog var obj = ['dialogcontainter', 'dialogtitle', 'dialogtitleinfo', 'dialogtitleico', 'dialogbody', 'dialogbottom']; for (var i = 0; i < obj.length; i++) { obj[i] = create('div', null, function (elm) { elm.className = obj[i]; }); } obj[2].innerHTML = this.Info; obj[4].innerHTML = this.Content; obj[1].appendChild(obj[2]); obj[1].appendChild(obj[3]); obj[0].appendChild(obj[1]); obj[0].appendChild(obj[4]); obj[0].appendChild(obj[5]); obj[0].id = 'dialog' + this.Zindex; document.body.appendChild(obj[0]); this._dragobj = obj[0]; this._resize = obj[5]; this._cancel = obj[3]; this._body = obj[4]; ///o,x1,x2 ////设置Dialog的长 宽 ,left ,top with (this._dragobj.style) { height = this.Height + "px"; top = this.Top + "px"; width = this.Width + "px"; left = this.Left + "px"; zIndex = this.Zindex; } this._body.style.height = this.Height - this.Titleheight - parseInt(CurrentStyle(this._body).paddingLeft) * 2 + 'px'; /////////////////////////////////////////////////////////////////////////////// 添加事件 addListener(this._dragobj, 'mousedown', BindAsEventListener(this, this.Start, true)); addListener(this._cancel, 'mouseover', Bind(this, this.Changebg, [this._cancel, '0px 0px', '-21px 0px'])); addListener(this._cancel, 'mouseout', Bind(this, this.Changebg, [this._cancel, '0px 0px', '-21px 0px'])); addListener(this._cancel, 'mousedown', BindAsEventListener(this, this.Disappear)); addListener(this._body, 'mousedown', BindAsEventListener(this, this.Cancelbubble)); addListener(this._resize, 'mousedown', BindAsEventListener(this, this.Start, false)); }, Disappear : function (e) { this.Cancelbubble(e); document.body.removeChild(this._dragobj); }, Cancelbubble : function (e) { this._dragobj.style.zIndex = ++Dialog.Zindex; document.all ? (e.cancelBubble = true) : (e.stopPropagation()) }, Changebg : function (o, x1, x2) { o.style.backgroundPosition = (o.style.backgroundPosition == x1) ? x2 : x1; }, Start : function (e, isdrag) { if (!isdrag) { this.Cancelbubble(e); } this._Css = isdrag ? {x : "left", y : "top"} : {x : "width", y : "height"} this._dragobj.style.zIndex = ++Dialog.Zindex; this._isdrag = isdrag; this._x = isdrag ? (e.clientX - this._dragobj.offsetLeft || 0) : (this._dragobj.offsetLeft || 0); this._y = isdrag ? (e.clientY - this._dragobj.offsetTop || 0) : (this._dragobj.offsetTop || 0); if (isIE) { addListener(this._dragobj, "losecapture", this._fS); this._dragobj.setCapture(); } else { e.preventDefault(); addListener(window, "blur", this._fS); } addListener(document, 'mousemove', this._fM) addListener(document, 'mouseup', this._fS) }, Move : function (e) { window.getSelection ? window.getSelection().removeAllRanges() : document.selection.empty(); var i_x = e.clientX - this._x, i_y = e.clientY - this._y; this._dragobj.style[this._Css.x] = (this._isdrag ? Math.max(i_x, 0) : Math.max(i_x, this.Minwidth)) + 'px'; this._dragobj.style[this._Css.y] = (this._isdrag ? Math.max(i_y, 0) : Math.max(i_y, this.Minheight)) + 'px' if (!this._isdrag) this._body.style.height = Math.max(i_y - this.Titleheight, this.Minheight - this.Titleheight) - 2 * parseInt(CurrentStyle(this._body).paddingLeft) + 'px'; savePos(this._dragobj.id); }, Stop : function () { removeListener(document, 'mousemove', this._fM); removeListener(document, 'mouseup', this._fS); if (isIE) { removeListener(this._dragobj, "losecapture", this._fS); this._dragobj.releaseCapture(); } else { removeListener(window, "blur", this._fS); } } }); var a = new Dialog({Width : 400, Height : 400, Left : 700, Top : 100}); new Dialog({Info : "欢迎", Content : "欢迎光临 "}); function creat() { var a = new Dialog({Info : title = "标题" + i, Left : 300 + left, Top : 300 + left, Content : '内容' + i, Zindex : (++Dialog.Zindex)}); savePos(a._dragobj.id); i++; left += 10; } function savePos(obj){// var aid = a._dragobj.id; var adig = $(obj).style; var b = {id : obj, w : adig.width, h : adig.height, t: adig.top, l : adig.left, z : adig.zIndex }; console.dir(b); }</script><%=width%></body></html>如何保存每个dialog的最后状态呢
如何保存每个dialog的最后状态呢
function savePos(obj){// var aid = a._dragobj.id; var adig = $(obj).style; var b = {id : obj, w : adig.width, h : adig.height, t: adig.top, l : adig.left, z : adig.zIndex }; console.dir(b); }在这个方法里边保存。

Outils d'IA chauds

Undresser.AI Undress
Application basée sur l'IA pour créer des photos de nu réalistes

AI Clothes Remover
Outil d'IA en ligne pour supprimer les vêtements des photos.

Undress AI Tool
Images de déshabillage gratuites

Clothoff.io
Dissolvant de vêtements AI

AI Hentai Generator
Générez AI Hentai gratuitement.

Article chaud
Outils chauds

Bloc-notes++7.3.1
Éditeur de code facile à utiliser et gratuit

SublimeText3 version chinoise
Version chinoise, très simple à utiliser

Envoyer Studio 13.0.1
Puissant environnement de développement intégré PHP

Dreamweaver CS6
Outils de développement Web visuel

SublimeText3 version Mac
Logiciel d'édition de code au niveau de Dieu (SublimeText3)


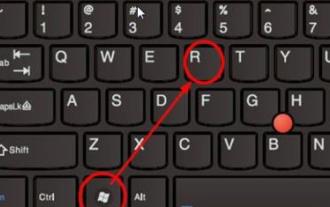 Détails sur la façon d'activer les paramètres des variables d'environnement sur Windows 11
Dec 30, 2023 pm 06:07 PM
Détails sur la façon d'activer les paramètres des variables d'environnement sur Windows 11
Dec 30, 2023 pm 06:07 PM
La fonction de variable d'environnement est un outil essentiel pour exécuter le programme de configuration dans le système, mais dans le dernier système win11, de nombreux utilisateurs ne savent toujours pas comment la configurer. Voici une introduction détaillée à l'emplacement de la variable d'environnement. Ouverture de variable d'environnement win11. Venez nous rejoindre. Apprenez à l'exploiter. Où se trouvent les variables d'environnement win11 : 1. Entrez d'abord "win+R" pour ouvrir la boîte d'exécution. 2. Entrez ensuite la commande : controlsystem. 3. Dans l'interface d'informations système qui s'ouvre, sélectionnez « Paramètres système avancés » dans le menu de gauche. 4. Sélectionnez ensuite l'option "Variables d'environnement" en bas de la fenêtre "Propriétés système" qui s'ouvre. 5. Enfin, dans les variables d'environnement ouvertes, vous pouvez effectuer les réglages pertinents en fonction de vos besoins.
 Chemin de démarrage Win11 et comment l'ouvrir
Jan 03, 2024 pm 11:13 PM
Chemin de démarrage Win11 et comment l'ouvrir
Jan 03, 2024 pm 11:13 PM
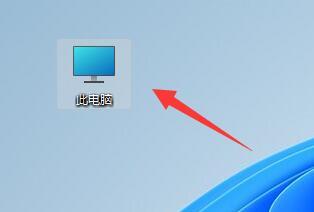
Chaque système Windows possède un chemin de démarrage si vous y ajoutez des fichiers ou des logiciels, il sera ouvert au démarrage. Cependant, de nombreux amis ne savent pas où se trouve le chemin de démarrage de Win11. En fait, il suffit de saisir le dossier correspondant sur le lecteur C. Chemin de démarrage Win11 : 1. Double-cliquez pour ouvrir « Ce PC » 2. Collez directement le chemin « C:\ProgramData\Microsoft\Windows\StartMenu\Programs\Startup » dans la zone du chemin. 3. Voici le chemin de démarrage de Win11. Si nous voulons ouvrir le fichier après le démarrage, nous pouvons y insérer le fichier. 4. Si vous ne pouvez pas entrer par ce chemin, il se peut qu'il soit masqué.
 Comment créer du pixel art dans GIMP
Feb 19, 2024 pm 03:24 PM
Comment créer du pixel art dans GIMP
Feb 19, 2024 pm 03:24 PM
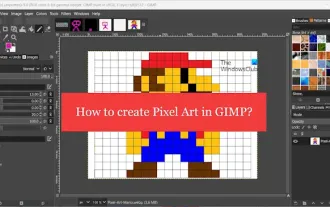
Cet article vous intéressera si vous souhaitez utiliser GIMP pour la création de pixel art sous Windows. GIMP est un logiciel d'édition graphique bien connu qui est non seulement gratuit et open source, mais qui aide également les utilisateurs à créer facilement de belles images et de superbes designs. En plus de convenir aussi bien aux concepteurs débutants qu'aux professionnels, GIMP peut également être utilisé pour créer du pixel art, une forme d'art numérique qui utilise les pixels comme seuls éléments de base pour dessiner et créer. Comment créer du pixel art dans GIMP Voici les principales étapes pour créer des images pixel à l'aide de GIMP sur un PC Windows : Téléchargez et installez GIMP, puis lancez l'application. Créez une nouvelle image. Redimensionnez la largeur et la hauteur. Sélectionnez l'outil Crayon. Définissez le type de pinceau sur pixels. installation
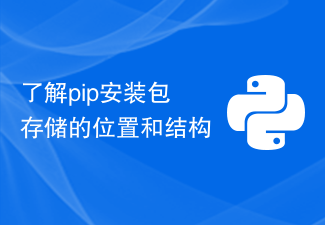 Comprendre l'emplacement et la structure du stockage du package d'installation pip
Jan 18, 2024 am 08:23 AM
Comprendre l'emplacement et la structure du stockage du package d'installation pip
Jan 18, 2024 am 08:23 AM
Pour en savoir plus sur l'emplacement de stockage des packages installés par pip, vous avez besoin d'exemples de code spécifiques. Pip est un outil de gestion de packages couramment utilisé dans le langage Python. Il est utilisé pour installer, mettre à niveau et gérer facilement les packages Python. Lorsque vous utilisez pip pour installer un package, il téléchargera automatiquement le fichier de package correspondant à partir de PyPI (Python Package Index) et l'installera à l'emplacement spécifié. Alors, où sont stockés les packages installés par pip ? C'est un problème que de nombreux développeurs Python rencontreront. Cet article approfondira l'emplacement des packages installés par pip et fournira
 Emplacement de l'Origami Bird au Stardome Railway Crocker Film and Television Park
Mar 27, 2024 pm 11:51 PM
Emplacement de l'Origami Bird au Stardome Railway Crocker Film and Television Park
Mar 27, 2024 pm 11:51 PM
Il y a un total de 20 oiseaux en origami dans le Stardome Railway Croaker Movie Park. De nombreux joueurs ne savent pas où se trouvent les oiseaux en origami dans Crocker Movie Park. L'éditeur a résumé les emplacements de chaque oiseau en origami pour aider tout le monde à le rechercher. et jetez un œil à ce dernier résumé des emplacements des oiseaux en origami dans le Croaker Film and Television Park pour un contenu spécifique. Guide du Honky Dome Railway Star Dome Railway Crocker Film Park Origami Bird Emplacement 1, Crocker Film Park 1er étage 2, Crocker Film Park 2e étage
 Comment créer un dossier sur Realme Phone ?
Mar 23, 2024 pm 02:30 PM
Comment créer un dossier sur Realme Phone ?
Mar 23, 2024 pm 02:30 PM
Titre : Guide du débutant Realme Phone : Comment créer des dossiers sur Realme Phone ? Dans la société actuelle, les téléphones portables sont devenus un outil indispensable dans la vie des gens. En tant que marque de smartphones populaire, RealMobile est appréciée des utilisateurs pour son système d'exploitation simple et pratique. Lors de l'utilisation des téléphones Realme, de nombreuses personnes peuvent être confrontées au besoin d'organiser des fichiers et des applications sur le téléphone, et la création de dossiers est un moyen efficace. Cet article explique comment créer des dossiers sur les téléphones Realme pour aider les utilisateurs à mieux gérer le contenu de leur téléphone. Non.
 Où est publié Kuaishou et comment changer son emplacement ? Comment ajouter un emplacement à une vidéo qui a été mise en ligne ?
Mar 21, 2024 pm 06:00 PM
Où est publié Kuaishou et comment changer son emplacement ? Comment ajouter un emplacement à une vidéo qui a été mise en ligne ?
Mar 21, 2024 pm 06:00 PM
En tant que plateforme de vidéos courtes bien connue en Chine, Kuaishou offre à de nombreux créateurs la possibilité de présenter leurs talents et de partager leur vie. Lors du téléchargement d'une vidéo, certains créateurs novices peuvent ne pas savoir comment modifier l'emplacement de publication de la vidéo. Cet article vous expliquera comment modifier l'emplacement de publication des vidéos Kuaishou et partagera quelques conseils pour la publication de vidéos Kuaishou afin de vous aider à mieux utiliser cette plateforme pour présenter vos œuvres. 1. Où est publié Kuaishou et comment changer son emplacement ? 1. Interface de publication : dans l'application Kuaishou, cliquez sur le bouton « Publier » pour accéder à l'interface de publication vidéo. 2. Informations d'emplacement : dans l'interface de publication, il y a une colonne « Emplacement » Cliquez pour accéder à l'interface de sélection d'emplacement. 3. Changer d'emplacement : dans l'interface de sélection d'emplacement, cliquez sur le bouton « Emplacement » pour afficher l'emplacement actuel. Si vous souhaitez modifier l'emplacement, cliquez sur "Emplacement"
![Comment augmenter la taille du disque dans VirtualBox [Guide]](https://img.php.cn/upload/article/000/887/227/171064142025068.jpg?x-oss-process=image/resize,m_fill,h_207,w_330) Comment augmenter la taille du disque dans VirtualBox [Guide]
Mar 17, 2024 am 10:10 AM
Comment augmenter la taille du disque dans VirtualBox [Guide]
Mar 17, 2024 am 10:10 AM
Nous rencontrons souvent des situations où la taille de disque prédéfinie n'a pas de place pour plus de données ? Si vous avez besoin de plus d'espace disque sur la machine virtuelle ultérieurement, vous devez étendre le disque dur virtuel et les partitions. Dans cet article, nous verrons comment augmenter la taille du disque dans VirtualBox. Augmenter la taille du disque dans VirtualBox Il est important de noter que vous souhaiterez peut-être sauvegarder les fichiers de votre disque dur virtuel avant d'effectuer ces opérations, car il y a toujours la possibilité que quelque chose se passe mal. C'est toujours une bonne pratique d'avoir des sauvegardes. Cependant, le processus fonctionne généralement correctement, assurez-vous simplement d'éteindre votre ordinateur avant de continuer. Il existe deux façons d'augmenter la taille du disque dans VirtualBox. Augmentez la taille du disque VirtualBox à l'aide de l'interface graphique à l'aide de CL
