一、文件的打开和创建
>>> f = open('/tmp/test.txt')
>>> f.read()
'hello python!\nhello world!\n'
>>> f
<open file '/tmp/test.txt', mode 'r' at 0x7fb2255efc00>
二、文件的读取
步骤:打开 -- 读取 -- 关闭
>>> f = open('/tmp/test.txt')
>>> f.read()
'hello python!\nhello world!\n'
>>> f.close()
读取数据是后期数据处理的必要步骤。.txt是广泛使用的数据文件格式。一些.csv, .xlsx等文件可以转换为.txt 文件进行读取。我常使用的是Python自带的I/O接口,将数据读取进来存放在list中,然后再用numpy科学计算包将list的数据转换为array格式,从而可以像MATLAB一样进行科学计算。
下面是一段常用的读取txt文件代码,可以用在大多数的txt文件读取中
filename = 'array_reflection_2D_TM_vertical_normE_center.txt' # txt文件和当前脚本在同一目录下,所以不用写具体路径
pos = []
Efield = []
with open(filename, 'r') as file_to_read:
  while True:
    lines = file_to_read.readline() # 整行读取数据
    if not lines:
      break
      pass
     p_tmp, E_tmp = [float(i) for i in lines.split()] # 将整行数据分割处理,如果分割符是空格,括号里就不用传入参数,如果是逗号, 则传入‘,'字符。
     pos.append(p_tmp)  # 添加新读取的数据
     Efield.append(E_tmp)
     pass
   pos = np.array(pos) # 将数据从list类型转换为array类型。
   Efield = np.array(Efield)
   pass
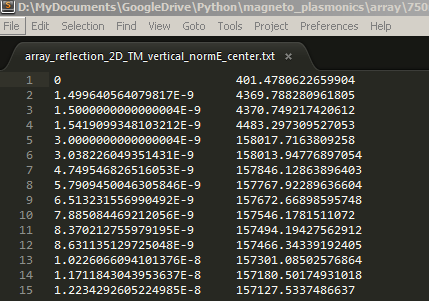
例如下面是将要读入的txt文件

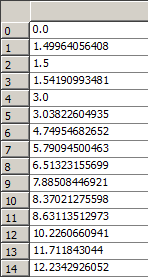
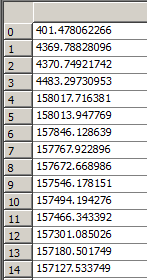
经过读取后,在Enthought Canopy的variable window查看读入的数据, 左侧为pos,右侧为Efield。


三、文件写入(慎重,小心别清空原本的文件)
步骤:打开 -- 写入 -- (保存)关闭
直接的写入数据是不行的,因为默认打开的是'r' 只读模式
>>> f.write('hello boy')
Traceback (most recent call last):
File "<stdin>", line 1, in <module>
IOError: File not open for writing
>>> f
<open file '/tmp/test.txt', mode 'r' at 0x7fe550a49d20>
应该先指定可写的模式
>>> f1 = open('/tmp/test.txt','w')
>>> f1.write('hello boy!')
但此时数据只写到了缓存中,并未保存到文件,而且从下面的输出可以看到,原先里面的配置被清空了
[root@node1 ~]# cat /tmp/test.txt
[root@node1 ~]#
关闭这个文件即可将缓存中的数据写入到文件中
>>> f1.close()
[root@node1 ~]# cat /tmp/test.txt
[root@node1 ~]# hello boy!
注意:这一步需要相当慎重,因为如果编辑的文件存在的话,这一步操作会先清空这个文件再重新写入。那么如果不要清空文件再写入该如何做呢?
使用r+ 模式不会先清空,但是会替换掉原先的文件,如下面的例子:hello boy! 被替换成hello aay!
>>> f2 = open('/tmp/test.txt','r+')
>>> f2.write('\nhello aa!')
>>> f2.close()
[root@node1 python]# cat /tmp/test.txt
hello aay!
如何实现不替换?
>>> f2 = open('/tmp/test.txt','r+')
>>> f2.read()
'hello girl!'
>>> f2.write('\nhello boy!')
>>> f2.close()
[root@node1 python]# cat /tmp/test.txt
hello girl!
hello boy!
可以看到,如果在写之前先读取一下文件,再进行写入,则写入的数据会添加到文件末尾而不会替换掉原先的文件。这是因为指针引起的,r+ 模式的指针默认是在文件的开头,如果直接写入,则会覆盖源文件,通过read() 读取文件后,指针会移到文件的末尾,再写入数据就不会有问题了。这里也可以使用a 模式
>>> f = open('/tmp/test.txt','a')
>>> f.write('\nhello man!')
>>> f.close()
>>>
[root@node1 python]# cat /tmp/test.txt
hello girl!
hello boy!
hello man!
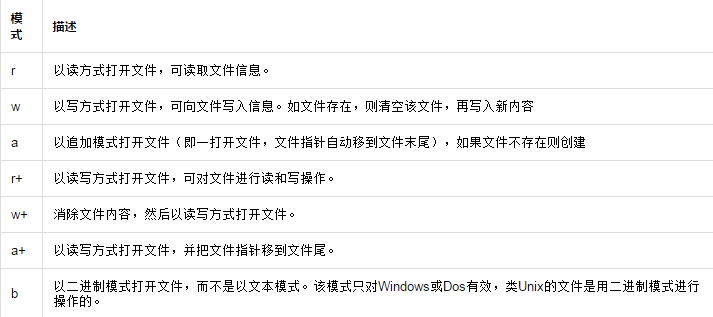
关于其他模式的介绍,见下表:

文件对象的方法:
f.readline() 逐行读取数据
方法一:
>>> f = open('/tmp/test.txt')
>>> f.readline()
'hello girl!\n'
>>> f.readline()
'hello boy!\n'
>>> f.readline()
'hello man!'
>>> f.readline()
''
方法二:
>>> for i in open('/tmp/test.txt'):
...   print i
...
hello girl!
hello boy!
hello man!
f.readlines()   将文件内容以列表的形式存放

>>> f = open('/tmp/test.txt')
>>> f.readlines()
['hello girl!\n', 'hello boy!\n', 'hello man!']
>>> f.close()
f.next() 逐行读取数据,和f.readline() 相似,唯一不同的是,f.readline() 读取到最后如果没有数据会返回空,而f.next() 没读取到数据则会报错
>>> f = open('/tmp/test.txt')
>>> f.readlines()
['hello girl!\n', 'hello boy!\n', 'hello man!']
>>> f.close()
>>>
>>> f = open('/tmp/test.txt')
>>> f.next()
'hello girl!\n'
>>> f.next()
'hello boy!\n'
>>> f.next()
'hello man!'
>>> f.next()
Traceback (most recent call last):
File "<stdin>", line 1, in <module>
StopIteration
f.writelines() 多行写入
>>> l = ['\nhello dear!','\nhello son!','\nhello baby!\n']
>>> f = open('/tmp/test.txt','a')
>>> f.writelines(l)
>>> f.close()
[root@node1 python]# cat /tmp/test.txt
hello girl!
hello boy!
hello man!
hello dear!
hello son!
hello baby!
f.seek(偏移量,选项)
>>> f = open('/tmp/test.txt','r+')
>>> f.readline()
'hello girl!\n'
>>> f.readline()
'hello boy!\n'
>>> f.readline()
'hello man!\n'
>>> f.readline()
' '
>>> f.close()
>>> f = open('/tmp/test.txt','r+')
>>> f.read()
'hello girl!\nhello boy!\nhello man!\n'
>>> f.readline()
''
>>> f.close()
这个例子可以充分的解释前面使用r+这个模式的时候,为什么需要执行f.read()之后才能正常插入
f.seek(偏移量,选项)
(1)选项=0,表示将文件指针指向从文件头部到“偏移量”字节处
(2)选项=1,表示将文件指针指向从文件的当前位置,向后移动“偏移量”字节
(3)选项=2,表示将文件指针指向从文件的尾部,向前移动“偏移量”字节
偏移量:正数表示向右偏移,负数表示向左偏移
>>> f = open('/tmp/test.txt','r+')
>>> f.seek(0,2)
>>> f.readline()
''
>>> f.seek(0,0)
>>> f.readline()
'hello girl!\n'
>>> f.readline()
'hello boy!\n'
>>> f.readline()
'hello man!\n'
>>> f.readline()
''
f.flush() 将修改写入到文件中(无需关闭文件)
>>> f.write('hello python!')
>>> f.flush()
[root@node1 python]# cat /tmp/test.txt
hello girl!
hello boy!
hello man!
hello python!
f.tell() 获取指针位置
>>> f = open('/tmp/test.txt')
>>> f.readline()
'hello girl!\n'
>>> f.tell()
12
>>> f.readline()
'hello boy!\n'
>>> f.tell()
23
四、内容查找和替换
1、内容查找
实例:统计文件中hello个数
思路:打开文件,遍历文件内容,通过正则表达式匹配关键字,统计匹配个数。
[root@node1 ~]# cat /tmp/test.txt
hello girl!
hello boy!
hello man!
hello python!
脚本如下:
方法一:
#!/usr/bin/python
import re
f = open('/tmp/test.txt')
source = f.read()
f.close()
r = r'hello'
s = len(re.findall(r,source))
print s
[root@node1 python]# python count.py
4
方法二:
#!/usr/bin/python
import re
fp = file("/tmp/test.txt",'r')
count = 0
for s in fp.readlines():
li = re.findall("hello",s)
if len(li)>0:
count = count + len(li)
print "Search",count, "hello"
fp.close()
[root@node1 python]# python count1.py
Search 4 hello
2、替换
实例:把test.txt 中的hello全部换为"hi",并把结果保存到myhello.txt中。
#!/usr/bin/python
import re
f1 = open('/tmp/test.txt')
f2 = open('/tmp/myhello.txt','r+')
for s in f1.readlines():
f2.write(s.replace('hello','hi'))
f1.close()
f2.close()
[root@node1 python]# touch /tmp/myhello.txt
[root@node1 ~]# cat /tmp/myhello.txt
hi girl!
hi boy!
hi man!
hi python!
实例:读取文件test.txt内容,去除空行和注释行后,以行为单位进行排序,并将结果输出为result.txt。test.txt 的内容如下所示:
#some words

Sometimes in life,
You find a special friend;
Someone who changes your life just by being part of it.
Someone who makes you laugh until you can't stop;
Someone who makes you believe that there really is good in the world.
Someone who convinces you that there really is an unlocked door just waiting for you to open it.
This is Forever Friendship.
when you're down,
and the world seems dark and empty,
Your forever friend lifts you up in spirits and makes that dark and empty world
suddenly seem bright and full.
Your forever friend gets you through the hard times,the sad times,and the confused times.
If you turn and walk away,
Your forever friend follows,
If you lose you way,
Your forever friend guides you and cheers you on.
Your forever friend holds your hand and tells you that everything is going to be okay.
脚本如下:
f = open('cdays-4-test.txt')
result = list()
for line in f.readlines():                # 逐行读取数据
line = line.strip()                #去掉每行头尾空白
if not len(line) or line.startswith('#'):   # 判断是否是空行或注释行
continue                  #是的话,跳过不处理
result.append(line)              #保存
result.sort()                       #排序结果
print result
open('cdays-4-result.txt','w').write('%s' % '\n'.join(result))        #保存入结果文件