 interface Web
 Tutoriel H5
 Utilisez HTML5 pour développer un jeu d'application localisé pour Android-GemPengpeng
Utilisez HTML5 pour développer un jeu d'application localisé pour Android-GemPengpeng
Cette fois, je vais parler de la façon d'utiliser le moteur lufylegend.js pour créer un jeu HTML5, puis de le convertir en une application Android localisée. Le processus de conversion est en fait très simple. illustrer étape par étape.
Tout d'abord, développons un jeu similaire au jeu. Cependant, le gameplay de ce jeu est original. Toute similitude est purement fortuite. Le jeu L'interface est la suivante .
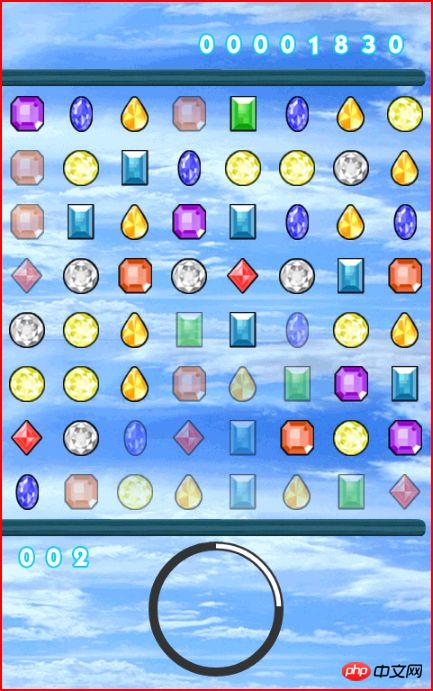
Fonctionnement du jeu : faites glisser l'écran vers le haut, le bas, la gauche et la droite pour déplacer les pierres précieuses dans différentes directions.
Règles du jeu : Lorsqu'il y a trois gemmes identiques adjacentes les unes aux autres, elles seront éliminées. Les gemmes qui ont été éliminées une fois deviendront translucides lorsque toutes les gemmes auront été éliminées une fois. , entrez dans l'étape suivante.
Connexion test du jeu :
http://lufylegend.com/demo/GemGem
Démarrage de la production
1. Préparation
Tout d'abord, vous devez télécharger le moteur lufylegend.js Ce qui suit est mon article lufylegend-1.7.0 sur le blog<.>
http://blog.csdn.net/lufy_legend/article/details/87197682. Développement de jeuxLLoadManage static a été étendu dans moteur lufylegend1.7.0 Classe, vous pouvez lire des images, des fichiers js et des fichiers texte. Expérimentons cette nouvelle fonction dans ce développement de jeu. Tout d'abord, regardez le tableau suivant
Liste de codes 1<.>
var loadData = [
{path:"../jquery.js",type:"js"},
{path:"./js/share.js",type:"js"},
{path:"./js/Social.js",type:"js"},
{path:"./js/GameRanking.js",type:"js"},
{path:"./js/GameLogo.js",type:"js"},
{path:"./js/GameClear.js",type:"js"},
{path:"./js/Gem.js",type:"js"},
{path:"./js/Stage.js",type:"js"},
{path:"./js/Clock.js",type:"js"},
{path:"./js/Point.js",type:"js"},
{path:"./js/GetPoint.js",type:"js"},
{path:"./js/Bullet.js",type:"js"},
{path:"./js/Event.js",type:"js"},
{path:"./js/function.js",type:"js"},
{path:"./js/GameBody.js",type:"js"},
{name:"num.+",path:"./images/plus.png"},
{name:"num.0",path:"./images/0.png"},
{name:"num.1",path:"./images/1.png"},
{name:"num.2",path:"./images/2.png"},
{name:"num.3",path:"./images/3.png"},
{name:"num.4",path:"./images/4.png"},
{name:"num.5",path:"./images/5.png"},
{name:"num.6",path:"./images/6.png"},
{name:"num.7",path:"./images/7.png"},
{name:"num.8",path:"./images/8.png"},
{name:"num.9",path:"./images/9.png"},
{name:"back",path:"./images/back.png"},
{name:"line",path:"./images/line.png"},
{name:"clear",path:"./images/clear.png"},
{name:"gem01",path:"./images/gem01.png"},
{name:"gem02",path:"./images/gem02.png"},
{name:"gem03",path:"./images/gem03.png"},
{name:"gem04",path:"./images/gem04.png"},
{name:"gem05",path:"./images/gem05.png"},
{name:"gem06",path:"./images/gem06.png"},
{name:"gem07",path:"./images/gem07.png"},
{name:"gem08",path:"./images/gem08.png"},
{name:"gem09",path:"./images/gem09.png"},
{name:"ico_sina",path:"./images/ico_sina.gif"},
{name:"ico_qq",path:"./images/ico_qq.gif"},
{name:"ico_facebook",path:"./images/ico_facebook.png"},
{name:"ico_twitter",path:"./images/ico_twitter.png"}
];Liste de codes 2
function main(){
	loadingLayer = new LoadingSample3();
	addChild(loadingLayer);
	LLoadManage.load(
		loadData,
		function(progress){
			loadingLayer.setProgress(progress);
		},
		function(result){
			LGlobal.setDebug(true);
			datalist = result;
			removeChild(loadingLayer);
			loadingLayer = null;
			gameInit();
		}
	);
}Liste de codes 3
function addGem(){
	stage.setStage(stage.num + 1);
	gemLayer.removeAllChild();
	list = [];
	//添加宝石
	for(i=0;i<8;i++){
		list.push([]);
		for(var j=0;j<8;j++){
			num = (Math.random()*9 >>> 0)+1;
			g = new Gem(num);
			g.x = j*60;
			g.y = i*60+120;
			gemLayer.addChild(g);
			list[i].push(g);
		}
	}
	//检验可消除宝石
	do{
		clearList = checkClear();
		if(clearList.length > 0){
			for(i=0;i<clearList.length;i++){
				g = clearList[i];
				num = (Math.random()*9 >>> 0)+1;
				g.change(num);
			}
		}
	}while(clearList.length > 0);
}Code Listing 4
function Gem(num){
	var self = this;
	base(self,LSprite,[]);
	self.num = num;
	self.bitmap = new LBitmap(new LBitmapData(datalist["gem0"+num]));
	self.bitmap.x=self.bitmap.y=10;
	self.addChild(self.bitmap);

}
Gem.prototype.change = function (num){
	var self = this;
	self.num = num;
	self.bitmap.bitmapData = new LBitmapData(datalist["gem0"+num]);
}La fonction checkClear est appelée dans la liste de codes 3 pour vérifier s'il existe des gemmes qui peuvent être éliminées. La méthode de détection consiste à effectuer d'abord une recherche horizontale, puis à effectuer une recherche verticale.
Liste de codes 5
clearList = [];
	//横向检索
	for(i=0;i<8;i++){
		checkList = [list[i][0]];
		for(j=1;j<8;j++){
			if(checkList[checkList.length - 1].num == list[i][j].num){
				checkList.push(list[i][j]);
			}else{
				clearList = addClearList(clearList,checkList);
				checkList = [list[i][j]];
			}
		}
		clearList = addClearList(clearList,checkList);
	}
	//纵向检索
	for(i=0;i<8;i++){
		checkList = [list[0][i]];
		for(j=1;j<8;j++){
			if(checkList[checkList.length - 1].num == list[j][i].num){
				checkList.push(list[j][i]);
			}else{
				clearList = addClearList(clearList,checkList);
				checkList = [list[j][i]];
			}
		}
		clearList = addClearList(clearList,checkList);
}<. 🎜>
Liste de codes 6
function addClearList(clearList,checkList){
	if(checkList.length >= 3){
		clearList = clearList.concat(checkList)
	}
	return clearList;
}Liste de codes 7
Jetons un coup d'œil à la méthode spécifique, d'abord la fonction onDown.
	backLayer.addEventListener(LMouseEvent.MOUSE_DOWN,onDown);
	backLayer.addEventListener(LMouseEvent.MOUSE_UP,onUp);
function onDown(e){
	if(mouse_down_obj.isMouseDown)return;
	continuous = 0;
	mouse_down_obj.x = e.offsetX;
	mouse_down_obj.y = e.offsetY;
	mouse_down_obj.time = new Date().getTime();
	mouse_down_obj.cx = e.offsetX/60 >>> 0;
	mouse_down_obj.cy = (e.offsetY - 120)/60 >>> 0;
	mouse_down_obj.isMouseDown = true;
	list[mouse_down_obj.cy][mouse_down_obj.cx].graphics.drawRect(1,"black",[0, 0, 60, 60],true,"#000000");
}
Jetons un coup d'œil à la fonction onUp.
Liste de codes 9
La fonction utilise la même méthode pour obtenir la position et l'heure à laquelle le clic se termine, puis la compare avec l'heure du clic, et calcule enfin la direction du trait, puis appelle la fonction de déplacement en fonction de la direction du trait pour faire bouger la gemme. Lafunction onUp(e){
list[mouse_down_obj.cy][mouse_down_obj.cx].graphics.clear();
if(new Date().getTime() - mouse_down_obj.time > 500){
mouse_down_obj.isMouseDown = false;
return;
}
var mx = e.offsetX - mouse_down_obj.x;
var my = e.offsetY - mouse_down_obj.y;
if(Math.abs(mx) > Math.abs(my)){
if(mx > 50){
move("right");
return;
}else if(mx < -50){
move("left");
return;
}
}else{
if(my > 50){
move("down");
return;
}else if(my < -50){
move("up");
return;
}
}
mouse_down_obj.isMouseDown = false;
}Liste de codes 10
function move(dir){
	direction = dir;
	var m = moveGem(dir,8);
	var mx = m[0],my = m[1];
	var obj,fun;
	for(var i=0;i<8;i++){
		if(mx == 0){
			obj = list[i][mouse_down_obj.cx];
		}else{
			obj = list[mouse_down_obj.cy][i];
		}
		if(i < 7){
			fun = null;
		}else{
			fun = function(){
				hiddenObj.visible = true;
				checkClear();
			};
		}
		LTweenLite.to(obj,0.3,
		{
			x:obj.x+mx,
			y:obj.y+my,
			onComplete:fun,
			ease:Strong.easeOut
		});

	}
}
Déplacez d'abord la gemme H la plus à gauche vers l'extrême gauche, puis utilisez la classe d'assouplissement LTweenLite pour déplacer les 8 gemmes entières d'affilée, en atténuant une unité vers la droite. C'est tout le contraire si vous allez à gauche, et le même principe s'applique pour monter et descendre.
Chaque fois que l'assouplissement est terminé, la fonction checkClear doit être appelée pour déterminer s'il y a des gemmes qui peuvent être éliminées. S'il y a des gemmes, commencez à éliminer les gemmes.
J'utilise toujours le balayage vers la droite comme exemple. Regardez l'image ci-dessous, en supposant que D1, D2, D3 peuvent être éliminés et E4, F4, G4 peuvent être éliminés <. 🎜>
那么首先将D1,D2,D3移到左边边界外,E4,F4,G4也移到边界外,表示被消除,之后对每一行的宝石进行位置判定,如每行的第一个宝石的x坐标应该是60,第二个为120,以此类推。如果他们不在自己的相应位置上,那么将其向左移动到规定位置就可以了,写成代码的话,如下。
代码清单11
function moveList(){
	var gem,time,maxTime,mx,my,fun;
	maxTime = 0;
	switch(direction){
		case "left":
			for(i=0;i<8;i++){
				for(j=0;j<8;j++){
					gem = list[i][j];
					mx = 60*j;
					if(gem.x > mx){
						time = 0.3*((gem.x-mx) / 60 >>> 0);
						if(maxTime < time)maxTime = time;
						fun = null;
						if(gem.x > 420){
							fun = function(gem){
								if(gem.x <= 420)gem.visible = true;
							}
						}
						LTweenLite.to(gem,time,
						{
							x:mx,
							onUpdate:fun,
							onComplete:fun,
							ease:Strong.easeOut
						});
					}
				}
			}
			break;
		case "right":
			for(i=0;i<8;i++){
				for(j=0;j<8;j++){
					gem = list[i][j];
					mx = 60*j;
					if(gem.x < mx){
						time = 0.3*((mx-gem.x) / 60 >>> 0);
						if(maxTime < time)maxTime = time;
						fun = null;
						if(gem.x < 0){
							fun = function(gem){
								if(gem.x >= 0)gem.visible = true;
							}
						}
						LTweenLite.to(gem,time,
						{
							x:mx,
							onUpdate:fun,
							onComplete:fun,
							ease:Strong.easeOut
						});
					}
				}
			}
			break;
		case "up":
			for(i=0;i<8;i++){
				for(j=0;j<8;j++){
					gem = list[j][i];
					my = 120+60*j;
					if(gem.y > my){
						time = 0.3*((gem.y-my) / 60 >>> 0);
						if(maxTime < time)maxTime = time;
						fun = null;
						if(gem.y > 560){
							fun = function(gem){
								if(gem.y <= 560)gem.visible = true;
							}
						}
						LTweenLite.to(gem,time,
						{
							y:my,
							onUpdate:fun,
							onComplete:fun,
							ease:Strong.easeOut
						});
					}
				}
			}
			break;
		case "down":
			for(i=0;i<8;i++){
				for(j=0;j<8;j++){
					gem = list[j][i];
					my = 120+60*j;
					if(gem.y < my){
						time = 0.3*((my-gem.y) / 60 >>> 0);
						if(maxTime < time)maxTime = time;
						fun = null;
						if(gem.y < 120){
							fun = function(gem){
								if(gem.y >= 120)gem.visible = true;
							}
						}
						LTweenLite.to(gem,time,
						{
							y:my,
							onUpdate:fun,
							onComplete:fun,
							ease:Strong.easeOut
						});
					}
				}
			}
			break;
	}
	LTweenLite.to({},maxTime*1.5,
	{
		onComplete:checkStageClear,
		ease:Strong.easeOut
	});
}当然,游戏是有时间限制的,看下面的Clock类。
代码清单12
function Clock(){
	var self = this;
	base(self,LSprite,[]);
	self.timer = 0;
	self.addTimer = 0.05;
	self.graphics.drawArc(5,"#333333",[0,0,70,0,2*Math.PI]);

}
Clock.prototype.onframe = function (){
	var self = this;
	self.timer += self.addTimer;
	self.graphics.clear();
	self.graphics.drawArc(10,"#333333",[0,0,70,0,2*Math.PI]);
	self.graphics.drawArc(5,"#ffffff",[0,0,70,-Math.PI*0.5,Math.PI*self.timer/180-Math.PI*0.5]);
}首先将Clock加载到游戏中,然后再利用ENTER_FRAME时间轴事件,来不断调用Clock的onframe不断的绘制圆弧,当timer的数值大于等于360的时候代表画完了整个圆弧,那么游戏结束。
以上,游戏的主要原理都介绍完了,下面看看如何来把游戏转化为本地App
三,发布本地化App
首先,用Eclipse新建一个Android Project

注:如何搭建Android环境,我就不说了,网上教程多得是,随便百度一下吧。
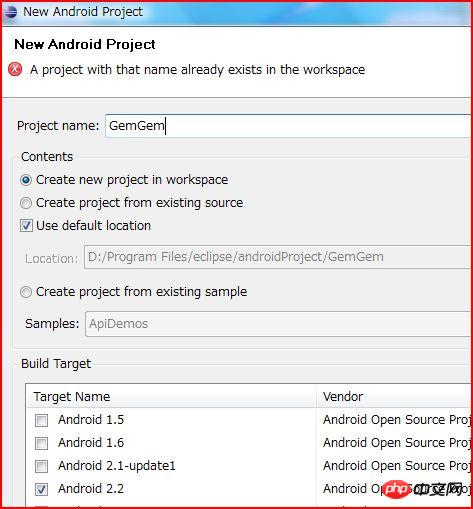
然后,填写项目名称,并选择相应的sdk版本,这里我选了2.2
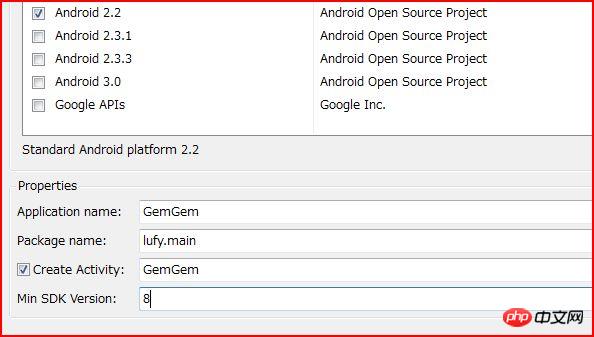
接着是填写相应数据,这个随自己心情就可以了。
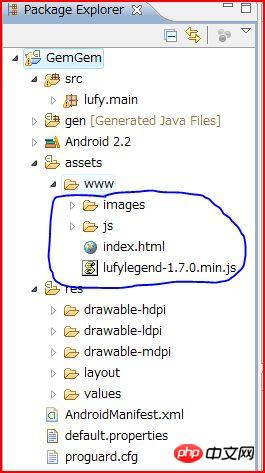
接着,重点来了,在工程下的assets文件夹下,简历一个www文件夹(名字自己随意),然后把刚才开发好的游戏复制到这个文件夹下,当然,lufylegend引擎也必须复制过来。
接着修改res/layout/main.xml文件,添加webView,如下
<?xml version="1.0" encoding="utf-8"?>
<LinearLayout xmlns:android="http://schemas.android.com/apk/res/android"
    android:layout_width="fill_parent"
    android:layout_height="fill_parent"
    android:orientation="vertical" >
    <WebView
        android:id="@+id/webView1"
        android:layout_width="match_parent"
        android:layout_height="match_parent" />
</LinearLayout>最后,修改Main.java文件,利用webView来显示html网页,如下
public class Main extends Activity {
    /** Called when the activity is first created. */
    @Override
    public void onCreate(Bundle savedInstanceState) {
        super.onCreate(savedInstanceState);
        setContentView(R.layout.main);
        WebView webview = (WebView )findViewById(R.id.webView1);
        webview.getSettings().setJavaScriptEnabled(true);
        webview.setVerticalScrollbarOverlay(true);
        webview.loadUrl("file:///android_asset/www/index.html");
    }
}好了,运行程序吧。

画面如下:
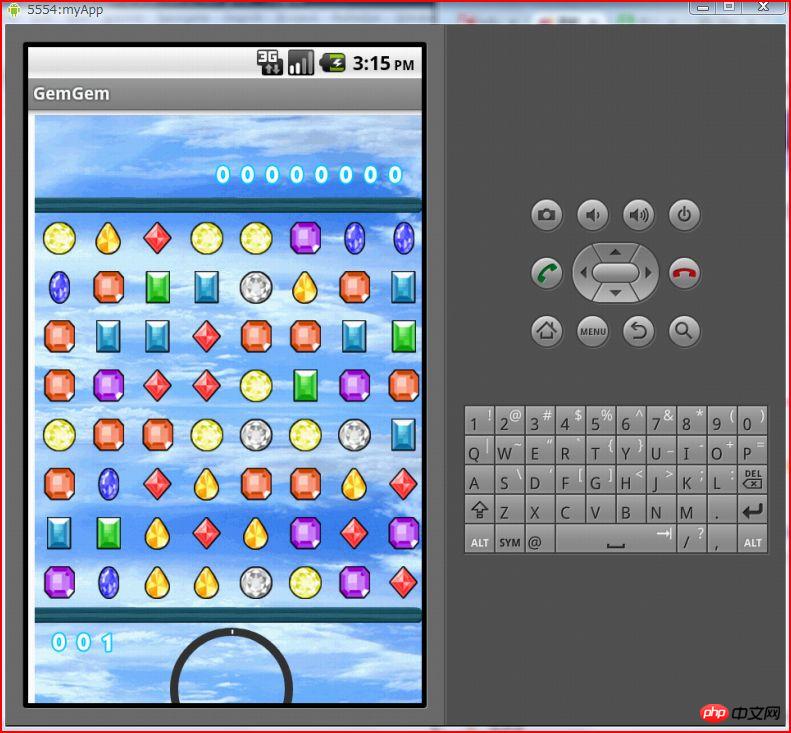
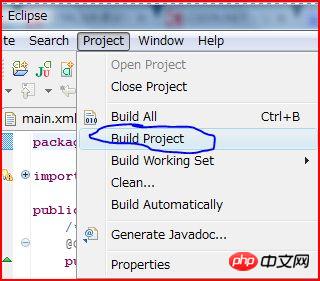
最后,想要发布游戏为.apk文件的话,build一下就好了。
发布后的apk文件。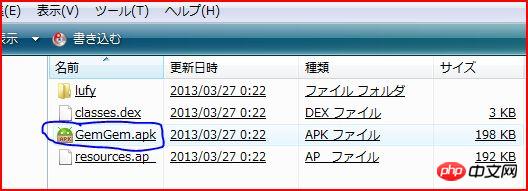
结束了,简单吧?
四,源码
最后给出本次游戏的源代码
http://lufylegend.com/lufylegend_download/GemGem.rar
注:只含游戏源码,lufylegend.js引擎请自己到官网下载
以上就是用HTML5来开发一款android本地化App游戏-宝石碰碰的内容,更多相关内容请关注PHP中文网(www.php.cn)!

Outils d'IA chauds

Undresser.AI Undress
Application basée sur l'IA pour créer des photos de nu réalistes

AI Clothes Remover
Outil d'IA en ligne pour supprimer les vêtements des photos.

Undress AI Tool
Images de déshabillage gratuites

Clothoff.io
Dissolvant de vêtements AI

Video Face Swap
Échangez les visages dans n'importe quelle vidéo sans effort grâce à notre outil d'échange de visage AI entièrement gratuit !

Article chaud

Outils chauds

Bloc-notes++7.3.1
Éditeur de code facile à utiliser et gratuit

SublimeText3 version chinoise
Version chinoise, très simple à utiliser

Envoyer Studio 13.0.1
Puissant environnement de développement intégré PHP

Dreamweaver CS6
Outils de développement Web visuel

SublimeText3 version Mac
Logiciel d'édition de code au niveau de Dieu (SublimeText3)

Sujets chauds
 Bordure de tableau en HTML
Sep 04, 2024 pm 04:49 PM
Guide de la bordure de tableau en HTML. Nous discutons ici de plusieurs façons de définir une bordure de tableau avec des exemples de bordure de tableau en HTML.
 Tableau imbriqué en HTML
Sep 04, 2024 pm 04:49 PM
Ceci est un guide des tableaux imbriqués en HTML. Nous discutons ici de la façon de créer un tableau dans le tableau ainsi que des exemples respectifs.
 Marge gauche HTML
Sep 04, 2024 pm 04:48 PM
Guide de la marge HTML gauche. Nous discutons ici d'un bref aperçu de la marge gauche HTML et de ses exemples ainsi que de son implémentation de code.
 Disposition du tableau HTML
Sep 04, 2024 pm 04:54 PM
Guide de mise en page des tableaux HTML. Nous discutons ici des valeurs de la mise en page des tableaux HTML ainsi que des exemples et des résultats en détail.
 Espace réservé d'entrée HTML
Sep 04, 2024 pm 04:54 PM
Guide de l'espace réservé de saisie HTML. Nous discutons ici des exemples d'espace réservé d'entrée HTML ainsi que des codes et des sorties.
 Liste ordonnée HTML
Sep 04, 2024 pm 04:43 PM
Guide de la liste ordonnée HTML. Ici, nous discutons également de l'introduction de la liste et des types HTML ordonnés ainsi que de leur exemple respectivement.
 Déplacer du texte en HTML
Sep 04, 2024 pm 04:45 PM
Guide pour déplacer du texte en HTML. Nous discutons ici d'une introduction, du fonctionnement des balises de sélection avec la syntaxe et des exemples à implémenter.
 Bouton HTML onclick
Sep 04, 2024 pm 04:49 PM
Guide du bouton HTML onclick. Nous discutons ici de leur introduction, de leur fonctionnement, des exemples et de l'événement onclick dans divers événements respectivement.


