
 développement back-end
tutoriel php
Explication détaillée des étapes pour créer un environnement de développement LNMP sous Mac OS
développement back-end
tutoriel php
Explication détaillée des étapes pour créer un environnement de développement LNMP sous Mac OS
Explication détaillée des étapes pour créer un environnement de développement LNMP sous Mac OS

Cet article présente les étapes pour créer un environnement de développement LNMP sous Mac OS. L'article présente les étapes étape par étape de manière très détaillée et a une certaine valeur de référence pour tous les amis qui en ont besoin. peut suivre Jetons un coup d'oeil ensemble.
1. Présentation
Tout le monde devrait savoir que LNMP signifie : LinuxNginx sous le système MySQL PHP est une architecture de serveur de site Web. Linux est le nom collectif d'une classe de systèmes d'exploitation informatiques Unix et est actuellement le système d'exploitation gratuit le plus populaire. Les versions représentatives incluent : debian, centos, ubuntu, fedora, gentoo, etc. Nginx est un serveur HTTP et proxy inverse hautes performances, ainsi qu'un serveur proxy IMAP/POP3/SMTP. Mysql est un petit système de gestion de bases de données relationnelles. PHP est un langage de script exécuté côté serveur et intégré dans les documents HTML. Ces quatre types de logiciels sont tous des logiciels gratuits et open source. Lorsqu’ils sont combinés, ils deviennent un système de service de site Web gratuit, efficace et évolutif. Jetons un coup d'œil aux détails de cet article.
2. Installer Homebrew
Une étape essentielle pour les programmeurs utilisant Mac est d'installer Homebrew, il est comme le yum La commande de centOS est la même que la commande apt-get d'ubuntu. Grâce à la commande brew, nous pouvons installer rapidement certains packages logiciels.
La commande pour installer Homebrew à l'aide de la ligne de commande est la suivante :
ruby -e "$(curl -fsSL https://raw.github.com/mxcl/homebrew/go)"
Utilisez brew doctor pour vérifier s'il y a un conflit, puis utilisez brew update && brew upgrade pour améliorer la bière.
3. Installer nginx
nginx peut être installé directement à l'aide de la commande Brew sous Mac OS :
brew install nginx
Si vous devez utiliser le port 80, vous devez ajouter nginx au groupe racine :
sudo cp -v /usr/local/opt/nginx/*.plist /Library/LaunchDaemons/
sudo chown root:wheel /Library/LaunchDaemons/homebrew.mxcl.nginx.plist
Utilisez ensuite la commande pour démarrer le service nginx :
sudo nginx
Test si nginx est installé avec succès, car Le fichier de configuration par défaut écoute le port 8080, alors faites d'abord une demande sur le port 8080 :
curl -IL http://www.php.cn/:8080
Le résultat devrait être similaire à ce qui suit :
HTTP/1.1 200 OK
Server: nginx/1.9.1
Date: Fri, 29 May 2015 14:50:47 GMT
Content-Type: text/html
Content-Length: 612
Last-Modified: Fri, 29 May 2015 14:40:47 GMT
Connection: keep-alive
ETag: "5444dea7-264"
Accept-Ranges: bytes
lié à nginx L'opération est la suivante :
sudo nginx //启动nginx
sudo nginx -s reload|reopen|quit //重新加载|重启|退出
4 Installer php-fpm
Parce que Brew n'a pas la source de php-fpm, alors ajoutez d'abord la source :
brew tap homebrew/dupes
brew tap homebrew/php
Ensuite, installez php-fpm, entrez la commande :
brew install php56 --whitout-apache --with-imap --with-tidy --with-debug --with-pgsql --with-mysql --with-fpm
Le Le programme s'installera automatiquement, attendez quelques minutes pour terminer l'installation.
Une fois l'installation terminée, vous devez ajouter php à $PATH :
# 如果使用bash的话
vim ~/.bash_profile
export PATH="/usr/local/sbin:$PATH"
source ~/.bash_profile

# 如果使用ZSH的话
vim ~/.zshrc
export PATH="/usr/local/sbin:$PATH"
source ~/.zshrc
Ensuite, vous pouvez configurer php-fpm pour qu'il démarre automatiquement au démarrage :
mkdir -p ~/Library/LaunchAgents
ln -sfv /usr/local/opt/php56/homebrew.mxcl.php56.plist ~/Library/LaunchAgents/
launchctl load -w ~/Library/LaunchAgents/homebrew.mxcl.php56.plist
use La commande suivante surveille si php-fpm démarre avec succès :
lsof -Pni4 | grep LISTEN | grep php
S'il démarre avec succès, un résultat similaire à celui-ci devrait s'afficher :
php-fpm 27578 wenzhiquan 9u IPv4 0xf29f8b26c08fc27  0t0 TCP 127.0.0.1:9000 (LISTEN)
php-fpm 27628 wenzhiquan 0u IPv4 0xf29f8b26c08fc27  0t0 TCP 127.0.0.1:9000 (LISTEN)
php-fpm 27629 wenzhiquan 0u IPv4 0xf29f8b26c08fc27  0t0 TCP 127.0.0.1:9000 (LISTEN)
php-fpm 27630 wenzhiquan 0u IPv4 0xf29f8b26c08fc27  0t0 TCP 127.0.0.1:9000 (LISTEN)
5. Installer MySQL
MySQL peut également être installé directement à l'aide de la commande Brew :
brew install mysql
De même, vous pouvez configurer MySQL pour qu'il démarre. automatiquement au démarrage :
ln -sfv /usr/local/opt/mysql/*.plist ~/Library/LaunchAgents
launchctl load ~/Library/LaunchAgents/homebrew.mxcl.mysql.plist
Effectuez ensuite une installation sécurisée de MySQL Utilisez les commandes suivantes pour modifier le mot de passe root, supprimer les utilisateurs anonymes, fermer les connexions à distance, etc. :
mysql_secure_installation
> Enter current password for root (enter for none):  //默认没有密码,直接回车即可
> Change the root password? [Y/n]      //是否更改root密码,选择是,然后输入并确认密码
> Remove anonymous users? [Y/n]       //是否删除匿名用户,选择是
> Disallow root login remotely? [Y/n]     //是否禁止远程登录,选择是
> Remove test database and access to it? [Y/n]   //是否删除test数据库,选择是
> Reload privilege tables now? [Y/n]     //是否重载表格数据,选择是
mysql -u root -p
Type 'help;' or '\h' for help. Type '\c' to clear the current input statement.

mysql> exit   //输入exit退出数据库
6. Configurez nginx
mkdir -p /usr/local/etc/nginx/logs
mkdir -p /usr/local/etc/nginx/sites-available
mkdir -p /usr/local/etc/nginx/sites-enabled
mkdir -p /usr/local/etc/nginx/conf.d
mkdir -p /usr/local/etc/nginx/ssl

sudo mkdir -p /var/www
sudo chown :staff /var/www
sudo chmod 775 /var/www
vim /usr/local/etc/nginx/nginx.conf
worker_processes 1;

error_log /usr/local/etc/nginx/logs/error.log debug;

events {
 worker_connections 1024;
}

http {
 include    mime.types;
 default_type  application/octet-stream;

 log_format main '$remote_addr - $remote_user [$time_local] "$request" '
      '$status $body_bytes_sent "$http_referer" '
      '"$http_user_agent" "$http_x_forwarded_for"';

 access_log /usr/local/etc/nginx/logs/access.log main;

 sendfile   on;

 keepalive_timeout 65;

 index index.html index.php;

 include /usr/local/etc/nginx/sites-enabled/*;
}vim /usr/local/ect/nginx/conf.d/php-fpm
location ~ \.php$ {
 try_files  $uri = 404;
 fastcgi_pass 127.0.0.1:9000;
 fastcgi_index index.php;
 fastcgi_param script_FILENAME $document_root$fastcgi_script_name;
 include  fastcgi_params;
}vim /usr/local/ect/nginx/sites-enabled/default
server {
 listen  80;
 server_name localhost;
 root  /var/www/;

 access_log /usr/local/etc/nginx/logs/default.access.log main;

 location / {
  include /usr/local/etc/nginx/conf.d/php-fpm;
 }

 location = /info {
  allow 127.0.0.1;
  deny all;
  rewrite (.*) /.info.php;
 }

 error_page 404  /404.html;
 error_page 403  /403.html;
}Résumé.
Ce qui précède est le contenu détaillé de. pour plus d'informations, suivez d'autres articles connexes sur le site Web de PHP en chinois!

Outils d'IA chauds

Undresser.AI Undress
Application basée sur l'IA pour créer des photos de nu réalistes

AI Clothes Remover
Outil d'IA en ligne pour supprimer les vêtements des photos.

Undress AI Tool
Images de déshabillage gratuites

Clothoff.io
Dissolvant de vêtements AI

AI Hentai Generator
Générez AI Hentai gratuitement.

Article chaud
Outils chauds

Bloc-notes++7.3.1
Éditeur de code facile à utiliser et gratuit

SublimeText3 version chinoise
Version chinoise, très simple à utiliser

Envoyer Studio 13.0.1
Puissant environnement de développement intégré PHP

Dreamweaver CS6
Outils de développement Web visuel

SublimeText3 version Mac
Logiciel d'édition de code au niveau de Dieu (SublimeText3)


 Pas de réponse lors de la saisie du mot de passe sur le clavier Mac ?
Feb 20, 2024 pm 01:33 PM
Pas de réponse lors de la saisie du mot de passe sur le clavier Mac ?
Feb 20, 2024 pm 01:33 PM
Introduction : Dans cet article, ce site Web vous présentera le contenu pertinent sur le clavier Mac qui ne répond pas lors de la saisie des mots de passe. J'espère que cela vous sera utile, jetons un coup d'œil. Comment résoudre le problème de l'impossibilité de saisir le mot de passe sur le système Apple Mac ? Vous pouvez également essayer de connecter ce clavier à d'autres ordinateurs pour voir s'il fonctionne normalement ? Si le même problème se produit sur un autre ordinateur, il s'agit probablement d'un problème lié au clavier lui-même. Vous pouvez envisager de remplacer le clavier ou de le réparer. La première fois que vous vous connectez à Alipay avec votre ordinateur Mac, vous trouverez l'interface de connexion et ne pourrez pas saisir votre mot de passe. Le champ de saisie du mot de passe affiche : « Veuillez cliquer ici pour installer le contrôle », la connexion Alipay nécessite donc l'installation de contrôles de sécurité. Les contrôles de sécurité peuvent crypter et protéger les informations que vous saisissez (montant, mot de passe, etc.) pour améliorer la sécurité du compte. Cravate
 3 conseils pour personnaliser facilement le nom de votre ordinateur Mac, le nom d'hôte et le nom Bonjour
Mar 06, 2024 pm 12:20 PM
3 conseils pour personnaliser facilement le nom de votre ordinateur Mac, le nom d'hôte et le nom Bonjour
Mar 06, 2024 pm 12:20 PM
De nombreux utilisateurs de Mac ont tendance à conserver le nom par défaut de leur appareil et n'envisageront peut-être jamais de le modifier. De nombreuses personnes choisissent de conserver le nom de la configuration initiale, comme « Johnny's MacBook Air » ou simplement « iMac ». Apprendre à changer le nom de votre Mac est une compétence très utile, surtout lorsque vous possédez plusieurs appareils, car cela peut vous aider à les distinguer et à les gérer rapidement. Ensuite, nous vous apprendrons étape par étape comment modifier le nom de l'ordinateur, le nom d'hôte et le nom Bonjour (nom d'hôte local) dans le système macOS. Pourquoi devriez-vous changer le nom de votre Mac ? Changer le nom de votre Mac peut non seulement montrer votre personnalité, mais également contribuer à améliorer l'expérience utilisateur : Personnalisez votre Mac : Le nom par défaut n'est peut-être pas à votre goût, remplacez-le par un nom que vous aimez.
 Vous avez oublié votre mot de passe d'installation Mac ?
Feb 20, 2024 pm 01:00 PM
Vous avez oublié votre mot de passe d'installation Mac ?
Feb 20, 2024 pm 01:00 PM
Introduction : Dans cet article, ce site Web vous présentera le contenu pertinent sur l'oubli du mot de passe du programme d'installation Mac. J'espère que cela vous sera utile, jetons un coup d'œil. Que faire si vous oubliez votre mot de passe pour le logiciel d'installation de l'ordinateur Apple Tout d'abord, recherchez iCloud dans les paramètres du téléphone et cliquez pour l'ouvrir. Ensuite, entrez votre numéro de compte et votre mot de passe. Il y a une ligne de petits mots sous le bouton de connexion qui vous demande si vous avez oublié votre identifiant ou votre mot de passe. Cliquez sur cette option. Normalement, lorsque vous saisissez plusieurs fois un mot de passe incorrect sur l'interface de connexion, votre MacBook Pro vous invite à utiliser votre identifiant Apple lié pour réinitialiser votre mot de passe. Il vous suffit de suivre les étapes demandées par le système pour terminer la réinitialisation du mot de passe. 3. Éteignez d'abord votre Mac, puis redémarrez-le. Tout en appuyant sur le bouton d'alimentation, appuyez immédiatement sur com sur le clavier.
 pkg à installer sur mac ?
Feb 20, 2024 pm 03:21 PM
pkg à installer sur mac ?
Feb 20, 2024 pm 03:21 PM
Préface : Aujourd'hui, ce site partagera avec vous le contenu pertinent sur l'installation des fichiers pkg sur Mac. Si cela peut résoudre le problème auquel vous êtes actuellement confronté, n'oubliez pas de suivre ce site et de commencer maintenant ! La version précédente de macos pkg ne peut pas être installée pour mettre à niveau le système d'exploitation : Si votre ordinateur portable utilise une ancienne version du système d'exploitation, il est recommandé de passer à la dernière version du système d'exploitation. Parce que les anciennes versions peuvent ne pas prendre en charge l'installation du dernier système macOS. Sélectionnez "Effacer" dans Utilitaire de disque, puis sélectionnez l'extension Macos dans le format, ne cochez pas l'option de cryptage et ne sélectionnez pas le format apfs, et enfin cliquez sur le bouton "Effacer" pour résoudre le problème de l'impossibilité de terminer le Installation MacOS. Faites glisser l'icône de l'application vers le fichier commençant par App
 Comment configurer WeChat Mac pour convertir automatiquement les messages vocaux en texte - Comment configurer la conversion voix en texte
Mar 19, 2024 am 08:28 AM
Comment configurer WeChat Mac pour convertir automatiquement les messages vocaux en texte - Comment configurer la conversion voix en texte
Mar 19, 2024 am 08:28 AM
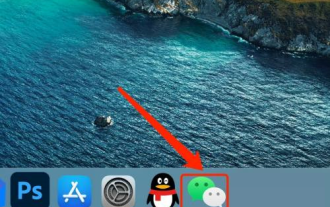
Récemment, certains amis ont demandé à l'éditeur comment configurer WeChat Mac pour convertir automatiquement les messages vocaux en texte ? Voici une méthode pour configurer WeChat Mac pour convertir automatiquement les messages vocaux en texte. Les amis dans le besoin peuvent venir en savoir plus. Étape 1 : Tout d’abord, ouvrez la version Mac de WeChat. Comme le montre l'image : Étape 2 : Ensuite, cliquez sur « Paramètres ». Comme le montre l'image : Étape 3 : Ensuite, cliquez sur « Général ». Comme le montre l'image : Étape 4 : Cochez ensuite l'option « Convertir automatiquement les messages vocaux du chat en texte ». Comme le montre l'image : Étape 5 : Enfin, fermez la fenêtre. Comme le montre l'image :
 Mac peut-il couper des fichiers sur le disque dur ?
Feb 20, 2024 pm 01:00 PM
Mac peut-il couper des fichiers sur le disque dur ?
Feb 20, 2024 pm 01:00 PM
Introduction : Cet article est là pour vous présenter le contenu pertinent de la découpe de fichiers sur le disque dur sur Mac. J'espère qu'il vous sera utile, jetons un coup d'œil. Comment exporter des photos vers un disque dur mobile sur un ordinateur Mac Vous pouvez utiliser l'application Finder ou Photos pour exporter des photos vers un disque dur mobile. Lorsque vous utilisez le Finder pour exporter des photos, assurez-vous d'abord que le disque dur mobile est connecté au Mac et qu'il est reconnu avec succès par le Mac. Les étapes pour transférer des photos d'un Mac vers le disque dur sont simples : connectez d'abord le disque dur mobile à l'ordinateur, puis ouvrez l'icône [Lanceur]. Ensuite, recherchez et cliquez sur l'icône [Photos] dans la fenêtre contextuelle. Dans la fenêtre [Photos] ouverte, maintenez la touche [Shift] enfoncée
 3 façons de convertir des photos HEIC en JPG sur Mac
Mar 15, 2024 pm 08:43 PM
3 façons de convertir des photos HEIC en JPG sur Mac
Mar 15, 2024 pm 08:43 PM
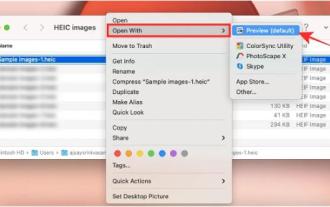
Par défaut, l'iPhone prend les photos de l'appareil photo au format HEIC. HEIC signifie High Efficiency Image Container et peut contenir plus de données de pixels que les fichiers PNG ou JPG, occupant beaucoup moins d'espace sur le stockage de l'iPhone par rapport aux autres formats. Ces fichiers fonctionnent mieux sur les iPhones, mais ne sont pas largement acceptés sur Internet car ils donnent souvent des images floues/granuleuses lorsque vous les partagez avec des appareils non Apple. Pour vous assurer que les images HEIC sont compatibles sur d'autres appareils, vous devrez peut-être les convertir au format JPG. Cet article explique comment convertir des images HEIC en JPG sur Mac. Comment convertir des photos HEIC en JPG sur Mac [3 méthodes]
 Méthode de démarrage Mac Black Apple ?
Feb 20, 2024 pm 01:00 PM
Méthode de démarrage Mac Black Apple ?
Feb 20, 2024 pm 01:00 PM
Préface : Cet article est là pour vous présenter le contenu pertinent sur la méthode de démarrage Mac Black Apple. J'espère qu'il vous sera utile, jetons un coup d'œil. Tutoriel de configuration rapide du démarrage Black Apple OC 1. Après être entré dans l'interface du logiciel LoverConfigurator, cliquez sur le paramètre "Paramètres de démarrage". Le nom du volume de démarrage par défaut est défini sur le nom du disque qui a été effacé lors de l'installation du système Black Apple. 0, puis cliquez sur Enregistrer dans le coin inférieur droit, redémarrez l'ordinateur et remplacez l'interface de démarrage amoureux par l'interface de démarrage du logo Apple. Secure Boot empêche efficacement les chargeurs de démarrage non signés de démarrer à partir de n'importe quel disque interne ou clé USB. Cependant, Clover ou OC boot ne prend pas en charge la fonction de démarrage sécurisé. Commencer
