 développement back-end
 Tutoriel C#.Net
 Exemple de développement C# - Outil de capture d'écran personnalisé (7) Exemple de code pour l'ajout d'une fonction de loupe
Exemple de développement C# - Outil de capture d'écran personnalisé (7) Exemple de code pour l'ajout d'une fonction de loupe
Étant donné que vous devrez peut-être capturer avec précision une certaine partie lors de la prise d'une capture d'écran, vous avez besoin d'une fonction loupe, afin qu'il soit plus facile de localiser l'emplacement de la capture d'écran lorsque prendre une capture d'écran.
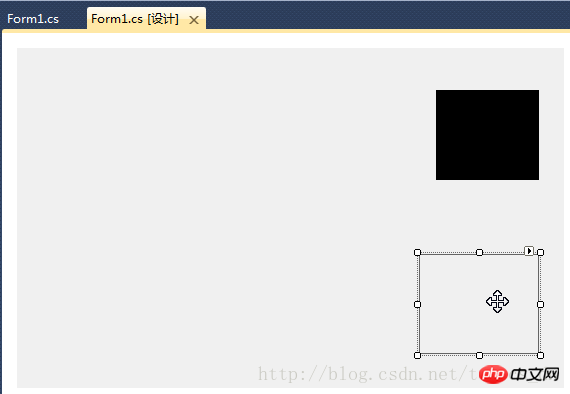
Ajouter PictureBox, l'attribut name est défini sur "pictureBox_zoom"

dans "Pour m1_Load"Gestionnaire d'événementsAjoutez le code suivant dans la fonction :
//设置放大镜的大小
            this.pictureBox_zoom.Width = this.ZoomBoxWidth;
            this.pictureBox_zoom.Height = this.ZoomBoxHeight;

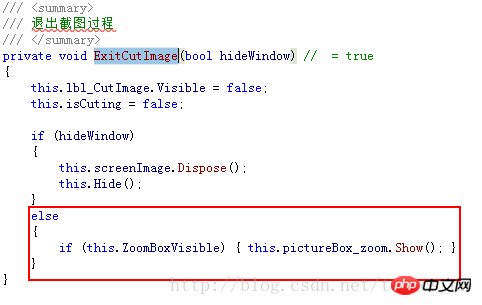
else condition de la méthode "ShowForm" Code :
if (this.ZoomBoxVisible)
                {
                    UpdateCutInfoLabel(UpdateUIMode.ShowZoomBox);
                    this.pictureBox_zoom.Show();
}if (this.pictureBox_zoom.Visible || (updateUIMode & UpdateUIMode.ShowZoomBox) != UpdateUIMode.None)
{
Point zoomLocation = new Point(MousePosition.X + 15, MousePosition.Y + 22);
if (zoomLocation.Y + this.pictureBox_zoom.Height > this.Height)
{
if (zoomLocation.X + this.pictureBox_zoom.Width > this.Width)
{
zoomLocation = new Point(MousePosition.X - this.pictureBox_zoom.Width - 10, MousePosition.Y - this.pictureBox_zoom.Height - 10);
}
else
{
zoomLocation = new Point(MousePosition.X + 15, MousePosition.Y - this.pictureBox_zoom.Height - 15);
}
}
else
{
if (zoomLocation.X + this.pictureBox_zoom.Width > this.Width)
{
zoomLocation = new Point(MousePosition.X - this.pictureBox_zoom.Width - 15, MousePosition.Y);
}
}
this.pictureBox_zoom.Location = zoomLocation;
if (!this.pictureBox_zoom.Visible)
{
this.pictureBox_zoom.Show();
}
}KeyUp" gestionnaire d'événements :

        /// <summary>
        /// 放大镜组件重绘事件处理程序
        /// 实时显示鼠标指针位置放大后的图像
        /// </summary>
        /// <param name="sender"></param>
        /// <param name="e"></param>
        private void pictureBox_zoom_Paint(object sender, PaintEventArgs e)
        {
            Bitmap bmp_lbl = new Bitmap(e.ClipRectangle.Width, e.ClipRectangle.Height);
            int srcWidth = (int)(this.ZoomBoxWidth / 10);
            int srcHeight = (int)(this.ZoomBoxHeight / 10);

            Bitmap bmp = new Bitmap(srcWidth, srcHeight);
            Rectangle srcRect = new Rectangle(MousePosition.X - 5, MousePosition.Y - 4, srcWidth, srcHeight);
            if (!isCuting)
            {
                srcRect = new Rectangle(MousePosition.X - 6, MousePosition.Y - 5, srcWidth, srcHeight);
            }
            Graphics g = Graphics.FromImage(bmp);
            g.DrawImage(screenImage, 0, 0, srcRect, GraphicsUnit.Pixel);
            g.Dispose();

            //Zoom
            int x, y;
            for (int row = 0; row < bmp.Height; row++)
            {
                for (int col = 0; col < bmp.Width; col++)
                {
                    Color pc = bmp.GetPixel(col, row);
                    for (int h = 0; h < 10; h++)
                    {
                        for (int w = 0; w < 10; w++)
                        {
                            x = col * 10 + w;
                            y = row * 10 + h;
                            if (x < bmp_lbl.Width && y < bmp_lbl.Height)
                            {
                                bmp_lbl.SetPixel(x, y, pc);
                            }
                        }
                    }
                }
            }

            e.Graphics.DrawImage(bmp_lbl, 0, 0);

            int blockX = e.ClipRectangle.Width / 2;
            int blockY = e.ClipRectangle.Height / 2;

            SolidBrush brush = new SolidBrush(Color.FromArgb(10, 124, 202));
            Pen pen = new Pen(brush, 2.0F);
            e.Graphics.DrawLine(pen, new Point(0, blockY), new Point(e.ClipRectangle.Width, blockY));
            e.Graphics.DrawLine(pen, new Point(blockX, 0), new Point(blockX, e.ClipRectangle.Height));

            g.Dispose();
            bmp_lbl.Dispose();
}Ce qui précède est le contenu détaillé de. pour plus d'informations, suivez d'autres articles connexes sur le site Web de PHP en chinois!

Outils d'IA chauds

Undresser.AI Undress
Application basée sur l'IA pour créer des photos de nu réalistes

AI Clothes Remover
Outil d'IA en ligne pour supprimer les vêtements des photos.

Undress AI Tool
Images de déshabillage gratuites

Clothoff.io
Dissolvant de vêtements AI

AI Hentai Generator
Générez AI Hentai gratuitement.

Article chaud

Outils chauds

Bloc-notes++7.3.1
Éditeur de code facile à utiliser et gratuit

SublimeText3 version chinoise
Version chinoise, très simple à utiliser

Envoyer Studio 13.0.1
Puissant environnement de développement intégré PHP

Dreamweaver CS6
Outils de développement Web visuel

SublimeText3 version Mac
Logiciel d'édition de code au niveau de Dieu (SublimeText3)
 Active Directory avec C#
Sep 03, 2024 pm 03:33 PM
Guide d'Active Directory avec C#. Nous discutons ici de l'introduction et du fonctionnement d'Active Directory en C# ainsi que de la syntaxe et de l'exemple.
 Générateur de nombres aléatoires en C#
Sep 03, 2024 pm 03:34 PM
Guide du générateur de nombres aléatoires en C#. Nous discutons ici du fonctionnement du générateur de nombres aléatoires, du concept de nombres pseudo-aléatoires et sécurisés.
 Sérialisation C#
Sep 03, 2024 pm 03:30 PM
Guide de sérialisation C#. Nous discutons ici de l'introduction, des étapes de l'objet de sérialisation C#, du fonctionnement et de l'exemple respectivement.
 Vue Grille de données C#
Sep 03, 2024 pm 03:32 PM
Guide de la vue Grille de données C#. Nous discutons ici des exemples de la façon dont une vue de grille de données peut être chargée et exportée à partir de la base de données SQL ou d'un fichier Excel.
 Modèles en C#
Sep 03, 2024 pm 03:33 PM
Guide des modèles en C#. Nous discutons ici de l'introduction et des 3 principaux types de modèles en C# ainsi que de ses exemples et de l'implémentation du code.
 Nombres premiers en C#
Sep 03, 2024 pm 03:35 PM
Guide des nombres premiers en C#. Nous discutons ici de l'introduction et des exemples de nombres premiers en c# ainsi que de l'implémentation du code.
 Factorielle en C#
Sep 03, 2024 pm 03:34 PM
Guide de Factorial en C#. Nous discutons ici de l'introduction de factorial en c# ainsi que de différents exemples et de l'implémentation du code.
 La différence entre le multithreading et le C # asynchrone
Apr 03, 2025 pm 02:57 PM
La différence entre le multithreading et l'asynchrone est que le multithreading exécute plusieurs threads en même temps, tandis que les opérations effectuent de manière asynchrone sans bloquer le thread actuel. Le multithreading est utilisé pour les tâches à forte intensité de calcul, tandis que de manière asynchrone est utilisée pour l'interaction utilisateur. L'avantage du multi-threading est d'améliorer les performances informatiques, tandis que l'avantage des asynchrones est de ne pas bloquer les threads d'interface utilisateur. Le choix du multithreading ou asynchrone dépend de la nature de la tâche: les tâches à forte intensité de calcul utilisent le multithreading, les tâches qui interagissent avec les ressources externes et doivent maintenir la réactivité de l'interface utilisateur à utiliser asynchrone.


